ECU Acura ZDX 2012 User Guide
[x] Cancel search | Manufacturer: ACURA, Model Year: 2012, Model line: ZDX, Model: Acura ZDX 2012Pages: 370, PDF Size: 10.06 MB
Page 58 of 370
uuChild Safety uSafety of Infants and Small Children
56
Safe Driving
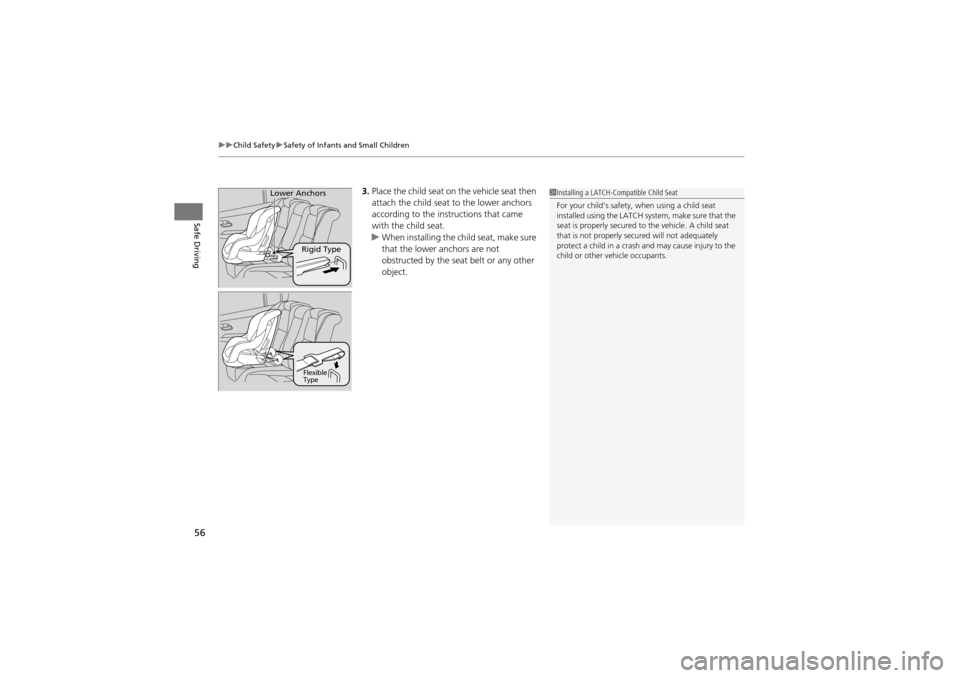
3. Place the child seat on the vehicle seat then
attach the child seat to the lower anchors
according to th e instructions that came
with the child seat.
u When installing the child seat, make sure
that the lower anchors are not
obstructed by the seat belt or any other
object.
Rigid Type
Lower Anchors
Flexible
Type
1Installing a LATCH-Compatible Child Seat
For your child’s safety, when using a child seat
installed using the LATCH sy stem, make sure that the
seat is properly secured to the vehicle. A child seat
that is not properly secu red will not adequately
protect a child in a crash an d may cause injury to the
child or other vehicle occupants.
Page 59 of 370
57
uuChild Safety uSafety of Infants and Small Children
Continued
Safe Driving
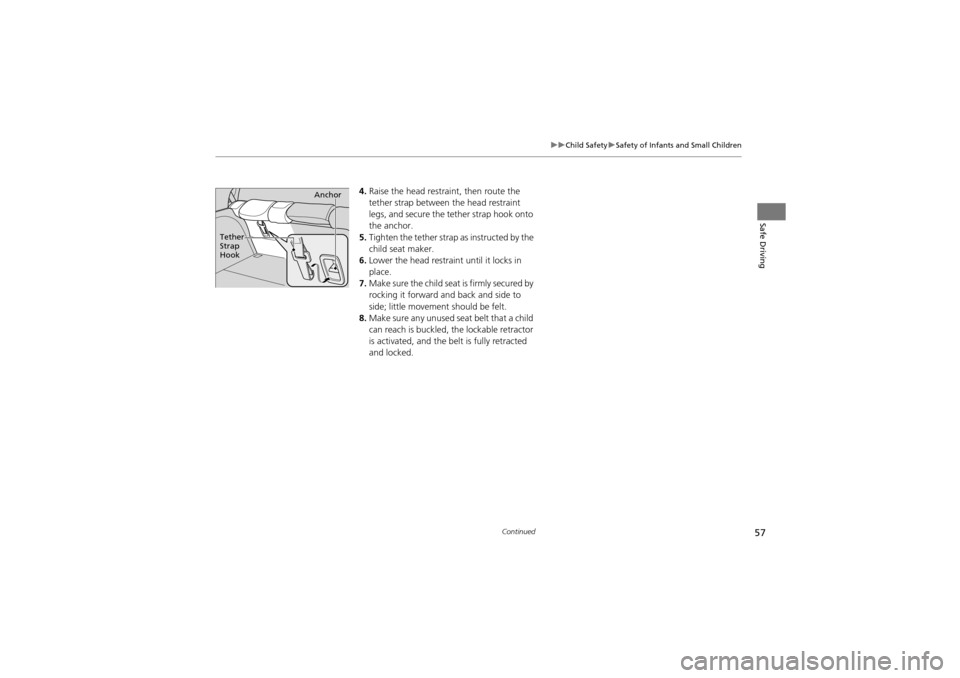
4. Raise the head restraint, then route the
tether strap between the head restraint
legs, and secure the tether strap hook onto
the anchor.
5. Tighten the tether strap as instructed by the
child seat maker.
6. Lower the head restraint until it locks in
place.
7. Make sure the child seat is firmly secured by
rocking it forward and back and side to
side; little movement should be felt.
8. Make sure any unused seat belt that a child
can reach is buckled, the lockable retractor
is activated, and the belt is fully retracted
and locked.
Tether
Strap
Hook Anchor
Page 60 of 370
uuChild Safety uSafety of Infants and Small Children
58
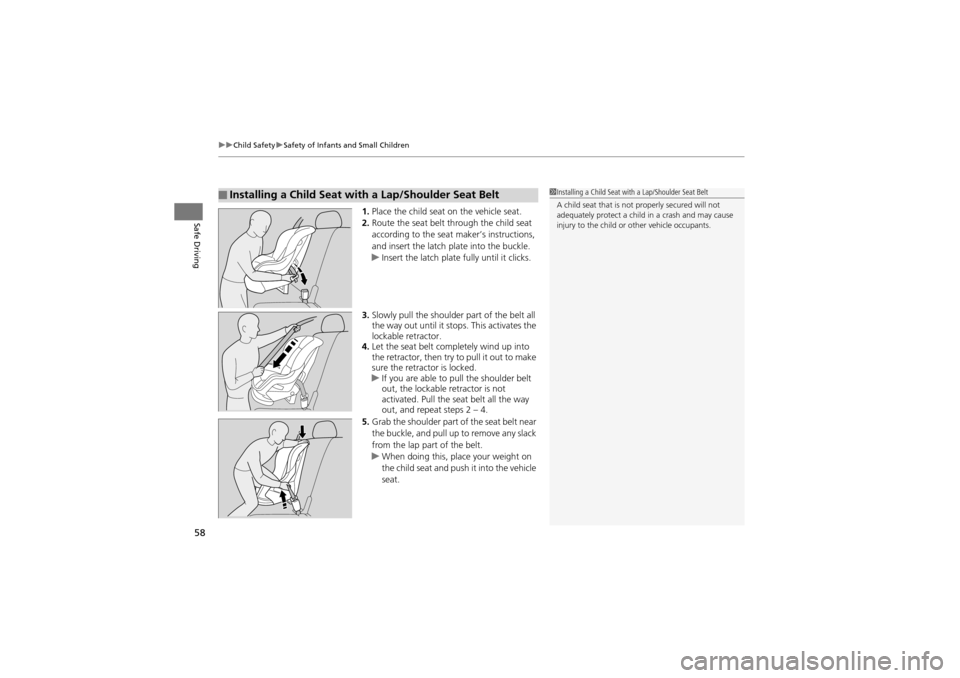
Safe Driving1. Place the child seat on the vehicle seat.
2. Route the seat belt th rough the child seat
according to the seat maker’s instructions,
and insert the latch pl ate into the buckle.
u Insert the latch plate fully until it clicks.
3. Slowly pull the shoulder part of the belt all
the way out until it st ops. This activates the
lockable retractor.
4. Let the seat belt completely wind up into
the retractor, then try to pull it out to make
sure the retractor is locked.
u If you are able to pul l the shoulder belt
out, the lockable retractor is not
activated. Pull the seat belt all the way
out, and repeat steps 2 – 4.
5. Grab the shoulder part of the seat belt near
the buckle, and pull up to remove any slack
from the lap part of the belt.
u When doing this, place your weight on
the child seat and push it into the vehicle
seat.
■Installing a Child Seat with a Lap/Shoulder Seat Belt1Installing a Child Seat with a Lap/Shoulder Seat Belt
A child seat that is not properly secured will not
adequately protect a child in a crash and may cause
injury to the child or other vehicle occupants.
Page 61 of 370
Continued59
uuChild Safety uSafety of Infants and Small Children
Safe Driving
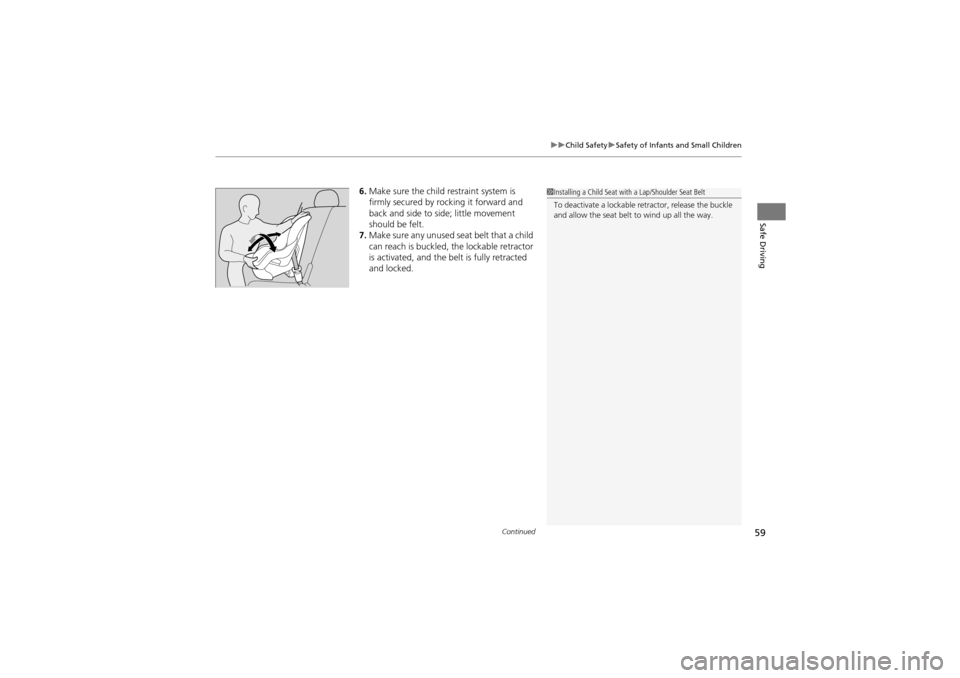
6. Make sure the child restraint system is
firmly secured by rocking it forward and
back and side to side; little movement
should be felt.
7. Make sure any unused seat belt that a child
can reach is buckled, the lockable retractor
is activated, and the belt is fully retracted
and locked.1Installing a Child Seat with a Lap/Shoulder Seat Belt
To deactivate a lockable re tractor, release the buckle
and allow the seat belt to wind up all the way.
Page 62 of 370
uuChild Safety uSafety of Infants and Small Children
60
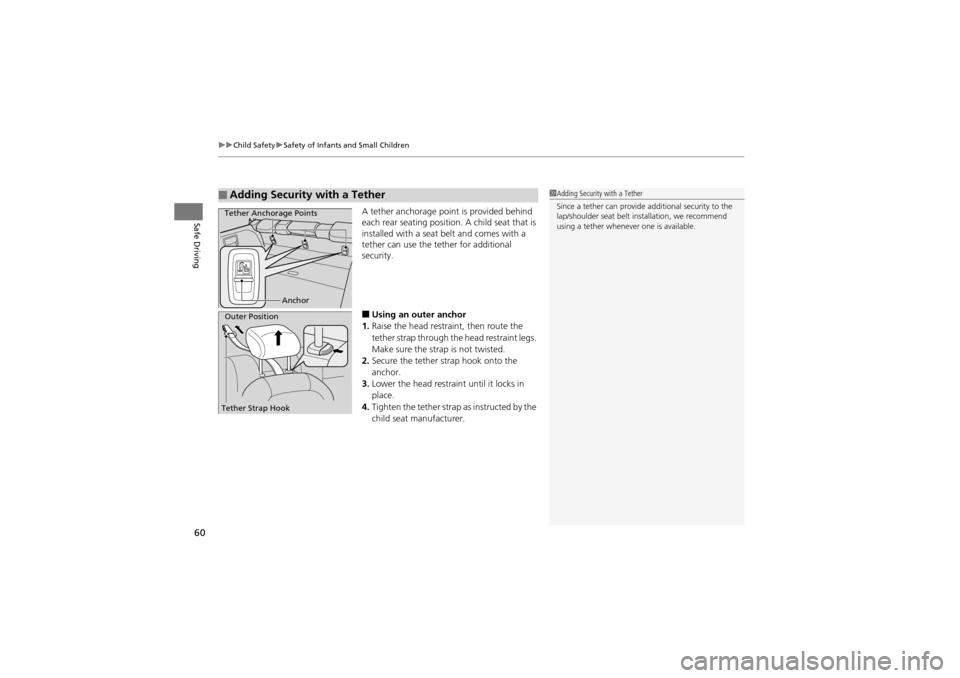
Safe DrivingA tether anchorage point is provided behind
each rear seating position. A child seat that is
installed with a seat belt and comes with a
tether can use the tether for additional
security.
■Using an outer anchor
1. Raise the head restra int, then route the
tether strap through th e head restraint legs.
Make sure the strap is not twisted.
2. Secure the tether strap hook onto the
anchor.
3. Lower the head restraint until it locks in
place.
4. Tighten the tether strap as instructed by the
child seat manufacturer.
■Adding Security with a Tether1Adding Security with a Tether
Since a tether can provide additional security to the
lap/shoulder seat belt in stallation, we recommend
using a tether whenever one is available.
Anchor
Tether Anchorage Points
Outer Position
Tether Strap Hook
Page 63 of 370
61
uuChild Safety uSafety of Infants and Small Children
Safe Driving
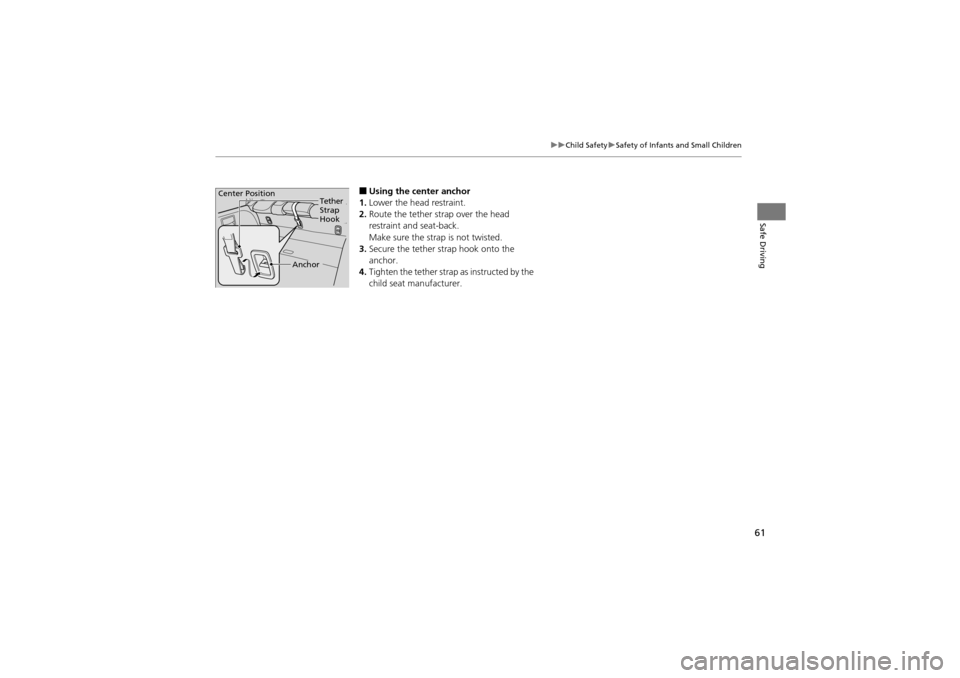
■Using the center anchor
1. Lower the head restraint.
2. Route the tether strap over the head
restraint and seat-back.
Make sure the strap is not twisted.
3. Secure the tether strap hook onto the
anchor.
4. Tighten the tether strap as instructed by the
child seat manufacturer.
Anchor
Tether
Strap
HookCenter Position
Page 65 of 370
63
uuChild Safety uSafety of Larger Children
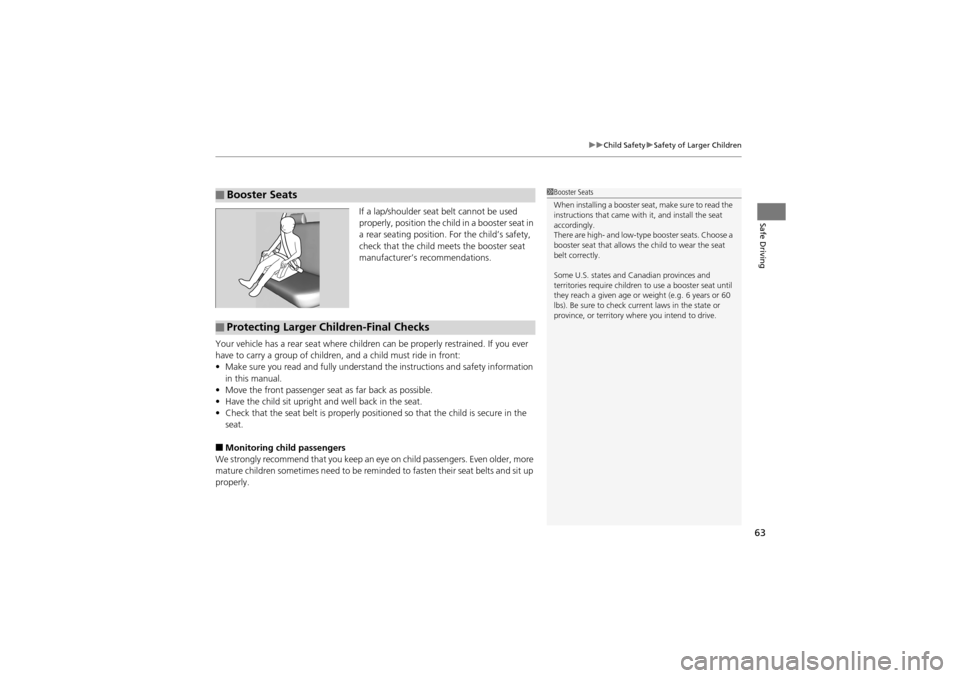
Safe DrivingIf a lap/shoulder seat belt cannot be used
properly, position the child in a booster seat in
a rear seating position. For the child’s safety,
check that the child meets the booster seat
manufacturer’s recommendations.
Your vehicle has a rear seat where children can be properly restrained. If you ever
have to carry a group of children, and a child must ride in front:
• Make sure you read and fully understand the instructions and safety information
in this manual.
• Move the front passenger seat as far back as possible.
• Have the child sit upright and well back in the seat.
• Check that the seat belt is properly positio ned so that the child is secure in the
seat.
■Monitoring child passengers
We strongly recommend that you keep an ey e on child passengers. Even older, more
mature children sometimes need to be remi nded to fasten their seat belts and sit up
properly.
■Booster Seats1 Booster Seats
When installing a booster seat , make sure to read the
instructions that came with it, and install the seat
accordingly.
There are high- and low-type booster seats. Choose a
booster seat that allows th e child to wear the seat
belt correctly.
Some U.S. states and Canadian provinces and
territories require children to use a booster seat until
they reach a given age or weight (e.g. 6 years or 60
lbs). Be sure to check curre nt laws in the state or
province, or territory where you intend to drive.
■Protecting Larger Children-Final Checks
Page 78 of 370
76
uuIndicators u
Instrument Panel
*1: Models with the keyless access system have an ENGINE START/STOP button instead of an ignition switch.
IndicatorNameOn/BlinkingExplanationMessage
Immobilizer
System Indicator
●Comes on briefly when you turn the
ignition switch to ON (w*1, then
goes off.
●Comes on if the immobilizer system
cannot recognize the key
information.
●Blinks - You cannot start the engine.
Turn the ignition switch to LOCK (0*1,
pull the key out, and then insert the key
and turn it to ON
(w*1 again.●Repeatedly blinks - The system may
be malfunctioning. Have the vehicle
checked by a dealer.
●Do not attempt to alter this system or
add other devices to it. Electrical
problems can occur.
—
Security System
Alarm Indicator●Blinks when the security system
alarm has been set.
2 Security System Alarm P. 120—
Page 97 of 370
95
uuGauges and Multi-Information Display uMulti-Information Display
Continued
Instrument Panel
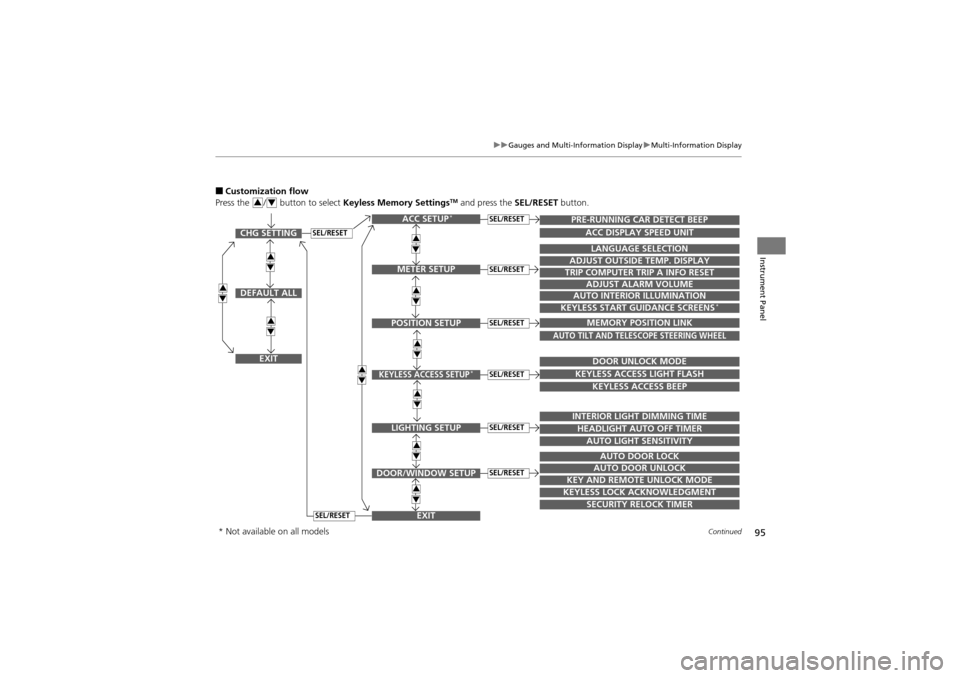
■Customization flow
Press the / button to select Keyless Memory SettingsTM and press the SEL/RESET button.34
SEL/RESETCHG SETTING
DEFAULT ALL
EXIT
ACC SETUP*
EXITSECURITY RELOCK TIMER
TRIP COMPUTER TRIP A INFO RESET
ADJUST ALARM VOLUME
AUTO INTERIOR ILLUMINATION
KEYLESS START GUIDANCE SCREENS*
LANGUAGE SELECTION
ADJUST OUTSIDE TEMP. DISPLAY
MEMORY POSITION LINK
AUTO TILT AND TELESCOPE STEERING WHEEL
DOOR UNLOCK MODE
KEYLESS ACCESS LIGHT FLASH
KEYLESS ACCESS BEEP
INTERIOR LIGHT DIMMING TIME
HEADLIGHT AUTO OFF TIMER
AUTO LIGHT SENSITIVITY
AUTO DOOR LOCK
AUTO DOOR UNLOCK
KEY AND REMOTE UNLOCK MODE
KEYLESS LOCK ACKNOWLEDGMENT
PRE-RUNNING CAR DETECT BEEP
ACC DISPLAY SPEED UNIT
34
34
34
34
34
34
34
34
34
34
METER SETUP
POSITION SETUP
KEYLESS ACCESS SETUP*
LIGHTING SETUP
DOOR/WINDOW SETUP
SEL/RESET
SEL/RESET
SEL/RESET
SEL/RESET
SEL/RESET
SEL/RESET
SEL/RESET
* Not available on all models
Page 100 of 370
98
uuGauges and Multi-Information Display uMulti-Information Display
Instrument Panel
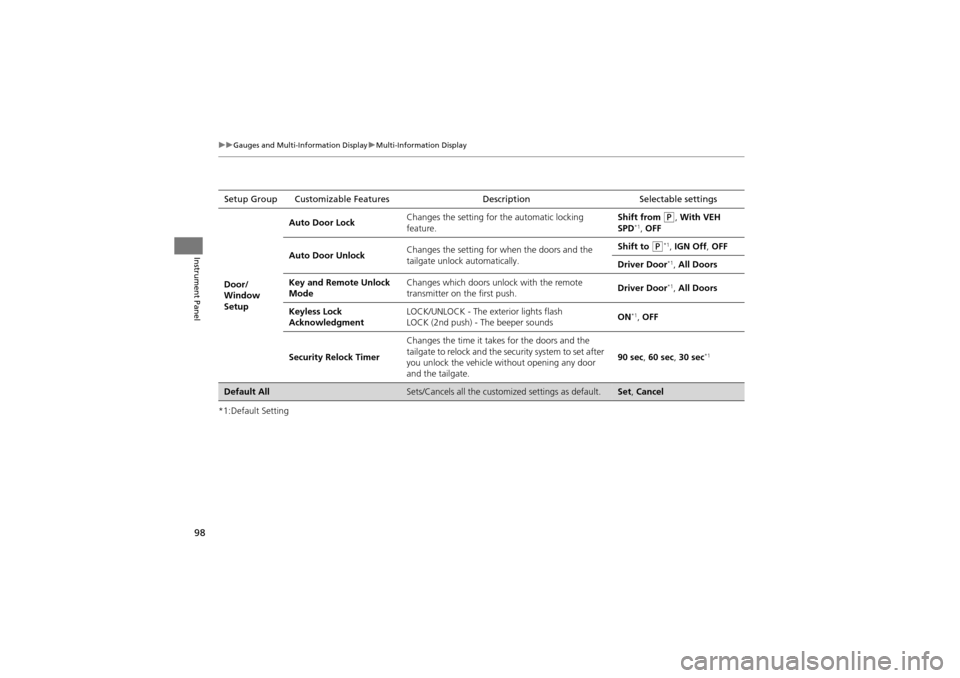
*1:Default SettingSetup Group Customizable Features
DescriptionSelectable settings
Door/
Window
Setup Auto Door Lock
Changes the setting for
the automatic locking
feature. Shift from
P, With VEH
SPD*1, OFF
Auto Door Unlock Changes the setting for wh
en the doors and the
tailgate unlock automatically. Shift to
P*1, IGN Off , OFF
Driver Door
*1, All Doors
Key and Remote Unlock
Mode Changes which doors unlock with the remote
transmitter on the first push.
Driver Door
*1,
All Doors
Keyless Lock
Acknowledgment LOCK/UNLOCK - The ex
terior lights flash
LOCK (2nd push) - The beeper sounds ON
*1,
OFF
Security Relock Timer Changes the time it takes for the doors and the
tailgate to relock and the security system to set after
you unlock the vehicle without opening any door
and the tailgate. 90 sec
, 60 sec , 30 sec
*1
Default AllSets/Cancels all the custom ized settings as default.Set, Cancel