climate control Acura ZDX 2013 User Guide
[x] Cancel search | Manufacturer: ACURA, Model Year: 2013, Model line: ZDX, Model: Acura ZDX 2013Pages: 324, PDF Size: 8.58 MB
Page 166 of 324
165
uuClimate Control SystemuSynchronized Mode
Controls
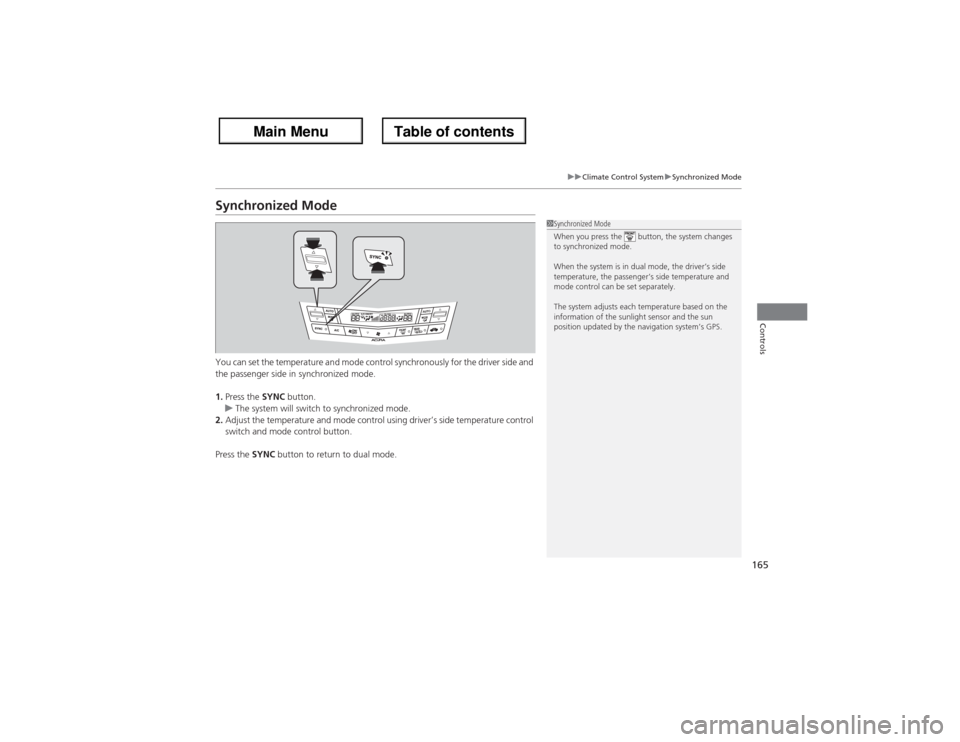
Synchronized ModeYou can set the temperature and mode control synchronously for the driver side and
the passenger side in synchronized mode.
1.Press the SYNC button.
uThe system will switch to synchronized mode.
2.Adjust the temperature and mode control using driver’s side temperature control
switch and mode control button.
Press the SYNC button to return to dual mode.
1Synchronized Mode
When you press the button, the system changes
to synchronized mode.
When the system is in dual mode, the driver’s side
temperature, the passenger’s side temperature and
mode control can be set separately.
The system adjusts each temperature based on the
information of the sunlight sensor and the sun
position updated by the navigation system’s GPS.
Page 167 of 324
166
uuClimate Control SystemuAutomatic Climate Control Sensors
Controls
Automatic Climate Control Sensors
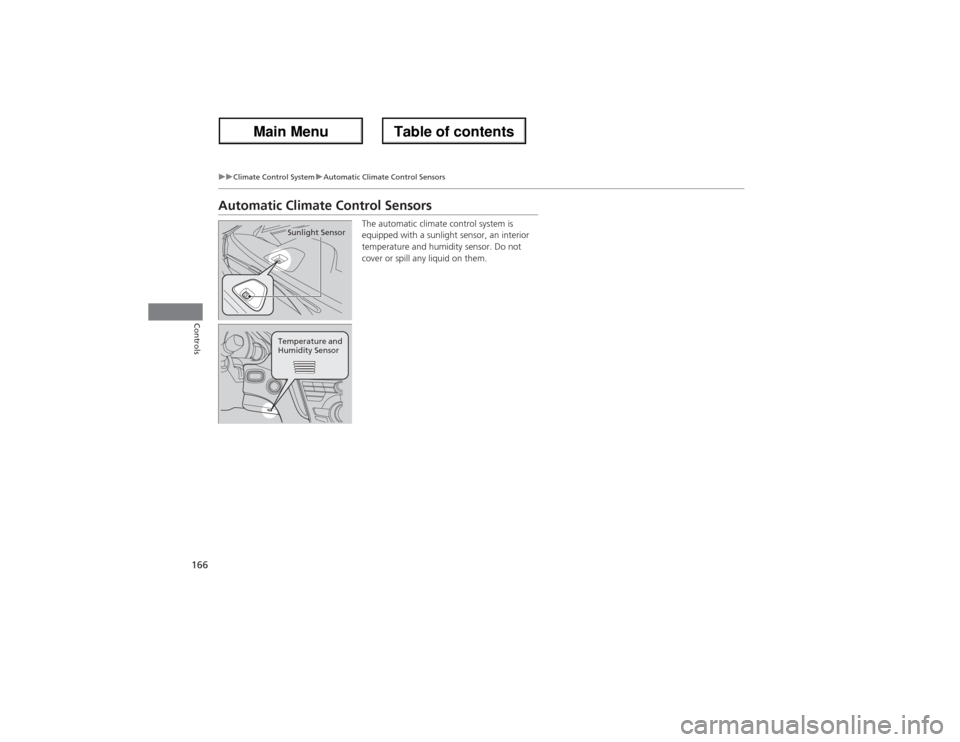
The automatic climate control system is
equipped with a sunlight sensor, an interior
temperature and humidity sensor. Do not
cover or spill any liquid on them.
Sunlight SensorTemperature and
Humidity Sensor
Page 186 of 324
185
Continued
Driving
When DrivingStarting the Engine
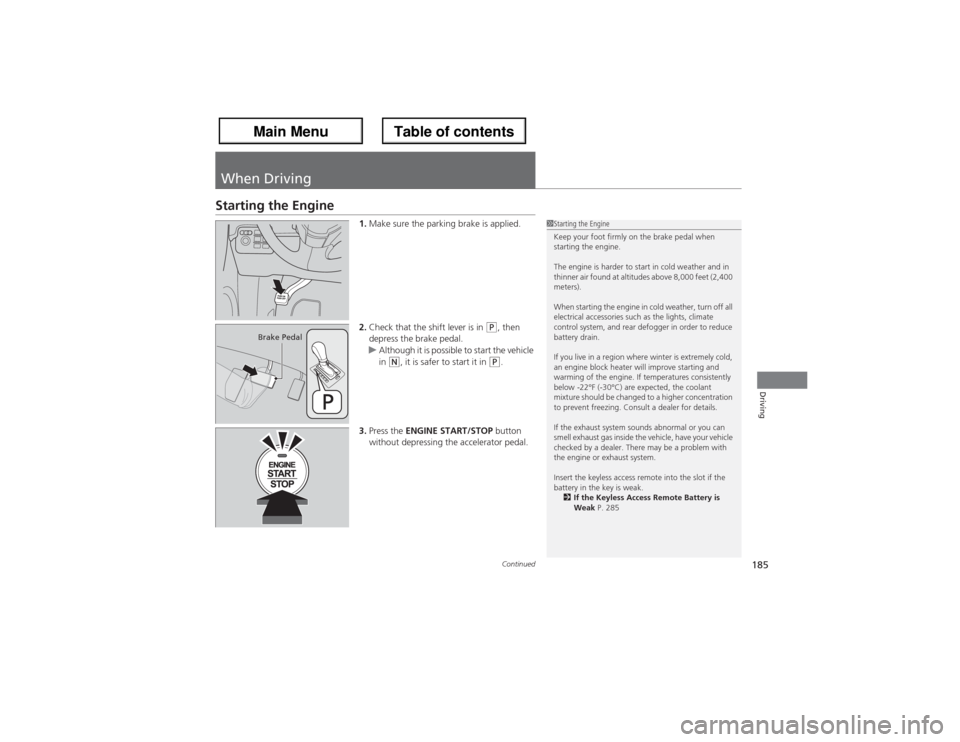
1.Make sure the parking brake is applied.
2.Check that the shift lever is in
(P, then
depress the brake pedal.
uAlthough it is possible to start the vehicle
in
(N, it is safer to start it in
(P.
3.Press the ENGINE START/STOP button
without depressing the accelerator pedal.
1Starting the Engine
Keep your foot firmly on the brake pedal when
starting the engine.
The engine is harder to start in cold weather and in
thinner air found at altitudes above 8,000 feet (2,400
meters).
When starting the engine in cold weather, turn off all
electrical accessories such as the lights, climate
control system, and rear defogger in order to reduce
battery drain.
If you live in a region where winter is extremely cold,
an engine block heater will improve starting and
warming of the engine. If temperatures consistently
below -22°F (-30°C) are expected, the coolant
mixture should be changed to a higher concentration
to prevent freezing. Consult a dealer for details.
If the exhaust system sounds abnormal or you can
smell exhaust gas inside the vehicle, have your vehicle
checked by a dealer. There may be a problem with
the engine or exhaust system.
Insert the keyless access remote into the slot if the
battery in the key is weak.
2If the Keyless Access Remote Battery is
Weak P. 285
Brake Pedal
Page 198 of 324
Continued
197
uuWhen DrivinguForward Collision Warning (FCW)
Driving
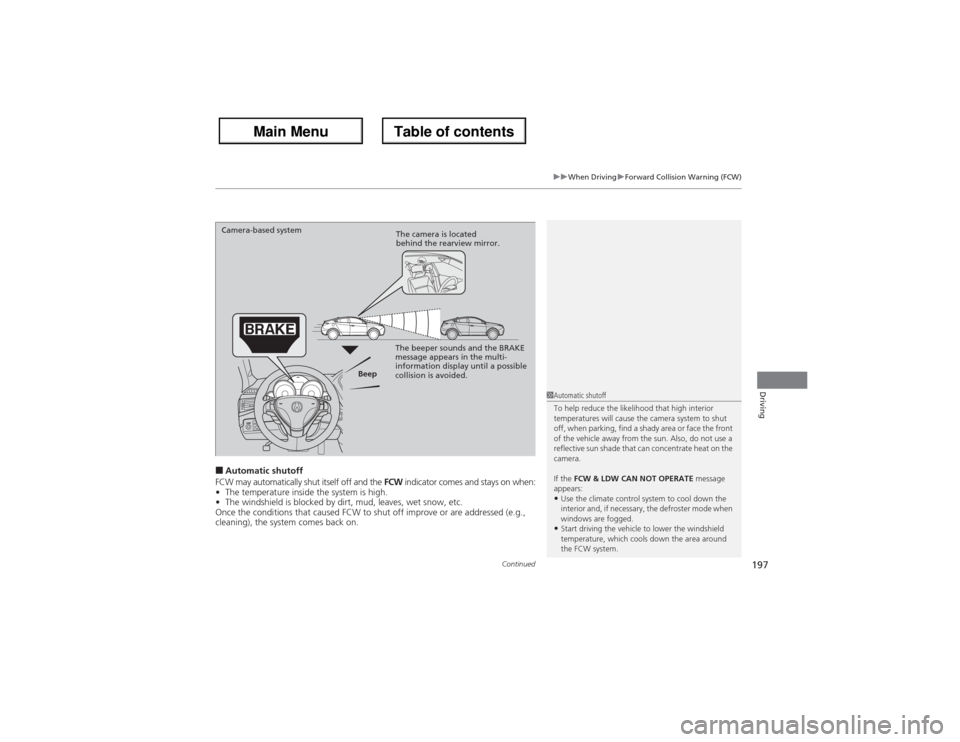
■Automatic shutoff
FCW may automatically shut itself off and the FCW indicator comes and stays on when:
•The temperature inside the system is high.
•The windshield is blocked by dirt, mud, leaves, wet snow, etc.
Once the conditions that caused FCW to shut off improve or are addressed (e.g.,
cleaning), the system comes back on.
1Automatic shutoff
To help reduce the likelihood that high interior
temperatures will cause the camera system to shut
off, when parking, find a shady area or face the front
of the vehicle away from the sun. Also, do not use a
reflective sun shade that can concentrate heat on the
camera.
If the FCW & LDW CAN NOT OPERATE message
appears:•Use the climate control system to cool down the
interior and, if necessary, the defroster mode when
windows are fogged.•Start driving the vehicle to lower the windshield
temperature, which cools down the area around
the FCW system.
Beep Camera-based system
The camera is located
behind the rearview mirror.
The beeper sounds and the BRAKE
message appears in the multi-
information display until a possible
collision is avoided.
Page 201 of 324
uuWhen DrivinguLane Departure Warning (LDW)
200Driving
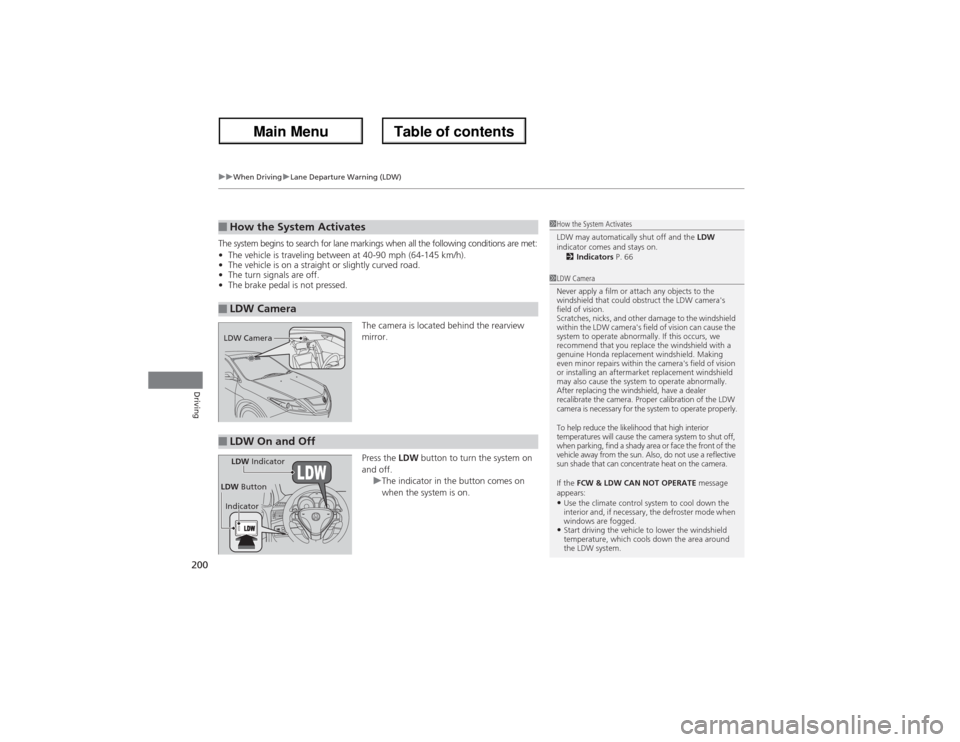
The system begins to search for lane markings when all the following conditions are met:
•The vehicle is traveling between at 40-90 mph (64-145 km/h).
•The vehicle is on a straight or slightly curved road.
•The turn signals are off.
•The brake pedal is not pressed.
The camera is located behind the rearview
mirror.
Press the LDW button to turn the system on
and off.
uThe indicator in the button comes on
when the system is on.■How the System Activates■LDW Camera
1How the System Activates
LDW may automatically shut off and the LDW
indicator comes and stays on.
2Indicators P. 661LDW Camera
Never apply a film or attach any objects to the
windshield that could obstruct the LDW camera's
field of vision.
Scratches, nicks, and other damage to the windshield
within the LDW camera's field of vision can cause the
system to operate abnormally. If this occurs, we
recommend that you replace the windshield with a
genuine Honda replacement windshield. Making
even minor repairs within the camera's field of vision
or installing an aftermarket replacement windshield
may also cause the system to operate abnormally.
After replacing the windshield, have a dealer
recalibrate the camera. Proper calibration of the LDW
camera is necessary for the system to operate properly.
To help reduce the likelihood that high interior
temperatures will cause the camera system to shut off,
when parking, find a shady area or face the front of the
vehicle away from the sun. Also, do not use a reflective
sun shade that can concentrate heat on the camera.
If the FCW & LDW CAN NOT OPERATE message
appears:•Use the climate control system to cool down the
interior and, if necessary, the defroster mode when
windows are fogged.•Start driving the vehicle to lower the windshield
temperature, which cools down the area around
the LDW system.
LDW Camera■LDW On and OffLDW Indicator
IndicatorLDW Button
Page 228 of 324
227
Maintenance
This chapter discusses basic maintenance.
Before Performing Maintenance
Inspection and Maintenance ............ 228Safety When Performing Maintenance..... 229Parts and Fluids Used in Maintenance
Service ........................................... 230
Maintenance Minder
TM..................... 231
Maintenance Under the Hood
Maintenance Items Under the Hood ..... 235Opening the Hood ........................... 236
Engine Compartment Covers ........... 237
Recommended Engine Oil ................ 238
Oil Check ......................................... 239
Adding Engine Oil ............................ 240
Changing the Engine Oil and Oil Filter ..... 241Engine Coolant ................................ 243
Transmission Fluid ............................ 245
Brake Fluid ....................................... 246
Power Steering Fluid Check.............. 247
Refilling Window Washer Fluid......... 248
Replacing Light Bulbs....................... 249Checking and Maintaining Wiper
Blades.......................................... 256Checking and Maintaining Tires
Checking Tires ................................. 258Tire and Loading Information Label ...... 259Tire Labeling .................................... 259
DOT Tire Quality Grading (U.S. Vehicles) ...... 261Wear Indicators ............................... 263
Tire Service Life ................................ 263
Tire and Wheel Replacement ........... 264
Tire Rotation .................................... 265
Winter Tires ..................................... 266
Battery............................................... 267
Remote Transmitter Care................. 268Climate Control System Maintenance
..... 269
Cleaning
Interior Care .................................... 270
Exterior Care.................................... 272
Page 262 of 324
261
uuChecking and Maintaining TiresuDOT Tire Quality Grading (U.S. Vehicles)
Continued
Maintenance
DOT Tire Quality Grading (U.S. Vehicles)The tires on your vehicle meet all U.S. Federal Safety
Requirements. All tires are also graded for treadwear, traction,
and temperature performance according to Department of
Transportation (DOT) standards. The following explains these
gradings.
Quality grades can be found where applicable on the tire sidewall
between tread shoulder and maximum section width.
The treadwear grade is a comparative rating based on the wear
rate of the tire when tested under controlled conditions on a
specified government test course. For example, a tire graded 150
would wear one and one-half (1 1/2) times as well on the
government course as a tire graded 100. The relative performance
of tires depends upon the actual conditions of their use, however,
and may depart significantly from the norm due to variations in
driving habits, service practices and differences in road
characteristics and climate.■Uniform Tire Quality Grading■Treadwear
1Uniform Tire Quality GradingFor example:
Treadwear 200
Traction AA
Temperature A
All passenger car tires must conform
to Federal Safety Requirements in
addition to these grades.
Page 270 of 324
269Maintenance
Climate Control System MaintenanceDust and Pollen FilterThe climate control system is equipped with a dust and pollen filter that collects
pollen, dust, and other debris in the air. The Maintenance Minder
TM messages will let
you know when to replace the filter.
We recommend that you replace the dust and pollen filter sooner when using your
vehicle in areas with high concentrations of dust.
1Dust and Pollen Filter
Using an air freshener may reduce the deodorizing
effect of the dust and pollen filter, and may reduce its
life.
If the airflow from the heating and cooling system
deteriorates noticeably, and the windows fog up
easily, the filter may need to be replaced. Please
contact a dealer for replacement.
Page 293 of 324
292Handling the Unexpected
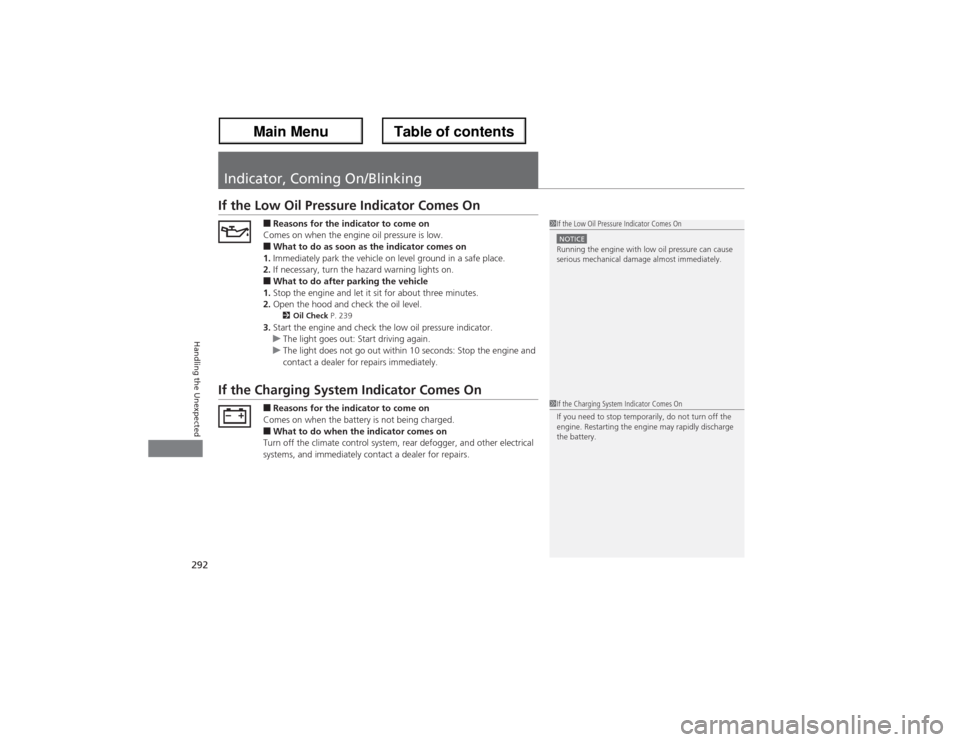
Indicator, Coming On/BlinkingIf the Low Oil Pressure Indicator Comes On
■Reasons for the indicator to come on
Comes on when the engine oil pressure is low.■What to do as soon as the indicator comes on
1.Immediately park the vehicle on level ground in a safe place.
2.If necessary, turn the hazard warning lights on.■What to do after parking the vehicle
1.Stop the engine and let it sit for about three minutes.
2.Open the hood and check the oil level.2Oil Check P. 239
3.Start the engine and check the low oil pressure indicator.
uThe light goes out: Start driving again.
uThe light does not go out within 10 seconds: Stop the engine and
contact a dealer for repairs immediately.
If the Charging System Indicator Comes On
■Reasons for the indicator to come on
Comes on when the battery is not being charged.■What to do when the indicator comes on
Turn off the climate control system, rear defogger, and other electrical
systems, and immediately contact a dealer for repairs.
1If the Low Oil Pressure Indicator Comes OnNOTICERunning the engine with low oil pressure can cause
serious mechanical damage almost immediately.1If the Charging System Indicator Comes On
If you need to stop temporarily, do not turn off the
engine. Restarting the engine may rapidly discharge
the battery.
Page 299 of 324
298
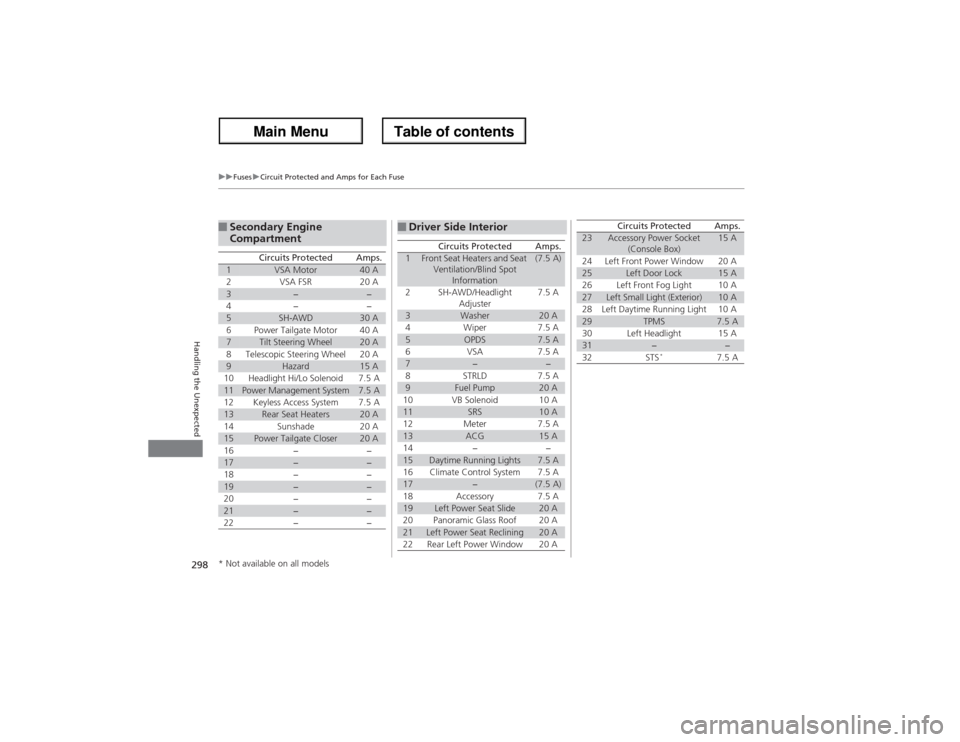
uuFusesuCircuit Protected and Amps for Each Fuse
Handling the Unexpected
■Secondary Engine
Compartment
Circuits Protected
Amps.
1
VSA Motor
40 A
2
VSA FSR
20 A
3
−
−
4
−
−
5
SH-AWD
30 A
6
Power Tailgate Motor
40 A
7
Tilt Steering Wheel
20 A
8
Telescopic Steering Wheel
20 A
9
Hazard
15 A
10
Headlight Hi/Lo Solenoid
7.5 A
11
Power Management System
7.5 A
12
Keyless Access System
7.5 A
13
Rear Seat Heaters
20 A
14
Sunshade
20 A
15
Power Tailgate Closer
20 A
16
−
−
17
−
−
18
−
−
19
−
−
20
−
−
21
−
−
22
−
−
■Driver Side Interior
Circuits Protected
Amps.
1
Front Seat Heaters and Seat
Ventilation/Blind Spot
Information
(7.5 A)
2
SH-AWD/Headlight
Adjuster
7.5 A
3
Washer
20 A
4
Wiper
7.5 A
5
OPDS
7.5 A
6
VSA
7.5 A
7
−
−
8
STRLD
7.5 A
9
Fuel Pump
20 A
10
VB Solenoid
10 A
11
SRS
10 A
12
Meter
7.5 A
13
ACG
15 A
14
−
−
15
Daytime Running Lights
7.5 A
16
Climate Control System
7.5 A
17
−
(7.5 A)
18
Accessory
7.5 A
19
Left Power Seat Slide
20 A
20
Panoramic Glass Roof
20 A
21
Left Power Seat Reclining
20 A
22
Rear Left Power Window
20 A
23
Accessory Power Socket
(Console Box)
15 A
24
Left Front Power Window
20 A
25
Left Door Lock
15 A
26
Left Front Fog Light
10 A
27
Left Small Light (Exterior)
10 A
28
Left Daytime Running Light
10 A
29
TPMS
7.5 A
30
Left Headlight
15 A
31
−
−
32
STS
*
7.5 A
Circuits Protected
Amps.
* Not available on all models