boot Alfa Romeo 147 2007 Owner handbook (in English)
[x] Cancel search | Manufacturer: ALFA ROMEO, Model Year: 2007, Model line: 147, Model: Alfa Romeo 147 2007Pages: 291, PDF Size: 5.52 MB
Page 9 of 291
GETTING TO KNOW YOUR CAR
7
The key metal insert operates:
– The ignition switch
-– the driver's door lock and, optional for
versions/markets where applicable, the pas-
senger's door lock
– The passenger’s side air-bag deactiva-
tion
– The fuel tank plug lock.
IMPORTANTTo guarantee the perfect
efficiency of the electronic devices contained
in keys, avoid letting tem directly exposed
to sunrays.
Together with the keys the CODE card is
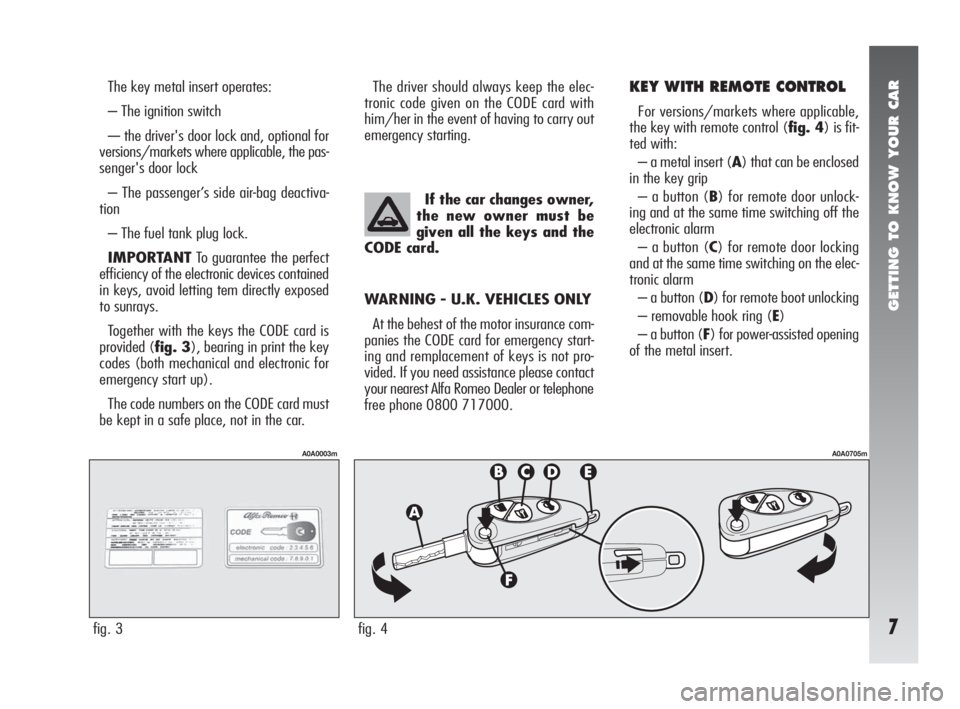
provided (fig. 3), bearing in print the key
codes (both mechanical and electronic for
emergency start up).
The code numbers on the CODE card must
be kept in a safe place, not in the car.The driver should always keep the elec-
tronic code given on the CODE card with
him/her in the event of having to carry out
emergency starting.
WARNING - U.K. VEHICLES ONLY
At the behest of the motor insurance com-
panies the CODE card for emergency start-
ing and remplacement of keys is not pro-
vided. If you need assistance please contact
your nearest Alfa Romeo Dealer or telephone
free phone 0800 717000.If the car changes owner,
the new owner must be
given all the keys and the
CODE card.KEY WITH REMOTE CONTROL
For versions/markets where applicable,
the key with remote control (fig. 4) is fit-
ted with:
– a metal insert (A) that can be enclosed
in the key grip
– a button (B) for remote door unlock-
ing and at the same time switching off the
electronic alarm
– a button (C) for remote door locking
and at the same time switching on the elec-
tronic alarm
– a button (D) for remote boot unlocking
– removable hook ring (E)
– a button (F) for power-assisted opening
of the metal insert.
fig. 3
A0A0003m
fig. 4
A0A0705m
Page 13 of 291
GETTING TO KNOW YOUR CAR
11
ELECTRONIC ALARM
(optional for versions/markets
where applicable)
DESCRIPTION
The system comprises: a transmitter, re-
ceiver, control unit with siren and volumet-
ric sensors. The electronic alarm is controlled
by the receiver incorporated in the instru-
ment cluster and it is turned on and off by
the remote control in the key which sends
the crypted and variable code. The electronic
alarm controls: the unlawful opening of
doors, bonnet and boot (perimetral protec-
tion), operation of the ignition key, battery
cable cutting, the presence of moving bod-
ies in the passenger compartment (volu-
metric protection) any abnormal raising/
sloping of the car (for versions/markets
where applicable) and central door locking.
It also makes it possible to cut off the vol-
umetric protection.
IMPORTANTThe engine inhibitor func-
tion is guaranteed by the Alfa Romeo CODE
system which is activated automatically
when the ignition key is removed.
REQUEST FOR ADDITIONAL
KEYS WITH REMOTE CONTROL
The receiver can recognise up to 5 keys
with incorporated remote control. Should a
new key with remote control be necessary
for any reason during the life of the car, con-
tact directly Alfa Romeo Authorised Services,
taking with you the CODE card, a personal
identity document and the car’s ownership
documents.
HOW TO ACTIVATE THE ALARM
With the doors, bonnet and boot shut and
the ignition key in the STOPorPARKpo-
sition (key removed), point the key with re-
mote control in the direction of the car, then
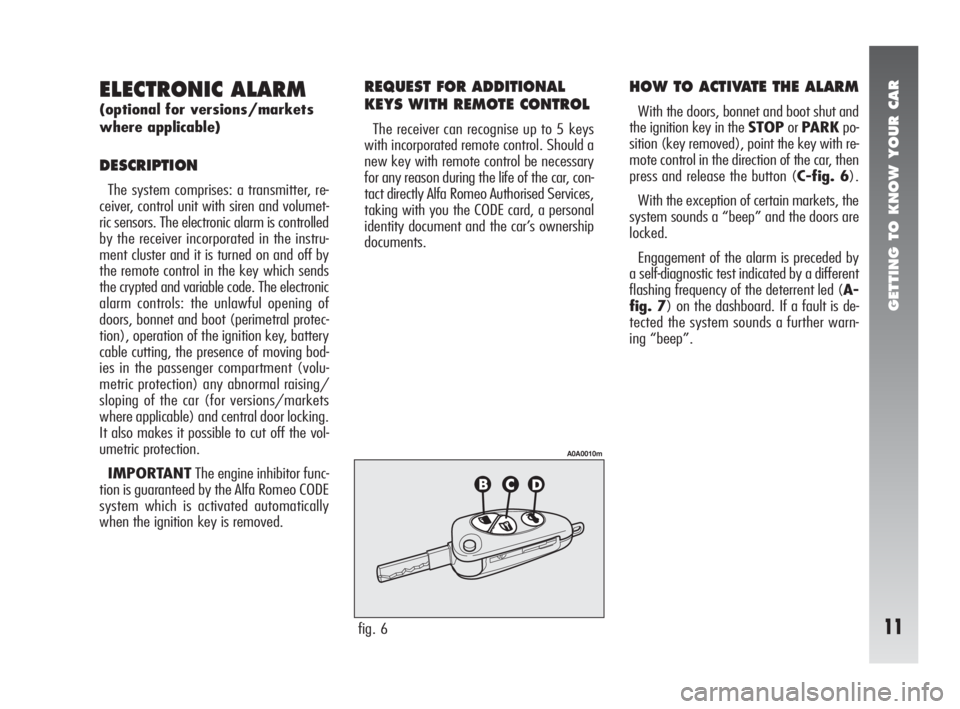
press and release the button (C-fig. 6).
With the exception of certain markets, the
system sounds a “beep” and the doors are
locked.
Engagement of the alarm is preceded by
a self-diagnostic test indicated by a different
flashing frequency of the deterrent led (A-
fig. 7) on the dashboard. If a fault is de-
tected the system sounds a further warn-
ing “beep”.
fig. 6
A0A0010m
Page 14 of 291
GETTING TO KNOW YOUR CAR
12
Surveillance
After switching on, the flashing of the de-
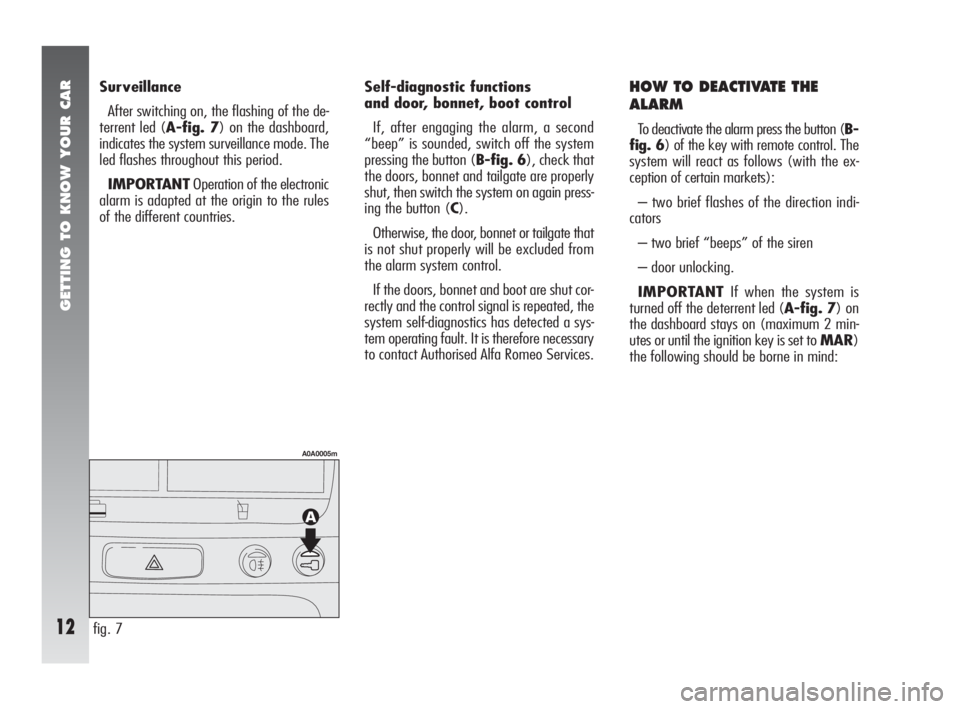
terrent led (A-fig. 7) on the dashboard,
indicates the system surveillance mode. The
led flashes throughout this period.
IMPORTANTOperation of the electronic
alarm is adapted at the origin to the rules
of the different countries.Self-diagnostic functions
and door, bonnet, boot control
If, after engaging the alarm, a second
“beep” is sounded, switch off the system
pressing the button (B-fig. 6), check that
the doors, bonnet and tailgate are properly
shut, then switch the system on again press-
ing the button (C).
Otherwise, the door, bonnet or tailgate that
is not shut properly will be excluded from
the alarm system control.
If the doors, bonnet and boot are shut cor-
rectly and the control signal is repeated, the
system self-diagnostics has detected a sys-
tem operating fault. It is therefore necessary
to contact Authorised Alfa Romeo Services.HOW TO DEACTIVATE THE
ALARM
To deactivate the alarm press the button (B-
fig. 6) of the key with remote control. The
system will react as follows (with the ex-
ception of certain markets):
– two brief flashes of the direction indi-
cators
– two brief “beeps” of the siren
– door unlocking.
IMPORTANTIf when the system is
turned off the deterrent led (A-fig. 7) on
the dashboard stays on (maximum 2 min-
utes or until the ignition key is set to MAR)
the following should be borne in mind:
fig. 7
A0A0005m
Page 21 of 291
GETTING TO KNOW YOUR CAR
19
REAR SEATS
EXTENDING THE
LUGGAGE COMPARTMENT
The split rear seat makes it possible to ex-
tend the luggage compartment totally or par-
tially, acting separately on one of the two
parts, thereby offering different possibilities
of load depending on the number of rear
passengers.Removing the rear parcel shelf
Proceed as follows:
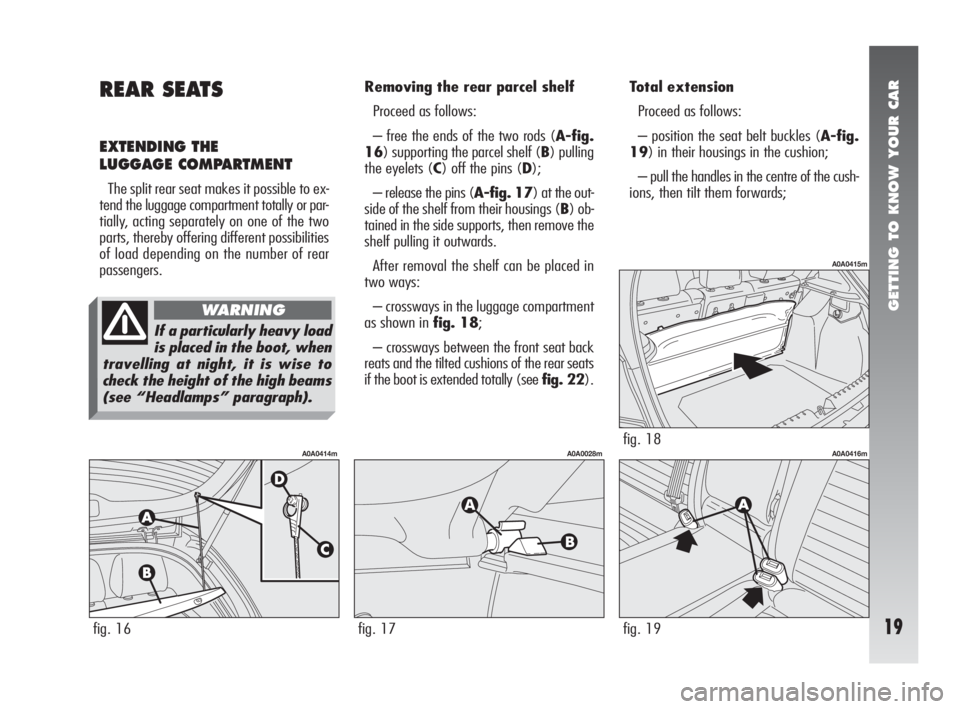
– free the ends of the two rods (A-fig.
16) supporting the parcel shelf (B) pulling
the eyelets (C) off the pins (D);
– release the pins (A-fig. 17) at the out-
side of the shelf from their housings (B) ob-
tained in the side supports, then remove the
shelf pulling it outwards.
After removal the shelf can be placed in
two ways:
– crossways in the luggage compartment
as shown in fig. 18;
– crossways between the front seat back
reats and the tilted cushions of the rear seats
if the boot is extended totally (see fig. 22).Total extension
Proceed as follows:
– position the seat belt buckles (A-fig.
19) in their housings in the cushion;
– pull the handles in the centre of the cush-
ions, then tilt them forwards;
fig. 16
A0A0414m
fig. 17
A0A0028m
fig. 19
A0A0416mfig. 18
A0A0415m
If a particularly heavy load
is placed in the boot, when
travelling at night, it is wise to
check the height of the high beams
(see “Headlamps” paragraph).
WARNING
Page 23 of 291
GETTING TO KNOW YOUR CAR
21
HEADREST ADJUSTMENT
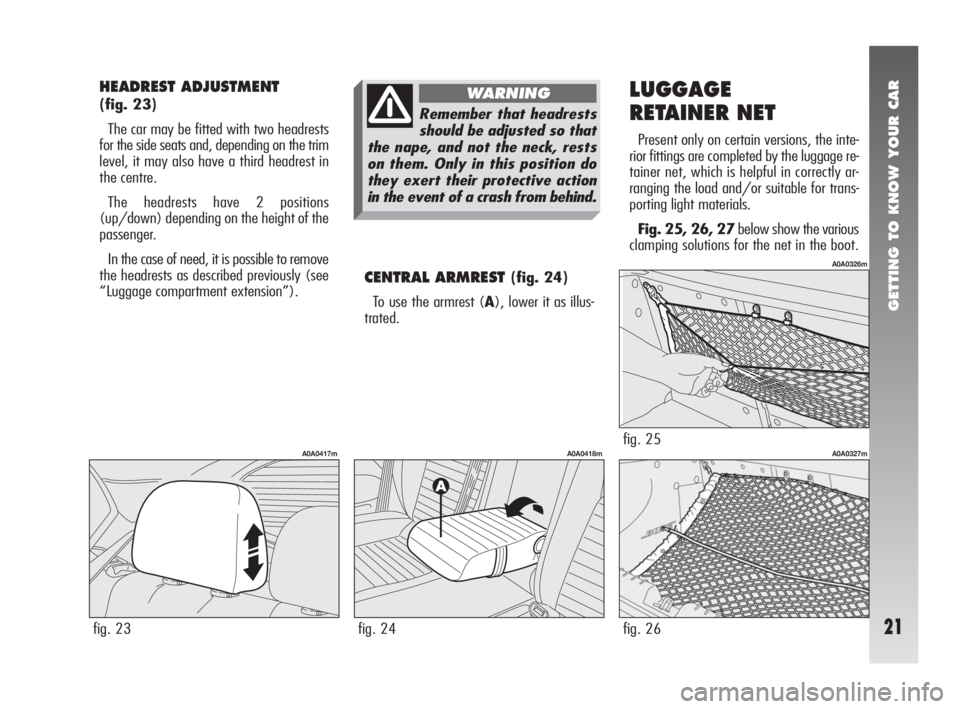
(fig. 23)
The car may be fitted with two headrests
for the side seats and, depending on the trim
level, it may also have a third headrest in
the centre.
The headrests have 2 positions
(up/down) depending on the height of the
passenger.
In the case of need, it is possible to remove
the headrests as described previously (see
“Luggage compartment extension”).
CENTRAL ARMREST (fig. 24)
To use the armrest (A), lower it as illus-
trated.
LUGGAGE
RETAINER NET
Present only on certain versions, the inte-
rior fittings are completed by the luggage re-
tainer net, which is helpful in correctly ar-
ranging the load and/or suitable for trans-
porting light materials.
Fig. 25, 26, 27below show the various
clamping solutions for the net in the boot.
fig. 23
A0A0417m
fig. 24
A0A0418mfig. 25
A0A0326m
Remember that headrests
should be adjusted so that
the nape, and not the neck, rests
on them. Only in this position do
they exert their protective action
in the event of a crash from behind.
WARNING
fig. 26
A0A0327m
Page 110 of 291
GETTING TO KNOW YOUR CAR
108
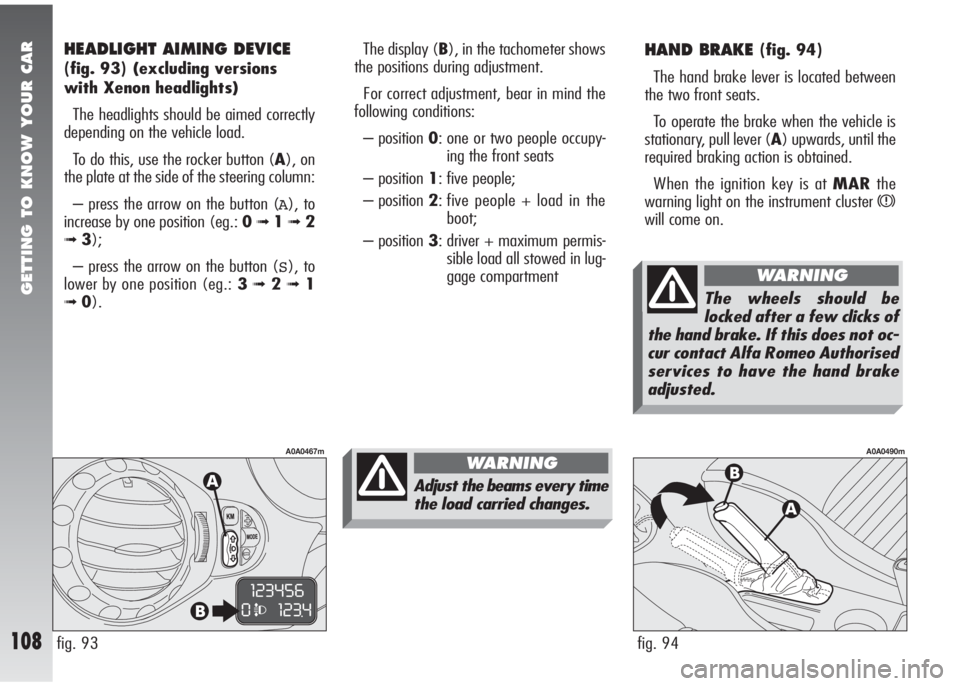
HAND BRAKE (fig. 94)
The hand brake lever is located between
the two front seats.
To operate the brake when the vehicle is
stationary, pull lever (A) upwards, until the
required braking action is obtained.
When the ignition key is at MARthe
warning light on the instrument cluster
x
will come on.
fig. 94
A0A0490m
The display (B), in the tachometer shows
the positions during adjustment.
For correct adjustment, bear in mind the
following conditions:
– position 0: one or two people occupy-
ing the front seats
– position 1: five people;
– position 2: five people + load in the
boot;
– position 3: driver + maximum permis-
sible load all stowed in lug-
gage compartment
fig. 93
A0A0467m
HEADLIGHT AIMING DEVICE
(fig. 93)(excluding versions
with Xenon headlights)
The headlights should be aimed correctly
depending on the vehicle load.
To do this, use the rocker button (A), on
the plate at the side of the steering column:
– press the arrow on the button (
A), to
increase by one position (eg.: 0
➟1➟ 2
➟3);
– press the arrow on the button (
S), to
lower by one position (eg.: 3
➟2➟1
➟0).
Adjust the beams every time
the load carried changes.
WARNING
The wheels should be
locked after a few clicks of
the hand brake. If this does not oc-
cur contact Alfa Romeo Authorised
services to have the hand brake
adjusted.
WARNING
Page 131 of 291
GETTING TO KNOW YOUR CAR
129fig. 128
A0A0132m
TAILGATE CLOSING
To lock, push in correspondence with the
Alfa Romeo badge to lower tailgate, until
you feel the click of the lock.
LUGGAGE COMPARTMENT
LIGHTING
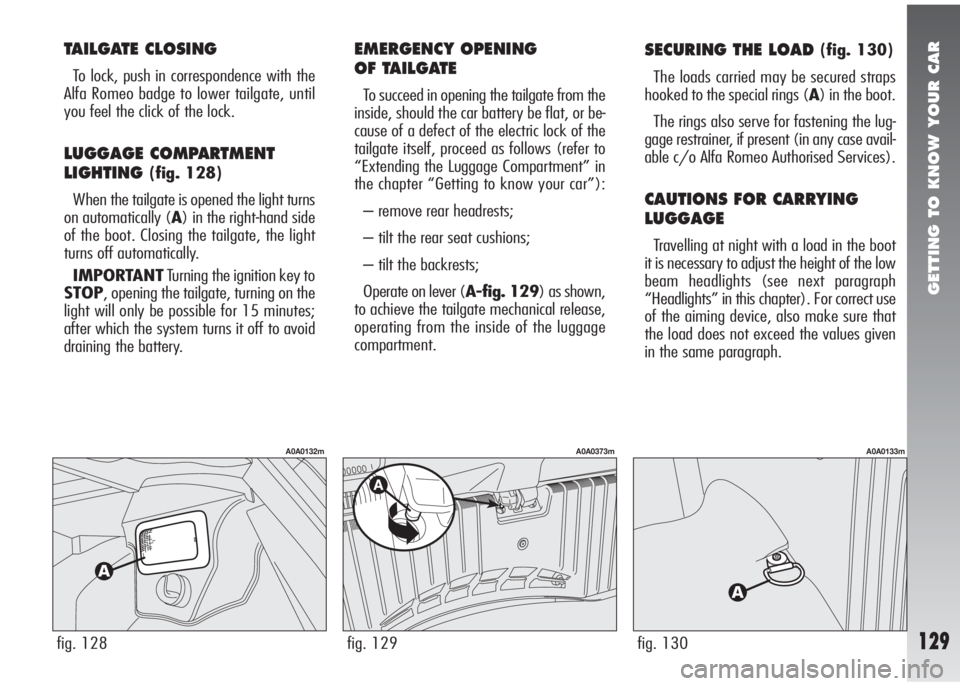
(fig. 128)
When the tailgate is opened the light turns
on automatically (A) in the right-hand side
of the boot. Closing the tailgate, the light
turns off automatically.
IMPORTANTTurning the ignition key to
STOP, opening the tailgate, turning on the
light will only be possible for 15 minutes;
after which the system turns it off to avoid
draining the battery.
SECURING THE LOAD (fig. 130)
The loads carried may be secured straps
hooked to the special rings (A) in the boot.
The rings also serve for fastening the lug-
gage restrainer, if present (in any case avail-
able c/o Alfa Romeo Authorised Services).
CAUTIONS FOR CARRYING
LUGGAGE
Travelling at night with a load in the boot
it is necessary to adjust the height of the low
beam headlights (see next paragraph
“Headlights” in this chapter). For correct use
of the aiming device, also make sure that
the load does not exceed the values given
in the same paragraph.
fig. 130
A0A0133m
fig. 129
A0A0373m
EMERGENCY OPENING
OF TAILGATE
To succeed in opening the tailgate from the
inside, should the car battery be flat, or be-
cause of a defect of the electric lock of the
tailgate itself, proceed as follows (refer to
“Extending the Luggage Compartment” in
the chapter “Getting to know your car”):
– remove rear headrests;
– tilt the rear seat cushions;
– tilt the backrests;
Operate on lever (A-fig. 129) as shown,
to achieve the tailgate mechanical release,
operating from the inside of the luggage
compartment.
Page 132 of 291
GETTING TO KNOW YOUR CAR
130fig. 132
A0A0437m
BONNET
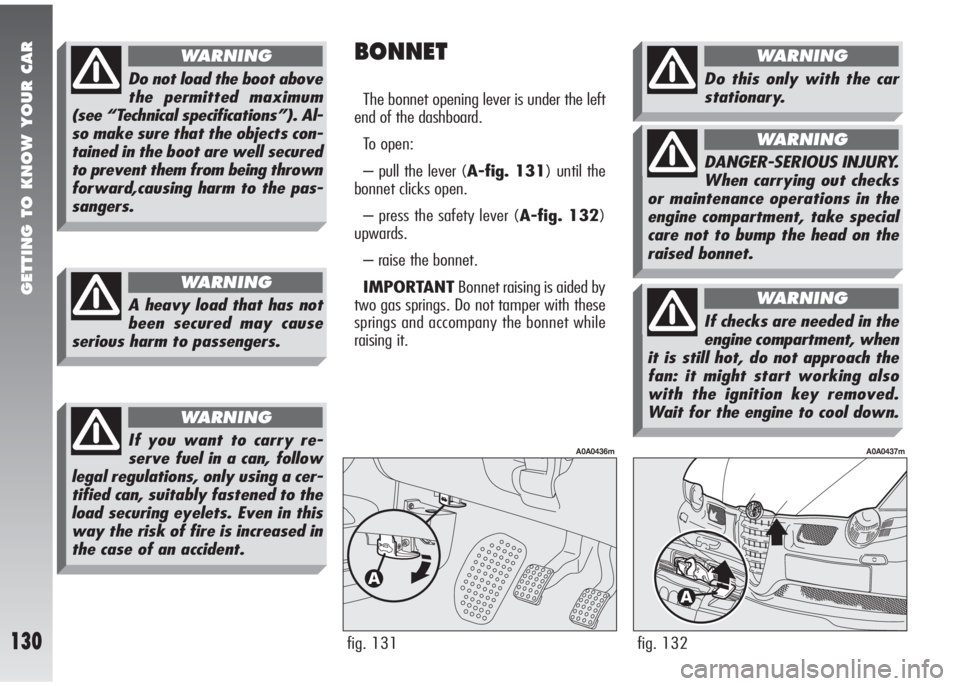
The bonnet opening lever is under the left
end of the dashboard.
To open:
– pull the lever (A-fig. 131) until the
bonnet clicks open.
– press the safety lever (A-fig. 132)
upwards.
– raise the bonnet.
IMPORTANTBonnet raising is aided by
two gas springs. Do not tamper with these
springs and accompany the bonnet while
raising it.
fig. 131
A0A0436m
A heavy load that has not
been secured may cause
serious harm to passengers.
WARNING
Do not load the boot above
the permitted maximum
(see “Technical specifications”). Al-
so make sure that the objects con-
tained in the boot are well secured
to prevent them from being thrown
forward,causing harm to the pas-
sangers.
WARNING
If you want to carry re-
serve fuel in a can, follow
legal regulations, only using a cer-
tified can, suitably fastened to the
load securing eyelets. Even in this
way the risk of fire is increased in
the case of an accident.
WARNING
Do this only with the car
stationary.
WARNING
DANGER-SERIOUS INJURY.
When carrying out checks
or maintenance operations in the
engine compartment, take special
care not to bump the head on the
raised bonnet.
WARNING
If checks are needed in the
engine compartment, when
it is still hot, do not approach the
fan: it might start working also
with the ignition key removed.
Wait for the engine to cool down.
WARNING
Page 134 of 291
GETTING TO KNOW YOUR CAR
132fig. 135
A0A0199m
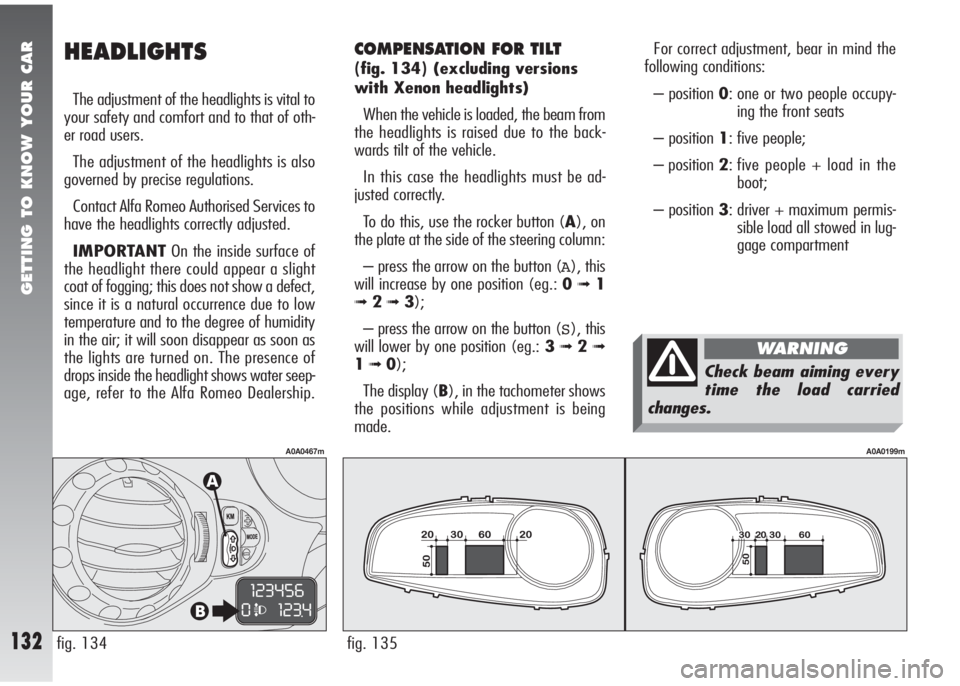
For correct adjustment, bear in mind the
following conditions:
– position 0: one or two people occupy-
ing the front seats
– position 1: five people;
– position 2: five people + load in the
boot;
– position 3: driver + maximum permis-
sible load all stowed in lug-
gage compartmentCOMPENSATION FOR TILT
(fig. 134)(excluding versions
with Xenon headlights)
When the vehicle is loaded, the beam from
the headlights is raised due to the back-
wards tilt of the vehicle.
In this case the headlights must be ad-
justed correctly.
To do this, use the rocker button (A), on
the plate at the side of the steering column:
– press the arrow on the button (
A), this
will increase by one position (eg.: 0
➟1
➟ 2➟3);
– press the arrow on the button (
S), this
will lower by one position (eg.: 3
➟2➟
1➟0);
The display (B), in the tachometer shows
the positions while adjustment is being
made.
fig. 134
A0A0467m
HEADLIGHTS
The adjustment of the headlights is vital to
your safety and comfort and to that of oth-
er road users.
The adjustment of the headlights is also
governed by precise regulations.
Contact Alfa Romeo Authorised Services to
have the headlights correctly adjusted.
IMPORTANTOn the inside surface of
the headlight there could appear a slight
coat of fogging; this does not show a defect,
since it is a natural occurrence due to low
temperature and to the degree of humidity
in the air; it will soon disappear as soon as
the lights are turned on. The presence of
drops inside the headlight shows water seep-
age, refer to the Alfa Romeo Dealership.
Check beam aiming every
time the load carried
changes.
WARNING
Page 143 of 291
GETTING TO KNOW YOUR CAR
141
ADVICE
Road safety
You are advised to learn how to use the
various radio functions (e.g. storing stations)
before starting to drive.
Reception conditions
Reception conditions change constantly
when driving. Reception may be disturbed
by the presence of mountains, buildings or
bridges particularly when far away from the
station being listened to.
IMPORTANTWhen receiving traffic in-
formation, the volume may be higher than
normal.Care and maintenance
The radio structure ensures long operation
with no need for particular maintenance.
In the event of a fault, contact Authorised
Alfa Romeo Services.
To clean the front panel only use a soft,
antistatic cloth. Cleaning and polishing prod-
ucts might spoil the surface.
Compact Disc
Remember that dirt, marks or distortion on
Compact Discs can cause skipping and poor
sound quality. For top performance condi-
tions, we give the following advice:
– Only use Compact Discs which have the
following brand:
– Carefully clean all Compact Disc of fin-
gerprints and dust using a soft cloth. Sup-
port Compact Discs from the outer circum-
ference and clean from the centre outwards.
INTRODUCTION
The fixed radio, fitted with Compact Disc
player and parametric sound equaliser has
been designed in accordance with the spe-
cific features of the passenger compartment,
with a personalised design that blends with
the style of the dashboard.
The radio is installed in a user-friendly po-
sition for the driver and passenger and the
graphics on the front panel make location
of the controls quick, facilitating use.
The CD-Changer for 10 discs, if present,
is housed in the right-hand side of the boot.
To increase safety against theft, the set is fit-
ted with a protection system that allows the
use of it only on the car on which it was orig-
inally fitted.
Below you will find the instructions for use,
which you are advised to read through care-
fully. The instructions also contain the pro-
cedure for controlling the CD-Changer
through the radio. For the instructions for
use of the CD-Changer refer to the specific
manual.
RADIO WITH COMPACT DISC PLAYER
Too high a volume when
driving can put the driver’s
life at risk and that of other peo-
ple. Therefore the volume should
always be adjusted in such a way
that it is always possible to hear
the noises of the surrounding en-
vironment (e.g. horns, ambulance,
police sirens, etc.).
WARNING