height adjustment Alfa Romeo 147 2007 Owner handbook (in English)
[x] Cancel search | Manufacturer: ALFA ROMEO, Model Year: 2007, Model line: 147, Model: Alfa Romeo 147 2007Pages: 291, PDF Size: 5.52 MB
Page 19 of 291
GETTING TO KNOW YOUR CAR
17
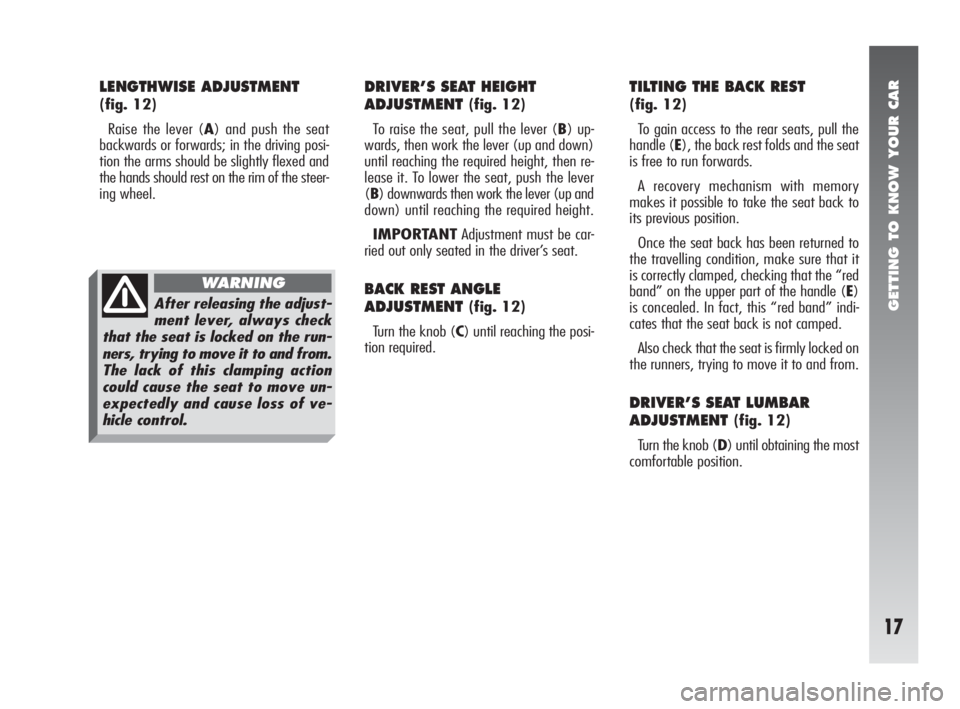
LENGTHWISE ADJUSTMENT
(fig. 12)
Raise the lever (A) and push the seat
backwards or forwards; in the driving posi-
tion the arms should be slightly flexed and
the hands should rest on the rim of the steer-
ing wheel.
DRIVER’S SEAT HEIGHT
ADJUSTMENT
(fig. 12)
To raise the seat, pull the lever (B) up-
wards, then work the lever (up and down)
until reaching the required height, then re-
lease it. To lower the seat, push the lever
(B) downwards then work the lever (up and
down) until reaching the required height.
IMPORTANTAdjustment must be car-
ried out only seated in the driver’s seat.
BACK REST ANGLE
ADJUSTMENT
(fig. 12)
Turn the knob (C) until reaching the posi-
tion required.
TILTING THE BACK REST
(fig. 12)
To gain access to the rear seats, pull the
handle (E), the back rest folds and the seat
is free to run forwards.
A recovery mechanism with memory
makes it possible to take the seat back to
its previous position.
Once the seat back has been returned to
the travelling condition, make sure that it
is correctly clamped, checking that the “red
band” on the upper part of the handle (E)
is concealed. In fact, this “red band” indi-
cates that the seat back is not camped.
Also check that the seat is firmly locked on
the runners, trying to move it to and from.
DRIVER’S SEAT LUMBAR
ADJUSTMENT
(fig. 12)
Turn the knob (D) until obtaining the most
comfortable position.
After releasing the adjust-
ment lever, always check
that the seat is locked on the run-
ners, trying to move it to and from.
The lack of this clamping action
could cause the seat to move un-
expectedly and cause loss of ve-
hicle control.
WARNING
Page 23 of 291
GETTING TO KNOW YOUR CAR
21
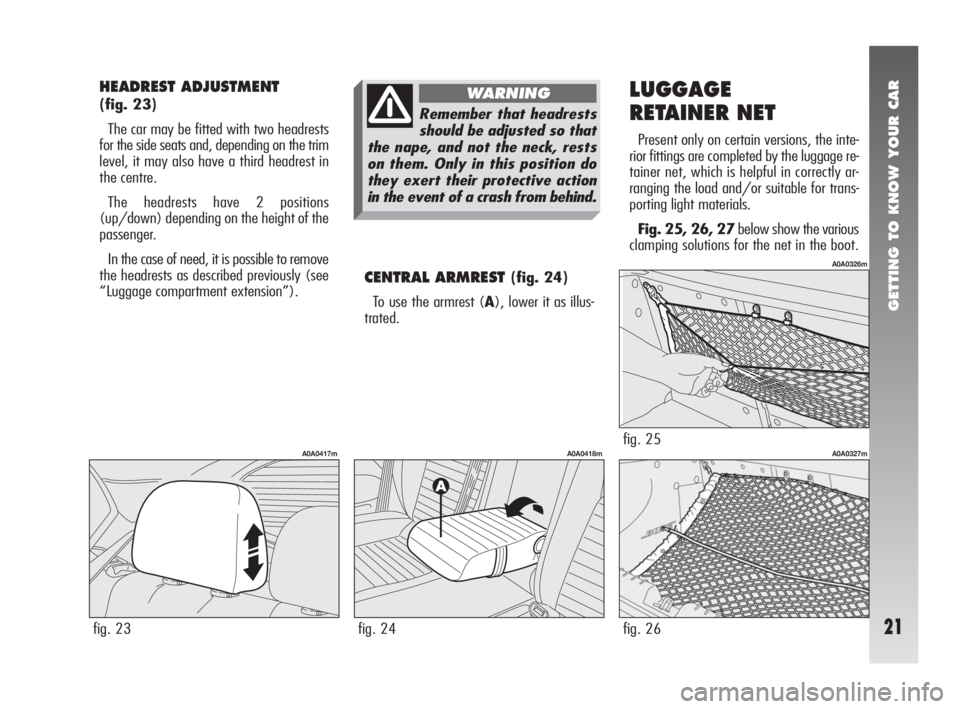
HEADREST ADJUSTMENT
(fig. 23)
The car may be fitted with two headrests
for the side seats and, depending on the trim
level, it may also have a third headrest in
the centre.
The headrests have 2 positions
(up/down) depending on the height of the
passenger.
In the case of need, it is possible to remove
the headrests as described previously (see
“Luggage compartment extension”).
CENTRAL ARMREST (fig. 24)
To use the armrest (A), lower it as illus-
trated.
LUGGAGE
RETAINER NET
Present only on certain versions, the inte-
rior fittings are completed by the luggage re-
tainer net, which is helpful in correctly ar-
ranging the load and/or suitable for trans-
porting light materials.
Fig. 25, 26, 27below show the various
clamping solutions for the net in the boot.
fig. 23
A0A0417m
fig. 24
A0A0418mfig. 25
A0A0326m
Remember that headrests
should be adjusted so that
the nape, and not the neck, rests
on them. Only in this position do
they exert their protective action
in the event of a crash from behind.
WARNING
fig. 26
A0A0327m
Page 24 of 291
GETTING TO KNOW YOUR CAR
22
STEERING WHEEL
ADJUSTMENTS
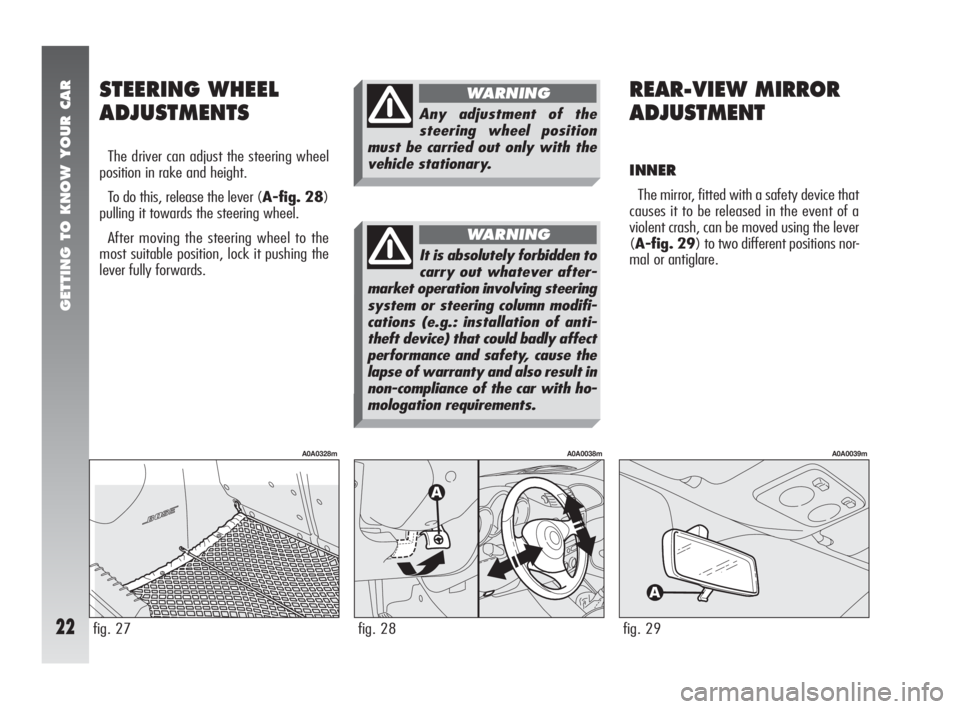
The driver can adjust the steering wheel
position in rake and height.
To do this, release the lever (A-fig. 28)
pulling it towards the steering wheel.
After moving the steering wheel to the
most suitable position, lock it pushing the
lever fully forwards.
REAR-VIEW MIRROR
ADJUSTMENT
INNER
The mirror, fitted with a safety device that
causes it to be released in the event of a
violent crash, can be moved using the lever
(A-fig. 29) to two different positions nor-
mal or antiglare.
fig. 27
A0A0328m
fig. 28
A0A0038m
fig. 29
A0A0039m
Any adjustment of the
steering wheel position
must be carried out only with the
vehicle stationary.
WARNING
It is absolutely forbidden to
carry out whatever after-
market operation involving steering
system or steering column modifi-
cations (e.g.: installation of anti-
theft device) that could badly affect
performance and safety, cause the
lapse of warranty and also result in
non-compliance of the car with ho-
mologation requirements.
WARNING
Page 29 of 291
GETTING TO KNOW YOUR CAR
27
FRONT SEAT BELT HEIGHT
ADJUSTMENT
The front seat belt ring can take different
positions which make it possible to adjust
the height of the belts.
Always adjust the height of the belts adapt-
ing it to the person who is wearing it. This
precaution improves their effectiveness. sub-
stantially reducing the risk of injury in the
event of a crash.
Correct adjustment is obtained when the
belt passes half way between the end of the
shoulder and the neck.
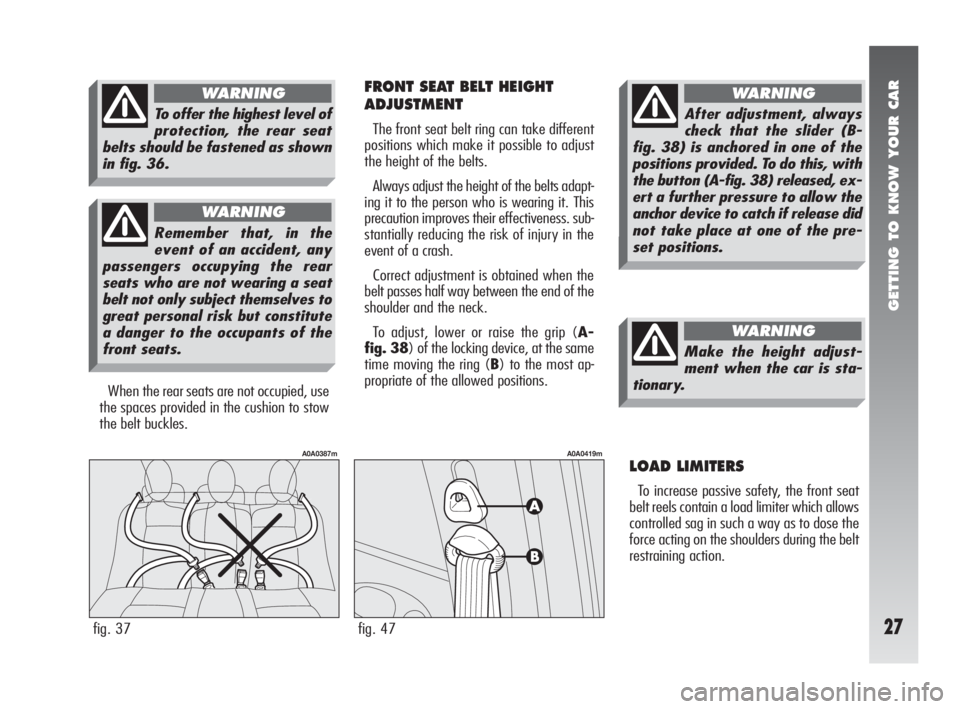
To adjust, lower or raise the grip (A-
fig. 38) of the locking device, at the same
time moving the ring (B) to the most ap-
propriate of the allowed positions.
LOAD LIMITERS
To increase passive safety, the front seat
belt reels contain a load limiter which allows
controlled sag in such a way as to dose the
force acting on the shoulders during the belt
restraining action.
fig. 47
A0A0419m
When the rear seats are not occupied, use
the spaces provided in the cushion to stow
the belt buckles.
fig. 37
A0A0387m
To offer the highest level of
protection, the rear seat
belts should be fastened as shown
in fig. 36.
WARNING
Remember that, in the
event of an accident, any
passengers occupying the rear
seats who are not wearing a seat
belt not only subject themselves to
great personal risk but constitute
a danger to the occupants of the
front seats.
WARNING
After adjustment, always
check that the slider (B-
fig. 38) is anchored in one of the
positions provided. To do this, with
the button (A-fig. 38) released, ex-
ert a further pressure to allow the
anchor device to catch if release did
not take place at one of the pre-
set positions.
WARNING
Make the height adjust-
ment when the car is sta-
tionary.
WARNING
Page 265 of 291
RIGHT HAND DRIVE VERSION
263
MILEAGE RECORDER
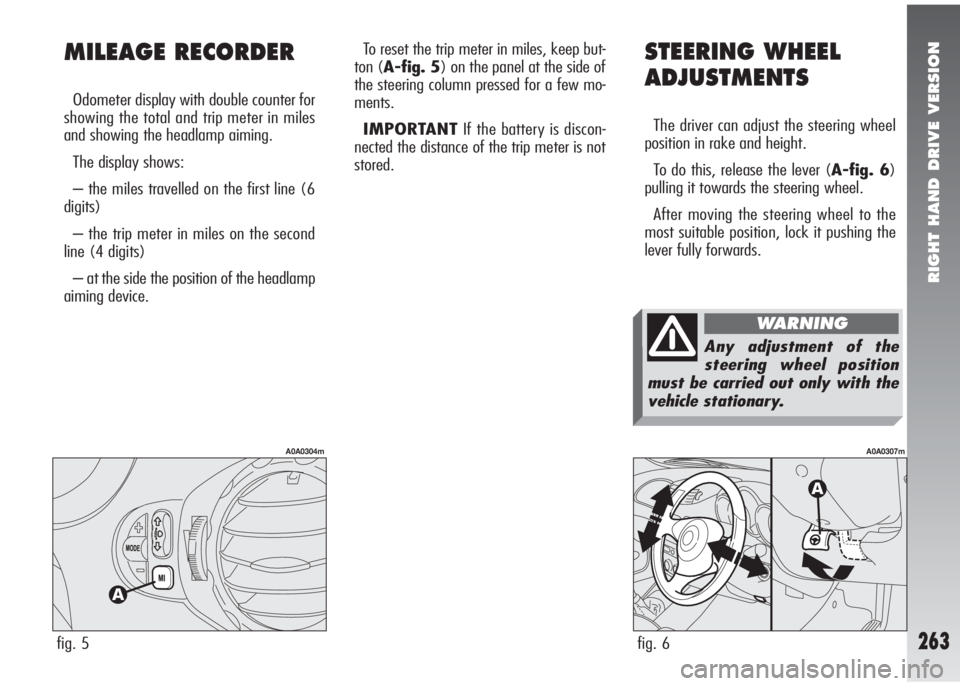
Odometer display with double counter for
showing the total and trip meter in miles
and showing the headlamp aiming.
The display shows:
– the miles travelled on the first line (6
digits)
– the trip meter in miles on the second
line (4 digits)
– at the side the position of the headlamp
aiming device.
fig. 5
A0A0304m
To reset the trip meter in miles, keep but-
ton (A-fig. 5) on the panel at the side of
the steering column pressed for a few mo-
ments.
IMPORTANTIf the battery is discon-
nected the distance of the trip meter is not
stored.STEERING WHEEL
ADJUSTMENTS
The driver can adjust the steering wheel
position in rake and height.
To do this, release the lever (A-fig. 6)
pulling it towards the steering wheel.
After moving the steering wheel to the
most suitable position, lock it pushing the
lever fully forwards.
fig. 6
A0A0307m
Any adjustment of the
steering wheel position
must be carried out only with the
vehicle stationary.
WARNING
Page 268 of 291
RIGHT HAND DRIVE VERSION
266
FRONT SEATS
fig. 10
A0A0477m
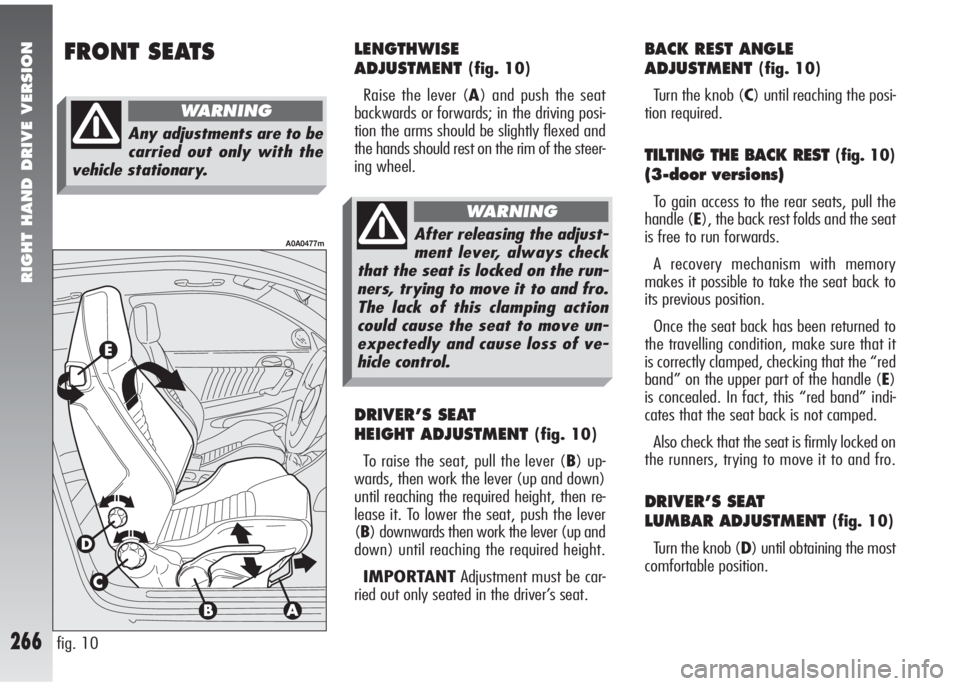
LENGTHWISE
ADJUSTMENT
(fig. 10)
Raise the lever (A) and push the seat
backwards or forwards; in the driving posi-
tion the arms should be slightly flexed and
the hands should rest on the rim of the steer-
ing wheel.
DRIVER’S SEAT
HEIGHT ADJUSTMENT
(fig. 10)
To raise the seat, pull the lever (B) up-
wards, then work the lever (up and down)
until reaching the required height, then re-
lease it. To lower the seat, push the lever
(B) downwards then work the lever (up and
down) until reaching the required height.
IMPORTANTAdjustment must be car-
ried out only seated in the driver’s seat.
BACK REST ANGLE
ADJUSTMENT
(fig. 10)
Turn the knob (C) until reaching the posi-
tion required.
TILTING THE BACK REST (fig. 10)
(3-door versions)
To gain access to the rear seats, pull the
handle (E), the back rest folds and the seat
is free to run forwards.
A recovery mechanism with memory
makes it possible to take the seat back to
its previous position.
Once the seat back has been returned to
the travelling condition, make sure that it
is correctly clamped, checking that the “red
band” on the upper part of the handle (E)
is concealed. In fact, this “red band” indi-
cates that the seat back is not camped.
Also check that the seat is firmly locked on
the runners, trying to move it to and fro.
DRIVER’S SEAT
LUMBAR ADJUSTMENT
(fig. 10)
Turn the knob (D) until obtaining the most
comfortable position.
Any adjustments are to be
carried out only with the
vehicle stationary.
WARNING
After releasing the adjust-
ment lever, always check
that the seat is locked on the run-
ners, trying to move it to and fro.
The lack of this clamping action
could cause the seat to move un-
expectedly and cause loss of ve-
hicle control.
WARNING
Page 282 of 291
ALPHABETICAL INDEX
280
- operation................................ 46
Rearview mirrors
- external ................................. 23
- internal .................................. 22
Reducing running costs
and environment pollution .......... 181
Refuelling
- specifications .......................... 254
Remote control ............................ 7
- additional remote controls ......... 11
- alarm system .......................... 11
- battery changing ..................... 10
- door opening-closing ................ 7
- ministerial homologation........... 14
- tailgate opening ...................... 8
Restraining the load...................... 129
Rev counter................................. 51
Reversing light ............................. 203
Right hand drive.................... 259Roof rack (provision) .................... 131
Running economy ........................ 183
Safe driving ............................... 178
Safeguarding emission reduction
devices .................................... 184
Safeguarding the environment ....... 174
Scheduled maintenance
programme .............................. 222
Seat belts ................................... 25
- carrying children safety ............. 31
- front belt height adjustment ...... 27
- general instructions .................. 29
- load limiters............................ 27
- maintenance ........................... 30
- pretensioners .......................... 28
- use of belts............................. 25
Seats for children ......................... 31
Seats, front............................ 16
- adjustments....................... 17
- centre armrest......................... 18- heating .................................. 18
- rear pockets ............................ 18
- tilting the back rest .................. 17
Seats, rear .................................. 19
- boot extension ........................ 19
- centre armrest......................... 21
- headrest ................................. 21
Sidelights
- changing front bulbs................. 202
- changing rear bulbs.................. 204
- changing side bulbs.................. 203
- switching on ........................... 43
Snow chains................................ 186
Spark plugs (technical data) .......... 247
Speakers ................................... 171
Speedometer............................... 51
Spray jets
- windscreen/rearscreen ............. 239