lock Alfa Romeo 147 2010 Owner handbook (in English)
[x] Cancel search | Manufacturer: ALFA ROMEO, Model Year: 2010, Model line: 147, Model: Alfa Romeo 147 2010Pages: 291, PDF Size: 5.52 MB
Page 206 of 291
IN AN EMERGENCY
204
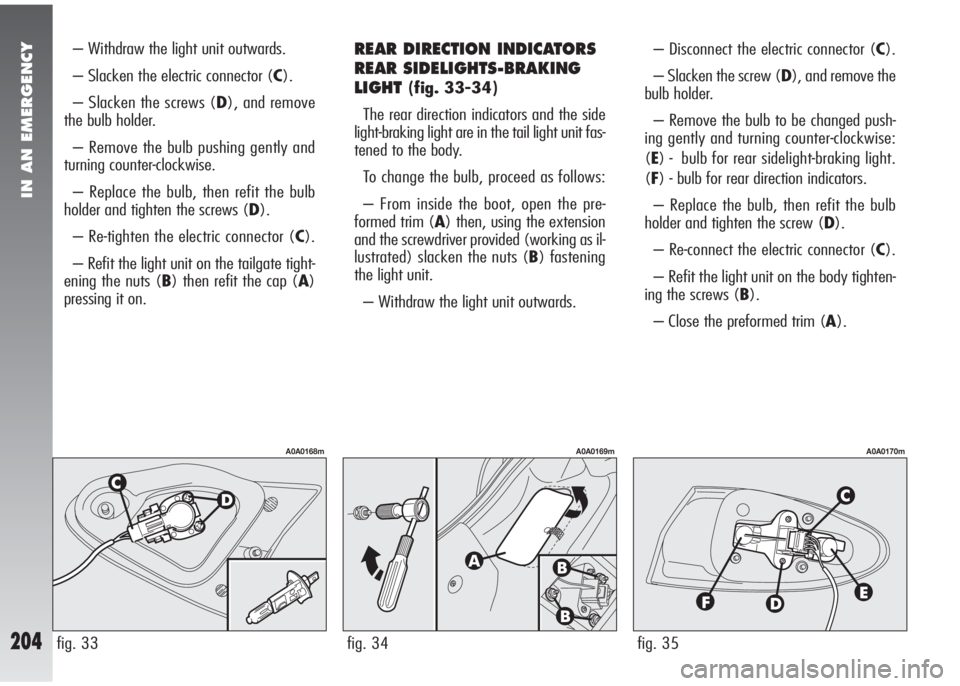
– Withdraw the light unit outwards.
– Slacken the electric connector (C).
– Slacken the screws (D), and remove
the bulb holder.
– Remove the bulb pushing gently and
turning counter-clockwise.
– Replace the bulb, then refit the bulb
holder and tighten the screws (D).
– Re-tighten the electric connector (C).
– Refit the light unit on the tailgate tight-
ening the nuts (B) then refit the cap (A)
pressing it on.REAR DIRECTION INDICATORS
REAR SIDELIGHTS-BRAKING
LIGHT
(fig. 33-34)
The rear direction indicators and the side
light-braking light are in the tail light unit fas-
tened to the body.
To change the bulb, proceed as follows:
– From inside the boot, open the pre-
formed trim (A) then, using the extension
and the screwdriver provided (working as il-
lustrated) slacken the nuts (B) fastening
the light unit.
– Withdraw the light unit outwards.– Disconnect the electric connector (C).
– Slacken the screw (D), and remove the
bulb holder.
– Remove the bulb to be changed push-
ing gently and turning counter-clockwise:
(E) - bulb for rear sidelight-braking light.
(F) - bulb for rear direction indicators.
– Replace the bulb, then refit the bulb
holder and tighten the screw (D).
– Re-connect the electric connector (C).
– Refit the light unit on the body tighten-
ing the screws (B).
– Close the preformed trim (A).
fig. 35
A0A0170m
fig. 34
A0A0169m
fig. 33
A0A0168m
Page 207 of 291
IN AN EMERGENCY
205
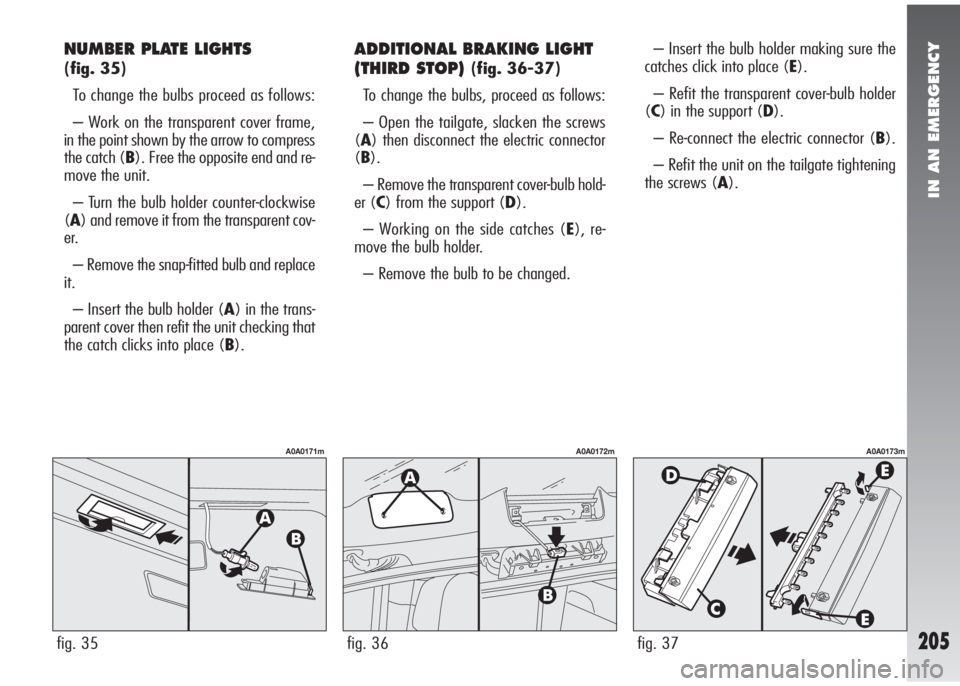
NUMBER PLATE LIGHTS
(fig. 35)
To change the bulbs proceed as follows:
– Work on the transparent cover frame,
in the point shown by the arrow to compress
the catch (B). Free the opposite end and re-
move the unit.
– Turn the bulb holder counter-clockwise
(A) and remove it from the transparent cov-
er.
– Remove the snap-fitted bulb and replace
it.
– Insert the bulb holder (A) in the trans-
parent cover then refit the unit checking that
the catch clicks into place (B).
ADDITIONAL BRAKING LIGHT
(THIRD STOP)
(fig. 36-37)
To change the bulbs, proceed as follows:
– Open the tailgate, slacken the screws
(A) then disconnect the electric connector
(B).
– Remove the transparent cover-bulb hold-
er (C) from the support (D).
– Working on the side catches (E), re-
move the bulb holder.
– Remove the bulb to be changed.– Insert the bulb holder making sure the
catches click into place (E).
– Refit the transparent cover-bulb holder
(C) in the support (D).
– Re-connect the electric connector (B).
– Refit the unit on the tailgate tightening
the screws (A).
fig. 37
A0A0173m
fig. 35
A0A0171m
fig. 36
A0A0172m
Page 212 of 291
IN AN EMERGENCY
210
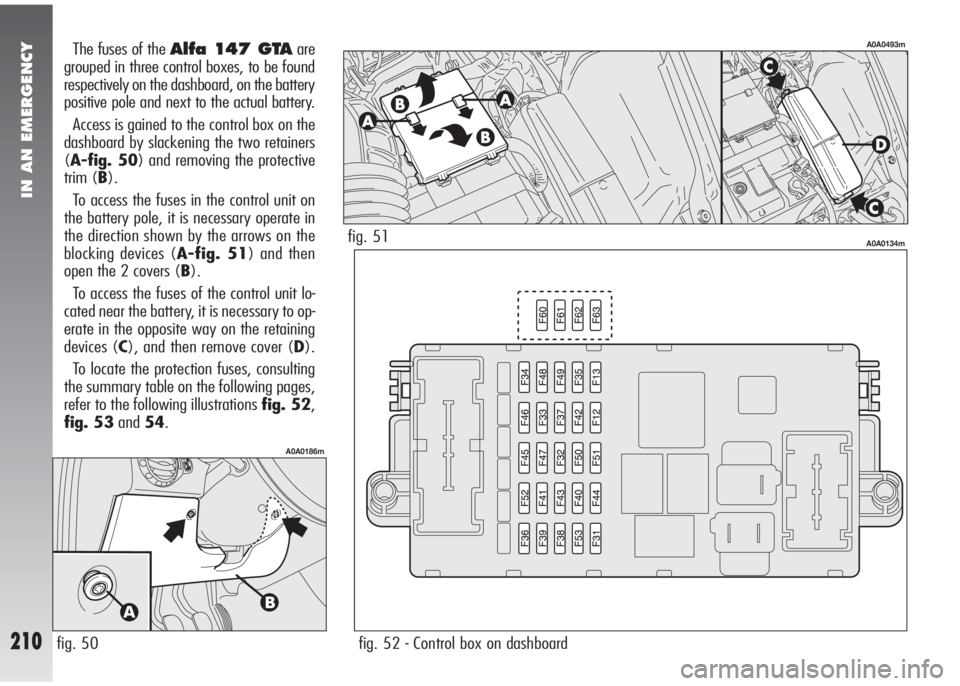
The fuses of the Alfa 147 GTAare
grouped in three control boxes, to be found
respectively on the dashboard, on the battery
positive pole and next to the actual battery.
Access is gained to the control box on the
dashboard by slackening the two retainers
(A-fig. 50) and removing the protective
trim (B).
To access the fuses in the control unit on
the battery pole, it is necessary operate in
the direction shown by the arrows on the
blocking devices (A-fig. 51) and then
open the 2 covers (B).
To access the fuses of the control unit lo-
cated near the battery, it is necessary to op-
erate in the opposite way on the retaining
devices (C), and then remove cover (D).
To locate the protection fuses, consulting
the summary table on the following pages,
refer to the following illustrations fig. 52,
fig. 53and54.
fig. 50
A0A0186m
fig. 52 - Control box on dashboard
A0A0134mfig. 51
A0A0493m
Page 215 of 291
IN AN EMERGENCY
213
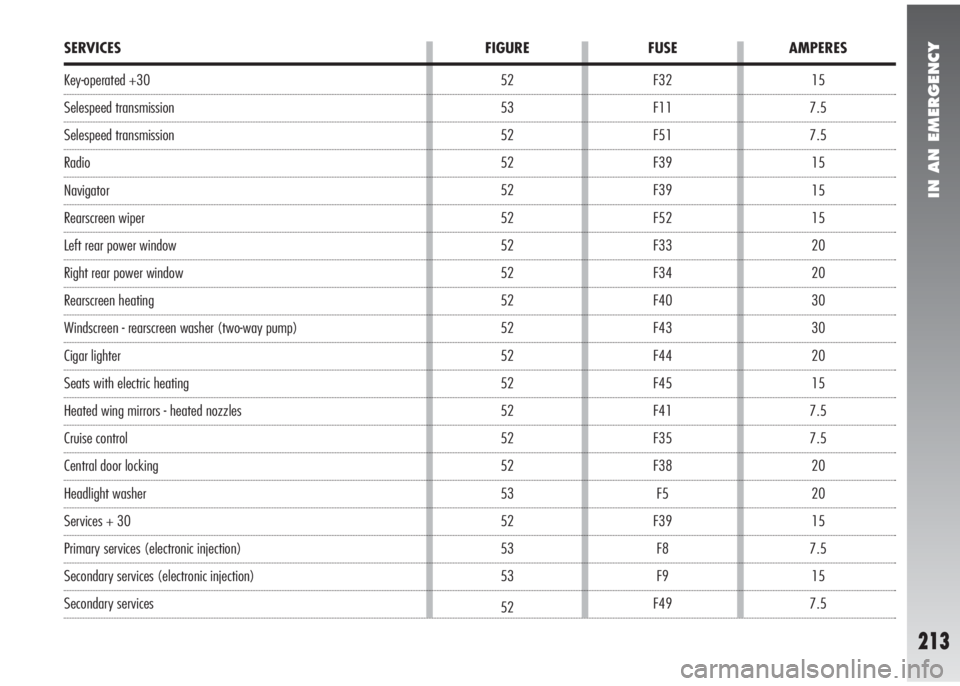
15
7.5
7.5
15
15
15
20
20
30
30
20
15
7.5
7.5
20
20
15
7.5
15
7.5 F32
F11
F51
F39
F39
F52
F33
F34
F40
F43
F44
F45
F41
F35
F38
F5
F39
F8
F9
F49 52
53
52
52
52
52
52
52
52
52
52
52
52
52
52
53
52
53
53
52
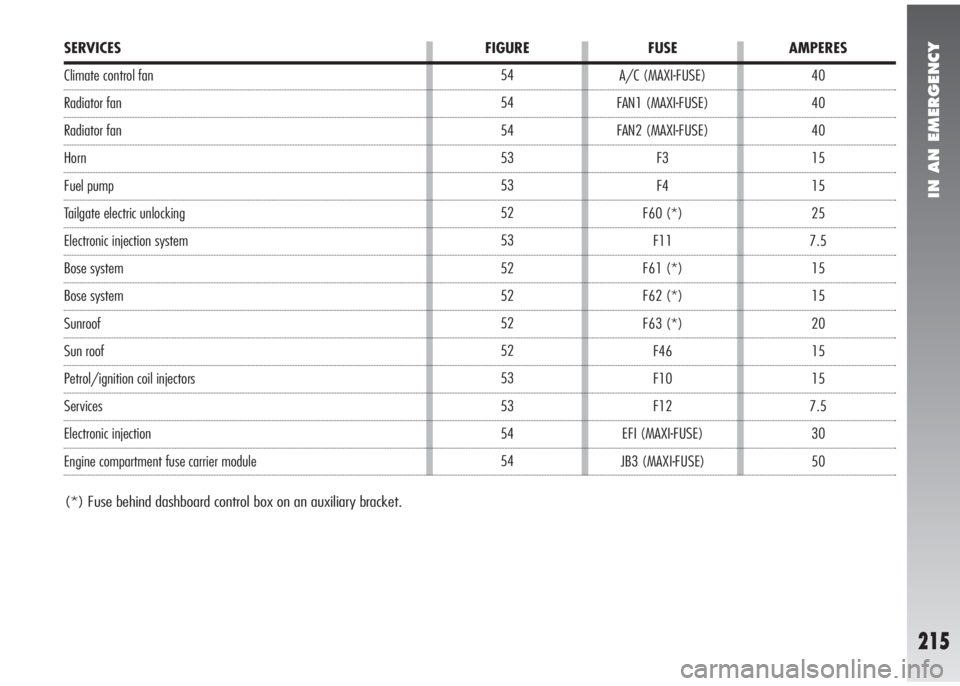
SERVICES FIGURE FUSE AMPERES
Key-operated +30
Selespeed transmission
Selespeed transmission
Radio
Navigator
Rearscreen wiper
Left rear power window
Right rear power window
Rearscreen heating
Windscreen - rearscreen washer (two-way pump)
Cigar lighter
Seats with electric heating
Heated wing mirrors - heated nozzles
Cruise control
Central door locking
Headlight washer
Services + 30
Primary services (electronic injection)
Secondary services (electronic injection)
Secondary services
Page 217 of 291
IN AN EMERGENCY
215
40
40
40
15
15
25
7.5
15
15
20
15
15
7.5
30
50 A/C (MAXI-FUSE)
FAN1 (MAXI-FUSE)
FAN2 (MAXI-FUSE)
F3
F4
F60 (*)
F11
F61 (*)
F62 (*)
F63 (*)
F46
F10
F12
EFI (MAXI-FUSE)
JB3 (MAXI-FUSE) 54
54
54
53
53
52
53
52
52
52
52
53
53
54
54
SERVICES FIGURE FUSE AMPERES
(*) Fuse behind dashboard control box on an auxiliary bracket.
Climate control fan
Radiator fan
Radiator fan
Horn
Fuel pump
Tailgate electric unlocking
Electronic injection system
Bose system
Bose system
Sunroof
Sun roof
Petrol/ignition coil injectors
Services
Electronic injection
Engine compartment fuse carrier module
Page 219 of 291
IN AN EMERGENCY
217
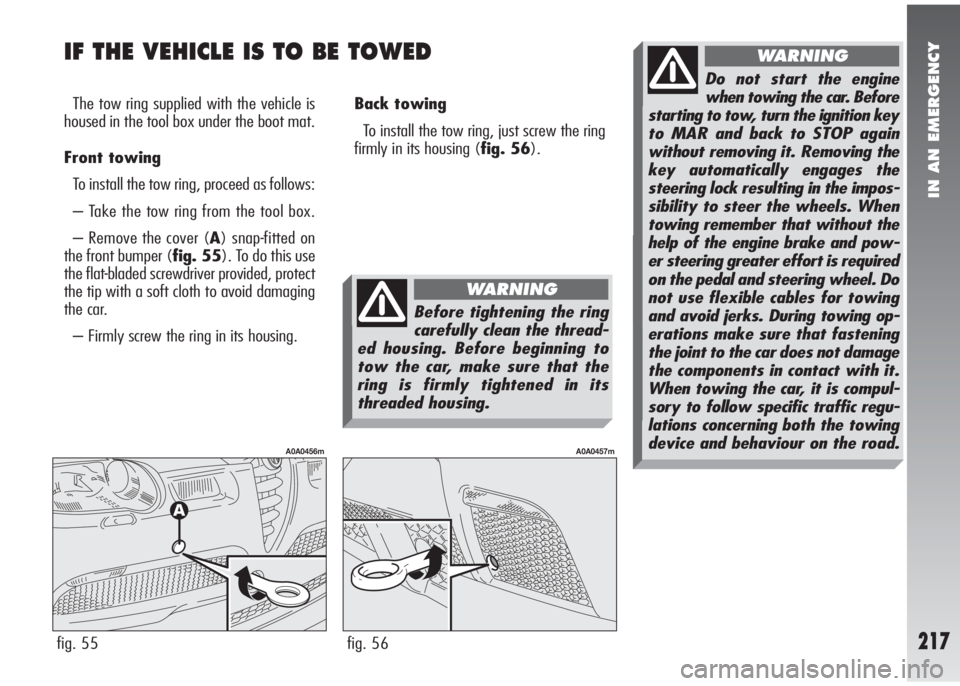
IF THE VEHICLE IS TO BE TOWED
The tow ring supplied with the vehicle is
housed in the tool box under the boot mat.
Front towing
To install the tow ring, proceed as follows:
– Take the tow ring from the tool box.
– Remove the cover (A) snap-fitted on
the front bumper (fig. 55). To do this use
the flat-bladed screwdriver provided, protect
the tip with a soft cloth to avoid damaging
the car.
– Firmly screw the ring in its housing.Back towing
To install the tow ring, just screw the ring
firmly in its housing (fig. 56).
fig. 55
A0A0456m
fig. 56
A0A0457m
Before tightening the ring
carefully clean the thread-
ed housing. Before beginning to
tow the car, make sure that the
ring is firmly tightened in its
threaded housing.
WARNING
Do not start the engine
when towing the car. Before
starting to tow, turn the ignition key
to MAR and back to STOP again
without removing it. Removing the
key automatically engages the
steering lock resulting in the impos-
sibility to steer the wheels. When
towing remember that without the
help of the engine brake and pow-
er steering greater effort is required
on the pedal and steering wheel. Do
not use flexible cables for towing
and avoid jerks. During towing op-
erations make sure that fastening
the joint to the car does not damage
the components in contact with it.
When towing the car, it is compul-
sory to follow specific traffic regu-
lations concerning both the towing
device and behaviour on the road.
WARNING
Page 221 of 291
IN AN EMERGENCY
219
IN THE EVENT
OF AN ACCIDENT
– It is important to keep calm.
– If you are not directly involved, stop at
least a few dozen metres away from the ac-
cident.
– On motorways, stop without blocking
the emergency lane.
– Turn the engine off and the hazard warn-
ing lights on.
– At night, illuminate the place of the ac-
cident with the headlights.
– Take care, do not risk being run over.– Signal the accident placing the triangle
at regulation distance in a clearly visible
place.
– Call the emergency organisation, giving
the most accurate information possible. On
motorways use the special phones provid-
ed.
– In motorway pileups, especially with
poor visibility, the risk of being involved in
other crashes is high. Leave the car imme-
diately and go beyond the guard-rail.
– If the doors are blocked, do not try to
get out of the car breaking the windscreen
which is stratified. The windows and rear
screen are easier to break.
– Remove the ignition key of the vehi-
cles involved.– If you note a smell of fuel or other chem-
ical products, do not smoke and have ciga-
rettes stubbed out.
– To put out fires, even small ones, use
the extinguisher, blankets, sand, or earth.
Never use water.
– If use of the lighting system is not nec-
essary, disconnect the battery negative ter-
minal (–).
Page 224 of 291
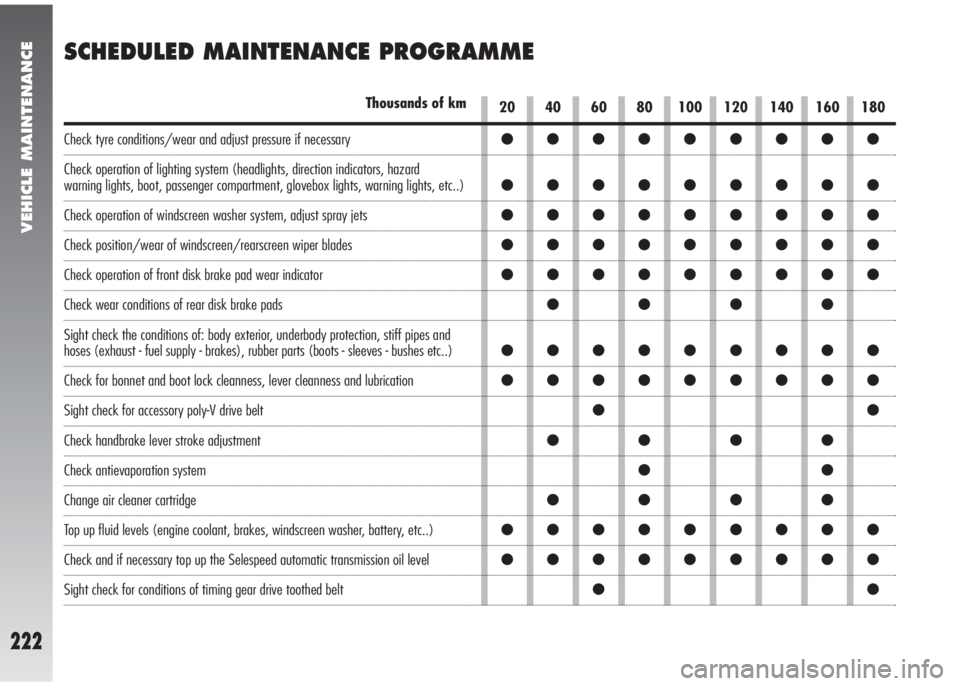
●●●●●●●●●
●●●●●●●●●
●●●●●●●●●
●●●●●●●●●
●●●●●●●●●
●●●●
●●●●●●●●●
●●●●●●●●●
●●
●●●●
●●
●●●●
●●●●●●●●●
●●●●●●●●●
●●
VEHICLE MAINTENANCE
222
SCHEDULED MAINTENANCE PROGRAMME
20 40 60 80 100 120 140 160 180Thousands of km
Check tyre conditions/wear and adjust pressure if necessary
Check operation of lighting system (headlights, direction indicators, hazard
warning lights, boot, passenger compartment, glovebox lights, warning lights, etc..)
Check operation of windscreen washer system, adjust spray jets
Check position/wear of windscreen/rearscreen wiper blades
Check operation of front disk brake pad wear indicator
Check wear conditions of rear disk brake pads
Sight check the conditions of: body exterior, underbody protection, stiff pipes and
hoses (exhaust - fuel supply - brakes), rubber parts (boots - sleeves - bushes etc..)
Check for bonnet and boot lock cleanness, lever cleanness and lubrication
Sight check for accessory poly-V drive belt
Check handbrake lever stroke adjustment
Check antievaporation system
Change air cleaner cartridge
Top up fluid levels (engine coolant, brakes, windscreen washer, battery, etc..)
Check and if necessary top up the Selespeed automatic transmission oil level
Sight check for conditions of timing gear drive toothed belt
Page 226 of 291
VEHICLE MAINTENANCE
224
ADDITIONAL
OPERATIONS
Every 1000 kmor before long journeys,
check and if necessary top up:
– engine coolant fluid level
– brake/hydraulic clutch control fluid level
– power steering fluid level
– windscreen/rearscreen and headlamp
washer fluid level
– tyre pressure and conditions.
Every 3000 kmcheck and if necessary
top up the engine oil level.
The use of products of the FL Seleniais
recommended which have been designed
and made expressly for Alfa Romeo cars
(see “Refuelling” in the “Technical Specifi-
cations” chapter).
ANNUAL INSPECTION
PROGRAMME
For cars with an annual mileage
of below 20,000 km (for example
about 10,000 km) the following
yearly inspection programme is ad-
vised:
– Check tyre conditions/wear and if nec-
essary adjust the pressure
– Check operation of lighting system
(headlights, direction indicators, hazard
warning lights, boot, passenger compart-
ment, glovebox lights, warning lights )
– Check operation of windscreen wiper
system, spray jet adjustment
– Check position/wear of windscreen/
rearscreen wiper blades
– Check front disk brake pad conditions
and wear
– Check for bonnet and boot lock clean-
ness, lever cleanness and lubrication– Sight check for conditions of: engine,
gearbox, transmission, pipes (exhaust - fu-
el supply - brakes) rubber parts (boots -
sleeves - bushes etc..), brake and fuel sup-
ply system hoses
– Check battery charge
– Sight check for conditions of various dri-
ve belts
– Check and if necessary top up fluid lev-
els (engine coolant, brakes, windscreen
washer, battery, etc...)
– Change engine oil
– Change engine oil filter
– Change pollen filter.
Page 232 of 291
VEHICLE MAINTENANCE
230
If the oil level in the reservoir is below the
specified one, top up only with one of the
products listed in the “Fluids and lubricants”
table in the “Technical Specifications” chap-
ter proceeding as follows.
– Start the engine and wait for the oil lev-
el in the reservoir to stabilise.
– With the engine running, turn the steer-
ing wheel lock to lock a few times.
– Top up to the MAXlevel notch, then
refit the cap.
Oil consumption is very
low, if topping up again is
needed shortly afterwards,
have the system checked for pos-
sible leaks by Alfa Romeo Autho-
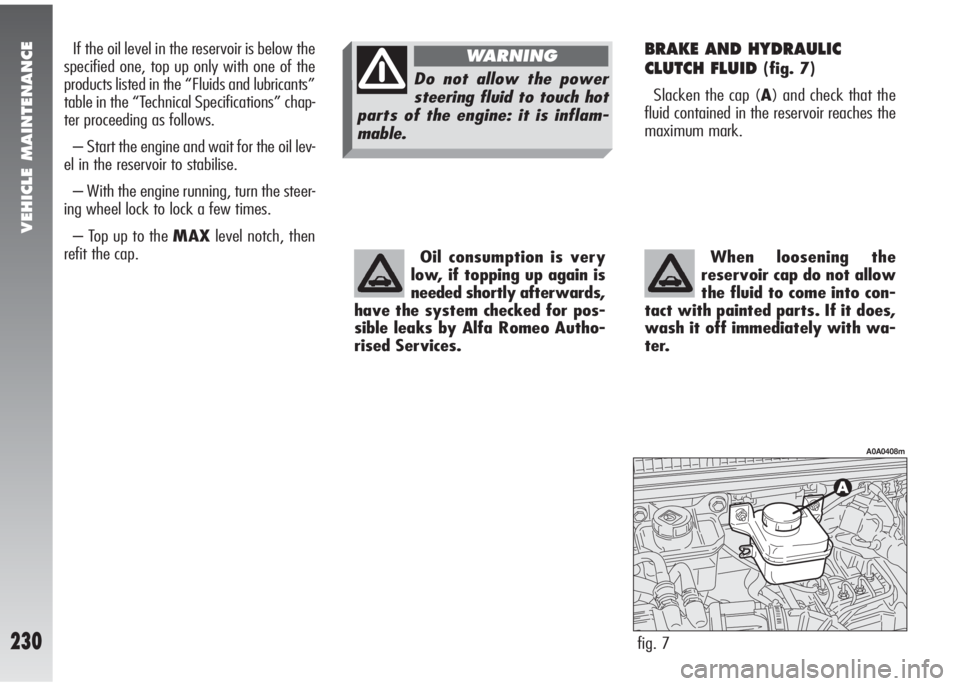
rised Services.BRAKE AND HYDRAULIC
CLUTCH FLUID
(fig. 7)
Slacken the cap (A) and check that the
fluid contained in the reservoir reaches the
maximum mark.
fig. 7
A0A0408m
When loosening the
reservoir cap do not allow
the fluid to come into con-
tact with painted parts. If it does,
wash it off immediately with wa-
ter.
Do not allow the power
steering fluid to touch hot
parts of the engine: it is inflam-
mable.
WARNING