heating Alfa Romeo 156 2006 Owner handbook (in English)
[x] Cancel search | Manufacturer: ALFA ROMEO, Model Year: 2006, Model line: 156, Model: Alfa Romeo 156 2006Pages: 357, PDF Size: 5.04 MB
Page 198 of 357
CORRECT USE OF THE CAR
196
Tyres
Tyres should be checked at least every four
4 weeks: if the pressure is too low, fuel con-
sumption increases as the resistance to the
rolling movement of the tyre is higher. In
this state, tyre wear is increased
and vehicle handling suffers which will af-
fect safety.
Unnecessary loads
Do not travel with too much luggage stowed
in the boot. The weight of the vehicle (es-
pecially when driving in town) and its trim
greatly affects consumption and stability.
Luggage/ski rack
Remove luggage or ski racks from the roof
of the vehicle as soon as they are no longer
needed. These accessories reduce the aero-
dynamic penetration of the vehicle and will
increase consumption. When transporting
particularly large objects, use a trailer where
possible.Electrical devices
Use the electric devices for the necessary
time only. The heated rear window, supple-
mentary lights, windscreen wipers, heating
system blower require large amounts of en-
ergy and, increasing the request for power
also increases fuel consumption (up to
+25% when driving in built-up areas).
Air conditioner
The air conditioner is an additional load
which greatly affects the engine leading to
higher consumption (on average up to
+20%). When the temperature outside the
vehicle permits it, use the air vents where
possible.
Spoilers
The use of aerodynamic optional extras
which are not certified for the specific use
on the vehicle, may reduce the aerodynamic
penetration of the vehicle and increase con-
sumption.
STYLE OF DRIVINGStarting
Do not warm the engine when the vehicle
is stationary or at high or low revs: in this
way the engine will warm up gradually in-
creasing consumption and emissions. You
should drive off slowly straight away avoid-
ing high revs so that the engine will warm
up more quickly.
Unnecessary actions
Avoid revving the engine when stopped at
traffic lights or before switching off the en-
gine and avoid doubling the clutch as these
actions have no purpose on modern vehicles
and serve only to increase consumption and
pollution.
Gear selection
As soon as the traffic and road conditions
allow it, shift to a higher gear. Using a lower
gear to liven up acceleration greatly in-
creases consumption. In the same way, im-
proper use of the higher gears will increase
consumption, emissions and wear and tear
on the engine.
Page 216 of 357

IN AN EMERGENCY
214
INFLATING PROCEDURE 1)Place the wheel in the position illus-
trated in the figure (A-fig. 13) for the op-
eration with the valve, then engage the
handbrake.
2)Screw the filling pipe (B-fig. 14) to
the bottle (C).
3)Unscrew the tyre valve plug, remove
the element inside the valve by using the
appropriate tool (D-fig. 15); be careful
not to place it on the sand or on a dirty sur-
face .
4)Introduce the filling pipe (B-fig. 16)
in the tyre valve, keep the bottle (C-fig.
16) with the pipe directed downwards, then
press it so that the whole sealer can get in-
to the tyre.5)Screw again the element inside the
valve with the tool (D-fig. 17).
6)Use the appropriate lever (E-fig. 18)
to insert and clamp the air compressor pipe
(F) to the tyre valve.
7)Start the engine, insert the plug (G-
fig. 19) in the lighter (or socket 12V) and
inflate the tyre according to the right pres-
sure value (see “Cold inflation pressures” in
the “Technical specification” chapter). You
are advised to check the tyre pressure val-
ue on the pressure gauge (H-fig. 18) with
the compressor off, in order to have a more
accurate reading.fig. 13
A0B0334m
fig. 14
A0B335m
IT IS NECESSARY TO KNOW
THAT:The sealer included in the quick repairing
kit, good for temperatures between –30°C
e +80°C, is not adequate for permanent
fixing.
The liquid inside the tyre can be easily re-
moved with water.
The sealer has no expire date.
Do not operate the com-
pressor for more than 20
minutes. Risk of overheating.
WARNING
Page 241 of 357
IN AN EMERGENCY
239
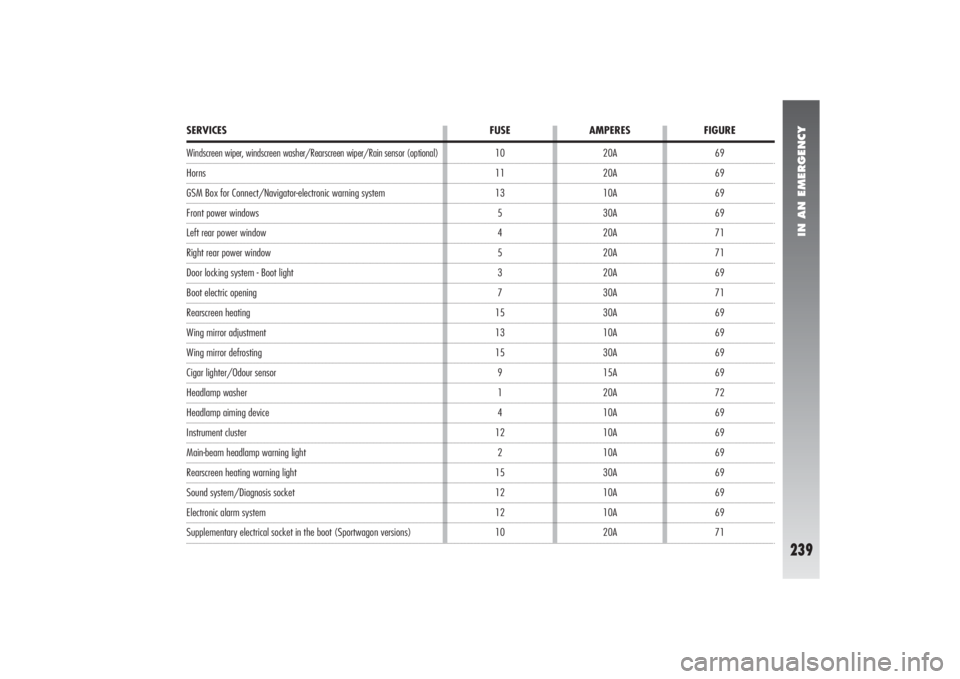
69
69
69
69
71
71
69
71
69
69
69
69
72
69
69
69
69
69
69
71 10
11
13
5
4
5
3
7
15
13
15
9
1
4
12
2
15
12
12
10
SERVICES FUSE AMPERES FIGUREWindscreen wiper, windscreen washer/Rearscreen wiper/Rain sensor (optional)HornsGSM Box for Connect/Navigator-electronic warning systemFront power windowsLeft rear power windowRight rear power windowDoor locking system - Boot lightBoot electric openingRearscreen heatingWing mirror adjustmentWing mirror defrostingCigar lighter/Odour sensorHeadlamp washerHeadlamp aiming deviceInstrument clusterMain-beam headlamp warning lightRearscreen heating warning lightSound system/Diagnosis socketElectronic alarm system Supplementary electrical socket in the boot (Sportwagon versions)20A
20A
10A
30A
20A
20A
20A
30A
30A
10A
30A
15A
20A
10A
10A
10A
30A
10A
10A
20A
Page 242 of 357
IN AN EMERGENCY
240
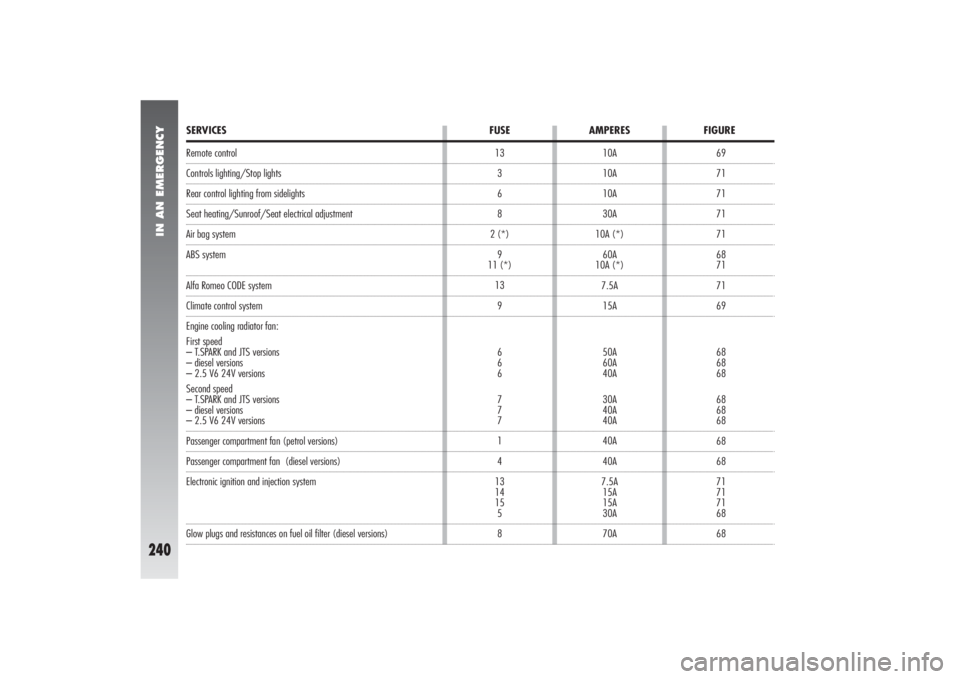
Remote controlControls lighting/Stop lightsRear control lighting from sidelightsSeat heating/Sunroof/Seat electrical adjustmentAir bag system
ABS systemAlfa Romeo CODE systemClimate control system
Engine cooling radiator fan:
First speed
– T.SPARK and JTS versions
– diesel versions
– 2.5 V6 24V versions
Second speed
– T.SPARK and JTS versions
– diesel versions– 2.5 V6 24V versionsPassenger compartment fan (petrol versions)Passenger compartment fan (diesel versions)
Electronic ignition and injection system Glow plugs and resistances on fuel oil filter (diesel versions)69
71
71
71
71
68
71
71
69
68
68
68
68
68
68
68
68
71
71
71
68
68 10A
10A
10A
30A
10A (*)
60A
10A (*)
7.5A
15A
50A
60A
40A
30A
40A
40A
40A
40A
7.5A
15A
15A
30A
70A 13
3
6
8
2 (*)
9
11 (*)
13
9
6
6
6
7
7
7
1
4
13
14
15
5
8SERVICES FUSE AMPERES FIGURE
Page 273 of 357

CAR MAINTENANCE
271
WHEELS AND TYRESTYRES PRESSURECheck the pressure of each tyre, includ-
ing the compact spare wheel, every two
weeks and before a long journey.
The pressure should be checked with the
tyre rested and cold.
It is normal for the pressure to increase
when the car is in use. If you have to check
or restore the pressure when the tyres are
hot, bear in mind that the pressure should
be +0.3 bar compare with the specified rat-
ing.
For the correct tyre inflation pressure, see
“Wheels” in the “Technical specifications”
chapter.Incorrect pressure causes abnormal tyre
wear fig. 25:
A- Normal pressure: tread evenly worn.
B- Low pressure: tread particularly worn
at the edges.
C- High pressure: tread particularly worn
in the centre.
fig. 25
A0B0235m
WARNINGS
Where possible, avoid sudden braking, tyre
squealing starts, etc.
Particularly avoid violent bumps against
kerbs, potholes or obstacles of various kinds.
Prolonged driving on rough roads may dam-
age the tyres.
Routinely check the tyres for cuts on the
sides, swellings or uneven tread wear. If nec-
essary contact Alfa Romeo Authorized Ser-
vices.
Avoid overloading the vehicle when trav-
elling: this may cause serious damage to the
wheels and tyres.
If a tyre is punctured, stop immediately
and change it to avoid damage to the tyre,
the rim, suspensions and steering system.
Tyres age even if they are not used much.
Cracks in the tread rubber are a sign of ag-
ing. In any case, if the tyres have been on
the car for over 6 years, they should be
checked by specialised personnel, to see if
they can still be used. Also remember to
check the spare wheel.
Remember that car road
holding also depends on
correct tyre inflation pressure.
WARNING
Excessively low pressure
causes overheating of the
tyre with the possibility of serious
damage to it.
WARNING
Tyres should be changed when the tread
thickness is reduced to 1.6 mm. In any case
follow local regulations.
Page 275 of 357

CAR MAINTENANCE
273
Proceed as follows:
– Raise the windscreen wiper arm and po-
sition the blade so that it forms an angle
of 90° with the arm.
– Press tab (B) of the coupling spring and
remove the blade to be replaced from the
arm (A).
– When the spring is released from the
curved top of the arm, move the blade to al-
low the arm to be withdrawn through the slot.
– Insert a new blade passing it through the
curved top of the arm (A) through the slot.
– Lift the blade to clamp tab (B) of the cou-
pling spring with the curved top of the arm.
– Lower the windscreen wiper arm.
WARNINGThe blades may differ ac-
cording to the versions. In any case, follow
the instructions provided in the packs avail-
able as spares from Alfa Romeo Authorized
Services. Changing the windscreen wiper
blade (fig. 27)
WARNINGThe blade on driver’s side
is fitted with a spoiler that improves adhe-
sion between the blade and the windscreen.
To prevent improper fitting, before changing
the blade, check the spoiler direction of the
blade to be replaced, then fit the new blade
following the same spoiler direction.
fig. 27
A0B0580m
WINDSCREEN/REAR
SCREEN WIPERSBLADESPeriodically clean the rubber part using spe-
cial products TUTELA PROFESSIONAL
SC 35is recommended.
If the rubber blades are bent or worn they
should be replaced. In any case they should
be changed once a year.
A few simple notions can reduce the pos-
sibility of damage to the blades:
– If the temperature falls below zero,
make sure that ice has not frozen the rub-
ber against the glass. If necessary, thaw us-
ing an antifreeze product.
– Remove any snow from the glass: in ad-
dition to protecting the blades, this prevents
effort on the motor and overheating.
– Do not operate the windscreen and rear
window wipers on dry glass.
Driving with worn wiper
blades is a serious hazard,
because visibility is reduced in bad
weather.
WARNING
Page 278 of 357

CAR MAINTENANCE
276
Detergents cause water
pollution. Therefore the en-
gine compartment should
be washed in areas equipped for
collecting and purifying the liquid
used in the washing process.
WARNINGThe vehicle should washed
with the engine cold and the ignition key at
STOP. After washing make sure that the
various protections (e.g. rubber caps and
various covers) have not been damaged or
removed. Do not wash the car after it has been left
in the sun or with the bonnet hot: this may
alter the shine of the paintwork.
Exterior plastic parts must be cleaned in
the same way as the rest of the vehicle.
Where possible, do not park under trees;
the resinous substance many species release
give the paint a dull appearance and in-
crease the possibility of triggering rust
processes.
WARNINGBird droppings must be
washed off immediately and thoroughly as
the acid they contain is particularly ag-
gressive.Windows
Use specific products to clean the windows.
Use clean cloths to avoid scratching or al-
tering the transparency of the glass.
WARNINGThe inside of the rearscreen
should be wiped gently with a cloth in the
direction of the filaments to avoid damag-
ing the heating device. Engine compartment
At the end of the winter the engine com-
partment should be carefully washed, with-
out directing the jet against electronic con-
trol units. Contact a specialised workshop to
have this done.
Page 331 of 357
ALPHABETICAL INDEX
329
Front light units
– bulb arrangement................... 220
Front roof light ............................ 162
– changing bulbs ...................... 230
Front seats .................................. 21
– adjustments .......................... 21
– centre armrest ....................... 22
– electric heating ..................... 22
– headrests .............................. 23
– rear pockets .......................... 23
Fuel
– consumption ......................... 322
– emergency flap opening
device ............................ 186-292
– fuel cap ............................... 186
– fuel flap................................ 137
– inertial fuel cut-off switch ........ 137
– level gauge and reserve
warning light ......................... 62
– refilling ................................ 319
– refuelling ........................ 185-292
– specifications ......................... 319
Fuel reserve ......................... 62-319
Fuel supply (technical data)........... 303
Fuel tank (capacity) .................... 319
Fuses and relays
– fuse summary table................ 238– fuses above the main fusebox.. 236
– fuses and relays accessible from
the glovebox ......................... 236
– fuses and relays in engine bay . 236
– fuses and relays in the main
fusebox ................................ 235
– generalities and cautions ........ 234
– list of protected devices .......... 238
– specific fuses for Sportwagon
versions ................................ 299
G
earshift lever ........................... 139
Getting to know your car.... 6
Glovebox light
– changing bulbs ..................... 232
Grab handles .......................... 161-292
H
andbrake lever......................... 138
Hazard lights
– switching on ......................... 135
Headlight aiming device
(corrector)................................ 138
Headlight washer ................... 52-274
Headlights
– beam adjustment .................. 138
– beam adjustment abroad ........ 177
– bulb replacement ............. 217-220– compensation for tilt............... 175
– gas discharge headlights ......... 176
Headrests
– front .................................... 23
– rear ............................... 24-279
Horn .......................................... 56
Identification data ....................... 299
Identification labels ...................... 300
Ignition device and steering lock 17-18
In an emergency.................... 205
In the event of a puncture ....... 207-294
– changing a wheel................... 209
– FIX&GO (quick tyre repair kit) . 212
– general instructions ................ 207
In the event of an accident ............ 246
– first aid kit ............................ 247
– if anybody is injured .............. 246
Inertial fuel cut-off switch .............. 137
Infocenter ................................... 64
– access to main menu screen .... 72
– control buttons ...................... 66
– date setting/time setting ........ 76
– default value reset ................. 85
– display ................................. 64
– display contrast adjustment ..... 84
Page 333 of 357
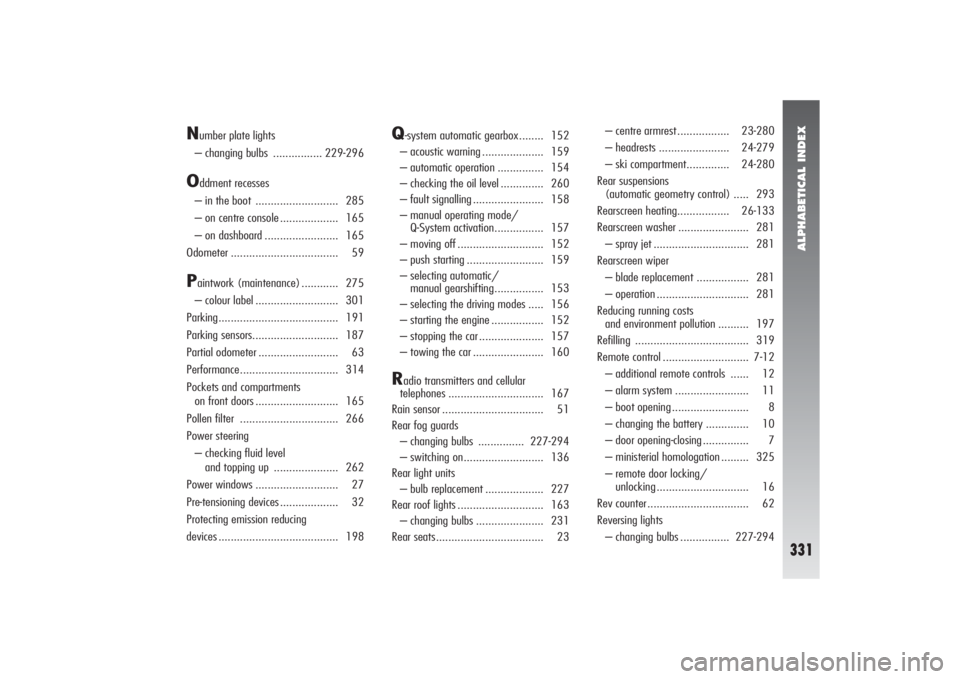
ALPHABETICAL INDEX
331
N
umber plate lights
– changing bulbs ................ 229-296
O
ddment recesses
– in the boot ........................... 285
– on centre console ................... 165
– on dashboard ........................ 165
Odometer ................................... 59
Paintwork (maintenance) ............ 275
– colour label ........................... 301
Parking....................................... 191
Parking sensors............................ 187
Partial odometer .......................... 63
Performance................................ 314
Pockets and compartments
on front doors ........................... 165
Pollen filter ................................ 266
Power steering
– checking fluid level
and topping up ..................... 262
Power windows ........................... 27
Pre-tensioning devices ................... 32
Protecting emission reducing
devices ....................................... 198
Q
-system automatic gearbox........ 152
– acoustic warning .................... 159
– automatic operation ............... 154
– checking the oil level .............. 260
– fault signalling ....................... 158
– manual operating mode/
Q-System activation................ 157
– moving off ............................ 152
– push starting ......................... 159
– selecting automatic/
manual gearshifting................ 153
– selecting the driving modes ..... 156
– starting the engine ................. 152
– stopping the car ..................... 157
– towing the car ....................... 160
R
adio transmitters and cellular
telephones ............................... 167
Rain sensor ................................. 51
Rear fog guards
– changing bulbs ............... 227-294
– switching on.......................... 136
Rear light units
– bulb replacement ................... 227
Rear roof lights ............................ 163
– changing bulbs ...................... 231
Rear seats................................... 23– centre armrest ................. 23-280
– headrests ....................... 24-279
– ski compartment.............. 24-280
Rear suspensions
(automatic geometry control) ..... 293
Rearscreen heating................. 26-133
Rearscreen washer ....................... 281
– spray jet ............................... 281
Rearscreen wiper
– blade replacement ................. 281
– operation .............................. 281
Reducing running costs
and environment pollution .......... 197
Refilling ..................................... 319
Remote control ............................ 7-12
– additional remote controls ...... 12
– alarm system ........................ 11
– boot opening ......................... 8
– changing the battery .............. 10
– door opening-closing ............... 7
– ministerial homologation ......... 325
– remote door locking/
unlocking .............................. 16
Rev counter................................. 62
Reversing lights
– changing bulbs ................ 227-294
Page 344 of 357

RIGHT HAND DRIVE VERSION
342
DASHBOARD1.Side air outlets - 2.Defrosting/demisting vents for side windows - 3.Upper side vents - 4.Passanger’s Air bag - 5.Sound system -
6.Engine coolant temperature gauge - 7.Clock - 8.Centre air vents - 9.Infocenter display - 10.Fuel level gauge - 11.Cruise control
lever (where fitted) - 12.Outside lights control lever - 13.Speedometer. - mileage recorder - 14.Check panel - 15.Rev counter -
16.Windscreen wiper control lever - 17.Bonnet opening lever - 18.Radio controls on the steering wheel (where applicable) -19.Igni-
tion switch - 20.Steering wheel lock/release lever - 21.Driver’s Air bag and horns - 22.Controls unit: instrument panel lighting adjust-
ment and healamp diming - 23.Controls for heating, ventilation and climate control - 24.Ashtray and cigar lighter - 25.Hazard warning
lights switch - 26.Glove box.fig. 1
A0B0611m