key Alfa Romeo 156 2006 Owner handbook (in English)
[x] Cancel search | Manufacturer: ALFA ROMEO, Model Year: 2006, Model line: 156, Model: Alfa Romeo 156 2006Pages: 357, PDF Size: 5.04 MB
Page 261 of 357

CAR MAINTENANCE
259
Do not add oil with dif-
ferent characteristics than
those of the oil already in
the system.Used gearbox oil contain
pollutants. Contact Alfa
Romeo Authorized Services
to have the oil changed as these
are equipped to dispose of the
waste oil respecting the environ-
ment and laws.
SELESPEED GEARBOX
HYDRAULIC SYSTEM OIL(fig. 13)
The oil level of the Selespeed system
should be carried out with the car on a lev-
el surface and with the engine stopped and
cold.
To check the level, proceed as follows:
– turn the ignition key to MAR;
– disconnect the breather tube and re-
move the cap (A) checking that the level
corresponds with the MAXmark on the dip-
stick of the actual cap;
– if the level is below the MAXmark, top
up with oil until reaching the correct level;
– after screwing the cap back on, insert
the breather tube completely on the cap
spout and turn the ignition key to STOP.fig. 13
A0B0162m
When the engine is hot,
take care when working
inside the engine compartment to
avoid burns. Remember that when
the engine is hot, the fan may cut
in: danger of injury.
WARNING
Page 265 of 357

CAR MAINTENANCE
263
WARNINGBrake and hydraulic clutch
fluid is hygroscopic (i.e. it absorbs moisture).
For this reason, if the car is mainly used in
areas with a high degree of atmospheric hu-
midity, the fluid should be replaced at more
frequent intervals than specified in the
Scheduled Maintenance Programme.
BRAKE AND HYDRAULIC
CLUTCH FLUID
(fig. 20)
From time to time check the instrument
panel warning light x
by pressing cover
(B) of the reservoir (A) (with the ignition
key at MAR) instrument panel warning
light should come on.
fig. 20
A0B0157m
When loosening the reser-
voir cap do not allow the
fluid to come into contact
with painted parts. If it does, wash
it off immediately with water.
Brake and clutch fluid is
poisonous and highly cor-
rosive. In the event of accidental
contact, wash the parts involved
immediately with neutral soap and
water, then rinse thoroughly. See
a doctor at once if the fluid is swal-
lowed.
WARNING
Symbol
π
on the contain-
er indicates synthetic type
brake fluid distinguishing it from
the mineral kind. Using mineral
type fluids damages the special
rubber braking system gaskets be-
yond repair.
WARNING
Page 270 of 357
CAR MAINTENANCE
268
WARNINGA battery kept at below
50% of its capacity is damaged by sulpha-
tion, the capacity is reduced and starting
is difficult, there is also more possibility of
freezing (this can occur at –10°C). In the
event of a prolonged stop, refer to “Vehi-
cle inactivity”, in the chapter “Getting the
best out of your car”. – Connect the charger cables to the bat-
tery terminals ensuring that the bias is cor-
rect.
– Turn on the charger.
– After charging turn off the charger be-
fore disconnecting it from the battery.
– Reconnect the battery negative termi-
nal (–).
WARNINGIf the car is fitted with an
alarm system, turn off the alarm with the
remote control and deactivate the system
turning the emergency key to “OFF” (see
“Electronic alarm” in “Getting to know your
car” chapter).
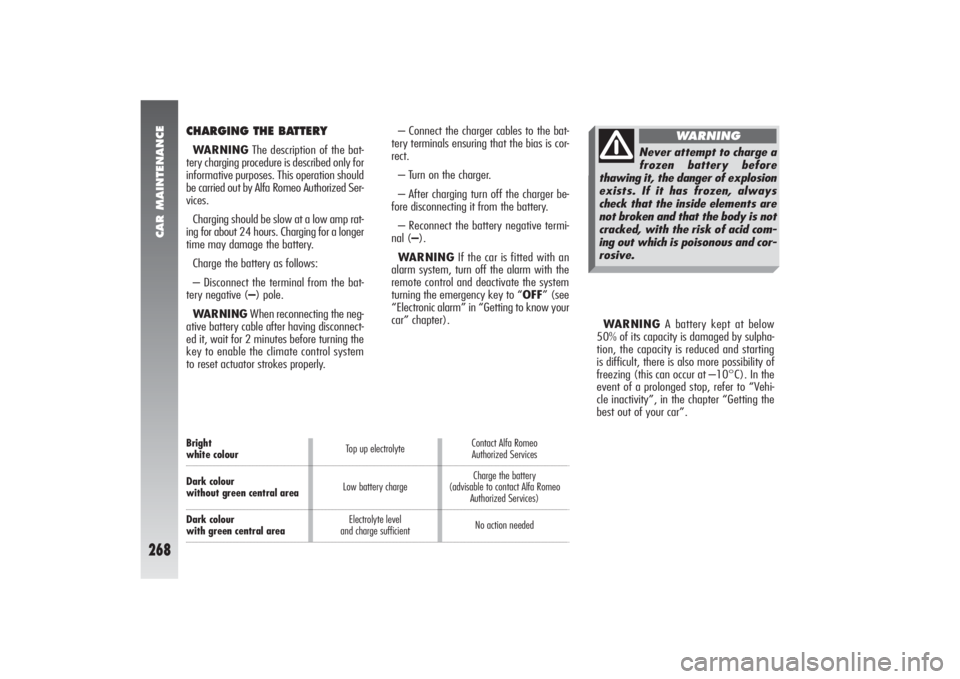
Bright white colour
Dark colour without green central area
Dark colour with green central areaTop up electrolyte
Low battery charge
Electrolyte level
and charge sufficientContact Alfa Romeo
Authorized Services
Charge the battery
(advisable to contact Alfa Romeo
Authorized Services)
No action neededCHARGING THE BATTERYWARNINGThe description of the bat-
tery charging procedure is described only for
informative purposes. This operation should
be carried out by Alfa Romeo Authorized Ser-
vices.
Charging should be slow at a low amp rat-
ing for about 24 hours. Charging for a longer
time may damage the battery.
Charge the battery as follows:
– Disconnect the terminal from the bat-
tery negative (–) pole.
WARNINGWhen reconnecting the neg-
ative battery cable after having disconnect-
ed it, wait for 2 minutes before turning the
key to enable the climate control system
to reset actuator strokes properly.
Never attempt to charge a
frozen battery before
thawing it, the danger of explosion
exists. If it has frozen, always
check that the inside elements are
not broken and that the body is not
cracked, with the risk of acid com-
ing out which is poisonous and cor-
rosive.
WARNING
Page 271 of 357
CAR MAINTENANCE
269
USEFUL HINTS TO EXTEND
THE LIFE OF YOUR BATTERYTo avoid quickly draining the battery and
to preserve its operating conditions over the
course of time, carefully follow the instruc-
tions below:
– The terminals must always be tightened.
– As far as possible, avoid keeping ser-
vices on for a long time with the engine
stopped (radio, hazard lights, parking lights,
etc.).
– When leaving the car parked in a
garage, make sure that the doors, bonnet,
boot and interior lids are properly shut to
prevent lights from staying on.
– Before doing any work on the electric
system, disconnect the battery negative ter-
minal.– If after purchasing the car, you wish to
install electrical accessories which need a
permanent electrical supply (alarm, hands-
free phone, radio-navigator with satellite an-
ti-theft function, etc.) contact Alfa Romeo
Authorized Services whose qualified per-
sonnel, in addition to suggesting the most
suitable devices from Lineaccessori Alfa
Romeo will be able to evaluate the total
electrical absorption, checking whether the
car’s electric system is able to support the
load required or whether a battery with high-
er capacity is necessary. In fact, these de-
vices continue to absorb current with the
ignition key off (car parked, engine off) and
may gradually drain the battery.
REPLACING THE BATTERYIf required, replace the battery with a gen-
uine spare part having the same specifica-
tions. If a battery with different specifica-
tions is fitted, the service intervals given in
the Programmed Maintenance Schedule in
this section will no longer be valid. Refer
to the instructions provided by the battery
manufacturer.
Page 272 of 357
CAR MAINTENANCE
270
– Do not check for current in the cables by
short-circuiting the ends.
– If electrical welding is to be carried out
on the body of the car, the electronic con-
trol units must be disconnected or removed
if the work involves the production of high
temperatures.
You are also reminded that services with
high current absorption activated by the user,
such as bottle warmers, vacuum cleaners,
cellular telephone, mini refrigerator, etc. ac-
celerate the battery drainage process if they
are powered with the engine not run-
ningor running at idle speed.
WARNINGIt should also be noted that
improper branches on connectors of the elec-
tric wiring for installing additional equipment
is dangerous, particularly if safety devices
are involved.
ELECTRONIC CONTROL
UNITSWith normal use of the car, no particular
precautions need to be taken.
In the event of work on the electric system
or emergency starting, the instructions giv-
en below must absolutely be adhered to:
– Always switch off the engine before dis-
connecting the battery from the electric sys-
tem.
– If it is necessary to charge the battery,
always disconnect it from the electric sys-
tem.
– When starting in an emergency, only
use an auxiliary battery and not a battery
charger.
– Check that the bias is correct and that
the connections between the battery and
the electric system are in efficient conditions.
– Do not connect or disconnect the ter-
minals of the electronic units while the ig-
nition key is at MAR.
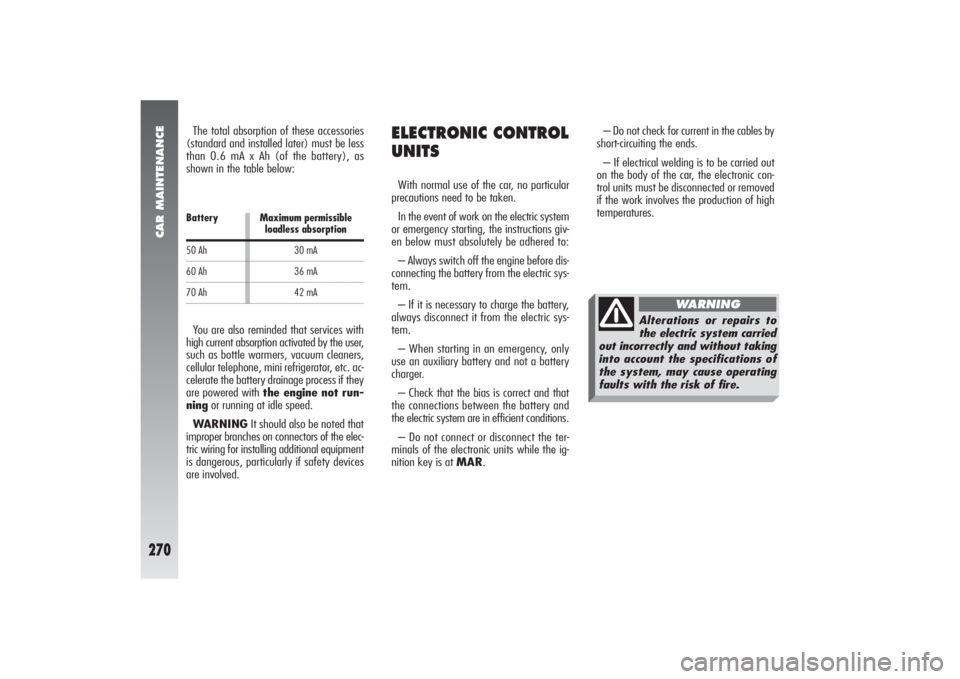
Battery50 Ah60 Ah70 AhMaximum permissible
loadless absorption
30 mA
36 mA
42 mAThe total absorption of these accessories
(standard and installed later) must be less
than 0.6 mA x Ah (of the battery), as
shown in the table below:
Alterations or repairs to
the electric system carried
out incorrectly and without taking
into account the specifications of
the system, may cause operating
faults with the risk of fire.
WARNING
Page 278 of 357

CAR MAINTENANCE
276
Detergents cause water
pollution. Therefore the en-
gine compartment should
be washed in areas equipped for
collecting and purifying the liquid
used in the washing process.
WARNINGThe vehicle should washed
with the engine cold and the ignition key at
STOP. After washing make sure that the
various protections (e.g. rubber caps and
various covers) have not been damaged or
removed. Do not wash the car after it has been left
in the sun or with the bonnet hot: this may
alter the shine of the paintwork.
Exterior plastic parts must be cleaned in
the same way as the rest of the vehicle.
Where possible, do not park under trees;
the resinous substance many species release
give the paint a dull appearance and in-
crease the possibility of triggering rust
processes.
WARNINGBird droppings must be
washed off immediately and thoroughly as
the acid they contain is particularly ag-
gressive.Windows
Use specific products to clean the windows.
Use clean cloths to avoid scratching or al-
tering the transparency of the glass.
WARNINGThe inside of the rearscreen
should be wiped gently with a cloth in the
direction of the filaments to avoid damag-
ing the heating device. Engine compartment
At the end of the winter the engine com-
partment should be carefully washed, with-
out directing the jet against electronic con-
trol units. Contact a specialised workshop to
have this done.
Page 281 of 357

ALFA 156 SPORTWAGON
279
CHILD SAFETY DEVICE
(fig. 4)
The rear doors are fitted with a locking de-
vice (A) which prevents them from being
opened from inside.
WARNINGEach device only acts on the
door on which it is installed.
The device can only be engaged with the
doors open raising or lowering the control
with the ignition key.
Position 1(control up) = Device engaged.
Position 2(control down) = Device re-
leased.
WARNINGAlso follow the instructions
given in the chapter “getting to know your
car” under the paragraph “Child safety de-
vice”.The third headrest (centre) is not remov-
able, whereas the side headrests may be re-
moved as follows:
– Raise the headrests about 2 cm.
– Press the buttons (Aand B-fig. 5) at
the same time and remove the headrests.
– To refit the headrests keep the buttons
pressed (Aand B-fig. 5) and insert them
completely.
fig. 6
A0B0095m
SEATSREAR SEATHeadrest
The car is fitted with two headrests for the
side seats (fig. 5). On request for ver-
sions/markets where applicable, the car
may also be fitted with a third headrest for
the central seat (fig. 6).
To pull out the third headrest, push it up-
wards until hearing the stopping click.
fig. 4
A0B0080m
fig. 5
A0B0094m
Page 283 of 357

ALFA 156 SPORTWAGON
281
CHANGING THE BLADE(fig. 11)
The rearscreen wiper blade should be re-
placed together with the arm.
To replace:
– mark the position of the blade in rela-
tion to the rearscreen.
– Raise the lid (A), slacken the nut (B)
and remove the arm (C).
– Correctly posiiton the new arm and firm-
ly tighten the fastening nut.
– Lower the lid.fig. 11
A0B0082m
REARSCREEN WIPER –
REARSCREEN WASHEROPERATION
(fig. 10)
This is only possible with the ignition key
at MAR.
To operate the rearscreen wiper turn the
knob (A) to position
(
. The rearscreen
wiper works intermittently.
Pushing the lever (B) forwards the
rearscreen washer jet comes into operation
which is disengaged when the lever is re-
leased.
With the rearscreen washer, the wiper
comes into operation automatically for a few
seconds.
fig. 10
A0B0081m
fig. 12
A0B0083m
SPRAY JET
(fig. 12)
If the jet does not spray, check that there
is fluid in the windscreen washer reservoir:
see the corresponding paragraph in the chap-
ter “Car maintenance”. Then check that the
holes on the jet (A) are not clogged and
free them using a pin, if necessary.
Page 284 of 357
ALFA 156 SPORTWAGON
282
LUGGAGE
COMPARTMENTThe boot lid can be opened from outside
the vehicle (pressing the button on the key)
and from inside the vehicle.
WARNINGIf the tailgate is not shut
properly, this will be shown by the corre-
sponding warning light
´
and warning mes-
sage on the Infocenter display.
OPENING FROM INSIDE (fig. 13)
To open the tailgate from inside the pas-
senger compartment pull the lever (A) at
the side of the driver’s seat.fig. 13
A0B0042m
Lifting the tailgate is facilitated by the ac-
tion of the gas springs.
The gas springs are cali-
brated to ensure correct
lifting of the tailgate with
the weights foreseen by the man-
ufacturer. The addition of objects
(spoiler, etc.) may adversely affect
correct operation and safety in use
of the tailgate.
OPENING WITH REMOTE
CONTROL
(fig. 14)
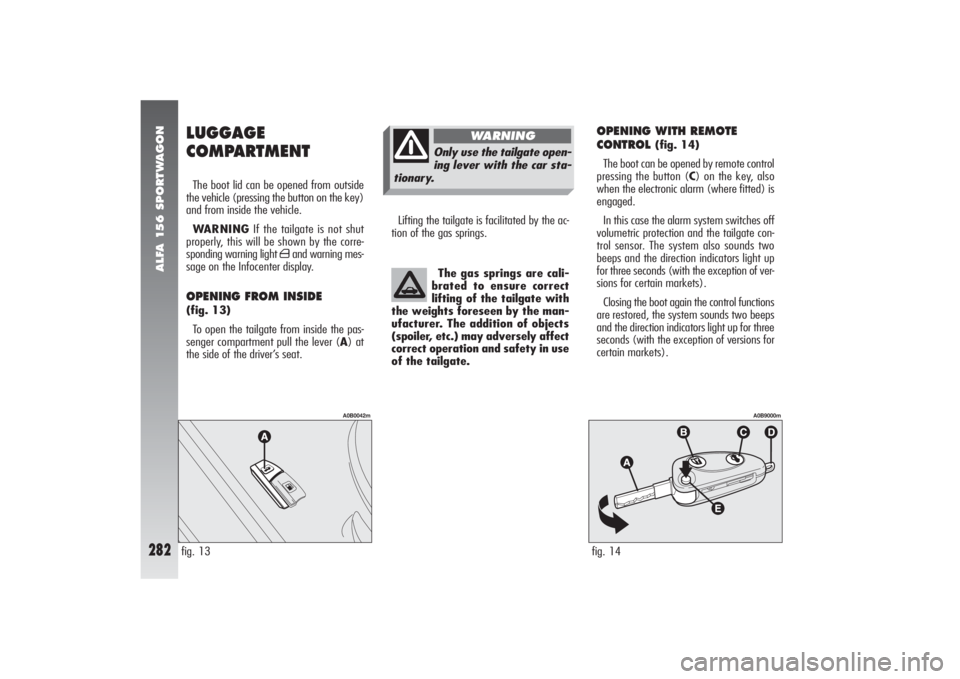
The boot can be opened by remote control
pressing the button (C) on the key, also
when the electronic alarm (where fitted) is
engaged.
In this case the alarm system switches off
volumetric protection and the tailgate con-
trol sensor. The system also sounds two
beeps and the direction indicators light up
for three seconds (with the exception of ver-
sions for certain markets).
Closing the boot again the control functions
are restored, the system sounds two beeps
and the direction indicators light up for three
seconds (with the exception of versions for
certain markets).
fig. 14
A0B9000m
Only use the tailgate open-
ing lever with the car sta-
tionary.
WARNING
Page 329 of 357
ALPHABETICAL INDEX
327
Bulbs
– general instructions ............... 218
– replacement .......................... 217
– types of bulbs ................. 218-219Car lifting
– with arm hoist ....................... 245
– with jack .............................. 245
– with workshop hoist .............. 245
Car maintenance..................... 248
Carrying children safely ................ 35
Catalytic converter ....................... 188
Ceiling lights................................ 162
– centre rear roof lamp .............. 163
– courtesy light......................... 163
– front roof light ....................... 162
– rear roof light ........................ 163
Centre rear roof lamp.................... 163
– bulb replacement ................... 231
Changing battery of key
with remote control ................... 10
Changing bulbs
– general instructions ............... 218
– replacement .......................... 217
– types of bulbs ................. 218-219
Changing wheels.......................... 209
– general instructions ................ 207Charging the battery .............. 242-268
Checking levels ............................ 254
– brake and clutch fluid ............. 263
– engine coolant....................... 261
– engine oil ............................. 257
– power steering oil .................. 261
– Q-system automatic
gearbox oil............................ 260
– Selespeed gearbox oil ............ 259
– windscreen/rearscreen/
headlamp washing fluid .......... 264
Child safety device .............. 19-35-279
Children (carrying safely) ............. 35
– child’s seats .................... 35-38
– presetting for installing the
Isofix type child restraint system 39
Cigar lighter ............................... 164
Cleaning and maintenance
– car exterior ........................... 274
– car interior ............................ 277
– engine compartment ............. 276
– fabric seats .......................... 277
– leather seats ........................ 277
– plastic parts........................... 277
– windows ............................... 276
Climate control system.................. 108
– air vents................... 108-109-110– controls ................................ 118
Climate control system, automatic
two-zone ................................. 114
Clock .......................... 57-58-59-60-61
Clutch
– checking fluid level
and topping up ...................... 263
CO
2emissions ............................. 324
CODE card................................... 7
Compact spare wheel ................... 294
– technical data ........................ 312
Controls ...................................... 135
Correct use of the car............ 189
Courtesy light .............................. 163
– bulb replacement ................... 232
Cruise control
(constant speed adjustment) ...... 53
Current socket (boot) ................... 285
D
ashboard ................ 57-58-59-60-61
– brighting adjustment............... 63
Dashboard lighting dimming .......... 136
Demisting-defrosting
– door mirrors .................... 25-133
– rearscreen....................... 26-133
– windscreen and front
side windows ........................ 132