buttons Alfa Romeo 159 2006 Owner handbook (in English)
[x] Cancel search | Manufacturer: ALFA ROMEO, Model Year: 2006, Model line: 159, Model: Alfa Romeo 159 2006Pages: 299, PDF Size: 4.64 MB
Page 36 of 299

34
SAFETY
DEVICES
WARNING LIGHTS
AND MESSAGES
IN AN
EMERGENCY
CAR
MAINTENANCE
TECHNICAL
SPECIFICATIONS
INDEX
DASHBOARD
AND
CONTROLS
CORRECT USE
OF THE CAR
Automatic headlight daylight
sensor (where provided)
(Light Sens.)
With this function it is possible to adjust
the light sensor sensitivity according to
3 levels.
To adjust the volume proceed as follows:
❒briefly press button MENU: the pre-
viously set level will flash on the dis-
play;
❒press button +or–to select the re-
quired volume;
❒briefly press buttonMENUto go
back to the menu screen or press the
button for long to go back to the stan-
dard screen.
Reset Trip B
This function enables to select Trip B re-
set mode (Automatic or Manual).
For further information see paragraph
“Trip computer”. Speed limit
With this function it is possible to set the
car speed limit (km/h or mph) which,
if exceeded, automatically sounds a
buzzer and displays a special message
(see section “Warning lights and mes-
sages”) to alert the driver.
To set the speed limit, proceed as fol-
lows:
❒briefly press button MENU: the dis-
play will show OFF;
❒press button +: the display will show
ON;
❒briefly press button MENUthen, use
buttons+/–to set the required
speed (during setting the value will
flash).
❒briefly press button MENUto go
back to the menu screen or press the
button for long to go back to the stan-
dard screen.IMPORTANTThe possible setting is
between 30 and 250 km/h (or be-
tween 20 and 150 mph) depending on
the unit set previously (see paragraph
“Units” described later). Every press
(pulse) of the button +/–increases or
decreases the value by 5 units. Keeping
the button +/–pressed obtains auto-
matic fast increase or decrease. When
you are near the required setting com-
plete adjustment with single presses.
To abort the setting:
❒briefly press button MENU: the dis-
play will show ON;
❒press button –: the display will show
OFF;
❒briefly press button MENUto go
back to the menu screen or press the
button for long to go back to the stan-
dard screen.
Page 41 of 299
39
SAFETY
DEVICES
WARNING LIGHTS
AND MESSAGES
IN AN
EMERGENCY
CAR
MAINTENANCE
TECHNICAL
SPECIFICATIONS
INDEX
DASHBOARD
AND
CONTROLS
CORRECT USE
OF THE CAR
Selecting the language
(Language)
Display messages can be shown in the
following languages: Italian, English,
German, Portuguese, Spanish, French,
Dutch and Brazilian.
To set the required language proceed as
follows:
❒briefly press button MENU, the pre-
viously set “language” will show on
the display;
❒press button +or–to select the re-
quired language;
❒briefly press button MENUto go
back to the menu screen or press the
button for long to go back to the stan-
dard screen.Adjusting the button volume
(Keys Vol.)
With this function the volume of the
roger-beep accompanying the activation
of certain buttons can be adjusted ac-
cording to 8 levels.
To adjust the volume proceed as follows:
❒briefly press button MENU, the pre-
viously set “level” will show on the
display;
❒press button +or–to select the re-
quired volume;
❒briefly press button MENUto go
back to the menu screen or press the
button for long to go back to the stan-
dard screen. Adjusting the failure/warning
buzzer volume (Beep Vol.)
With this function the volume of the
buzzer accompanying any failure/warn-
ing indication can be adjusted according
to 8 levels.
To adjust the volume proceed as follows:
❒briefly press button MENU, the pre-
viously set “level” will show on the
display;
❒press button +or–to select the re-
quired volume;
❒briefly press button MENUto go
back to the menu screen or press the
button for long to go back to the stan-
dard screen.
Page 45 of 299
43
SAFETY
DEVICES
WARNING LIGHTS
AND MESSAGES
IN AN
EMERGENCY
CAR
MAINTENANCE
TECHNICAL
SPECIFICATIONS
INDEX
DASHBOARD
AND
CONTROLS
CORRECT USE
OF THE CARTRIP BUTTON
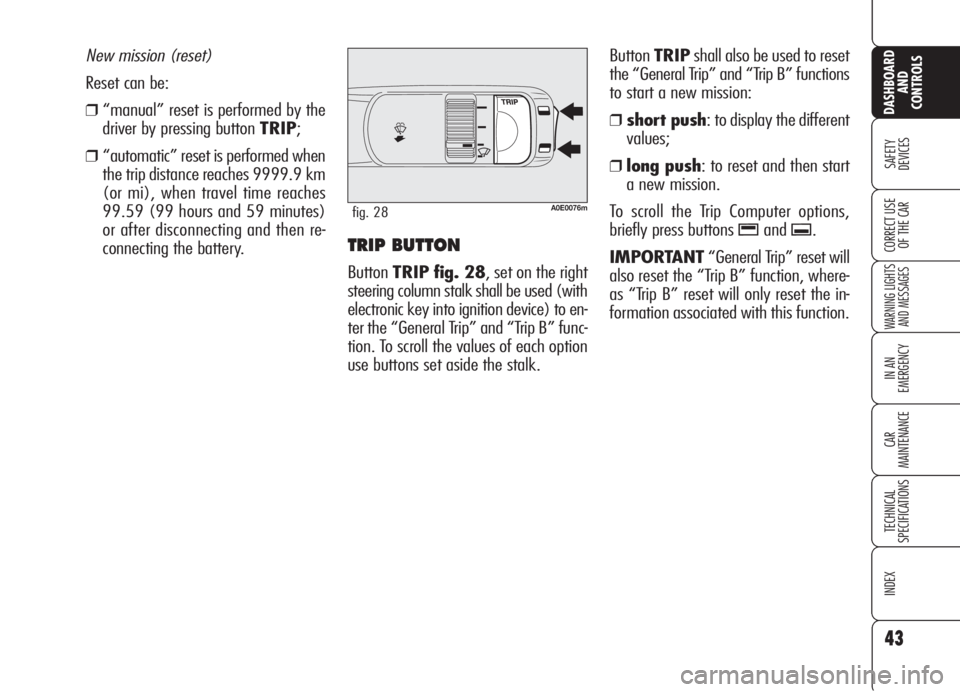
ButtonTRIP fig. 28, set on the right
steering column stalk shall be used (with
electronic key into ignition device) to en-
ter the “General Trip” and “Trip B” func-
tion. To scroll the values of each option
use buttons set aside the stalk.ButtonTRIPshall also be used to reset
the “General Trip” and “Trip B” functions
to start a new mission:
❒short push: to display the different
values;
❒long push: to reset and then start
a new mission.
To scroll the Trip Computer options,
briefly press buttons
-and..
IMPORTANT“General Trip” reset will
also reset the “Trip B” function, where-
as “Trip B” reset will only reset the in-
formation associated with this function. New mission (reset)
Reset can be:
❒“manual” reset is performed by the
driver by pressing button TRIP;
❒“automatic” reset is performed when
the trip distance reaches 9999.9 km
(or mi), when travel time reaches
99.59 (99 hours and 59 minutes)
or after disconnecting and then re-
connecting the battery.
A0E0076mfig. 28
Page 49 of 299
47
SAFETY
DEVICES
WARNING
LIGHTS AND
MESSAGES
IN AN
EMERGENCY
CAR
MAINTENANCE
TECHNICAL
SPECIFICATIONS
INDEX
CORRECT USE
OF THE CAR
DASHBOARD
AND
CONTROLS
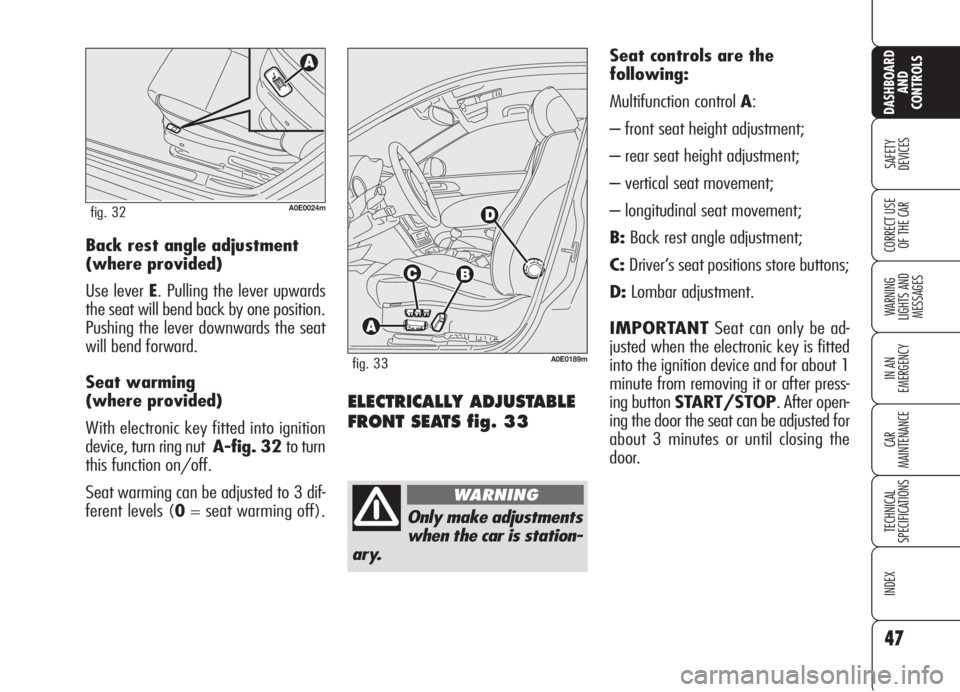
ELECTRICALLY ADJUSTABLE
FRONT SEATS fig. 33
Seat controls are the
following:
Multifunction control A:
– front seat height adjustment;
– rear seat height adjustment;
– vertical seat movement;
– longitudinal seat movement;
B:Back rest angle adjustment;
C:Driver’s seat positions store buttons;
D:Lombar adjustment.
IMPORTANTSeat can only be ad-
justed when the electronic key is fitted
into the ignition device and for about 1
minute from removing it or after press-
ing button START/STOP. After open-
ing the door the seat can be adjusted for
about 3 minutes or until closing the
door. Back rest angle adjustment
(where provided)
Use lever E. Pulling the lever upwards
the seat will bend back by one position.
Pushing the lever downwards the seat
will bend forward.
Seat warming
(where provided)
With electronic key fitted into ignition
device, turn ring nut A-fig. 32 to turn
this function on/off.
Seat warming can be adjusted to 3 dif-
ferent levels (0= seat warming off).
A0E0024mfig. 32
Only make adjustments
when the car is station-
ary.
WARNING
A0E0189mfig. 33
Page 50 of 299
48
SAFETY
DEVICES
WARNING
LIGHTS AND
MESSAGES
IN AN
EMERGENCY
CAR
MAINTENANCE
TECHNICAL
SPECIFICATIONS
INDEX
CORRECT USE
OF THE CAR
DASHBOARD
AND
CONTROLS
HEAD RESTRAINTS
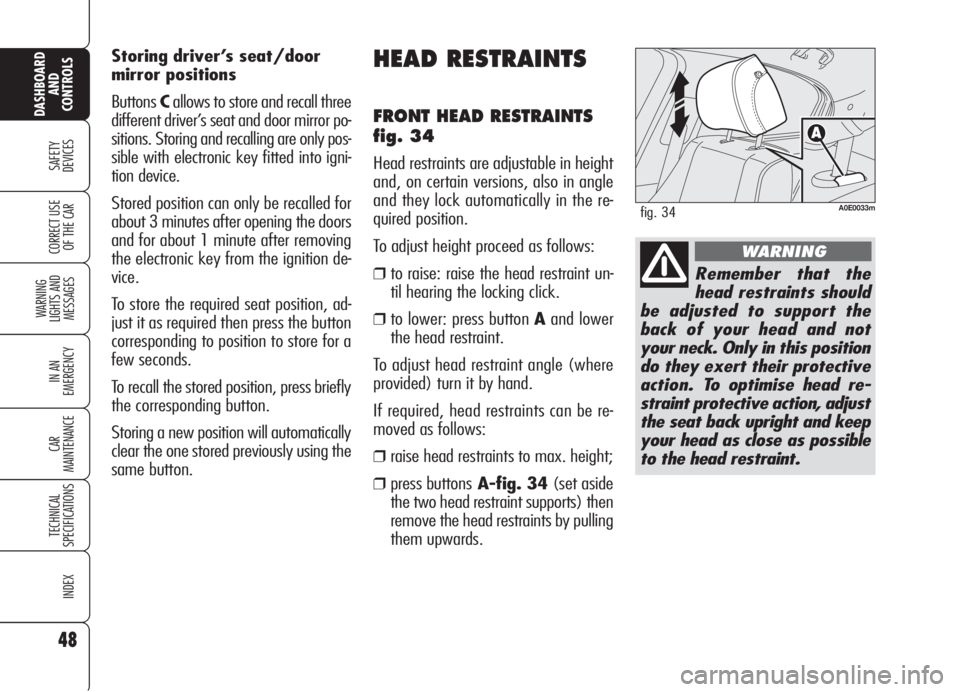
FRONT HEAD RESTRAINTS
fig. 34
Head restraints are adjustable in height
and, on certain versions, also in angle
and they lock automatically in the re-
quired position.
To adjust height proceed as follows:
❒to raise: raise the head restraint un-
til hearing the locking click.
❒to lower: press button Aand lower
the head restraint.
To adjust head restraint angle (where
provided) turn it by hand.
If required, head restraints can be re-
moved as follows:
❒raise head restraints to max. height;
❒press buttonsA-fig. 34(set aside
the two head restraint supports) then
remove the head restraints by pulling
them upwards. Storing driver’s seat/door
mirror positions
ButtonsCallows to store and recall three
different driver’s seat and door mirror po-
sitions. Storing and recalling are only pos-
sible with electronic key fitted into igni-
tion device.
Stored position can only be recalled for
about 3 minutes after opening the doors
and for about 1 minute after removing
the electronic key from the ignition de-
vice.
To store the required seat position, ad-
just it as required then press the button
corresponding to position to store for a
few seconds.
To recall the stored position, press briefly
the corresponding button.
Storing a new position will automatically
clear the one stored previously using the
same button.
A0E0033mfig. 34
Remember that the
head restraints should
be adjusted to support the
back of your head and not
your neck. Only in this position
do they exert their protective
action. To optimise head re-
straint protective action, adjust
the seat back upright and keep
your head as close as possible
to the head restraint.
WARNING
Page 51 of 299
49
SAFETY
DEVICES
WARNING
LIGHTS AND
MESSAGES
IN AN
EMERGENCY
CAR
MAINTENANCE
TECHNICAL
SPECIFICATIONS
INDEX
CORRECT USE
OF THE CAR
DASHBOARD
AND
CONTROLS
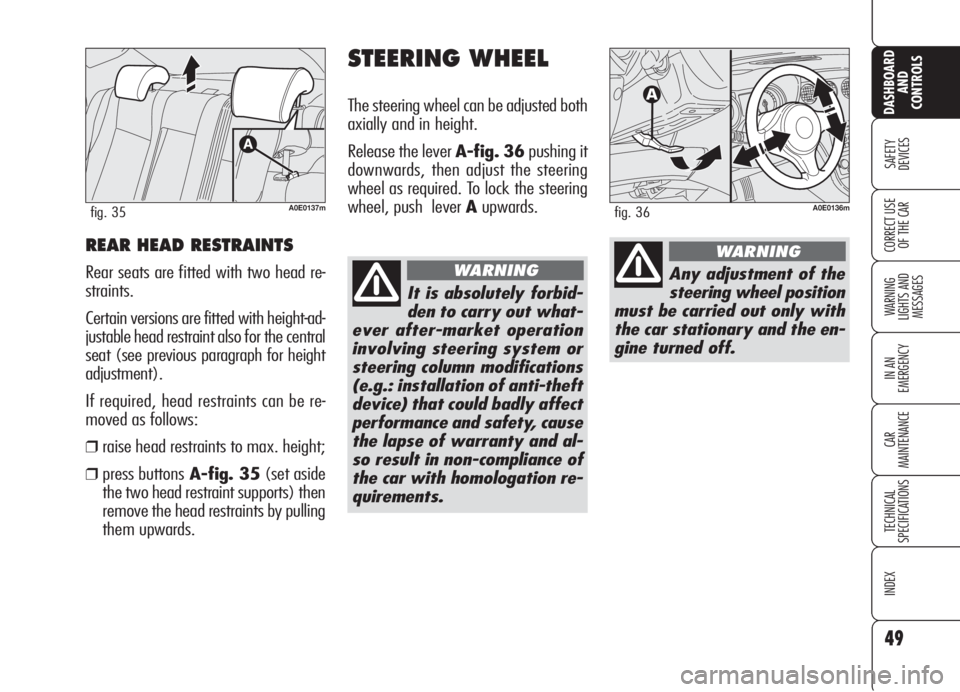
REAR HEAD RESTRAINTS
Rear seats are fitted with two head re-
straints.
Certain versions are fitted with height-ad-
justable head restraint also for the central
seat (see previous paragraph for height
adjustment).
If required, head restraints can be re-
moved as follows:
❒raise head restraints to max. height;
❒press buttonsA-fig. 35(set aside
the two head restraint supports) then
remove the head restraints by pulling
them upwards.
STEERING WHEEL
The steering wheel can be adjusted both
axially and in height.
Release the lever A-fig. 36pushing it
downwards, then adjust the steering
wheel as required. To lock the steering
wheel, push lever Aupwards.
A0E0137mfig. 35
It is absolutely forbid-
den to carry out what-
ever after-market operation
involving steering system or
steering column modifications
(e.g.: installation of anti-theft
device) that could badly affect
performance and safety, cause
the lapse of warranty and al-
so result in non-compliance of
the car with homologation re-
quirements.
WARNING
A0E0136mfig. 36
Any adjustment of the
steering wheel position
must be carried out only with
the car stationary and the en-
gine turned off.
WARNING
Page 54 of 299

52
SAFETY
DEVICES
WARNING
LIGHTS AND
MESSAGES
IN AN
EMERGENCY
CAR
MAINTENANCE
TECHNICAL
SPECIFICATIONS
INDEX
CORRECT USE
OF THE CAR
DASHBOARD
AND
CONTROLS
Storing the “parking”
position of the door mirror
on the passenger side
On versions equipped with electric seats,
when engaging reverse for parking to
improve visibility the driver can adjust
(and store) the passenger's door mirror
to a position different than that used
commonly. To store mirror position pro-
ceed as follows:
❒To perform storing, proceed as fol-
lows: engage reverse with car
stopped and electronic key fitted in-
to the ignition device;
❒move device A-fig. 39to position
2(passenger door mirror selection);
❒adjust the passenger door mirror to
obtain the best position for parking
manoeuvres;
❒keep one of the buttons C-fig. 33
pressed for at least 3 seconds (see
paragraph “Seats” in this section).
Together with the passenger door mir-
ror “parking” position, also the driver
seat position and the driver door mirror
will be stored. The sound of a buzzer
will confirm that the mirror position has
been stored.Recalling the passenger door
mirror “parking” position
Proceed as follows: fit the electronic key
into the ignition device, engage reverse,
move device A-fig. 39to position 2
(passenger door mirror selection).
The mirror will set automatically to the
previously stored position.
If no parking position has been stored,
when engaging reverse the passenger
door mirror will slightly lower to favour
the parking manoeuvre.
The passenger door mirror will return au-
tomatically to its original position about
10 seconds after disengaging reverse,
immediately after exceeding 10 km/h
with forward gear or when moving de-
viceA-fig. 39to0.Automatic door mirror
realignment
Each time the electronic key is fitted in-
to the ignition device the door mirrors
return automatically to the last position
reached and/or recalled before remov-
ing the electronic key from the ignition
device.
This enables mirror alignment if, when
the car is parked, one of the door mir-
rors has been moved manually and/or
accidentally.
Defrosting/demisting
The electric mirrors are fitted with heat-
ing coils which come into operation
when turning on the heated rear win-
dow (pressing button
().
IMPORTANTThis function is timed
and is deactivated after a few minutes.
Page 59 of 299
57
SAFETY
DEVICES
WARNING
LIGHTS AND
MESSAGES
IN AN
EMERGENCY
CAR
MAINTENANCE
TECHNICAL
SPECIFICATIONS
INDEX
CORRECT USE
OF THE CAR
DASHBOARD
AND
CONTROLS
CLIMATE CONTROL
(fast cooling)
Proceed as follows:
❒turn knob Acompletely leftwards;
❒turn knob Cto top speed;
❒turn knob BtoO;
❒press buttons √andv(buttons
leds on).
How to keep the required
cooling
Proceed as follows:
❒turn air recirculation off (if on).
❒turn knob Ato the required temper-
ature;
❒turn the knurled ring Cto the required
fan speed.
LOOKING AFTER THE
SYSTEM
During the winter, the climate control
system
√must be turned on at least
once a month for about ten minutes.
Before summer, have the system
checked at Alfa Romeo Authorized Ser-
vices.
RECIRCULATION
To turn this function on press button
v: the button led will turn on.
This function is particularly useful when
the outside air is heavily polluted (in a
traffic jam, tunnel, etc.) However, it is
better not to use it for long periods, es-
pecially if there are several people in the
car to prevent window misting up.
Do not use the air recirculation function
on rainy/cold days as it would consid-
erably increase the possibility of the win-
dows misting inside.
IMPORTANTThe inside air recircula-
tion system makes it possible to reach
the required (“heating” or “cooling”)
conditions faster.After connecting/dis-
connecting the battery,
wait for 3 minutes at
least before fitting the electronic
key into the ignition device in
order to allow the climate con-
trol system control unit to reset
the positions of the electric ac-
tuators that adjust air temper-
ature and distribution.
Page 60 of 299
58
SAFETY
DEVICES
WARNING
LIGHTS AND
MESSAGES
IN AN
EMERGENCY
CAR
MAINTENANCE
TECHNICAL
SPECIFICATIONS
INDEX
CORRECT USE
OF THE CAR
DASHBOARD
AND
CONTROLS
To guarantee perfect
and regular sensor op-
eration do not apply
stickers in the “monitoring”
area between sensor and wind-
screen. Keep windscreen and
sensor clean and avoid to accu-
mulate dust or other sub-
stances.
AUTOMATIC TWO-/
THREE-ZONE
CLIMATE CONTROL
SYSTEM
(where provided)
DESCRIPTION
The car is fitted with a two-/three-zone
climate control system which makes it
possible to separately adjust the air tem-
perature in the two/three passenger’s
compartment areas to reach the required
comfort.
For top quality temperature control in
the two/three areas of the passenger's
compartment, the system is fitted with
external temperature sensor, passen-
ger's compartment temperature sensor
and two-side sun radiation sensor.
The climate control system automatically
controls and adjusts the following pa-
rameters and functions:
❒air temperature at driver/passengers
vents;
❒fan speed;
❒air distribution at driver/passenger
vents;
❒compressor activation;
❒air recirculation.
The following parameters and functions
can be set or changed manually:
❒required temperature;
❒fan speed;
❒air distribution on seven levels ;
❒compressor on/off;
❒window demisting/defrosting;
❒air recirculation;
❒one-zone function.
The system is fitted with AQS (Air Qual-
ity System) sensor (where provided),
that turns on air recirculation automati-
cally when it detects the presence of out-
side polluted air (for example in queues
and tunnels).
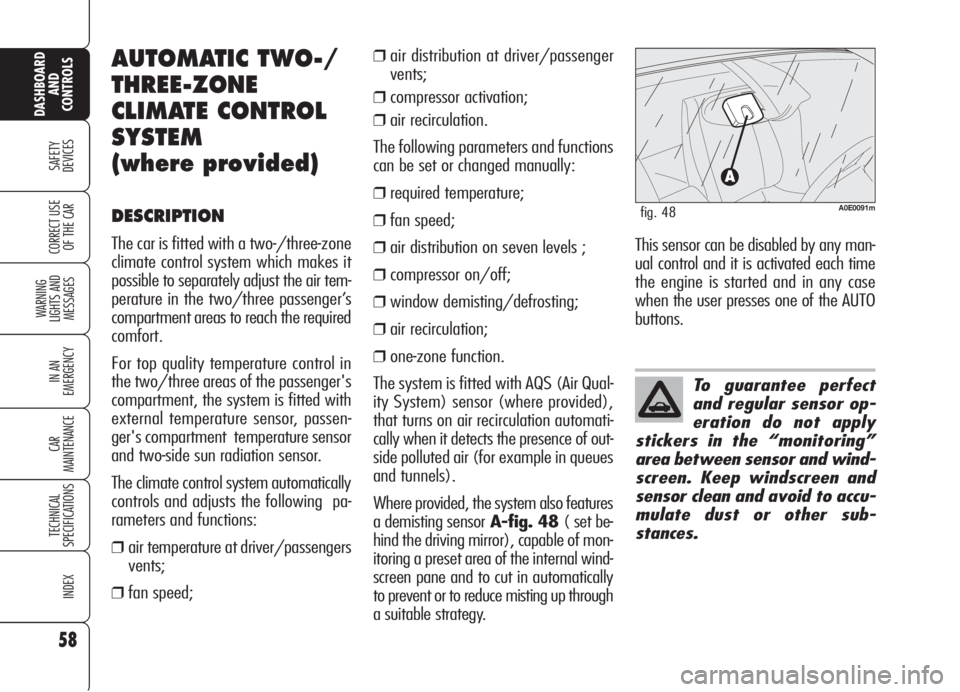
Where provided, the system also features
a demisting sensorA-fig. 48 ( set be-
hind the driving mirror), capable of mon-
itoring a preset area of the internal wind-
screen pane and to cut in automatically
to prevent or to reduce misting up through
a suitable strategy.
A0E0091mfig. 48
This sensor can be disabled by any man-
ual control and it is activated each time
the engine is started and in any case
when the user presses one of the AUTO
buttons.
Page 61 of 299

59
SAFETY
DEVICES
WARNING
LIGHTS AND
MESSAGES
IN AN
EMERGENCY
CAR
MAINTENANCE
TECHNICAL
SPECIFICATIONS
INDEX
CORRECT USE
OF THE CAR
DASHBOARD
AND
CONTROLS
I- Button for activating the MONO function (alignment of set temperatures), cor-
responding to driver’s one;
L- air recirculation on/off button;
M- climate control compressor on/off button;
N- passenger’s compartment temperature sensor TWO-ZONE controls fig. 49
A- air distribution buttons (on driver and
passenger side);
B- temperature adjustment knob on dri-
ver side;
C- automatic operation button (FULL
AUTO);
D- climate control data display;
E- temperature adjustment knob on
passenger side;
F- heated rear window/door mirrors
on/off button;
G- MAX-DEF function button (fast de-
frosting/demisting function for wind-
screen, heated rear window and door
mirrors with heating function);
H- buttons for adjusting the fan speed
and for turning the climate control sys-
tem off (OFF);
fig. 49 - TWO-ZONE configurationA0E0058m