clock Alfa Romeo 159 2008 Owner handbook (in English)
[x] Cancel search | Manufacturer: ALFA ROMEO, Model Year: 2008, Model line: 159, Model: Alfa Romeo 159 2008Pages: 303, PDF Size: 5.18 MB
Page 18 of 303
16
SAFETY
DEVICES
WARNING LIGHTS
AND MESSAGES
IN AN
EMERGENCY
CAR
MAINTENANCE
TECHNICAL
SPECIFICATIONS
INDEX
DASHBOARD
AND
CONTROLS
CORRECT USE
OF THE CAR
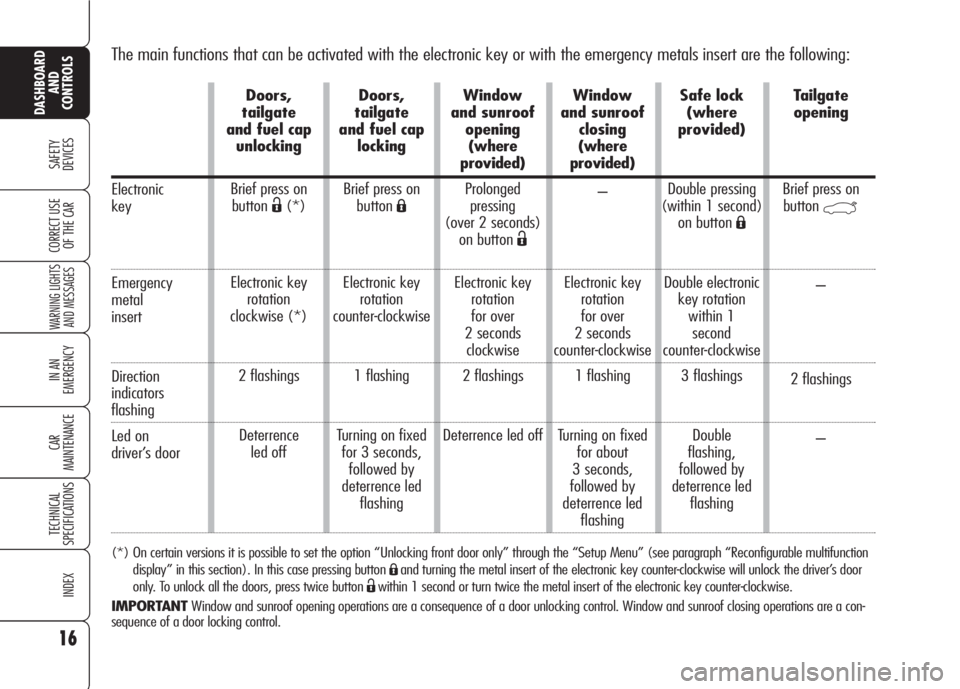
The main functions that can be activated with the electronic key or with the emergency metals insert are the following:
(*) On certain versions it is possible to set the option “Unlocking front door only” through the “Setup Menu” (see paragraph “Reconfigurable multifunction
display” in this section). In this case pressing button
Áand turning the metal insert of the electronic key counter-clockwise will unlock the driver’s door
only. To unlock all the doors, press twice button
Ëwithin 1 second or turn twice the metal insert of the electronic key counter-clockwise.
IMPORTANTWindow and sunroof opening operations are a consequence of a door unlocking control. Window and sunroof closing operations are a con-
sequence of a door locking control.
Electronic
key
Emergency
metal
insert
Direction
indicators
flashing
Led on
driver’s door
Doors,
tailgate
and fuel cap
unlocking
Brief press on
button
Ë(*)
Electronic key
rotation
clockwise (*)
2 flashings
Deterrence
led offDoors,
tailgate
and fuel cap
locking
Brief press on
buttonÁ
Electronic key
rotation
counter-clockwise
1 flashing
Turning on fixed
for 3 seconds,
followed by
deterrence led
flashingWindow
and sunroof
opening
(where
provided)
Prolonged
pressing
(over 2 seconds)
on button
Ë
Electronic key
rotation
for over
2 seconds
clockwise
2 flashings
Deterrence led offWindow
and sunroof
closing
(where
provided)
–
Electronic key
rotation
for over
2 seconds
counter-clockwise
1 flashing
Turning on fixed
for about
3 seconds,
followed by
deterrence led
flashingSafe lock
(where
provided)
Double pressing
(within 1 second)
on button
Á
Double electronic
key rotation
within 1
second
counter-clockwise
3 flashings
Double
flashing,
followed by
deterrence led
flashingTailgate
opening
Brief press on
button
`
–
2 flashings
–
Page 27 of 303
25
SAFETY
DEVICES
WARNING LIGHTS
AND MESSAGES
IN AN
EMERGENCY
CAR
MAINTENANCE
TECHNICAL
SPECIFICATIONS
INDEX
DASHBOARD
AND
CONTROLS
CORRECT USE
OF THE CAR
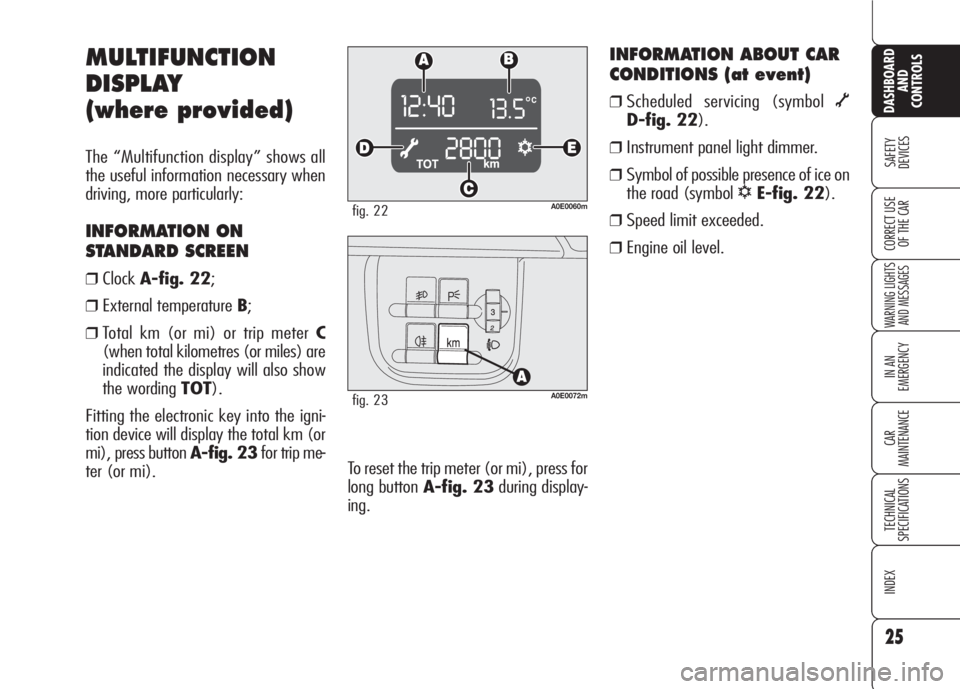
INFORMATION ABOUT CAR
CONDITIONS (at event)
❒Scheduled servicing (symbol õ
D-fig. 22).
❒Instrument panel light dimmer.
❒Symbol of possible presence of ice on
the road (symbol
√E-fig. 22).
❒Speed limit exceeded.
❒Engine oil level.
MULTIFUNCTION
DISPLAY
(where provided)
The “Multifunction display” shows all
the useful information necessary when
driving, more particularly:
INFORMATION ON
STANDARD SCREEN
❒ClockA-fig. 22;
❒External temperature B;
❒Total km (or mi) or trip meter C
(when total kilometres (or miles) are
indicated the display will also show
the wording TOT).
Fitting the electronic key into the igni-
tion device will display the total km (or
mi), press button A-fig. 23for trip me-
ter (or mi).
A0E0060mfig. 22
A0E0072mfig. 23
To reset the trip meter (or mi), press for
long button A-fig. 23during display-
ing.
Page 28 of 303
Speed limit (SPEED BEEP)
With this function it is possible to set the
car speed limit (km/h or mph) which,
if exceeded, automatically sounds a
buzzer and displays a specific message
(see section “Warning lights and mes-
sages”) to alert the driver. Once the
warning cycle is over the display will
resume the standard screen. The warn-
ing message will disappear only after
the car speed slows 5 km/h (5 mph)
below the set speed limit or after press-
ing briefly the MENUbutton. This pro-
cedure is carried out just once after ex-
ceeding the speed limit and it can be re-
peated only if the car speed slows at
least 5 km/h (5 mph) below the set
speed limit and then it increases until
exceeding the speed limit again.
26
SAFETY
DEVICES
WARNING LIGHTS
AND MESSAGES
IN AN
EMERGENCY
CAR
MAINTENANCE
TECHNICAL
SPECIFICATIONS
INDEX
DASHBOARD
AND
CONTROLS
CORRECT USE
OF THE CAR
A0E0074mfig. 24
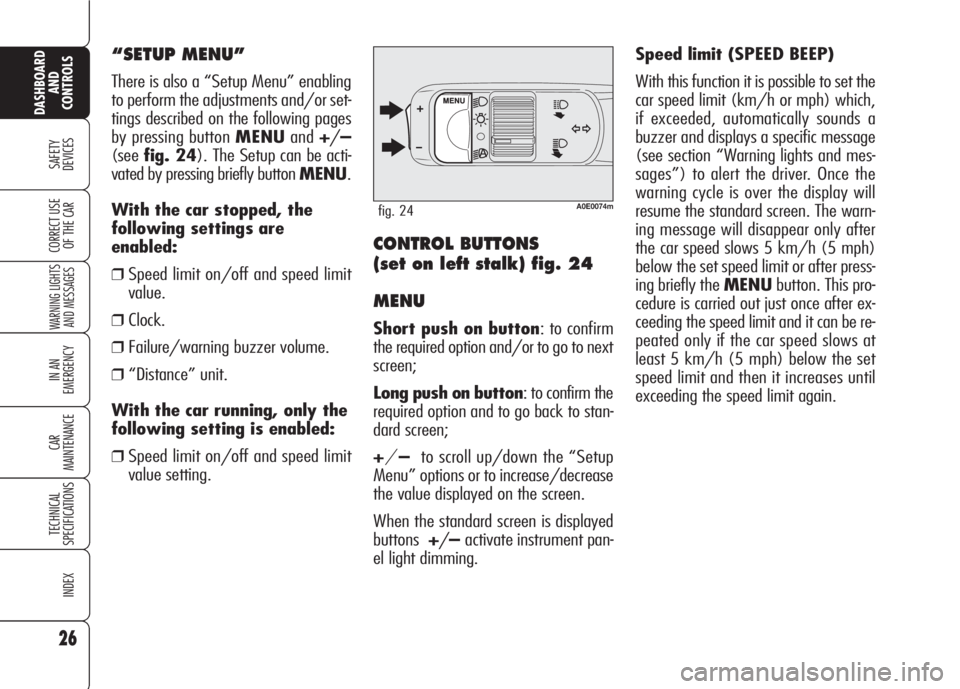
“SETUP MENU”
There is also a “Setup Menu” enabling
to perform the adjustments and/or set-
tings described on the following pages
by pressing button MENUand+/–
(seefig. 24). The Setup can be acti-
vated by pressing briefly button MENU.
With the car stopped, the
following settings are
enabled:
❒Speed limit on/off and speed limit
value.
❒Clock.
❒Failure/warning buzzer volume.
❒“Distance” unit.
With the car running, only the
following setting is enabled:
❒Speed limit on/off and speed limit
value setting.
CONTROL BUTTONS
(set on left stalk) fig. 24
MENU
Short push on button: to confirm
the required option and/or to go to next
screen;
Long push on button: to confirm the
required option and to go back to stan-
dard screen;
+/–to scroll up/down the “Setup
Menu” options or to increase/decrease
the value displayed on the screen.
When the standard screen is displayed
buttons+/–activate instrument pan-
el light dimming.
Page 29 of 303
To set the speed limit, proceed as fol-
lows:
❒press button MENUuntil selecting
SPEED BEEP: the display will show
SPEED BEEPand setting condition
(ON= speed limit on/ OFF= speed
limit off);
❒press again button MENU:ON(or
OFF) will flash;
❒press buttons +/–to select ONor
OFF;
❒selectingONwill make the last
speed limit set flashing on the dis-
play;
❒press buttons +/–to adjust the val-
ue.
IMPORTANT The possible setting is be-
tween 30 and 250 km/h (or between
20 and 150 mph) depending on the unit
set previously (see paragraph “Units” de-
scribed later). Every press (pulse) of the
button+/–increases or decreases the
value by 5 units. Keeping the button +/–
pressed obtains automatic fast increase or
decrease. When you are near the required
setting complete adjustment with single
presses.
27
SAFETY
DEVICES
WARNING LIGHTS
AND MESSAGES
IN AN
EMERGENCY
CAR
MAINTENANCE
TECHNICAL
SPECIFICATIONS
INDEX
DASHBOARD
AND
CONTROLS
CORRECT USE
OF THE CAR
Failure/warning buzzer
volume (BUZZ)
With this function the volume of the
buzzer accompanying any failure/warn-
ing indications can be adjusted accord-
ing to 4 levels. The buzzer can be ad-
justed and excluded.
Proceed as follows:
❒press button MENUuntil selecting
BUZZ: the display will show BUZZ
and a figure corresponding to the
buzzer volume level;
❒press again button MENU: the fig-
ure will flash;
❒press buttons +/–to adjust the
buzzer volume.
To mute the buzzer set the volume lev-
el to “0” using buttons +/–. Clock (TIME REG)
This function enables to adjust the clock.
To adjust the clock proceed as follows:
❒press button MENUuntil selecting
TIME REG;
❒press again button MENU:TIME
and clock will flash;
❒press buttons +/–to adjust time.
Clock is always displayed in 24h mode
(24 hours).
Page 32 of 303
30
SAFETY
DEVICES
WARNING LIGHTS
AND MESSAGES
IN AN
EMERGENCY
CAR
MAINTENANCE
TECHNICAL
SPECIFICATIONS
INDEX
DASHBOARD
AND
CONTROLS
CORRECT USE
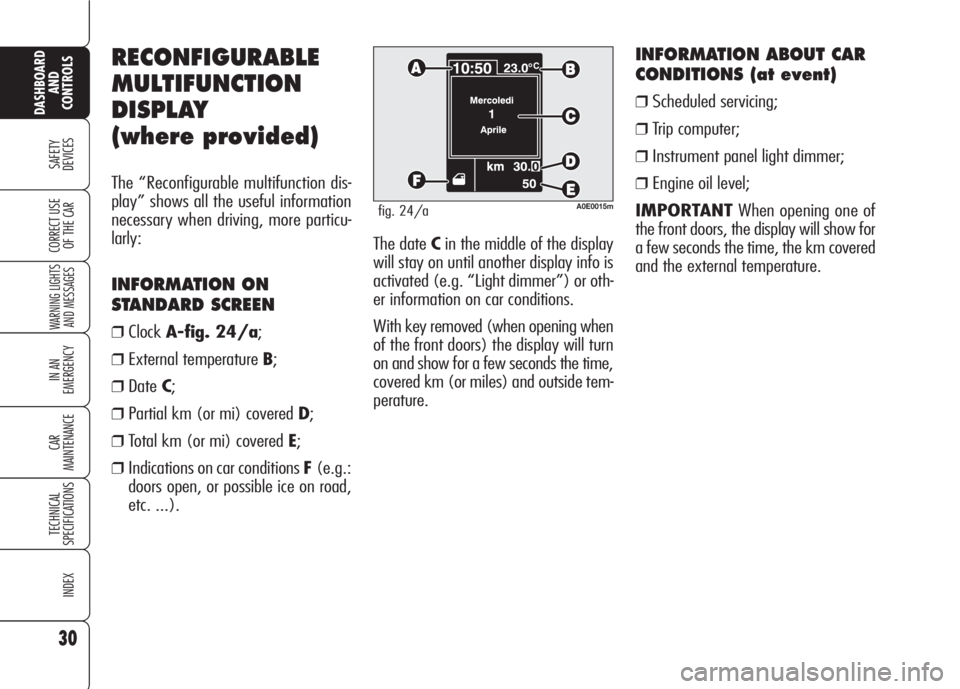
OF THE CARThe date Cin the middle of the display
will stay on until another display info is
activated (e.g. “Light dimmer”) or oth-
er information on car conditions.
With key removed (when opening when
of the front doors) the display will turn
on and show for a few seconds the time,
covered km (or miles) and outside tem-
perature.
INFORMATION ABOUT CAR
CONDITIONS (at event)
❒Scheduled servicing;
❒Trip computer;
❒Instrument panel light dimmer;
❒Engine oil level;
IMPORTANTWhen opening one of
the front doors, the display will show for
a few seconds the time, the km covered
and the external temperature.
RECONFIGURABLE
MULTIFUNCTION
DISPLAY
(where provided)
The “Reconfigurable multifunction dis-
play” shows all the useful information
necessary when driving, more particu-
larly:
INFORMATION ON
STANDARD SCREEN
❒ClockA-fig. 24/a;
❒External temperature B;
❒DateC;
❒Partial km (or mi) covered D;
❒Total km (or mi) covered E;
❒Indications on car conditions F(e.g.:
doors open, or possible ice on road,
etc. ...).
A0E0015mfig. 24/a
Page 34 of 303
32
SAFETY
DEVICES
WARNING LIGHTS
AND MESSAGES
IN AN
EMERGENCY
CAR
MAINTENANCE
TECHNICAL
SPECIFICATIONS
INDEX
DASHBOARD
AND
CONTROLS
CORRECT USE
OF THE CAR
Selecting “Date” and “Clock”:
❒briefly press button MENUto select
the first value to change (e.g. hours/
minutes or year/month/day);
❒operate buttons +or–(by single
press) to select the new setting;
❒briefly press button MENUto store
the new setting and to go to the next
setup menu option, if this is the last
one you will go back to the previously
selected option of the main menu.
ENGINE OIL LEVEL
INDICATION
Fitting the electronic key into the igni-
tion device, the display will show for a
few seconds the engine oil level. At this
stage, to clear this indication and to go
to next screen, press button MENU.
Low oil level will be indicated by a ded-
icated warning message on the display.
IMPORTANT Check the proper en-
gine oil level on the dipstick (see para-
graph “Checking levels” in section “Car
maintenance”).
IMPORTANTProper engine oil level
shall be checked with the car on level
ground.
IMPORTANT To read the correct oil
level after fitting the electronic key, wait
for about 2 seconds before starting the
engine.
IMPORTANT Engine oil level could in-
crease after a long stop. Selecting an option of the main
menu with submenu:❒briefly press button MENUto display
the first submenu option;
❒operate buttons +or–(by single
press) to scroll all submenu options;
❒briefly press button MENUto select
the displayed submenu option and to
enter the corresponding setup menu;
❒operate buttons +or–(by single
press) to select the new setting of this
submenu option;
❒briefly press button MENUto store
the new setting and go back to the
previously selected submenu option.
Page 35 of 303
33
SAFETY
DEVICES
WARNING LIGHTS
AND MESSAGES
IN AN
EMERGENCY
CAR
MAINTENANCE
TECHNICAL
SPECIFICATIONS
INDEX
DASHBOARD
AND
CONTROLS
CORRECT USE
OF THE CAR
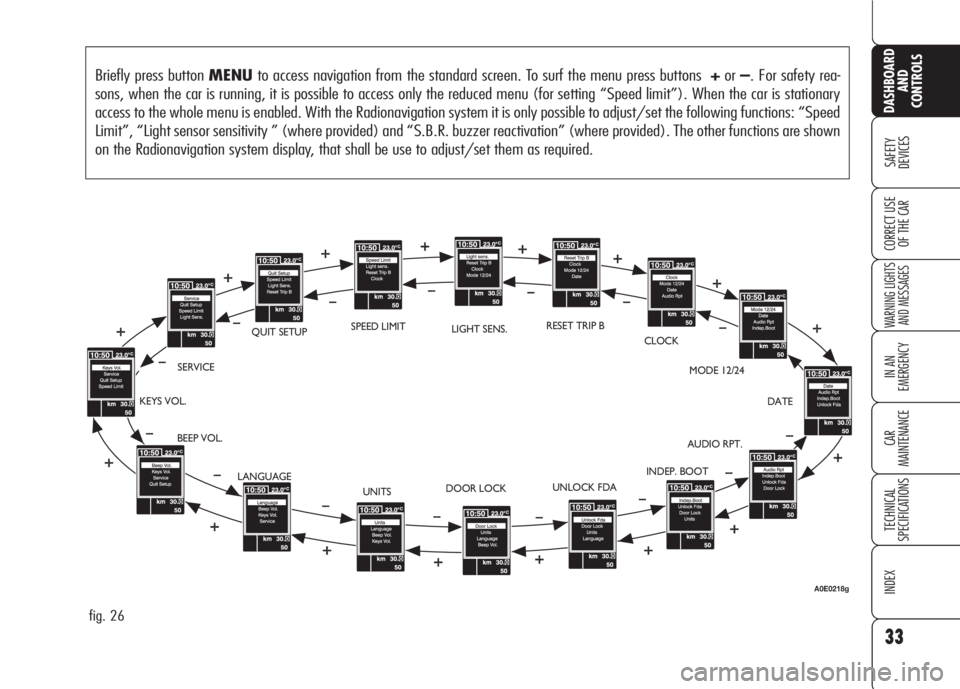
Briefly press button MENUto access navigation from the standard screen. To surf the menu press buttons +or–. For safety rea-
sons, when the car is running, it is possible to access only the reduced menu (for setting “Speed limit”). When the car is stationary
access to the whole menu is enabled. With the Radionavigation system it is only possible to adjust/set the following functions: “Speed
Limit”, “Light sensor sensitivity ” (where provided) and “S.B.R. buzzer reactivation” (where provided). The other functions are shown
on the Radionavigation system display, that shall be use to adjust/set them as required.
fig. 26
BEEP VOL.SERVICEQUIT SETUPLIGHT SENS.RESET TRIP B
CLOCK
MODE 12/24
DATE
AUDIO RPT.
INDEP. BOOT
UNLOCK FDA
DOOR LOCK
UNITS KEYS VOL.
LANGUAGESPEED LIMIT
A0E0218g
Page 37 of 303
35
SAFETY
DEVICES
WARNING LIGHTS
AND MESSAGES
IN AN
EMERGENCY
CAR
MAINTENANCE
TECHNICAL
SPECIFICATIONS
INDEX
DASHBOARD
AND
CONTROLS
CORRECT USE
OF THE CAR
IMPORTANT Every press (pulse) on
the button +/–increases/decreases by
one unit. Keeping button +/–pressed
obtains fast increase/decrease. When
you are near the required setting com-
plete adjustment with single presses.
❒briefly press button MENUto go
back to the menu screen or press the
button for long to go back to the stan-
dard screen. Setting the clock (Clock)
This function enables to set the clock.
Proceed as follows:
❒briefly press button MENU: “hours”
will show on the display;
❒press button +or–to select the re-
quired volume;
❒briefly press button MENU: “min-
utes” will flash on the display;
❒press button +or–to adjust;Clock mode (Mode 12/24)
This function is used to set the clock in
the 12h or 24h mode.
To adjust proceed as follows:
❒briefly press button MENU: 12h or
24h (according to previous setting)
will show on the display;
❒press button +or–to select the re-
quired language;
❒briefly press button MENUto go
back to the menu screen or press the
button for long to go back to the stan-
dard screen.
Page 63 of 303
61
SAFETY
DEVICES
WARNING
LIGHTS AND
MESSAGES
IN AN
EMERGENCY
CAR
MAINTENANCE
TECHNICAL
SPECIFICATIONS
INDEX
CORRECT USE
OF THE CAR
DASHBOARD
AND
CONTROLS
AIR TEMPERATURE
ADJUSTMENT KNOBS
Turning the knob knurled rings (B/
E/P), clockwise or counter-clockwise,
respectively raises or lowers the tem-
perature of the air required respective-
ly in the left front zone (knob B) or right
front zone (knob E) or rear zone (knob
P) of the passenger compartment. The
temperatures set are shown on the dis-
playD/S.
Turning the knob knurled rings fully
clockwise or counter-clockwise until they
reach the extreme selections HIorLO,
the maximum heating or cooling func-
tions are respectively engaged.HI function (HIGH)
(maximum heating power)
It is switched on by setting a tempera-
ture of more than 32°C on the display,
and can be switched on independently
from the driver’s or passengers’ side, or
both of them; this setting brings the sys-
tem to the “one-zone” mode and it is
shown by both displays.
This functions can be switched on when
you wish to heat the passenger com-
partment as quickly as possible, by tak-
ing the greatest advantage from the sys-
tem potential.
The function uses the maximum tem-
perature of the heating fluid, whereas
air distribution and fan speed are con-
trolled automatically by the system.
SWITCHING THE CLIMATE
CONTROL SYSTEM ON
The system can be turned on by press-
ing any button (excluding
(,vand
MONO); it is however advisable to set
the required temperatures on the display
and then to press the AUTO button.
The climate control system allows to per-
sonalise required temperatures (driver and
passengers).
Page 96 of 303
94
SAFETY
DEVICES
WARNING
LIGHTS AND
MESSAGES
IN AN
EMERGENCY
CAR
MAINTENANCE
TECHNICAL
SPECIFICATIONS
INDEX
CORRECT USE
OF THE CAR
DASHBOARD
AND
CONTROLS
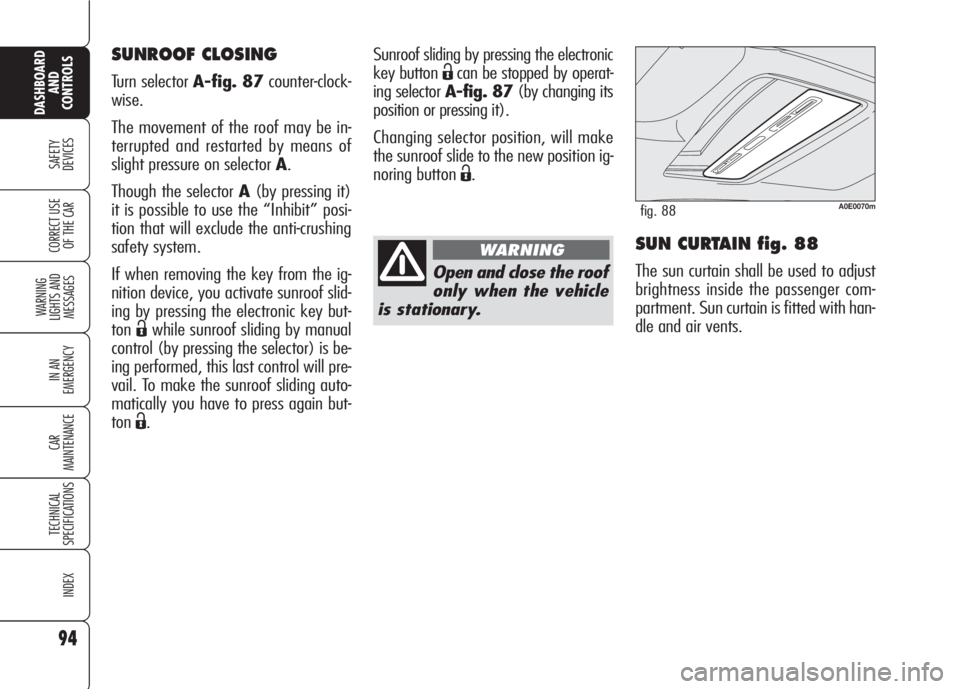
SUN CURTAIN fig. 88
The sun curtain shall be used to adjust
brightness inside the passenger com-
partment. Sun curtain is fitted with han-
dle and air vents. Sunroof sliding by pressing the electronic
key button
Ëcan be stopped by operat-
ing selector A-fig. 87(by changing its
position or pressing it).
Changing selector position, will make
the sunroof slide to the new position ig-
noring button
Ë.
Open and close the roof
only when the vehicle
is stationary.
WARNING
A0E0070mfig. 88
SUNROOF CLOSING
Turn selector A-fig. 87counter-clock-
wise.
The movement of the roof may be in-
terrupted and restarted by means of
slight pressure on selector A.
Though the selector A(by pressing it)
it is possible to use the “Inhibit” posi-
tion that will exclude the anti-crushing
safety system.
If when removing the key from the ig-
nition device, you activate sunroof slid-
ing by pressing the electronic key but-
ton
Ëwhile sunroof sliding by manual
control (by pressing the selector) is be-
ing performed, this last control will pre-
vail. To make the sunroof sliding auto-
matically you have to press again but-
ton
Ë.