language Alfa Romeo 159 2008 Owner handbook (in English)
[x] Cancel search | Manufacturer: ALFA ROMEO, Model Year: 2008, Model line: 159, Model: Alfa Romeo 159 2008Pages: 303, PDF Size: 5.18 MB
Page 35 of 303
33
SAFETY
DEVICES
WARNING LIGHTS
AND MESSAGES
IN AN
EMERGENCY
CAR
MAINTENANCE
TECHNICAL
SPECIFICATIONS
INDEX
DASHBOARD
AND
CONTROLS
CORRECT USE
OF THE CAR
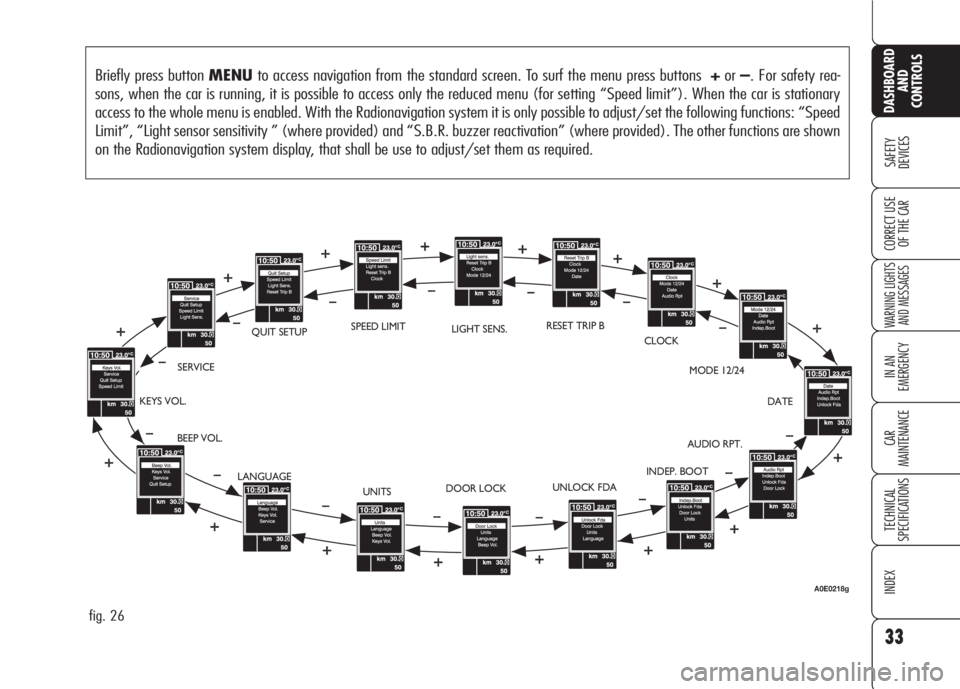
Briefly press button MENUto access navigation from the standard screen. To surf the menu press buttons +or–. For safety rea-
sons, when the car is running, it is possible to access only the reduced menu (for setting “Speed limit”). When the car is stationary
access to the whole menu is enabled. With the Radionavigation system it is only possible to adjust/set the following functions: “Speed
Limit”, “Light sensor sensitivity ” (where provided) and “S.B.R. buzzer reactivation” (where provided). The other functions are shown
on the Radionavigation system display, that shall be use to adjust/set them as required.
fig. 26
BEEP VOL.SERVICEQUIT SETUPLIGHT SENS.RESET TRIP B
CLOCK
MODE 12/24
DATE
AUDIO RPT.
INDEP. BOOT
UNLOCK FDA
DOOR LOCK
UNITS KEYS VOL.
LANGUAGESPEED LIMIT
A0E0218g
Page 37 of 303
35
SAFETY
DEVICES
WARNING LIGHTS
AND MESSAGES
IN AN
EMERGENCY
CAR
MAINTENANCE
TECHNICAL
SPECIFICATIONS
INDEX
DASHBOARD
AND
CONTROLS
CORRECT USE
OF THE CAR
IMPORTANT Every press (pulse) on
the button +/–increases/decreases by
one unit. Keeping button +/–pressed
obtains fast increase/decrease. When
you are near the required setting com-
plete adjustment with single presses.
❒briefly press button MENUto go
back to the menu screen or press the
button for long to go back to the stan-
dard screen. Setting the clock (Clock)
This function enables to set the clock.
Proceed as follows:
❒briefly press button MENU: “hours”
will show on the display;
❒press button +or–to select the re-
quired volume;
❒briefly press button MENU: “min-
utes” will flash on the display;
❒press button +or–to adjust;Clock mode (Mode 12/24)
This function is used to set the clock in
the 12h or 24h mode.
To adjust proceed as follows:
❒briefly press button MENU: 12h or
24h (according to previous setting)
will show on the display;
❒press button +or–to select the re-
quired language;
❒briefly press button MENUto go
back to the menu screen or press the
button for long to go back to the stan-
dard screen.
Page 39 of 303
37
SAFETY
DEVICES
WARNING LIGHTS
AND MESSAGES
IN AN
EMERGENCY
CAR
MAINTENANCE
TECHNICAL
SPECIFICATIONS
INDEX
DASHBOARD
AND
CONTROLS
CORRECT USE
OF THE CAR
Driver’s door unlocking
(Unlock Fda)
With this function it is possible to unlock
only the driver’s door by pressing the
electronic key button
Ë.
With this function active (ON), it is
however possible to unlock the other
doors by pressing the door unlock but-
ton on central console.
To activate/deactivate (ON/OFF) this
function proceed as follows:
❒briefly press button MENU:ONor
OFF(according to previous setting)
will flash on the display;
❒press button +or–to select the re-
quired language;
❒briefly press button MENUto go
back to the menu screen or press the
button for long to go back to the stan-
dard screen.Automatic central door locking
(Door lock)
When activated (ON), this function
locks automatically the doors when the
car speed exceeds 20 km/h.
To activate/deactivate (ON/OFF) this
function proceed as follows:
❒briefly press buttonMENU:ONor
OFF(according to previous setting)
will flash on the display;
❒press button +or–to select the re-
quired language;
❒briefly press button MENUto go
back to the menu screen or press the
button for long to go back to the stan-
dard screen.
Function activation is indicated by the
circular led around the button
q. Independent boot unlocking
(Indep. Boot)
With this function it is possible to unlock
the boot independently from doors.
When the function is enabled, the trunk
opens by pressing
`on the elec-
tronic key, or by acting on the lever lo-
cated under the left back seat (refer to
“Boot” paragraph in this chapter) in-
hibiting the key that opens the trunk lo-
cated on the front roof light.
To activate independent boot function
(ON) or deactivate it (OFF), proceed
as follows:
❒briefly press button MENU:ONor
OFF(according to previous setting)
will flash on the display;
❒press button +or–to select the re-
quired language;
❒briefly press button MENUto go
back to the menu screen or press the
button for long to go back to the stan-
dard screen.
Page 40 of 303
Consumption
If the distance unit set is km (see pre-
vious paragraph) the display will enable
to set the fuel consumption unit (l/100
km, km/l or mpg).
If the distance unit set is “mi” (see pre-
vious paragraph) fuel consumption will
be displayed “mpg”.
In this case the option “Cons.Unit” of the
“Setup Menu” can be selected but it is
locked on “mpg”.
To set the required unit proceed as fol-
lows:
❒briefly press button MENU: “km/l”
or “l/100 km” (according to previ-
ous setting) will show on the display;
❒press button +or–to select the re-
quired language;
❒briefly press button MENUto go
back to the menu screen or press the
button for long to go back to the stan-
dard screen.Temperature
This function enables to set the tem-
perature unit (°C or °F).
To set the required unit proceed as fol-
lows:
❒briefly press button MENU: °C or °F
(according to previous setting) will
show on the display;
❒press button +or–to select the re-
quired language;
❒briefly press button MENUto go
back to the menu screen or press the
button for long to go back to the stan-
dard screen. Units
With this function it is possible to set the
units for distance covered (km or mi),
fuel consumption (l/100 km, km/l or
mpg) and temperature (°C or °F).
Distance
To set the required unit proceed as fol-
lows:
❒briefly press button MENU: “km” or
“mi” (according to previous setting)
will show on the display;
❒press button +or–to select the re-
quired language;
❒briefly press button MENUto go
back to the menu screen or press the
button for long to go back to the stan-
dard screen.
38
SAFETY
DEVICES
WARNING LIGHTS
AND MESSAGES
IN AN
EMERGENCY
CAR
MAINTENANCE
TECHNICAL
SPECIFICATIONS
INDEX
DASHBOARD
AND
CONTROLS
CORRECT USE
OF THE CAR
Page 41 of 303
39
SAFETY
DEVICES
WARNING LIGHTS
AND MESSAGES
IN AN
EMERGENCY
CAR
MAINTENANCE
TECHNICAL
SPECIFICATIONS
INDEX
DASHBOARD
AND
CONTROLS
CORRECT USE
OF THE CAR
Selecting the language
(Language)
Display messages can be shown in the
following languages: Italian, English,
German, Portuguese, Spanish, French,
Dutch and Brazilian.
To set the required language proceed as
follows:
❒briefly press button MENU, the pre-
viously set “language” will show on
the display;
❒press button +or–to select the re-
quired language;
❒briefly press button MENUto go
back to the menu screen or press the
button for long to go back to the stan-
dard screen.Adjusting the button volume
(Keys Vol.)
With this function the volume of the
roger-beep accompanying the activation
of certain buttons can be adjusted ac-
cording to 8 levels.
To adjust the volume proceed as follows:
❒briefly press button MENU, the pre-
viously set “level” will show on the
display;
❒press button +or–to select the re-
quired volume;
❒briefly press button MENUto go
back to the menu screen or press the
button for long to go back to the stan-
dard screen. Adjusting the failure/warning
buzzer volume (Beep Vol.)
With this function the volume of the
buzzer accompanying any failure/warn-
ing indication can be adjusted according
to 8 levels.
To adjust the volume proceed as follows:
❒briefly press button MENU, the pre-
viously set “level” will show on the
display;
❒press button +or–to select the re-
quired volume;
❒briefly press button MENUto go
back to the menu screen or press the
button for long to go back to the stan-
dard screen.