buttons Alfa Romeo 159 2010 Owner handbook (in English)
[x] Cancel search | Manufacturer: ALFA ROMEO, Model Year: 2010, Model line: 159, Model: Alfa Romeo 159 2010Pages: 331, PDF Size: 4.84 MB
Page 91 of 331
PROGRAMMING
IMPORTANTWhile programming the
system, check for the absence of peo-
ple, animals or objects within the ma-
noeuvre space of main doors or gates to
prevent the risk of injuries or damages.
IMPORTANTPull up the handbrake
and fit the key into the ignition device.
Do not start the engine.Proceed as follows:
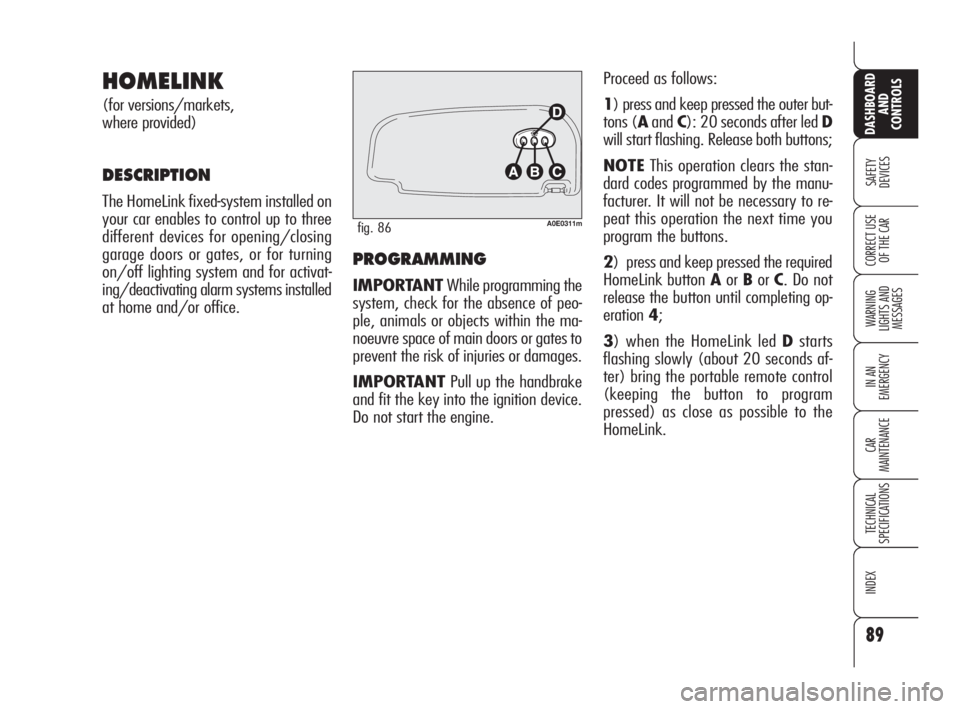
1) press and keep pressed the outer but-
tons (Aand C): 20 seconds after led D
will start flashing. Release both buttons;
NOTEThis operation clears the stan-
dard codes programmed by the manu-
facturer. It will not be necessary to re-
peat this operation the next time you
program the buttons.
2) press and keep pressed the required
HomeLink button Aor Bor C. Do not
release the button until completing op-
eration 4;
3) when the HomeLink led Dstarts
flashing slowly (about 20 seconds af-
ter) bring the portable remote control
(keeping the button to program
pressed) as close as possible to the
HomeLink.
89
SAFETY
DEVICES
WARNING
LIGHTS AND
MESSAGES
IN AN
EMERGENCY
CAR
MAINTENANCE
TECHNICAL
SPECIFICATIONS
INDEX
CORRECT USE
OF THE CAR
DASHBOARD
AND
CONTROLS
HOMELINK
(for versions/markets,
where provided)
DESCRIPTION
The HomeLink fixed-system installed on
your car enables to control up to three
different devices for opening/closing
garage doors or gates, or for turning
on/off lighting system and for activat-
ing/deactivating alarm systems installed
at home and/or office.
A0E0311mfig. 86
083-128 Alfa 159 GB 3-12-2009 14:08 Pagina 89
Page 92 of 331

HOW TO USE THE
HOMELINK SYSTEM
The HomeLink remote control activates
the operation of the garage door mo-
tor or gate motor exactly as the portable
remote control. The car shall be within
the range of the motor and the key shall
be fitted into the ignition device.
Press the programmed button (Aor B
or C). During signal transmission the led
Dwill stay on and the set system
(garage door, gate, etc.) will obey.
If the HomeLink system set as described
above does not work, this may be due
to the fact the original portable remote
control has an alternate code (see para-
graph "Synchronising alternate codes").
It is however always possible to use the
original portable remote control to op-
erate the system (garage door, gate,
etc.).
SYNCHRONISING
ALTERNATE CODES
To ascertain whether your garage door
motor or gate motor is provided with an
alternate code, proceed as follows:
consult the owner handbook provided
by the garage door motor's or gate mo-
tor's manufacturer;
the portable remote control seems to
have programmed HomeLink; HomeLink
however is not up to open or to close
the garage door or the gate;
press and keep pressed the programmed
button (Aor Bor C).
With an alternate code system, the led
Dblinks fast for short and then it stays
on glowing steadily for two seconds.
This sequence is repeated for 20 sec-
onds. The distance required between the
portable remote control and the Home-
Link depends on the system to be pro-
grammed (type of frequency of main
door, gate or other system).
If Ddoes not start to flash quickly try
again changing the distance between
HomeLink and portable remote control
(move them away slightly). If 20 sec-
onds later the led is still flashing slow-
ing, repeat the operation changing again
the distance between Homelink and re-
mote control.
4) the HomeLink led Dwill start blink-
ing, first slowly and then quickly. When
it starts flashing quickly, release both
buttons (HomeLink and portable remote
control).
90
SAFETY
DEVICES
WARNING
LIGHTS AND
MESSAGES
IN AN
EMERGENCY
CAR
MAINTENANCE
TECHNICAL
SPECIFICATIONS
INDEX
CORRECT USE
OF THE CAR
DASHBOARD
AND
CONTROLS
083-128 Alfa 159 GB 3-12-2009 14:08 Pagina 90
Page 94 of 331

CLEARING THE
PROGRAMMED BUTTONS
You are recommended to clear the
HomeLink programming before selling
the car.
Programming is cleared on all the three
buttons at the same time.
Proceed as follows:
❒press and keep pressed the outer
buttons (Aand C): 20 seconds af-
ter led Dwill start flashing.
❒Release both buttons.
TECHNICAL DATA FOR THE
ASSISTANCE SERVICE
If after following the previous instruc-
tions you are still unable to set the
HomeLink system, contact the Assis-
tance Service (HomeLink toll free num-
ber 00800046635465) and commu-
nicate the following data:
❒make and model of your car, in-
cluding the date of manufacture and
the country where you bought it;
❒make, model, date of manufacture
and operating frequency of the orig-
inal portable remote control (if
known).
IMPORTANTCertain phone carriers
do not permit the use of the toll-free
number. It is therefore required to dial
the alternative pay-number, +49 6838
907-277 (dialling this number will start
an international call). The distance required between the
portable remote control and the Home-
Link depends on the system to be pro-
grammed (type of frequency of main
door, gate or other system).
If Ddoes not start to flash quickly try
again changing the distance between
HomeLink and portable remote control
(move them away slightly). If 20 sec-
onds later the led is still flashing slow-
ing, repeat the operation changing again
the distance between Homelink and re-
mote control.
3) the HomeLink led Dwill start blink-
ing, first slowly and then quickly. When
it starts flashing quickly, release both
buttons (HomeLink and portable remote
control).
In this way the system previously pro-
grammed on HomeLink is cleared and
the new system is ready for use. This
operation has no effect on the other two
HomeLink buttons.
92
SAFETY
DEVICES
WARNING
LIGHTS AND
MESSAGES
IN AN
EMERGENCY
CAR
MAINTENANCE
TECHNICAL
SPECIFICATIONS
INDEX
CORRECT USE
OF THE CAR
DASHBOARD
AND
CONTROLS
083-128 Alfa 159 GB 3-12-2009 14:08 Pagina 92
Page 102 of 331

100
SAFETY
DEVICES
WARNING
LIGHTS AND
MESSAGES
IN AN
EMERGENCY
CAR
MAINTENANCE
TECHNICAL
SPECIFICATIONS
INDEX
CORRECT USE
OF THE CAR
DASHBOARD
AND
CONTROLS
C(for versions/markets, where pro-
vided) – rear left window open-
ing/closing; “automatic continuous”
mode operation during window open-
ing/closing;
D (for versions/markets, where pro-
vided) – rear right window open-
ing/closing; “automatic continuous”
mode operation just during window
opening;
E(for versions/markets, where pro-
vided) – rear power window en-
abling/disabling controls (when rear
power window controls are disabled, the
led on button Ewill turn on and disabled
controls will turn off).
Press buttons A, B, C or Dto open/
close the required window.
Pressing briefly one of the buttons the
window “jerks” whereas a prolonged
pressing makes the window opening or
closing in “automatic continuous”
mode.
Pressing button A, B, C or Dagain will
stop the window in the required posi-
tion.Front passenger door/
rear doors
Front passenger door and, on certain
versions, rear doors are fitted with but-
ton panels controlling opening/closing
of the corresponding window.
CONTROLS
Driver side
On the driver’s door panel are set the
buttons fig. 93 for controlling, with
electronic key fitted into the ignition de-
vice:
A– front left window opening/closing;
window opening or closing in “auto-
matic continuous” mode;
B – front right window open-
ing/closing; window opening or closing
in “automatic continuous” mode (only
versions with 4 power windows);
A0E0051mfig. 93
Improper use of the
power windows can be
dangerous. Before and
during its operation ensure that
any passengers are not at risk
from the moving glass either by
personal objects getting caught
in the mechanism or by being in-
jured by it directly. Always re-
move the ignition key when
getting out of the car to prevent
the power windows being op-
erated accidentally and consti-
tuting a danger to the passen-
gers in the car.
083-128 Alfa 159 GB 3-12-2009 14:08 Pagina 100
Page 295 of 331
293
SOUND SYSTEM
FADER adjustment ..................................................... 305
LOUDNESS function ................................................... 305
Antitheft protection ................................................... 305
RADIO (Tuner) .......................................................... 306
Introduction ............................................................. 306
Selecting the frequency band ...................................... 306
Presetting buttons ..................................................... 306
Storing the last station heard ...................................... 306
Automatic tuning ...................................................... 307
Manual tuning .......................................................... 307
AUTOSTORE function ................................................. 307
Emergency alarm reception ........................................ 308
EON function ............................................................ 308
Stereophonic stations ................................................ 308
Menu ...................................................................... 308
- MENU button functions ............................................ 308
- AF SWITCHING function ............................................ 309
- TRAFFIC INFO function ............................................. 309
- REGIONAL MODE function ......................................... 310
- MP3 DISPLAY function ............................................. 310
- SPEED VOLUME function ........................................... 311
- EXTERNAL AUDIO VOL function .................................. 311
- RADIO OFF function ................................................. 311
- RESTORE DEFAULT function ....................................... 311
S S
O O
U U
N N
D D
S S
Y Y
S S
T T
E E
M M
INTRODUCTION ......................................................... 295
Advice ..................................................................... 295
- Road safety ............................................................ 295
- Reception conditions ................................................ 295
- Care and maintenance ............................................. 295
- Compact Disc ......................................................... 296
Technical data .......................................................... 297
HI-FI Bose System .................................................... 298
QUICK GUIDE ........................................................... 299
Steering wheel controls .............................................. 301
General ................................................................... 302
- Radio section .......................................................... 302
- Compact Disc section ............................................... 302
- MP3 CD section ...................................................... 302
- Audio section .......................................................... 302
FUNCTIONS AND ADJUSTMENTS................................... 303
Turning the sound system on ...................................... 303
Turning the sound system off ...................................... 303
Selecting Radio/CD/CD Changer ................................. 303
Audio source memory function .................................... 303
Volume adjustment ................................................... 303
SPEED VOLUME function ............................................ 303
MUTE/PAUSE function ............................................... 304
Audio adjustments .................................................... 304
Bass/Treble adjustment ............................................. 304
Balance adjustment ................................................... 304
293-318 Alfa 159 GB 8-04-2009 10:56 Pagina 293
Page 302 of 331
300
SOUND SYSTEM
Button
FM AS
AM
CD
MUTE
AUDIO
MENU
Button
÷N
˜
O
1 2 3 4 5 6
Button
ı
÷˜
N
O
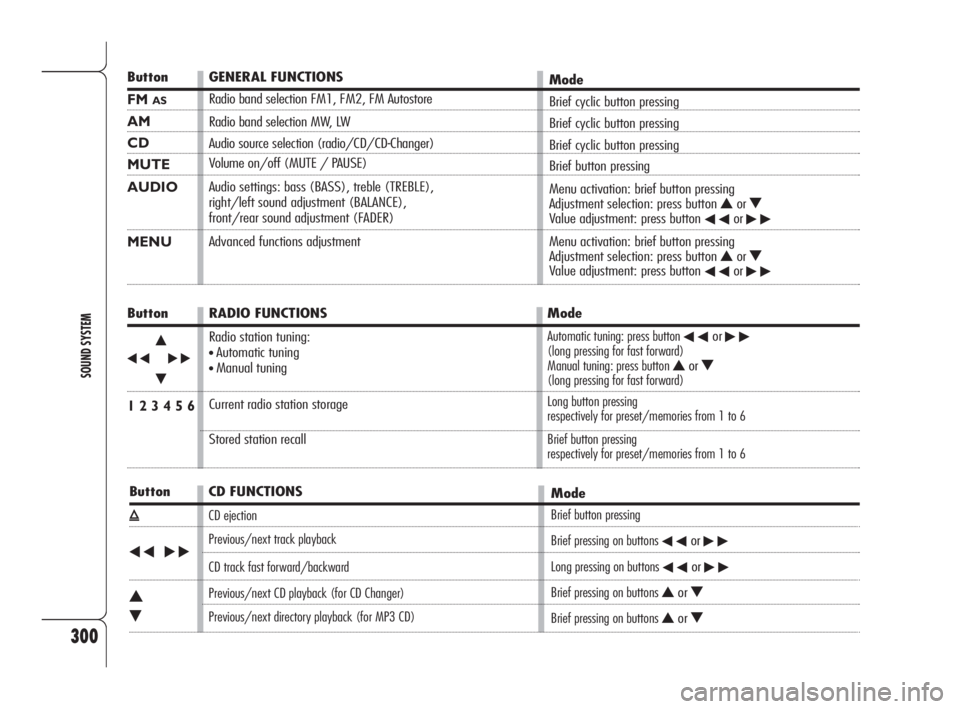
GENERAL FUNCTIONS
Radio band selection FM1, FM2, FM Autostore
Radio band selection MW, LW
Audio source selection (radio/CD/CD-Changer)
Volume on/off (MUTE / PAUSE)
Audio settings: bass (BASS), treble (TREBLE),
right/left sound adjustment (BALANCE),
front/rear sound adjustment (FADER)
Advanced functions adjustmentMode
Brief cyclic button pressing
Brief cyclic button pressing
Brief cyclic button pressing
Brief button pressing
Menu activation: brief button pressing
Adjustment selection: press button
NorOValue adjustment: press button ÷or˜
Menu activation: brief button pressing
Adjustment selection: press button NorOValue adjustment: press button ÷or˜
RADIO FUNCTIONS
Radio station tuning:
•Automatic tuning
•Manual tuning
Current radio station storage
Stored station recallMode
Automatic tuning: press button ÷or˜(long pressing for fast forward)
Manual tuning: press button NorO(long pressing for fast forward)
Long button pressing
respectively for preset/memories from 1 to 6
Brief button pressing
respectively for preset/memories from 1 to 6
CD FUNCTIONS
CD ejection
Previous/next track playback
CD track fast forward/backward
Previous/next CD playback (for CD Changer)
Previous/next directory playback (for MP3 CD)
Mode
Brief button pressing
Brief pressing on buttons
÷or˜
Long pressing on buttons ÷or˜
Brief pressing on buttons NorO
Brief pressing on buttons NorO
293-318 Alfa 159 GB 8-04-2009 10:56 Pagina 300
Page 306 of 331
304
SOUND SYSTEM
AUDIO ADJUSTMENTS
The options proposed by the audio menu dif-
fer according to the audio source selected:
AM/FM/CD/CDC.
To change Audio functions, press briefly but-
ton AUDIO. The display will show “BASS”.
To scroll the Menu options, use buttons
N
or O. To change the setting of the option
selected, press buttons
÷or ˜.
The display will show the current status of
the function selected.
The functions controlled by the menu are the
following:
❒BASS (bass adjustment);
❒TREBLE (treble adjustment);
❒BALANCE (right/left balance);
❒FADER (excluding versions with Bose HI-
FI system) (front/rear balance);
❒LOUDNESS (excluding versions with Bose
HI-FI system) (LOUDNESS on/off);
❒EQUALIZER (excluding versions with Bose
HI-FI system) (standard equalization ac-
tivation and selection);
❒USER EQUALISER (personal equalization
setting).
TONE ADJUSTMENT
(bass/treble)
Proceed as follows:
❒Use button Nor Oto select “BASS”
or “TREBLE” in the AUDIO menu;
❒press button ÷or ˜to in-
crease/decrease the basses or trebles.
Pressing the buttons briefly the change is grad-
ual by steps. Pressing longer, changing is
faster.
BALANCE ADJUSTMENT
Proceed as follows:
❒Use button Nor Oto select “BALANCE”
in the AUDIO menu;
❒press button ÷to increase the sound
from the right speakers or button
˜to increase the sound from the left speak-
ers.
Pressing the buttons briefly the change is grad-
ual by steps. Pressing longer, changing is
faster.
Select “
÷0 ˜” to set the same val-
ue for both right and left speakers.
MUTE /PAUSE FUNCTION
(turning off the volume
completely)
To switch on the Mute function, briefly press
the button MUTE. Volume will gradually low-
er and the display will show the word
“MUTE” (when in radio mode) or “PAUSE”
(when in CD or CD-Changer mode).
To switch off the Mute function, press the
button MUTE again. Volume will gradually
become louder returning to the value set be-
fore switching on the Mute function.
Changing volume will deactivate the Mute
function and the volume will be set to the
new level selected.
With the Mute function on:
❒if an emergency alarm or a traffic bulletin
arrives with the TA function on, the mes-
sage ignores the Mute function. The Mute
function will be resumed at the end of the
traffic announcement.
293-318 Alfa 159 GB 8-04-2009 10:56 Pagina 304
Page 307 of 331
305
SOUND SYSTEM
PRESET/USER*/CLASSIC/
ROCK/JAZZ functions
(equalizer on/off)
The integrated equalizer can be turned on
or off. With the equalizer off, it is possible
to change the sound settings only adjust-
ing the bass (“BASS”) and treble tones
(“TREBLE”), while activating the function
makes it possible to adjust the sound curves.
To turn the equalizer off, select “PRESET”
by means of button
÷or ˜.
To turn the equalizer on, use button
÷or ˜to select one of the following op-
tions:
❒“USER” (adjustment of the 7 equalizer
bands that can be changed by the user);
❒“CLASSIC” (predefined equalizer adjust-
ment for best playing of classic music);
❒“ROCK” (predefined equalizer adjust-
ment for best playing of rock and pop mu-
sic);
❒“JAZZ” (predefined equalizer adjustment
for best playing of jazz music).
When one of the equalizer settings is on,
the display shows “EQ”.*USER EQ SETTINGS function
(only if the USER equalizer
setting has been selected)
(excluding versions with
Bose HI-FI system)
To set a personal equalizer adjustment, use
button
Nor Oto select USER and then
press button
Ofor long.
The display shows a graph with 7 bars,
where each bar represents a frequency.
Choose the bar to be adjusted using button
÷or ˜; the bar chosen starts to flash
and it is possible to adjust it using button
N
or O.
To store the new settings, press button AU-
DIO again. The display still shows “USER EQ
SETTINGS”.
ANTITHEFT PROTECTION
Refer to section “CD PLAYER”.
FADER ADJUSTMENT
Proceed as follows:
❒Use button Nor Oto select “FADER” in
the AUDIO menu;
❒press button ÷to increase the sound
from the rear speakers or button
˜to
increase the sound from the front speak-
ers.
Pressing the buttons briefly the change is grad-
ual by steps. Pressing longer, changing is
faster.
Select “
÷0 ˜” to set the same val-
ue for both front and rear speakers.
LOUDNESS FUNCTION
The Loudness function improves the sound
volume when listening at low level, in-
creasing the basses and trebles.
To switch the function on/off, use button
Nor Oto select “LOUDNESS” in the AU-
DIO menu. The function condition (on or off)
is shown on the display for few seconds by
“LOUDNESS ON” or “LOUDNESS OFF”.
293-318 Alfa 159 GB 8-04-2009 10:56 Pagina 305
Page 308 of 331
306
SOUND SYSTEM
SELECTING THE FREQUENCY
BAND
If in the Tuner mode, briefly and repeated-
ly press button FM or AM to select the re-
quired frequency band.
Every time the button is pressed the fol-
lowing bands are selected in sequence:
❒Pressing button FM: “FM1”, “FM2”,
“FMT”;
❒Pressing button AM: , “MW” and “LW”.
Each band is shown by the respective word-
ing on the display.
The last station selected in the respective fre-
quency band will be tuned.
The FM band is divided into sections: FM1,
FM2 and FMT. The FMT reception band is re-
served to the stations stored automatically
with the AutoSTore function.
PRESETTING BUTTONS
The buttons with symbols from 1 to 6 make
it possible to set the following presettings:
❒18 in the FM band (6 in FM1, 6 in FM2,
6 in FMT);
❒6 in the MW band;
❒6 in the LW band;
To call a preset station, choose the required
frequency band and then press briefly the
corresponding preset button (from 1 to 6).
Pressing the respective preset button for
longer than 2 seconds will store the tuned
station. Storing is confirmed by a beep.
STORING THE LAST STATION
HEARD
The radio automatically keeps in storage the
last station heard for each reception band,
which is then tuned when the radio is turned
on or the reception band is changed.
INTRODUCTION
When the set is turned on the last function
selected before turning off is played (Radio,
CD or CD Changer).
To select the Tuner source while listening
to another audio source, press briefly but-
tons FM or AM, according to the required
frequency band.
When Tuner is on, the display will show the
selected station name (RDS stations only)
(or frequency), the frequency band (e.g.:
FM1) and the preselection button number
(e.g.: P1).
R R
A A
D D
I I
O O
( (
T T
U U
N N
E E
R R
) )
293-318 Alfa 159 GB 8-04-2009 10:56 Pagina 306
Page 309 of 331
307
SOUND SYSTEM
AUTOSTORE FUNCTION
(automatic station storage)
To switch on the AutoSTore function, keep
button FM-AS pressed until receiving the con-
firmation beep. With this function the ra-
dio automatically stores the six stations with
the strongest signal in decreasing order of
intensity of the FMT frequency band.
IMPORTANT Activating the AutoSTore func-
tion cancels the stations stored previously in
the FMT band.
If the TA function is on (traffic information),
only the stations that send traffic informa-
tion will be stored.
During automatic storage the display shows
“FM AST”.
To interrupt AutoSTore press button FM-AS
again: the radio will automatically tune to
the station heard before activation of the Au-
toSTore function.At the end of the AutoSTore function the ra-
dio automatically tunes on the first preset
station in the FMT band stored on preset but-
ton 1.
On buttons numbered from 1 to 6, the sta-
tions are automatically stored that give a
strong signal in that moment in the present
band.
Activating the AutoSTore function in MW or
LW bands will automatically select the FMT
band where the function is then run.
IMPORTANT Sometimes the AutoSTore func-
tion is unable to find 6 stations with a strong
signal. In this case the previous stations will
be stored on the free preset buttons.
AUTOMATIC TUNING
Briefly press button ÷or ˜to start
automatically searching the tuning for the
next station that it is possible to receive in
the direction chosen.
If button
÷or ˜is pressed for longer,
quick searching takes place. When the button
is released, the tuner stops on the next re-
ceivable station.
If the TA function is on (traffic information),
the tuner only searches stations which broad-
cast traffic bulletins.
MANUAL TUNING
This allows manual station searching in the
chosen band.
Select the required frequency band and then
press briefly and repeatedly button
Nor O
to start searching in the chosen band. Press-
ing one of the buttons
Nor Olonger obtains
fast forward searching, which is stopped when
the button is released.
293-318 Alfa 159 GB 8-04-2009 10:56 Pagina 307