brake fluid Alfa Romeo 4C 2014 Owner handbook (in English)
[x] Cancel search | Manufacturer: ALFA ROMEO, Model Year: 2014, Model line: 4C, Model: Alfa Romeo 4C 2014Pages: 190, PDF Size: 7.87 MB
Page 8 of 190
 GRAPHICAL INDEX
.
HEADLIGHTS
❒Bulb types ..........................................120
❒ Daytime running lights ......................... 27
❒ Side lights/dipped headlights .............. 27
❒")
GRAPHICAL INDEX
.
HEADLIGHTS
❒Bulb types ..........................................120
❒ Daytime running lights ......................... 27
❒ Side lights/dipped headlights .............. 27
❒ Main beam headlights ......................... 27
❒ Bulb replacement ................................118
WHEELS
❒Rims and tyres ....................................163
❒ Tyre pressure ......................................166
❒ Wheel repair .......................................115
DOOR MIRRORS
❒Adjustment ......................................... 18
❒ Folding ............................................... 18
DOORS
❒Central opening/closing ...................... 36
SCREEN WASHER / BRAKE FLUID
❒Checking levels ...................................139
WINDSCREEN WIPERS
❒Operation ........................................... 28
❒ Blade replacement ..............................148
TOW HOOK
❒Attachment .........................................130
1
A0L0120
5
24-9-2013 11:49 Pagina 5
Page 50 of 190
 Activation
Move the lever A fig. 47 upwards (to the
letter “d”) and hold in this position for
5 seconds, until the \"Race\" mode
activation indicator appears on the
display. When \"Race&#")
Activation
Move the lever A fig. 47 upwards (to the
letter “d”) and hold in this position for
5 seconds, until the "Race" mode
activation indicator appears on the
display. When "Race" mode is
activated, the longitudinal/lateral
accelerometer indicator screen
(G-meter information) is displayed
automatically. This considers
gravitational acceleration (G) fig. 50.
ESC and ASR systems:the systems
are deactivated in order to ensure
the fullest sensation of sport, leaving
the driver in full control of the vehicle.
When the vehicle is in unstable
conditions, the ESC reactivates
automatically when the brake pedal is
pressed until the ABS intervenes,
thus returning the vehicle to stable
conditions. "Electronic Q2" system:
the system
is calibrated to increase traction whilst
accelerating on bends, improving
the agility of the car.
Engine and gearbox/transmission:
adoption of sports mapping.
IMPORTANT In "Race", the sensitivity of
the accelerator pedal increases
considerably. Consequently, driving is
less fluid and comfortable.
IMPORTANT In "Race" mode the
transmission only works in MANUAL
mode. For further details, refer to the
"Using the transmission" section in
chapter "Starting and driving".
Deactivation
To deactivate "Race" mode and return
to "Dynamic", move lever A fig. 47
downwards (to letter “a”) and keep it in
this position for half a second. In this
case, the LED corresponding to
"Dynamic" mode will light up and the
"Dynamic" mode activation indication
will appear on the display. “All Weather” MODE
Activation
Move the lever A fig. 47 downwards (to
the letter “a”) and hold in this position
for half a second, until the
corresponding LED lights up and the
“All Weather” mode activation indicator
appears on the display.
ESC and ASR systems:
intervention
thresholds aimed at ensuring maximum
safety in low-grip driving conditions. It
is advisable to select "All Weather"
mode in the presence of low-grip road
surfaces.
"ELECTRONIC Q2" SYSTEM: the
system is deactivated.
Engine and gearbox/transmission:
standard response.50
A0L0111
51
A0L0112
47
24-9-2013 11:49 Pagina 47
Page 62 of 190
 KNOWING THE INSTRUMENT PANEL
This section of the booklet gives you all
the information you need to
understand, interpret and use the
instrument panel correctly.CONTROL PANEL AND
INSTRUMENTS ..........")
KNOWING THE INSTRUMENT PANEL
This section of the booklet gives you all
the information you need to
understand, interpret and use the
instrument panel correctly.CONTROL PANEL AND
INSTRUMENTS ............................... 60
SETUP MENU ................................. 62
MENU OPTIONS ............................. 64
TRIP COMPUTER ........................... 68
WARNING LIGHTS AND
MESSAGES .................................... 71
- LOW BRAKE FLUID / HANDBRAKE
ENGAGED .......................................... 71
- EBD FAILURE .................................. 72
- AIRBAG FAILURE ............................. 72
- SEAT BELTS NOT FASTENED .......... 72
- ABS FAILURE ................................... 73
- PASSENGER AIRBAG
DEACTIVATED .................................... 74
- INJECTION/EOBD SYSTEM
FAILURE ............................................. 75
- TPMS ............................................... 76
- ELECTRONIC STABILITY CONTROL
(ESC) SYSTEM ................................... 77
- ASR FUNCTION DEACTIVATED
WARNING LIGHT ............................... 77
- SIDE LIGHTS AND DIPPED
HEADLIGHTS ..................................... 78
- FOLLOW ME HOME ........................ 78
- LEFT DIRECTION INDICATOR .......... 79
- RIGHT DIRECTION INDICATOR ....... 79
- MAIN BEAM HEADLIGHTS .............. 79
- LOW ENGINE OIL PRESSURE ......... 80
-ENGINE OIL DETERIORATED ........... 80
- ENGINE COOLANT TEMPERATURE
TOO HIGH .......................................... 81
- ALTERNATOR FAILURE ................... 81
- GEARBOX FAILURE ......................... 82
-INCOMPLETE DOOR LOCKING ........ 82
-WORN BRAKE PADS ........................ 82
- ALFA ROMEO CODE SYSTEM
FAILURE ............................................. 82 - FUEL RESERVE/LIMITED RANGE .... 83
- FUEL RESERVE/LIMITED RANGE
SENSOR FAULT ................................. 83
- CRUISE CONTROL .......................... 83
- DOOR MIRROR
DEMISTING/DEFROSTING ................. 83
- EXTERIOR LIGHTS FAULT ............... 84
- SERVICE (SCHEDULED SERVICING)
............................................................ 84
- GENERAL FAILURE ......................... 85
- FUEL CUT-OFF ................................ 85
- LUGGAGE COMPARTMENT OPEN . 86
- POSSIBLE ICE ON ROAD ................ 86
- BRAKE LIGHTS FAILURE ................. 86
- PARKING SENSOR FAILURE ........... 86
- DISPLAY OF SELECTED DRIVING
MODE (“Alfa DNA” system) ................. 86
59
24-9-2013 11:49 Pagina 59
Page 74 of 190
 WARNING LIGHTS AND MESSAGESWARNING The warning light switches on together with a dedicated message and/or acoustic signal when applicable. These
indications are indicative and precautionary and as suc")
WARNING LIGHTS AND MESSAGESWARNING The warning light switches on together with a dedicated message and/or acoustic signal when applicable. These
indications are indicative and precautionary and as such must not be considered as exhaustive and/or alternative to the
information contained in the Owner Handbook, which you are advised to read carefully in all cases. Always refer to the
information in this section in the event of a failure indication.
IMPORTANT Failure indications displayed are divided into two categories: very serious and less serious failures. Serious faults
are indicated by a repeated and prolonged warning "cycle". Less serious faults are indicated by warning "cycle" with a shorter
duration. The display cycle of both categories can be interrupted. The instrument panel warning light will stay on until the cause
of the malfunction is eliminated.
WARNING LIGHTS ON INSTRUMENT PANELWarning lights onpanel What it means
What to do
redLOW BRAKE FLUID / HANDBRAKE
ENGAGED
The warning light switches on when the key is
turned to MAR-ON, but it should switch off after a
few seconds.
Low brake fluid
The warning light switches on when the brake
fluid in the reservoir falls below the minimum level,
possibly due to a leak in the circuit.
Restore the brake fluid level, then check that the
warning light has switched off.
If the warning light stays on, contact the
dedicated Alfa Romeo Fiat Dealership.
Handbrake engaged
The warning light switches on when the
handbrake is engaged. Release the handbrake, then check that the
warning light has switched off.
If the warning light stays on, contact the
dedicated Alfa Romeo Fiat Dealership.
71
24-9-2013 11:49 Pagina 71
Page 139 of 190
 Thousands of kilometres20 40 60 80 100 120
Months 12 24 36 48 60 72
Check condition and wear of rear brake pads and discs, and
operation of pad wear indicator ●●●●●●
Check and, if necessar")
Thousands of kilometres20 40 60 80 100 120
Months 12 24 36 48 60 72
Check condition and wear of rear brake pads and discs, and
operation of pad wear indicator ●●●●●●
Check and, if necessary, top-up fluid levels (engine cooling,
brakes, windscreen washer, etc.) ●●●●●●
Visually inspect condition of the accessory drive belt(s) ●
Inspect the conditions of toothed timing drive belt ●
Check handbrake lever travel and adjust, if necessary (or every 12
months) ●●●●●●
Check exhaust emissions/smokiness ●●●
Check engine control system operation (through diagnosis socket) ●●●●●●
Check and possible top up of oil level for the dual clutch
automatic transmission ●
Replace spark plugs (#) ●●
Replace accessory drive belt(s) ●
Replace toothed timing drive belt (*) ●(#) The following are essential to ensure correct operation and prevent serious damage to the engine: only use spark plugs of the same make and type which are
specially certified for such engines (see the information in the “Engine” paragraph in the “Technical specifications” section); strictly comply with the spark plug
replacement interval given in the Scheduled Servicing Plan; for spark plug replacement, it is advisable to contact the dedicated Alfa Romeo Dealership.
(*) Irrespective of the mileage, the timing drive belt must be changed every 4 years for heavy-duty use (cold climates, town use, long periods of idling) or at least every 5 years.
136
SERVICING AND MAINTENANCE
24-9-2013 11:50 Pagina 136
Page 140 of 190
 Thousands of kilometres20 40 60 80 100 120
Months 12 24 36 48 60 72
Replace the air cleaner cartridge ●●●●●●
Change engine oil and replace oil filter (**)
Change brake fluid (or every 24 m")
Thousands of kilometres20 40 60 80 100 120
Months 12 24 36 48 60 72
Replace the air cleaner cartridge ●●●●●●
Change engine oil and replace oil filter (**)
Change brake fluid (or every 24 months) ●●●(**) The actual interval for changing the oil and replacing the engine oil filter depends on the vehicle usage conditions and is signalled by the warning light or
message (if present) on the instrument panel or every 12 months.
137
24-9-2013 11:50 Pagina 137
Page 141 of 190
 PERIODIC CHECKSEvery 1,000 km or before long
journeys, check and, if necessary, top
up the following:
❒engine coolant level;
❒ brake fluid;
❒ screen washer fluid;
❒ tyre inflation pressure and")
PERIODIC CHECKSEvery 1,000 km or before long
journeys, check and, if necessary, top
up the following:
❒engine coolant level;
❒ brake fluid;
❒ screen washer fluid;
❒ tyre inflation pressure and condition;
❒ operation of lighting system
(headlamps, direction indicators,
hazard warning lights, etc.);
❒ operation of screen washing/wiping
system and positioning/wear of
wiper blade.
Every 3,000 km, check and top up if
required: engine oil level.
HEAVY-DUTY USE OF
THE CARIf the car is used mainly under one of
the following conditions:
❒ if the car is used under demanding
conditions, e.g. on track;
❒ dusty roads;
❒ short, repeated journeys (less than
7–8 km) at sub-zero outside
temperatures;
❒ engine often idling or driving long
distances at low speeds or long
periods of inactivity;
the following checks must be carried
out more often than indicated in the
Scheduled Servicing Plan:
❒ check of front and rear disc brake
pad condition and wear;
❒ check cleanliness of tailgate locks,
cleanliness and lubrication of linkage;
❒ visually inspect conditions of: engine,
gearbox, transmission, pipes and
hoses (exhaust - fuel system -
brakes) and rubber elements (boots -
sleeves - bushes - etc.);
❒ check battery charge and battery
fluid level (electrolyte);
❒ visually inspect condition of the
accessory drive belts; ❒
check and, if necessary, change
engine oil and replace oil filter;
❒ check and, if necessary, replace air
cleaner.
Using the car on track should be
regarded as an exception. The car has
been designed and produced for road
use.
138
SERVICING AND MAINTENANCE
24-9-2013 11:50 Pagina 138
Page 143 of 190
 The plugs for topping the brake fluid and the windscreen washer fluid are located between the bonnet and the windscreen, by
respectively removing the suitable panel D and the suitable protection grid")
The plugs for topping the brake fluid and the windscreen washer fluid are located between the bonnet and the windscreen, by
respectively removing the suitable panel D and the suitable protection grid E; to top up, use the suitable kit supplied as
standard (see descriptions below).
19)111
A0L0153
140
SERVICING AND MAINTENANCE
24-9-2013 11:50 Pagina 140
Page 145 of 190
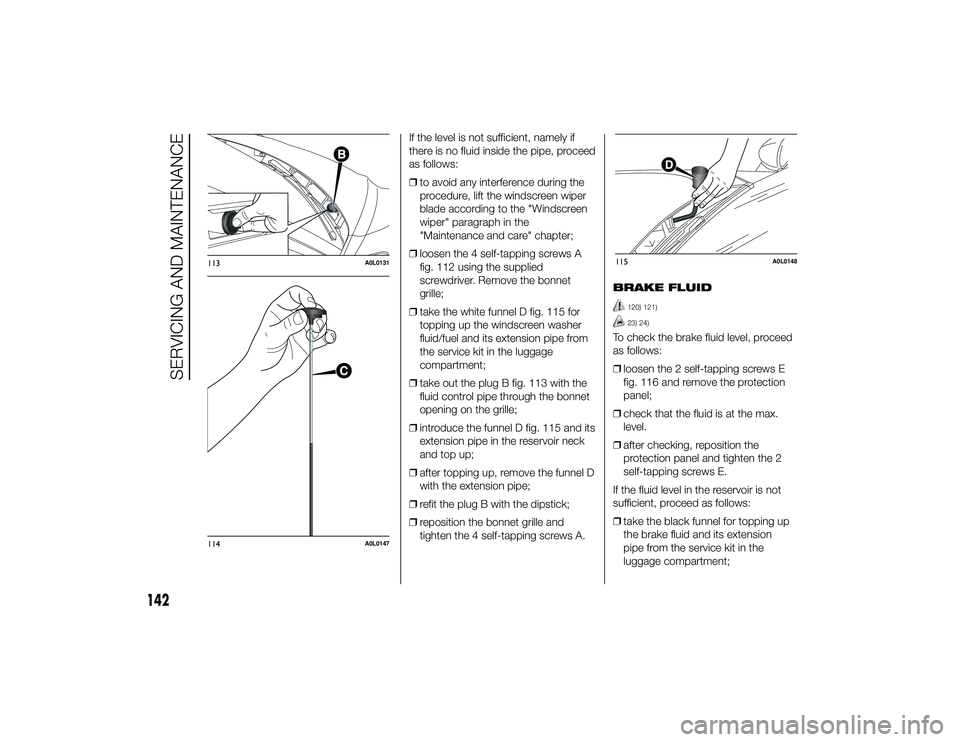
If the level is not sufficient, namely if
there is no fluid inside the pipe, proceed
as follows:
❒to avoid any interference during the
procedure, lift the windscreen wiper
blade according to the "Windscreen
wiper" paragraph in the
"Maintenance and care" chapter;
❒ loosen the 4 self-tapping screws A
fig. 112 using the supplied
screwdriver. Remove the bonnet
grille;
❒ take the white funnel D fig. 115 for
topping up the windscreen washer
fluid/fuel and its extension pipe from
the service kit in the luggage
compartment;
❒ take out the plug B fig. 113 with the
fluid control pipe through the bonnet
opening on the grille;
❒ introduce the funnel D fig. 115 and its
extension pipe in the reservoir neck
and top up;
❒ after topping up, remove the funnel D
with the extension pipe;
❒ refit the plug B with the dipstick;
❒ reposition the bonnet grille and
tighten the 4 self-tapping screws A. BRAKE FLUID
120) 121)23) 24)
To check the brake fluid level, proceed
as follows:
❒
loosen the 2 self-tapping screws E
fig. 116 and remove the protection
panel;
❒ check that the fluid is at the max.
level.
❒ after checking, reposition the
protection panel and tighten the 2
self-tapping screws E.
If the fluid level in the reservoir is not
sufficient, proceed as follows:
❒ take the black funnel for topping up
the brake fluid and its extension
pipe from the service kit in the
luggage compartment;
113
A0L0131
114
A0L0147
115
A0L0148
142
SERVICING AND MAINTENANCE
24-9-2013 11:50 Pagina 142
Page 146 of 190
 ❒loosen the reservoir plug and
introduce the funnel F fig. 117 with
the extension pipe in the reservoir
inlet;
❒ after topping up, remove the funnel F
with the extension pipe;
❒ tighten the rese")
❒loosen the reservoir plug and
introduce the funnel F fig. 117 with
the extension pipe in the reservoir
inlet;
❒ after topping up, remove the funnel F
with the extension pipe;
❒ tighten the reservoir plug;
❒ reposition the protection panel and
tighten the 2 self-tapping screws E.
WARNING Be very careful while
removing the plug from the opening to
prevent the plug from falling inside
the vehicle body.
IMPORTANT
19) Be careful not to confuse the various types of fluids while
topping up: they are not
compatible with each other!
Topping up with an unsuitable
fluid could severely damage your
vehicle.
20) The oil level should never exceed the MAX mark.
21) Do not add oil with specifications other than those of the oil already
in the engine. 22) PARAFLU
UP
anti-freeze fluid is
used in the engine cooling
system; use the same fluid type as
that already in the cooling system
when topping up. PARAFLU
UP
may not be mixed with other types
of anti-freeze fluids. If topping up
with an unsuitable product, under
no circumstances start the engine
and contact a dedicated Alfa
Romeo Dealership.
23) Avoid allowing brake fluid, which is extremely corrosive, to come
into contact with painted areas.
Should it happen, immediately
wash with water.
24) Be very careful while topping up the brake fluid, as it could drip
from the extension pipe inside the
vehicle under-bonnet and on
parts of the body and windscreen,
corroding and damaging them.
Adopt suitable protection (e.g
absorbing paper) to reduce this
risk as much as possible.
116
A0L0149
117
A0L0160
143
24-9-2013 11:50 Pagina 143