Alfa Romeo 4C 2015 Owner handbook (in English)
Manufacturer: ALFA ROMEO, Model Year: 2015, Model line: 4C, Model: Alfa Romeo 4C 2015Pages: 199, PDF Size: 7.67 MB
Page 121 of 199
IN AN EMERGENCY
A punctured tyre or a burnt-out bulb?
At times, a problem may interfere
with our journey.
The pages on emergencies can help
you to deal with critical situations
independently and with calm.
In an emergency we recommend that
you call the freephone number found in
the Warranty Booklet.
You can also use the freephone number
00 800 2532 4200 to find your nearest
dedicated Alfa Romeo Dealership.STARTING THE ENGINE .................118
REPAIRING A WHEEL .....................119
REPLACING A WHEEL ...................122
CHANGING A BULB .......................126
REPLACING EXTERIOR BULBS......129
INTERIOR BULB REPLACEMENT ...132
REPLACING FUSES........................133
RECHARGING THE BATTERY ........136
RAISING THE CAR..........................136
TOWING THE CAR .........................137
117
Page 122 of 199
STARTING THE
ENGINE
Contact the dedicated Alfa Romeo
Dealership immediately if
warning
light stays on constantly on the
instrument panel.
JUMP STARTING
If the battery is flat, start the engine
using an auxiliary battery with the same
capacity or a little higher than the flat
one.
12)91)
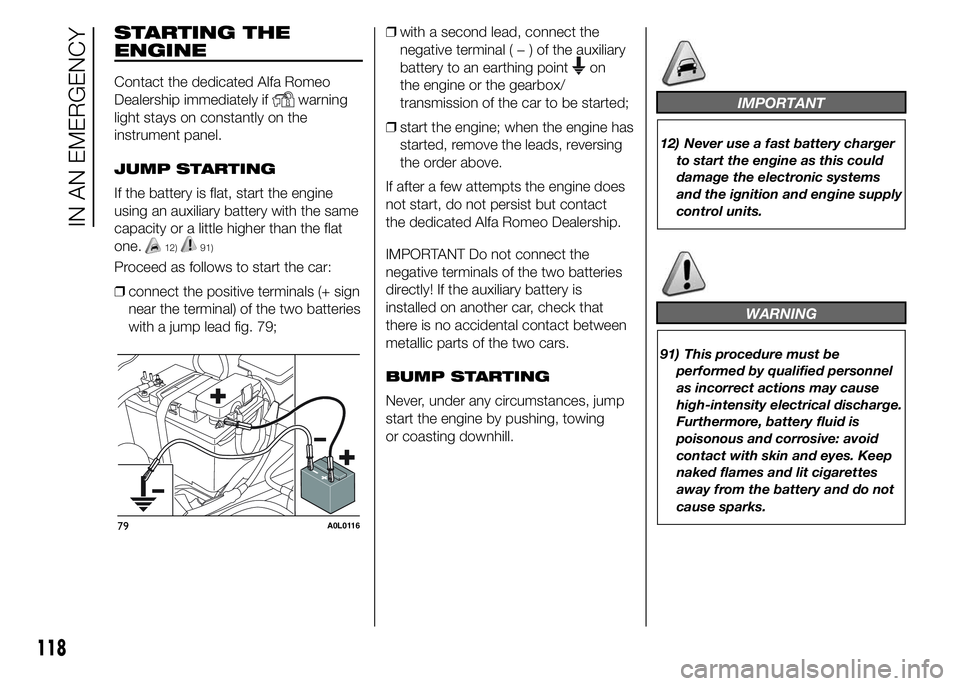
Proceed as follows to start the car:
❒connect the positive terminals (+ sign
near the terminal) of the two batteries
with a jump lead fig. 79;❒with a second lead, connect the
negative terminal(−)oftheauxiliary
battery to an earthing point
on
the engine or the gearbox/
transmission of the car to be started;
❒start the engine; when the engine has
started, remove the leads, reversing
the order above.
If after a few attempts the engine does
not start, do not persist but contact
the dedicated Alfa Romeo Dealership.
IMPORTANT Do not connect the
negative terminals of the two batteries
directly! If the auxiliary battery is
installed on another car, check that
there is no accidental contact between
metallic parts of the two cars.
BUMP STARTING
Never, under any circumstances, jump
start the engine by pushing, towing
or coasting downhill.
IMPORTANT
12) Never use a fast battery charger
to start the engine as this could
damage the electronic systems
and the ignition and engine supply
control units.
WARNING
91) This procedure must be
performed by qualified personnel
as incorrect actions may cause
high-intensity electrical discharge.
Furthermore, battery fluid is
poisonous and corrosive: avoid
contact with skin and eyes. Keep
naked flames and lit cigarettes
away from the battery and do not
cause sparks.
79A0L0116
118
IN AN EMERGENCY
Page 123 of 199

REPAIRING A WHEEL
GENERAL
INSTRUCTIONS
The car is equipped with a quick tyre
repair device called the "Fix&Go
automatic" kit.
92) 94)
To use it, follow the instructions below.
93) 95) 96)13)2)
"Fix&Go automatic" KIT
It is located in the luggage
compartment.
The kit includes:
❒bottle A fig. 80 containing sealant
and fitted with: filling tube B and
adhesive label C with the wording
“max. 80 km/h” to be placed in
a clearly visible position (e.g. on the
dashboard) after repairing the tyre;
❒compressor D complete with
pressure gauge and connectors;
❒an information leaflet fig. 81,
providing instructions for using the kit
correctly. This booklet should be
given to the persons charged with
handling the tyre treated with this kit;
❒a pair of gloves located in the side
compartment of the compressor;
❒adaptors for inflating different
elements.IMPORTANT The sealant is suitable for
use at temperatures in the range from
−20°C to +50°C. The sealant has an
expiry date.INFLATION PROCEDURE
Proceed as follows:
97)
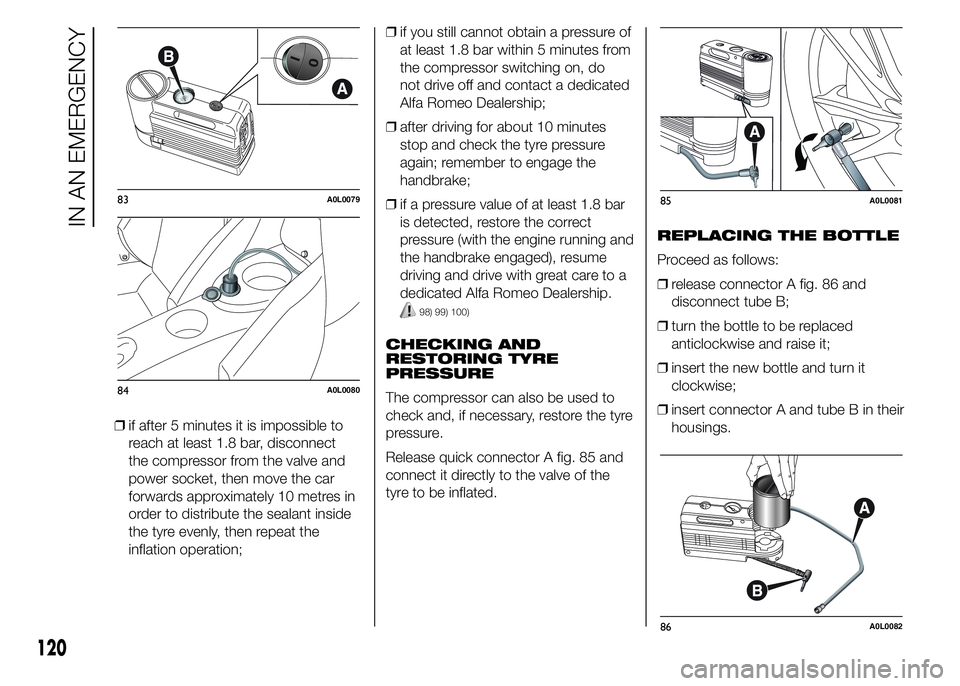
❒engage the handbrake, unscrew the
tyre valve cap, take out filler hose A
fig. 82 and tighten ring nut B on
the tyre valve;
❒make sure that switch A fig. 83 for
the compressor is in position 0 (off),
start the engine, insert the plug
into the cigar lighter socket on the
central tunnel (see fig. 84) and switch
on the compressor by bringing
switch A fig. 83 to I (on);
❒inflate the tyre to the pressure
indicated in the “Wheels” paragraph
in the “Technical data” chapter. In
order to obtain a more precise
reading, check the pressure value on
pressure gauge B fig. 83 with the
compressor off;
80A0L0076
81A0L0077
82A0L0078
119
Page 124 of 199
❒if after 5 minutes it is impossible to
reach at least 1.8 bar, disconnect
the compressor from the valve and
power socket, then move the car
forwards approximately 10 metres in
order to distribute the sealant inside
the tyre evenly, then repeat the
inflation operation;❒if you still cannot obtain a pressure of
at least 1.8 bar within 5 minutes from
the compressor switching on, do
not drive off and contact a dedicated
Alfa Romeo Dealership;
❒after driving for about 10 minutes
stop and check the tyre pressure
again; remember to engage the
handbrake;
❒if a pressure value of at least 1.8 bar
is detected, restore the correct
pressure (with the engine running and
the handbrake engaged), resume
driving and drive with great care to a
dedicated Alfa Romeo Dealership.
98) 99) 100)
CHECKING AND
RESTORING TYRE
PRESSURE
The compressor can also be used to
check and, if necessary, restore the tyre
pressure.
Release quick connector A fig. 85 and
connect it directly to the valve of the
tyre to be inflated.REPLACING THE BOTTLE
Proceed as follows:
❒release connector A fig. 86 and
disconnect tube B;
❒turn the bottle to be replaced
anticlockwise and raise it;
❒insert the new bottle and turn it
clockwise;
❒insert connector A and tube B in their
housings.
83A0L0079
84A0L0080
85A0L0081
86A0L0082
120
IN AN EMERGENCY
Page 125 of 199

WARNING
92) Indicate the presence of the
stationary car in accordance with
current regulations: hazard
warning lights, warning triangle,
etc. Those on board should get
out of the vehicle and wait for the
wheel to be repaired away from
the threat posed by the traffic.
If parked on a slope or rough
surface, chock the wheels with
wedges or other suitable devices
(for the correct procedure for
parking the car safely, refer to the
"Parking" paragraph in the
"Starting and driving" chapter).
93) Give the booklet to the
technicians who will be handling
the tyre that was treated using
the "Fix&Go automatic" kit.
94) A repair is not possible if the
wheel rim is damaged (groove
is deformed, causing air to
escape). Do not remove foreign
bodies (screws or nails) from the
tyre.95) Do not use the compressor for
more than 20 consecutive
minutes. Risk of overheating. The
kit is not suitable for definitive
repairs, so the repaired tyres may
only be used temporarily.
96) The bottle contains ethylene
glycol and latex: it may cause
an allergic reaction. It is harmful if
swallowed. Eye irritant. It may
cause sensitisation if inhaled or
on contact. Avoid contact with
eyes, skin and clothes. In the
event of contact, rinse
immediately with plenty of water.
If ingested, do not induce
vomiting. Rinse out your mouth,
drink large quantities of water and
seek immediate medical attention.
Keep out of the reach of children.
The product must not be used
by asthmatics. Do not inhale the
vapours during insertion and
suction. Call a doctor immediately
if allergic reactions are noted.
Store the bottle in its special
compartment, away from sources
of heat. The sealant has an expiry
date. Replace the bottle if the
sealant has expired.
97) Wear the protective gloves
provided with the kit.98) Apply the adhesive label where it
can be easily seen by the driver as
a reminder that the tyre has been
treated with the quick repair kit.
Drive carefully, especially on
corners. Do not exceed 80 km/h.
Avoid sudden acceleration or
braking.
99) If the pressure has fallen below
1.8 bar, do not drive any further:
the Fix&Go automatic quick tyre
repair kit cannot guarantee proper
hold because the tyre is too
damaged. Contact a dedicated
Alfa Romeo Dealership.
100) Always indicate that the tyre
was repaired using the quick
tyre repair kit. Give the booklet to
the personnel charged with
handling the tyre treated with the
repair kit.
121
Page 126 of 199
IMPORTANT
13) Punctures caused by foreign
bodies can be repaired if the
damage does not exceed 4 mm on
the tread and on the shoulder of
the tyre. Do not use the repair
kit if the tyre was damaged as a
result of being used when
underinflated.
IMPORTANT
2) Dispose of the bottle and the
sealant properly. Dispose of the
components in compliance with
national and local regulations.
REPLACING A
WHEEL
(for versions/markets, where provided)
GENERAL
INSTRUCTIONS
In some specific markets, the car may
be equipped with a space-saver wheel:
see the instructions on the following
pages for changing the tyre.
101) 102) 103) 104) 105)
JACK
Please note that:
❒the jack weight is 1.7 kg;
❒the jack requires no adjustment;
❒the jack cannot be repaired and in
the event of a fault it must be
replaced by another original one;
❒no tool other than its operating rod
may be fitted on the jack.
To change a wheel, proceed as follows:
❒stop the car in a position that is not
dangerous for oncoming traffic
where you can change the wheel
safely. The ground should be flat
if possible, and sufficiently firm;❒switch off the engine, pull up the
handbrake and engage the 1
stgear
or reverse. Wear the reflective safety
jacket (compulsory by law) before
getting out of the car;
❒take the space-saver wheel;
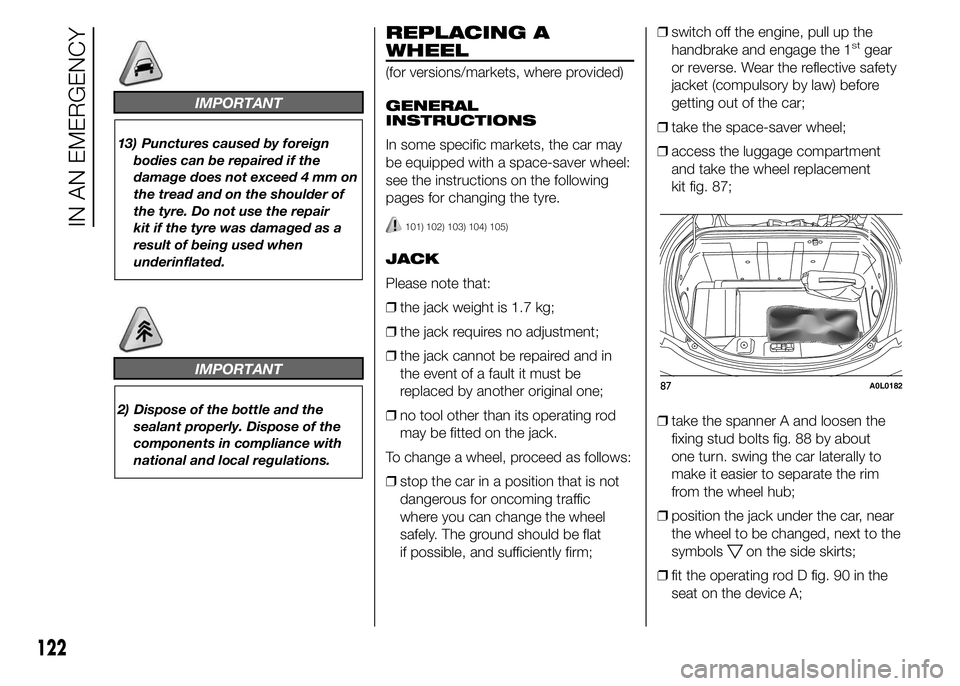
❒access the luggage compartment
and take the wheel replacement
kit fig. 87;
❒take the spanner A and loosen the
fixing stud bolts fig. 88 by about
one turn. swing the car laterally to
make it easier to separate the rim
from the wheel hub;
❒position the jack under the car, near
the wheel to be changed, next to the
symbols
on the side skirts;
❒fit the operating rod D fig. 90 in the
seat on the device A;
87A0L0182
122
IN AN EMERGENCY
Page 127 of 199

❒push the jack under the car using the
rod until the wording "STOP" on the
rod corresponds with the side skirt:
"FRONT" when replacing the front
wheel, "REAR" when replacing the
rear wheel (see fig. 91 - fig. 92);
❒fit the suitable tool E fig. 90 on the
operating rod;
IMPORTANT As shown in fig. 91 - fig.
92, on the operating rod D there is
the indication of max. limit for front and
rear insertion under car that must
coincide with the mark on the side
skirts.
❒operate the device A so as to extend
the jack, until the upper part B fig. 89
rests correctly in one of the lifting
points shown in fig. 93 - fig. 94,
otherwise, reposition the jack;IMPORTANT Make sure that the upper
part B of the jack rests firmly on the
car underbody in the points shown in
fig. 93 - fig. 94 so as to prevent the car
from falling when it is lifted
❒operate the jack and lift the car until
the wheel is several centimetres off
the ground;
88A0L018389A0L0184
90A0L0186
STOP - FRONT
STOP - FRONT
91A0L0189
STOP - REAR
STOP - REAR
92A0L0190
93 - Rear areaA0L0185
123
Page 128 of 199
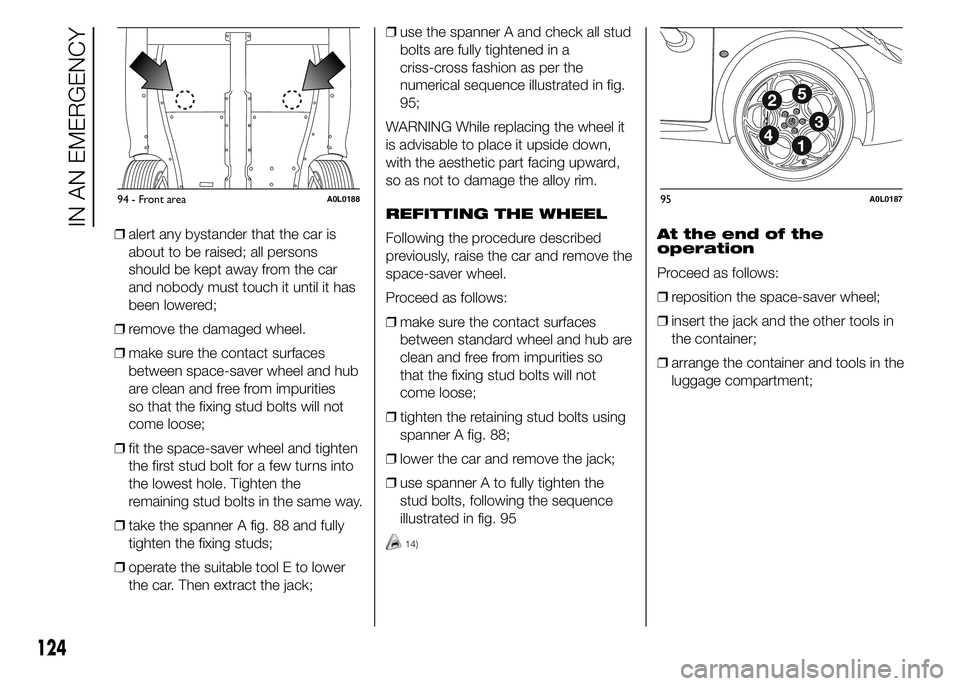
❒alert any bystander that the car is
about to be raised; all persons
should be kept away from the car
and nobody must touch it until it has
been lowered;
❒remove the damaged wheel.
❒make sure the contact surfaces
between space-saver wheel and hub
are clean and free from impurities
so that the fixing stud bolts will not
come loose;
❒fit the space-saver wheel and tighten
the first stud bolt for a few turns into
the lowest hole. Tighten the
remaining stud bolts in the same way.
❒take the spanner A fig. 88 and fully
tighten the fixing studs;
❒operate the suitable tool E to lower
the car. Then extract the jack;❒use the spanner A and check all stud
bolts are fully tightened in a
criss-cross fashion as per the
numerical sequence illustrated in fig.
95;
WARNING While replacing the wheel it
is advisable to place it upside down,
with the aesthetic part facing upward,
so as not to damage the alloy rim.
REFITTING THE WHEEL
Following the procedure described
previously, raise the car and remove the
space-saver wheel.
Proceed as follows:
❒make sure the contact surfaces
between standard wheel and hub are
clean and free from impurities so
that the fixing stud bolts will not
come loose;
❒tighten the retaining stud bolts using
spanner A fig. 88;
❒lower the car and remove the jack;
❒use spanner A to fully tighten the
stud bolts, following the sequence
illustrated in fig. 95
14)
At the end of the
operation
Proceed as follows:
❒reposition the space-saver wheel;
❒insert the jack and the other tools in
the container;
❒arrange the container and tools in the
luggage compartment;
94 - Front areaA0L018895A0L0187
124
IN AN EMERGENCY
Page 129 of 199
WARNING
101) The space-saver wheel (for
versions/markets, where
provided) is specific to your car,
do not use it on other models,
or use the space-saver wheel of
other models on your car. The
space-saver wheel must only be
used in the event of emergency. It
must only be used for the
distance necessary to reach a
service point and the car speed
must not exceed 80 km/h. The
space-saver wheel has an orange
label that summarises the main
cautions for use and limitations.
Never remove or cover the label.
The following information is
provided in four languages on the
label: "Important! For temporary
use only! 80 km/h max! Replace
with a standard wheel as soon as
possible. Never cover this
indication."102) Use your hazard lights, warning
triangle, etc to show that your car
is stationary. Passengers should
get out of the car and wait for the
wheel to be changed away from
the traffic. In the event of a wheel
change on a slope or on
unsurfaced roads, chock the
wheels.
103) Car handling is modified with
the space-saver wheel fitted.
Avoid violent acceleration and
braking, abrupt steering and fast
cornering. The overall duration
of the space-saver wheel is of
about 3000 km, after which the
relevant tyre must be replaced
with another one of the same
type. Never install a standard tyre
on a rim that is designed for use
with a space-saver wheel. Have
the wheel repaired and refitted as
soon as possible. Using two or
more space-saver wheels at the
same time is forbidden. Do not
grease the stud bolt threads
before you fit them, because they
could suddenly come loose.104) Use the jack only to replace
wheels on the car with which it
is supplied or on other cars of the
same model. Never use the jack
for other purposes, such as lifting
other car models. Never use it
for repair operations under the
car. Incorrectly positioning the
jack may cause the car to fall. Do
not use the jack for loads higher
than those shown on the label.
105) The space-saver wheel cannot
be fitted with snow chains.
IMPORTANT
14) Contact a dedicated Alfa Romeo
Dealership as soon as possible to
have the correct tightening of
the wheel stud bolts checked.
125
Page 130 of 199
CHANGING A BULB
15)
106) 107) 108)
GENERAL
INSTRUCTIONS
❒Before changing a bulb check the
contacts for oxidation;
❒replace blown bulbs with others of
the same type and power;
❒after replacing a headlight bulb,
always check its alignment;
❒when a light is not working, check
that the corresponding fuse is intact
before changing the bulb. For the
location of fuses, refer to the
paragraph “If a fuse blows” in this
chapter.IMPORTANT
15) Halogen bulbs must be handled
by holding the metallic part only.
Touching the transparent part
of the bulb with your fingers may
reduce the intensity of the
emitted light and even reduce the
lifespan of the bulb. In the case
of accidental contact, rub the
lamp with a cloth and spirit and
leave to dry.
WARNING
106) Modifications or repairs to the
electric system that are not
carried out properly or do not take
the system technical
specifications into account can
cause malfunctions leading to the
risk of fire.
107) Halogen bulbs contain
pressurised gas; in the case of
breakage they may burst.108) Due to the high supply voltage,
gas discharge bulbs (Bi-Xenon)
should only be replaced by
specialised personnel: danger of
death! Contact a dedicated Alfa
Romeo Dealership.
IMPORTANT When the weather is cold
or damp or after heavy rain or washing,
the surface of headlights or rear lights,
may steam up and/or form drops of
condensation on the inside. This is
a natural phenomenon due to the
difference in temperature and humidity
between the inside and the outside
of the glass which does not indicate a
fault and does not compromise the
normal operation of lighting devices.
The mist disappears quickly when the
lights are turned on, starting from
the centre of the diffuser, extending
progressively towards the edges.
126
IN AN EMERGENCY