fuse Alfa Romeo 4C 2016 Owner handbook (in English)
[x] Cancel search | Manufacturer: ALFA ROMEO, Model Year: 2016, Model line: 4C, Model: Alfa Romeo 4C 2016Pages: 182, PDF Size: 9.49 MB
Page 25 of 182
CLIMATE CONTROL
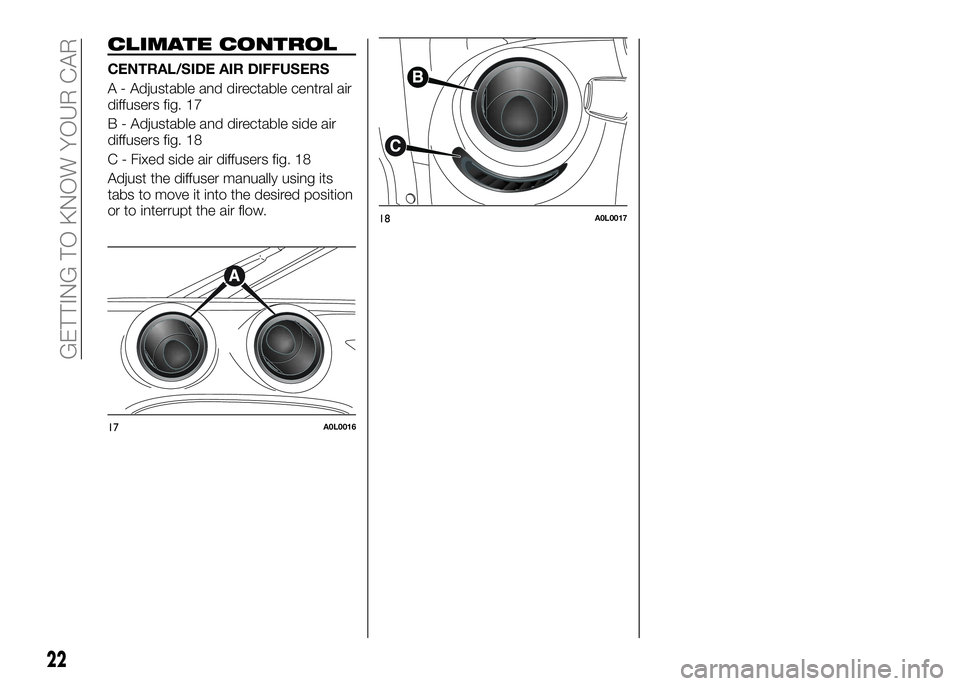
CENTRAL/SIDE AIR DIFFUSERS
A - Adjustable and directable central air
diffusers fig. 17
B - Adjustable and directable side air
diffusers fig. 18
C - Fixed side air diffusers fig. 18
Adjust the diffuser manually using its
tabs to move it into the desired position
or to interrupt the air flow.
17A0L0016
18A0L0017
22
GETTING TO KNOW YOUR CAR
Page 26 of 182
CLIMATIC COMFORT
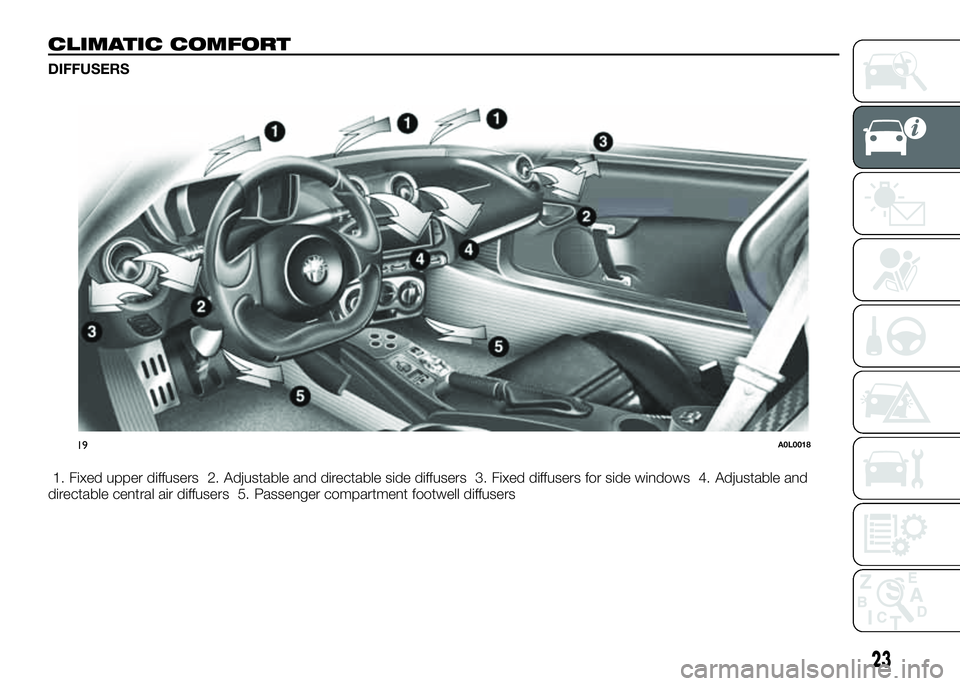
DIFFUSERS
1. Fixed upper diffusers 2. Adjustable and directable side diffusers 3. Fixed diffusers for side windows 4. Adjustable and
directable central air diffusers 5. Passenger compartment footwell diffusers
19A0L0018
23
Page 27 of 182
HEATING AND VENTILATION
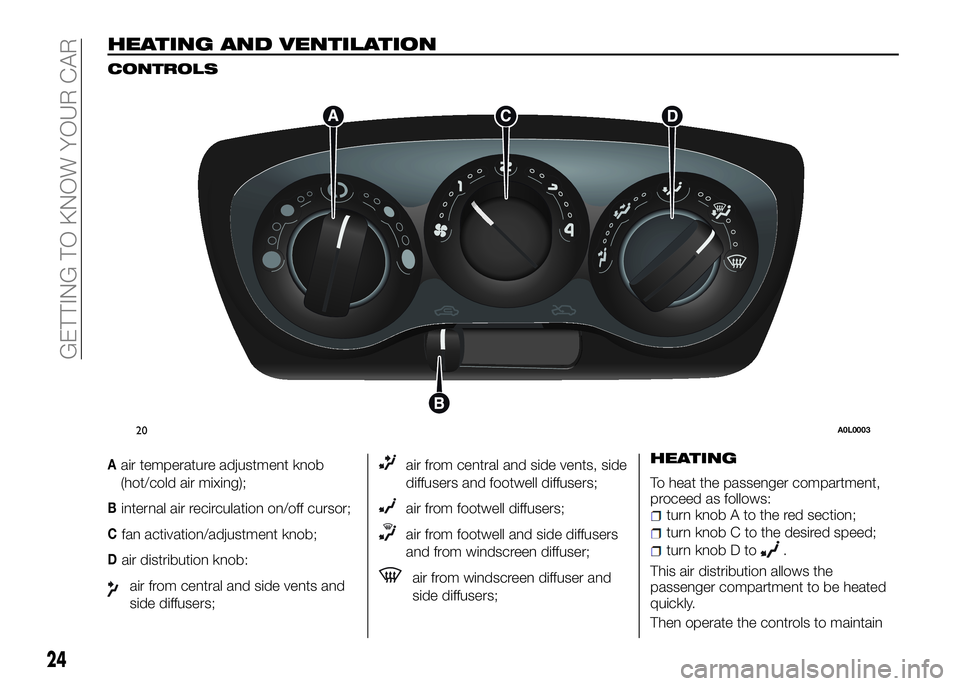
CONTROLS
Aair temperature adjustment knob
(hot/cold air mixing);
Binternal air recirculation on/off cursor;
Cfan activation/adjustment knob;
Dair distribution knob:
air from central and side vents and
side diffusers;
air from central and side vents, side
diffusers and footwell diffusers;
air from footwell diffusers;
air from footwell and side diffusers
and from windscreen diffuser;
air from windscreen diffuser and
side diffusers;HEATING
To heat the passenger compartment,
proceed as follows:
turn knob A to the red section;
turn knob C to the desired speed;
turn knob D to.
This air distribution allows the
passenger compartment to be heated
quickly.
Then operate the controls to maintain
20A0L0003
24
GETTING TO KNOW YOUR CAR
Page 29 of 182
MANUAL CLIMATE CONTROL(for versions/markets, where provided)
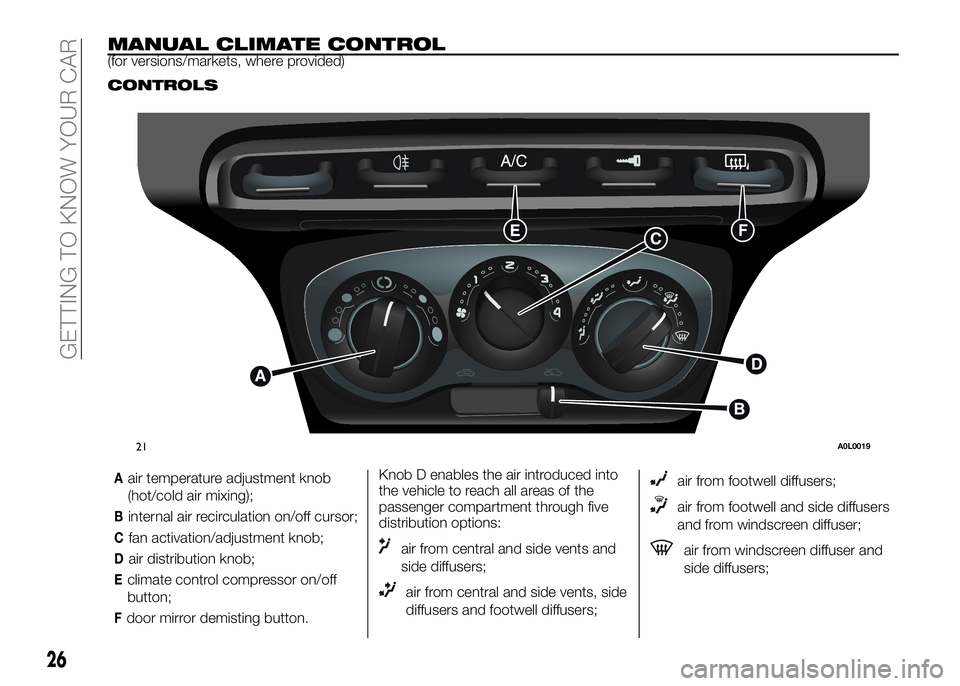
CONTROLS
Knob D enables the air introduced into
the vehicle to reach all areas of the
passenger compartment through five
distribution options:
air from central and side vents and
side diffusers;
air from central and side vents, side
diffusers and footwell diffusers;
air from footwell diffusers;
air from footwell and side diffusers
and from windscreen diffuser;
air from windscreen diffuser and
side diffusers;
21A0L0019
26
GETTING TO KNOW YOUR CAR
Aair temperature adjustment knob
(hot/cold air mixing);
Binternal air recirculation on/off cursor;
Cfan activation/adjustment knob;
Dair distribution knob;
Eclimate control compressor on/off
button;
Fdoor mirror demisting button.
Page 30 of 182
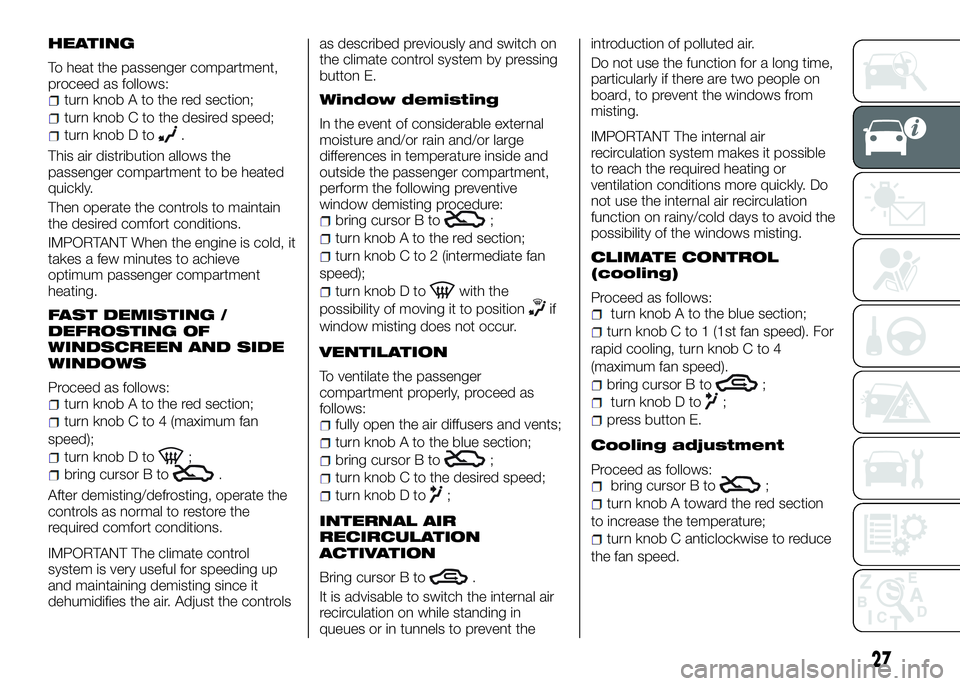
HEATING
To heat the passenger compartment,
proceed as follows:
turn knob A to the red section;
turn knob C to the desired speed;
turn knob D to.
This air distribution allows the
passenger compartment to be heated
quickly.
Then operate the controls to maintain
the desired comfort conditions.
IMPORTANT When the engine is cold, it
takes a few minutes to achieve
optimum passenger compartment
heating.
FAST DEMISTING /
DEFROSTING OF
WINDSCREEN AND SIDE
WINDOWS
Proceed as follows:turn knob A to the red section;
turn knob C to 4 (maximum fan
speed);
turn knob D to;
bring cursor B to.
After demisting/defrosting, operate the
controls as normal to restore the
required comfort conditions.
IMPORTANT The climate control
system is very useful for speeding up
and maintaining demisting since it
dehumidifies the air. Adjust the controlsas described previously and switch on
the climate control system by pressing
button E.
Window demisting
In the event of considerable external
moisture and/or rain and/or large
differences in temperature inside and
outside the passenger compartment,
perform the following preventive
window demisting procedure:
bring cursor B to;
turn knob A to the red section;
turn knob C to 2 (intermediate fan
speed);
turn knob D towith the
possibility of moving it to position
if
window misting does not occur.
VENTILATION
To ventilate the passenger
compartment properly, proceed as
follows:
fully open the air diffusers and vents;
turn knob A to the blue section;
bring cursor B to;
turn knob C to the desired speed;
turn knob D to;
INTERNAL AIR
RECIRCULATION
ACTIVATION
Bring cursor B to.
It is advisable to switch the internal air
recirculation on while standing in
queues or in tunnels to prevent theintroduction of polluted air.
Do not use the function for a long time,
particularly if there are two people on
board, to prevent the windows from
misting.
IMPORTANT The internal air
recirculation system makes it possible
to reach the required heating or
ventilation conditions more quickly. Do
not use the internal air recirculation
function on rainy/cold days to avoid the
possibility of the windows misting.
CLIMATE CONTROL
(cooling)
Proceed as follows:turn knob A to the blue section;
turn knob C to 1 (1st fan speed). For
rapid cooling, turn knob C to 4
(maximum fan speed).
bring cursor B to;
turn knob D to;
press button E.
Cooling adjustment
Proceed as follows:bring cursor B to;
turn knob A toward the red section
to increase the temperature;
turn knob C anticlockwise to reduce
the fan speed.
27
Page 39 of 182
DOORS
CENTRAL DOOR
LOCKING/UNLOCKING
Locking doors from the outside
With the doors closed, press the
button on the key or turn the metal
insert (located inside the key) in the
door lock.
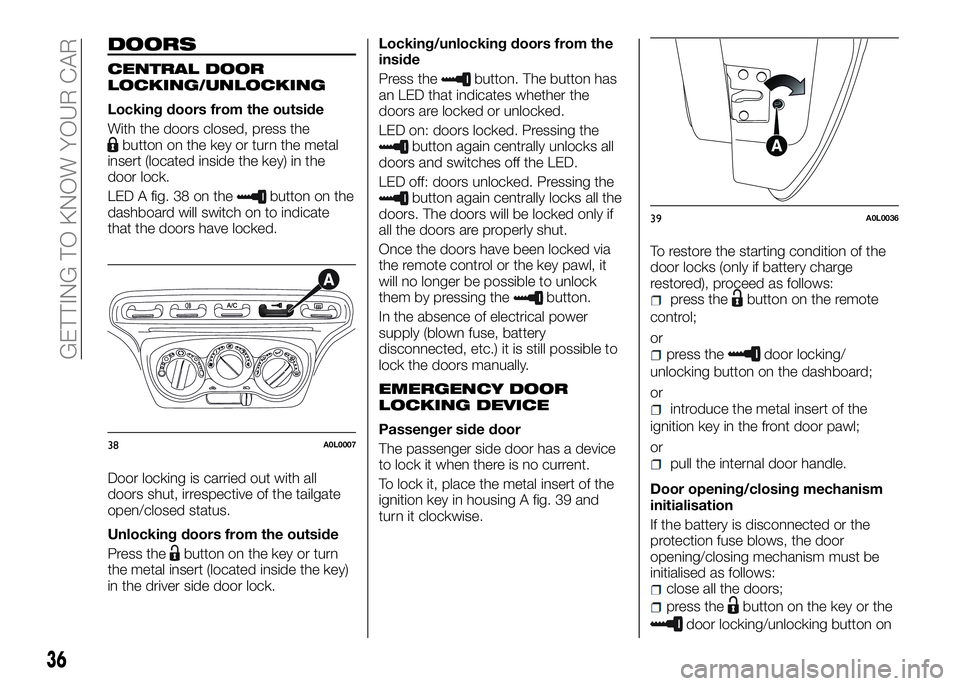
LED A fig. 38 on the
button on the
dashboard will switch on to indicate
that the doors have locked.
Door locking is carried out with all
doors shut, irrespective of the tailgate
open/closed status.
Unlocking doors from the outside
Press the
button on the key or turn
the metal insert (located inside the key)
in the driver side door lock.Locking/unlocking doors from the
inside
Press the
button. The button has
an LED that indicates whether the
doors are locked or unlocked.
LED on: doors locked. Pressing the
button again centrally unlocks all
doors and switches off the LED.
LED off: doors unlocked. Pressing the
button again centrally locks all the
doors. The doors will be locked only if
all the doors are properly shut.
Once the doors have been locked via
the remote control or the key pawl, it
will no longer be possible to unlock
them by pressing the
button.
In the absence of electrical power
supply (blown fuse, battery
disconnected, etc.) it is still possible to
lock the doors manually.
EMERGENCY DOOR
LOCKING DEVICE
Passenger side door
The passenger side door has a device
to lock it when there is no current.
To lock it, place the metal insert of the
ignition key in housing A fig. 39 and
turn it clockwise.To restore the starting condition of the
door locks (only if battery charge
restored), proceed as follows:
press thebutton on the remote
control;
or
press thedoor locking/
unlocking button on the dashboard;
or
introduce the metal insert of the
ignition key in the front door pawl;
or
pull the internal door handle.
Door opening/closing mechanism
initialisation
If the battery is disconnected or the
protection fuse blows, the door
opening/closing mechanism must be
initialised as follows:
close all the doors;
press thebutton on the key or the
door locking/unlocking button on
38A0L0007
39A0L0036
36
GETTING TO KNOW YOUR CAR
Page 40 of 182
the dashboard;
press thebutton on the key or the
door locking/unlocking button on
the dashboard.
ELECTRIC WINDOWS
These operate when the ignition key is
turned to MAR-ON and for about three
minutes after the ignition key is turned
to STOP or removed unless one of the
doors is opened.
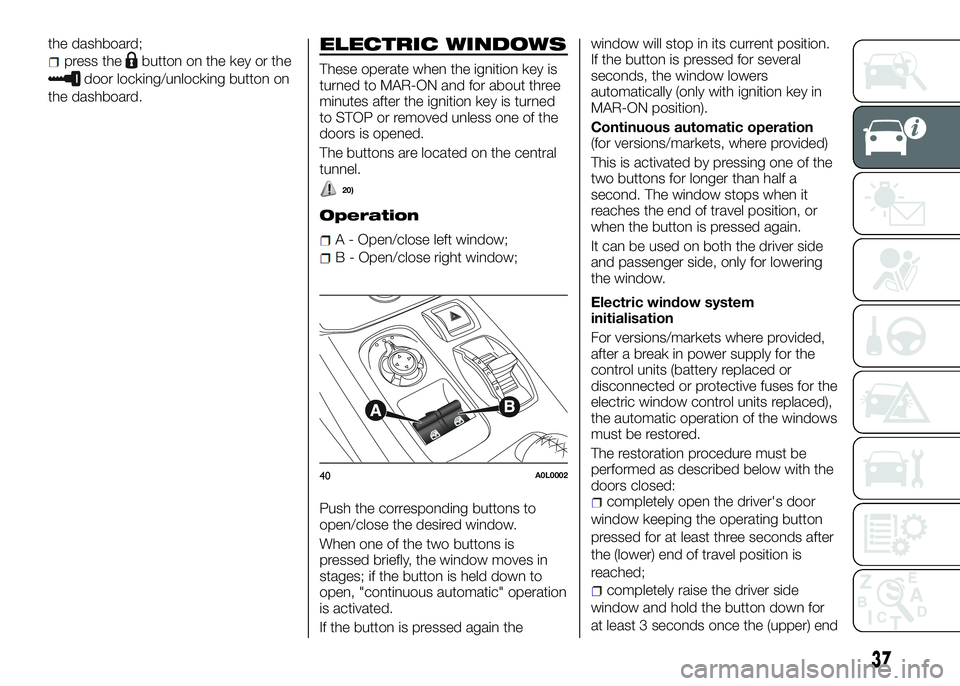
The buttons are located on the central
tunnel.
20)
Operation
A - Open/close left window;
B - Open/close right window;
Push the corresponding buttons to
open/close the desired window.
When one of the two buttons is
pressed briefly, the window moves in
stages; if the button is held down to
open, "continuous automatic" operation
is activated.
If the button is pressed again thewindow will stop in its current position.
If the button is pressed for several
seconds, the window lowers
automatically (only with ignition key in
MAR-ON position).
Continuous automatic operation
(for versions/markets, where provided)
This is activated by pressing one of the
two buttons for longer than half a
second. The window stops when it
reaches the end of travel position, or
when the button is pressed again.
It can be used on both the driver side
and passenger side, only for lowering
the window.
Electric window system
initialisation
For versions/markets where provided,
after a break in power supply for the
control units (battery replaced or
disconnected or protective fuses for the
electric window control units replaced),
the automatic operation of the windows
must be restored.
The restoration procedure must be
performed as described below with the
doors closed:
completely open the driver's door
window keeping the operating button
pressed for at least three seconds after
the (lower) end of travel position is
reached;
completely raise the driver side
window and hold the button down for
at least 3 seconds once the (upper) end
40A0L0002
37
Page 82 of 182
Warning lights on
displayWhat it means What to do
amberEXTERIOR LIGHTS FAILURE
The symbol and corresponding message appear on the
display if a fault is detected in one of the following lights:
daytime running lights (DRL)
side lights
dipped beam headlights
direction indicators
rear fog lights
reversing lights
number plate lights.
The fault relating to these lights may be caused by: one
or more blown fuses, one or more blown bulbs or a
broken electrical connection.Check, and if necessary replace the fuses involved, in
accordance with the "Fuse replacement" paragraph in
the "In an emergency" chapter; if this does not resolve
the fault, check, and if necessary replace, the bulbs
involved, in accordance with the "External bulb
replacement" paragraph in the "In an emergency"
chapter.
Should this operation also fail to resolve the fault,
contact the dedicated Alfa Romeo Dealership, for a
comprehensive check of the electrical system.
amberSERVICE (SCHEDULED SERVICING)
The digital warning light
is automatically displayed,
along with a dedicated message, with key at MAR,
2,000 km (or equivalent value in miles) before the
following scheduled servicing interval and is activated
again every 200 km (or equivalent value in miles).Contact a dedicated Alfa Romeo Dealership. The
operations in the “Scheduled Servicing Plan” will be
performed and the message will be reset.
79
Page 84 of 182
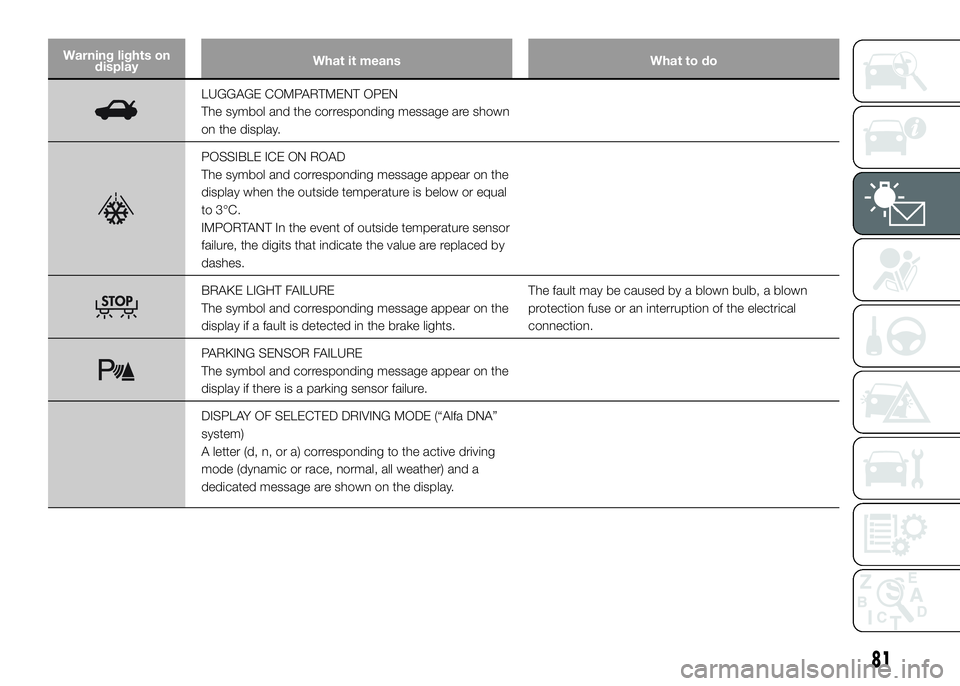
Warning lights on
displayWhat it means What to do
LUGGAGE COMPARTMENT OPEN
The symbol and the corresponding message are shown
on the display.
POSSIBLE ICE ON ROAD
The symbol and corresponding message appear on the
display when the outside temperature is below or equal
to 3°C.
IMPORTANT In the event of outside temperature sensor
failure, the digits that indicate the value are replaced by
dashes.
BRAKE LIGHT FAILURE
The symbol and corresponding message appear on the
display if a fault is detected in the brake lights.The fault may be caused by a blown bulb, a blown
protection fuse or an interruption of the electrical
connection.
PARKING SENSOR FAILURE
The symbol and corresponding message appear on the
display if there is a parking sensor failure.
DISPLAY OF SELECTED DRIVING MODE (“Alfa DNA”
system)
A letter (d, n, or a) corresponding to the active driving
mode (dynamic or race, normal, all weather) and a
dedicated message are shown on the display.
81
Page 107 of 182
IN AN EMERGENCY
A punctured tyre or a burnt-out bulb?
At times, a problem may interfere with
our journey.
The pages on emergencies can help
you to deal with critical situations
independently and with calm.
In an emergency we recommend that
you call the freephone number found in
the Warranty Booklet.
You can also use the toll-free number
00 800 2532 4200 to find your nearest
dedicated Alfa Romeo DealershipSTARTING THE ENGINE.......105
REPAIRING A WHEEL.........106
REPLACING A WHEEL........109
CHANGING A BULB..........112
REPLACING EXTERIOR BULBS . . .116
INTERIOR BULB REPLACEMENT. .119
REPLACING FUSES..........120
RECHARGING THE BATTERY. . . .124
RAISING THE CAR...........124
TOWING THE CAR...........125
104
IN AN EMERGENCY