display Alfa Romeo 8C 2007 Owner handbook (in English)
[x] Cancel search | Manufacturer: ALFA ROMEO, Model Year: 2007, Model line: 8C, Model: Alfa Romeo 8C 2007Pages: 223, PDF Size: 14.35 MB
Page 124 of 223

122
5
OTHER SYSTEM
FUNCTIONS
“Low-grip” WET mode
This mode can be used on particularly slippery
road surfaces (e.g., snow, ice) and it is
activated/deactivated by pressing button
E.
This will light up the letter “W” on the instrument
panel display.
While driving, the system ignores any
gearshifting which would cause RPM adjustment
above 2800 RPM.
“Low-grip” mode has priority over the other
functions (“automatic gearshift” and “SPORT”)
and it assists the VDC system.It is always a good rule to deactivate the other
operating modes (“automatic gearshift” and
“SPORT”) before you select “low-grip” mode.
“Automatic gearshift” mode AUTO
It is activated/deactivated by pressing the
button
D; the gear displayed is replaced with the
letter “D” and the system will automatically shift
the gears UP and DOWN according to the vehicle
speed, the engine RPM and the torque/power
requested by the driver.
WARNING: The “automatic gearshift” mode has
priority over “SPORT” mode. Therefore, if you
press the AUTO button, D the system will operate
in “automatic gearshift” mode.You can go back to NORMAL mode (or SPORT
mode, if this was active) by holding the button
D
pressed down until the word AUTO goes off.When the vehicle is stationary, requesting N 1
st
or R will not cause the system to switch from
“Automatic gearshift” to “Normal” mode.
It is always a good rule to deactivate the other
operating modes before you select “Automatic
gearshift” mode.
“No auto exit” strategy
In AUTO mode you can always request
a gearshift using the paddles, which will
temporarily set the system to “manual” mode.
This is shown on the display by the word “AUTO”
that flashes for 5 seconds and then illuminates
permanently, thus confirming that the system
has returned to AUTO mode. A further gearshift
request will restart the 5-second timer.
E
D
Page 125 of 223

123
5
F
USING THE VEHICLE
“SPORT” mode
It is activated by pressing button
F; the letter “S”
will illuminate on the display.
To return to “NORMAL” mode from “SPORT”
mode, press the button again.
As “SPORT” mode has lower priority over “low-
grip” and “automatic gearshift” modes, if these
are already active when you activate “SPORT”
mode, the system will ignore the command even
though the relative warning light switches on.
CAUTION
“SPORT” mode is characterised
by faster gearshifts than in
“NORMAL” mode and engine power
reduction through the ASR system is
kept to a minimum.
Fast gearshifting however always depends on
the accelerator pedal travel and on the engine
RPM, as in “NORMAL” mode.
DOWNshifts with the accelerator pedal released,
will have a braking effect approaching the
skidding of the driving wheels on dry asphalt.
Under racing-style driving conditions with
gearshifts at high engine RPM, double-clutching
when up-shifting is performed automatically.
CAUTION
It is advisable not to use
“SPORT” mode on roads with low or
medium “grip” conditions (e.g. ice,
snow, or wet roads) as the driving
wheels could skid during gearshifts.
Therefore, excessive use of the vehicle
in “SPORT” mode is advisable only on
racetracks.
If you use a racing-style driving when starting-off
or gearshifting with SPORT mode active, you
might feel the driving wheels begin to slip even
on dry roads.
It is a good rule to deactivate the other operating
modes (“low-grip” and “automatic gearshift”)
before you select “SPORT” mode.
Page 127 of 223

125
5
USING THE VEHICLE
USING THE
ENGINEBREAKING-IN
The latest methods of production provide high
precision in the construction and coupling of
components. However, the moving parts do
undergo a settling process, basically in the first
hours of vehicle operation.
ENGINE AND
TRANSMISSION
Avoid exceeding 5000 RPM for the first 1000
km.
After starting the vehicle, do not exceed 4000
RPM until the engine has warmed up sufficiently
(water temperature: 65, 70 °C).
Do not let the engine run at a constantly high
RPM for a prolonged time.WHILE DRIVING
Never travel with the Rev. Counter indicator
approaching the peak RPM - not even downhill.
When the revolution counter indicator is
approaching the peak RPM, drive carefully to
avoid exceeding this limit.
WARNING: In normal conditions all the red
warning lights on the instrument panel and on
the display must be off. When they illuminate,
they indicate a problem in the relative system.Ensure proper operation of the various devices by
checking the relative control gauges.
WARNING: Continuing to drive when a red
warning light is on could cause serious damage
to the vehicle and affect performance.
CAUTION
Never turn the engine off
while driving downhill as the vacuum
decrease prevents the servo brake
from functioning correctly. After a few
braking attempts, the system will
become almost completely inefficient.
The power steering will also loose its
efficiency in these condition.
Page 129 of 223

127
5
A
B
C
USING THE VEHICLE
CAUTION
Cruise Control must only
be activated when traffic and the
route permit a constant speed to be
maintained safely, for a sufficiently
long distance.
CONTROLS
The Cruise Control function is controlled by
means of the switch
A, the dial
B and the button
C (RCL).
Switch
A can be set to two positions:
- OFF the device is deactivated;
- ON the device is active. When the device
is activated, the symbol
illuminates on
the instrument panel display.The dial
B is used to store and maintain the
vehicle speed, or to increase or decrease the
speed stored.
Rotate the dial
B to position (+) to save the
speed reached or to increase the speed stored.
Rotate the dial B to position (–) to decrease the
stored speed.
Each turn of the dial
B increases or decreases the
speed by about 1 km/h. Rotate and hold the
dial to vary the speed continuously. When a new
speed is reached, it will automatically remain
constant.
Button
C (RCL) allows you to reset the stored
speed.
WARNING: When the ignition key is turned to
position STOP or the switch A to position OFF,
the stored speed is deleted and the system
deactivated.STORING A SPEED
Set the switch
A to ON and bring the vehicle up
to the desired speed. Rotate the dial
B to (+)
for at least three seconds, then release it. The
vehicle speed is saved and the accelerator pedal
can then be released.
The vehicle will proceed at the constant speed
stored in the memory until the brake pedal is
pressed.
If necessary, (for example, to pass another
vehicle), you can accelerate by simply pressing
the accelerator pedal. Afterwards, when you
release the accelerator pedal, the vehicle will
return to the speed saved previously.
Page 141 of 223

139
5
A
USING THE VEHICLE
Malfunction indication
In the event of electric parking brake system
failures, the warning light
! on the display
will come on.
Depending on the message displayed, it signals
the following failures of the EPB system:
- Parking brake failure
If the message warning you to go to the
nearest Authorised Service Centre of the
Manufacturer’s Network is displayed,
drive slowly and remember that the electric
parking brake device is not functioning.
- Excessive temperature. If after leaving the engine off (key turned
to STOP) for about 15 minutes without
using the parking brake, the warning
light illuminates again when the engine
is started, slowly drive to an Authorised
Service Centre of the Manufacturer’s
Network. If the brake failure is accompanied by the
message “Mechanical release only”, the
manual emergency deactivation procedure
must be performed to release the parking
brake.
Deactivating the PARK OFF automatic
operation
To deactivate manual operation of the electric
parking brake, with the engine on, press the
button
A on the dashboard. The words PARK OFF
will appear on the display for 5 seconds and then
the page that was active previously will reappear.
To reactivate automatic operation, press the
button A again, the words PARK ON appear on
the display for 5 seconds.
WARNING: In certain conditions, when the
battery voltage is low, the electric parking brake
activation/deactivation system may temporarily
be deactivated for safety reasons. Therefore,
typically during engine starting when the battery
voltage drops, the message PARK OFF may
temporarily appear on the display indicating that
automatic operation is temporarily disabled.
WARNING: In the case of performance
starting, check that the electric parking brake is
disengaged.
Page 148 of 223

146
6
EMERGENCY
STARTINGIf the Alfa Romeo CODE fails to deactivate the
engine immobilizer, the CODE
warning light
will illuminate permanently, while the EOBD
warning light will go off after four seconds
to turn on again immediately afterwards: the
engine will not start. To start the engine, it is
necessary to follow the emergency starting
procedure.
WARNING: We recommend that you carefully
read the entire procedure before performing it.
If you make a mistake, turn the ignition key to
STOP and repeat the operations from step 1.1) Read the 5-digit electronic code found on
the CODE CARD.
2) Turn the ignition key to MAR: at this
moment the CODE
and EOBD
warning lights are on.
3) Depress the accelerator pedal and hold
it down. Approximately 8 seconds later,
the EOBD warning light will go off.
Release the accelerator and get ready to
count the number of times the EOBD warning light fl ashes.
4) As soon as the number of fl ashing is equal
to the fi rst digit of your CODE CARD, fully
depress the accelerator pedal and hold it
down until the EOBD warning light
goes off (after approximately 4 seconds).
You can now release the accelerator pedal.
5) The EOBD warning light starts fl ashing
again. As soon as the displayed number of
fl ashing is equal to the second digit of your
CODE CARD, depress the accelerator and
hold it down.
6) Follow the same procedure for the
remaining digits in the code on the CODE
CARD.
7) When the last digit has been entered, keep
the accelerator pedal pressed down. The
EOBD warning light comes on for 4
seconds and then goes off. You can now
release the accelerator pedal.
8) A quick fl ashing of the EOBD warning
light (about 4 seconds) confi rms that
procedure has been carried out correctly.
9) Start the engine by pressing the START
button while holding the brake pedal
depressed.If the EOBD warning light remains on,
turn the key to position STOP and repeat the
procedure from step 1.
This procedure can be repeated an unlimited
number of times.
WARNING: After an emergency staring, you
should contact an Authorised Service Centre of
the Manufacturer’s Network as the emergency
starting procedure will have to be carried out
every time you start the vehicle.
Page 152 of 223

150
6
E
F
HG
A
B
C
D
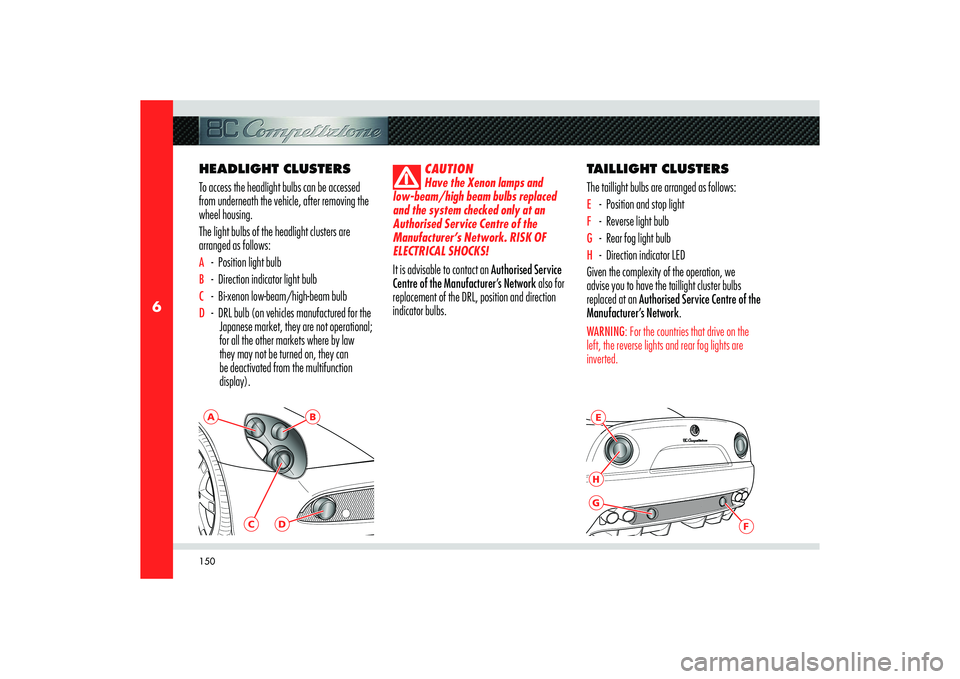
HEADLIGHT CLUSTERS
To access the headlight bulbs can be accessed
from underneath the vehicle, after removing the
wheel housing.
The light bulbs of the headlight clusters are
arranged as follows:A - Position light bulb B - Direction indicator light bulbC - Bi-xenon low-beam/high-beam bulbD - DRL bulb (on vehicles manufactured for the
Japanese market, they are not operational;
for all the other markets where by law
they may not be turned on, they can
be deactivated from the multifunction
display).
CAUTION
Have the Xenon lamps and
low-beam/high beam bulbs replaced
and the system checked only at an
Authorised Service Centre of the
Manufacturer’s Network. RISK OF
ELECTRICAL SHOCKS!
It is advisable to contact an Authorised Service
Centre of the Manufacturer’s Network also for
replacement of the DRL, position and direction
indicator bulbs.
TAILLIGHT CLUSTERS
The taillight bulbs are arranged as follows:E - Position and stop lightF - Reverse light bulbG - Rear fog light bulbH - Direction indicator LED
Given the complexity of the operation, we
advise you to have the taillight cluster bulbs
replaced at an Authorised Service Centre of the
Manufacturer’s Network.WARNING: For the countries that drive on the
left, the reverse lights and rear fog lights are
inverted.
Page 166 of 223

164
6
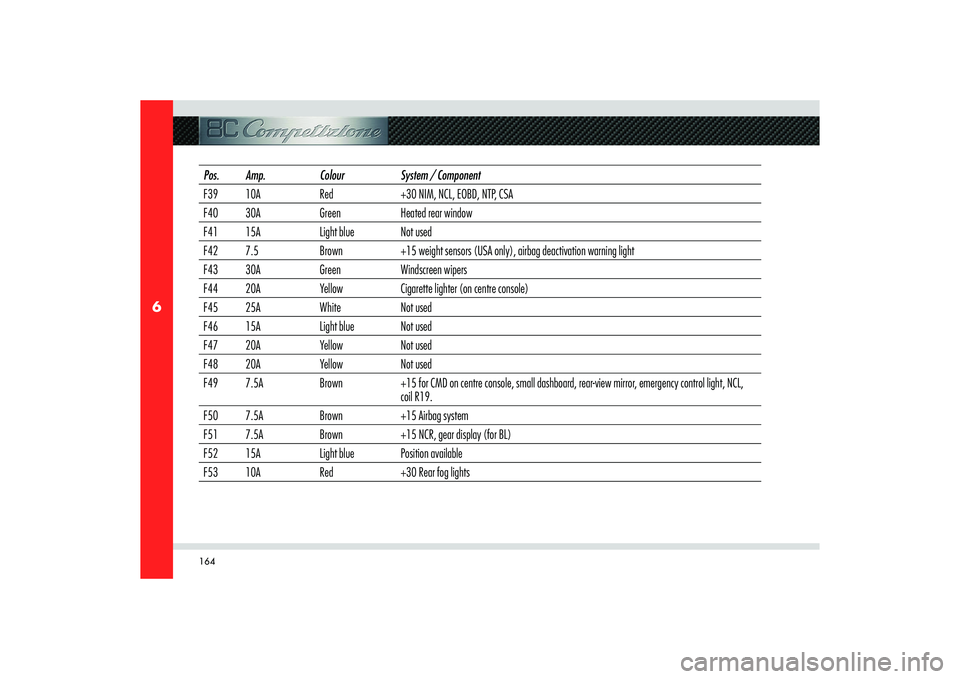
Pos. Amp. Colour System / Component
F39 10A Red +30 NIM, NCL, EOBD, NTP, CSA
F40 30A Green Heated rear window
F41 15A Light blue Not used
F42 7.5 Brown +15 weight sensors (USA only), airbag deactivation warning light
F43 30A Green Windscreen wipers
F44 20A Yellow Cigarette lighter (on centre console)
F45 25A White Not used
F46 15A Light blue Not used
F47 20A Yellow Not used
F48 20A Yellow Not used
F49 7.5A Brown +15 for CMD on centre console, small dashboard, rear-view mirror, emergency control light, NCL,
coil R19.
F50 7.5A Brown +15 Airbag system
F51 7.5A Brown +15 NCR, gear display (for BL)
F52 15A Light blue Position available
F53 10A Red +30 Rear fog lights
Page 172 of 223

170
6
IF YOU HAVE TO
TOW THE VEHICLE If you need to tow the vehicle, observe the
following recommendations:
- if possible, have the vehicle transported on
a vehicle equipped with loading platform
and specifi c for roadside assistance and
recovery.
If this is not possible:
- Tow the vehicle for a stretch of less than
100 km at a speed below 60 km/h, using
the towing hook provided in the toolkit.To be able to tow the vehicle, you must:
- Turn the ignition key to MAR without
starting the engine (see page 87)
- Engage neutral (position N) by
simultaneously pulling the gearshift paddles
UP and DOWN while holding the brake
pedal depressed (see page 118)
- turn the key back to position STOP.
CAUTION
Do not extract the key, as the
steering wheel will lock automatically
and you will be unable to steer the
wheels.
CAUTION
When towing the vehicle, make
sure that you observe the road traffic
regulations concerning both the towing
device and driving conduct.CAUTION
When towing the vehicle with
the engine off, remember that, without
the assistance of the brake servo, a
stronger effort is required on the brake
pedal for braking and on the steering
wheel for steering.
CAUTION
Screw down the towing hook
into its seat (approx. 11 turns).
Accurately clean the threaded seat
before tightening the hook.
WARNING: If you have to tow the vehicle with 2
wheels raised, ensure that the ignition key is in
the STOP position. Otherwise, when the VDC is
active, the relative ECU will store a malfunction,
which will cause the illumination of the warning
light
on the instrument panel display. This
requires the intervention of an Authorised
Service Centre of the Manufacturer’s Network
to correct the system malfunction.
Page 193 of 223

191
8
MAINTENANCE
The Scheduled Maintenance operations are
indicated on the display up to the ninth service
when the due date is approaching; this value is
shown in kilometres.
The message is displayed only once, upon
activating the instrument panel, at decreasing
intervals expressed in Km (1800, 1600, ......
100, 50).
Once the set limit in kilometres is reached, every
time the instrument panel is turned on thereafter,
the message “Service Stop expired” will be
displayed.Selecting the “Service” function from the Setup
menu, you can view when the next service is due
(see page 48).