warning lights Alfa Romeo 8C 2009 Owner handbook (in English)
[x] Cancel search | Manufacturer: ALFA ROMEO, Model Year: 2009, Model line: 8C, Model: Alfa Romeo 8C 2009Pages: 223, PDF Size: 14.35 MB
Page 6 of 223
4
ABBREVIATIONS
Some descriptions and terms with particular
meanings are found in this manual in an
abbreviated form:
A.C. - AIR CONDITIONING
ABS - ANTI-LOCK BRAKING SYSTEM - Wheel
locking prevention system during
braking
ASR - ANTI-SLIP REGULATION - Prevention
of slipping during acceleration
CAN - CONTROLLER AREA NETWORK
DRL - DAY RUNNING LIGHTS
EBD - ELECTRONIC BRAKE-FORCE
DISTRIBUTION - Electronically-
controlled brake distributor
ECU - ELECTRONIC CONTROL UNIT
EPB - ELECTRIC PARKING BRAKE
– Automatic parking brake
ETD - EMERGENCY TENSIONING DEVICE
FTP - FLASH TO PASS – headlight fl ashingMSP - MOTOR SCHLEPPMOMENT
REGELUNG – Engine braking torque
adjustment
VDC - Vehicle Dynamics Control
WET - “Low grip” function.
UPDATING
The high quality level of the vehicle is subject to
constant improvements. Therefore, there may
be differences between this manual and your
vehicle.
All specifi cations and illustrations contained in
this manual refer to those resulting as of the
printing date. CONSULTING THE
MANUAL
To facilitate reading and fast consultation, the
topics have been divided into sections and
chapters.
The important parts requiring particular attention
are easily identifi able in the sections and
chapters.
N.B.: EXTREME CAUTION
REQUIRED:
failure to comply with the instructions
could cause hazardous situations
involving personal and vehicle safety!
WARNING: warning aimed at preventing
any damage to the vehicle and thus hazards
involving the safety of persons.
Page 36 of 223
34
2
WARNING: If you have to tow the vehicle with
2 wheels raised, ensure that the ignition key
is in the STOP position. Otherwise, with VDC
activated, the relative control unit will store a
malfunction, resulting in the illumination of the
warning lights
on the instrument panel and
on the display: this requires the intervention
of an Authorised Service Centre of the
Manufacturer’s Network to correct the system
malfunction.
WARNING: In low- and medium-grip conditions
(e.g., rain, snow, ice, sand, etc.) it is advisable
not to use SPORT mode, even with the VDC
activated.
WARNING: Driving on parabolic curves will
deactivate the system.
ASR SYSTEM (ELECTRONIC ANTI-
SKID DEVICE)The ASR system avoids driving wheels skidding
during acceleration through the engine control
unit (spark advance delay, engine throttle
opening reduction and fuel injection cut) and the
rear brakes.
The action of the ASR system enhances vehicle
stability and improves active safety while driving,
specially under the following conditions:
inside wheel skidding when cornering due
to dynamic load variations or excessive
acceleration
excessive power transmitted to the
wheels, also in relation to the road surface
conditions acceleration on slippery, snow-covered or icy
roads
grip loss on wet road surface
(aquaplaning).
In normal conditions (SPORT mode off), the ASR
system increases stability in low and medium
grip conditions, while with SPORT mode active
the system favours traction, thereby optimising
vehicle performance on dry asphalt.
Page 43 of 223
3
INSTRUMENTS AND CONTROLS
Dashboard .......................................................................................................................... 42
Instrument panel ................................................................................................................. 45
Reconfi gurable multifunction display ...................................................................................... 46
Warning lights and messages ................................................................................................ 60
Instruments and gauges ........................................................................................................66
Controls ............................................................................................................................. 68
Internal equipment .............................................................................................................. 72
Page 47 of 223
45
3
1
24
3
INSTRUMENTS AND CONTROLS
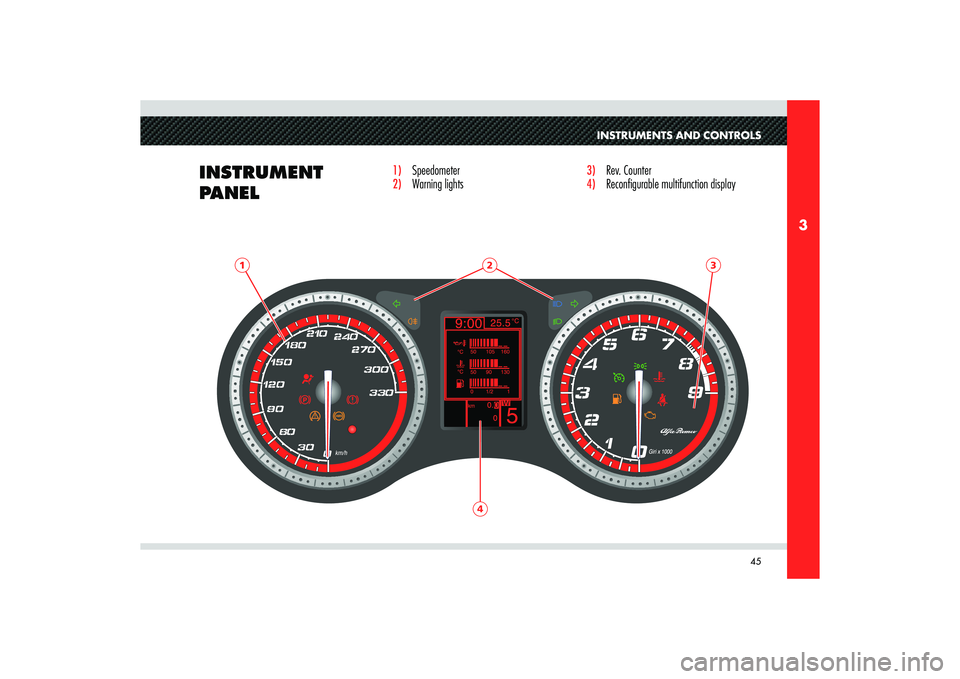
INSTRUMENT
PANEL
1) Speedometer 2) Warning lights
3)
Rev. Counter
4)
Reconfi gurable multifunction display
Page 52 of 223
50
3
Brightness adjustment
This function allows you to adjust the brightness
of the instrument panel to 8 levels.
To adjust, proceed as follows:
- briefl y press the MENU button: the display
highlights the level previously set.
- press button + o – to adjust;
- press the MENU button briefl y to return to
the menu page or hold it down to return to
the standard page.Speed limit
This function allows you to set the vehicle
speed limit (km/h or mph). When this limit is
exceeded, you are warned with an acoustic and
visual warning and a message appears on the
display (see the section “Warning lights and
messages”).
To set the speed limit proceed as follows:
- briefl y press the MENU button: the message
OFF is displayed ;
- Press the + button: the message ON; is
displayed briefl y press the MENU button
then press the buttons +/– to set the
desired speed (the value fl ashes during
setting).
- press the MENU button briefl y to return to
the main page or hold it down to return to
the standard page.
WARNING: The value can be set between
30 and 250 km/h (or 20 and 150 mph)
depending on the unit of measure previously
set (see the chapter “Unit of measure” below).
When the +/– button is pressed once, the speed
is increased/decreased by 5 units. Holding the
+/– button down, the value automatically
increases/decreases continuously until you
release the button. When you are close to the
desired value, release the button and then press
it briefly a few times until you reach the desired
value.To cancel the setting:
- briefl y press the MENU button: the message
ON is displayed;
- press button –: the message OFF is
displayed;
- press the MENU button briefl y to return to
the menu page or hold it down to return to
the standard screen page.
Page 53 of 223
51
3
INSTRUMENTS AND CONTROLS
Adjusting the sensing range of the twilight
sensor (Automatic low-beam)
This function allows you to adjust the sensing
range of the twilight sensor to 3 levels.
To adjust, proceed as follows:
- briefl y press the MENU button: the display
highlights the sensing range level previously
set
- press button + o – to adjust;
- press the MENU button briefl y to return to
the menu page or hold it down to return to
the standard screen page.Trip B reset mode (Reset TRIP B)
This function allows you to select Trip B reset
mode (automatic or manual).
For further information see the chapter “TRIP
button”.Clock adjustment (Clock)
This function allows you to adjust the clock.
To adjust the time proceed as follows:
- briefl y press the MENU button: the display
highlights the “hours”
- press button + o – to adjust;
- briefl y press the MENU button: the display
highlights the “minutes”
- press button + o – to adjust;
WARNING: When the button is pressed once
+/– the value increases/decreases by 1
unit. Holding the +/– button down, the value
automatically increases/decreases continuously
until you release the button. When you are close
to the desired value, release the button and then
press it briefly a few times until you reach the
desired value.- press the MENU button briefl y to return to
the main page or hold it down to return to
the standard page.
Page 54 of 223
52
3
Clock mode (12/24 mode)
This function allows you to set the time display
mode in 12h or 24h format.
To set the clock proceed as follows:
- briefl y press the MENU button: the display
highlights 12h or 24h (depending on the
format previously set);
- press button + o – to select;
- press the MENU button briefl y to return to
the main page or hold it down to return to
the standard page.Date adjustment (Date)
This function allows you to adjust the date (year
- month - day).
To adjust the date proceed as follows:
- briefl y press the MENU button: the “year”
fl ashes on the display
- press button + o – to adjust;
- briefl y press the MENU button: the
“month” fl ashes on the display
- press button + o – to adjust;
- briefl y press the MENU button: the “day”
fl ashes on the display
- press button + o – to adjust;
WARNING: When the button is pressed once
+/– the value increases/decreases by 1 unit.
Holding the +/– button down +/–the value
automatically increases/decreases continuously
until you release the button. When you are close
to the desired value, release the button and then
press it briefly a few times until you reach the
desired value. - press the MENU button briefl y to return to
the main page or hold it down to return to
the standard page.
Page 56 of 223
54
3
WARNING:If the vehicle is tested on the roller
test bench without any operator on board, check
in the vehicle Setup menu that the automatic
door locking function is disabled or that a
window is open, or that there is a second key
available outside the vehicle.
Unit of Measure (Unit of Measure)
This function allows you to set the unit of
measure for the mileage (km or mi), fuel
consumption (l/100 km, km/l or mpg) and
temperature (°C or °F).
DistanceTo set the desired unit of measure, proceed as
follows:
- briefl y press the MENU button: the display
highlights “km” or “mi” (depending on
what was previously set);
- press button + or – to select;
- press the MENU button briefl y to return to
the menu page or hold it down to return to
the standard screen page.
Fuel consumption If the unit of measure for the mileage is set to
“km” (see previous chapter), you can set the
unit of measure for fuel consumption (l/100
km, km/l or mpg).
If the unit of measure for the mileage is set to
“mi” (see previous chapter), the display will
show the fuel consumption in “mpg”.
In this case, the “Fuel consumption Unit of
Measure” option in the Setup menu can be
selected but is fixed on the indication in “mpg”.
To set the desired unit of measure, proceed as
follows:
- briefl y press the MENU button: the
display highlights “km/l” or “l/100 km”
(depending on the unit was previously set);
- press button + o – to select;
- press the MENU button briefl y to return to
the menu page or hold it down to return to
the standard screen page.
Page 57 of 223
55
3
INSTRUMENTS AND CONTROLS
TemperatureThis function allows you to set the unit of
measure for the temperature (°C or °F).
To set the desired unit of measure, proceed as
follows:
- briefl y press the MENU button: the display
highlights °C or °F (depending on the unit
was previously set);
- press button + o – to select;
- press the MENU button briefl y to return to
the menu page or hold it down to return to
the standard screen page.Language selection (Language)
You can select one of the following languages
for the messages shown on the display: Italian,
English, German, Portuguese, Spanish, French,
Dutch and Brazilian.
To set the desired language, proceed as follows:
- press the MENU button briefl y, the display
highlights the “language” previously set;
- press button + o – to select;
- press the MENU button briefl y to return to
the main page or hold it down to return to
the standard page.Failure/warning buzzer volume (Beep Vol.)
This function allows adjusting (to 8 levels) the
volume of the buzzer that sounds together with
display of the failure/warning.
To set the desired volume, proceed as follows:
- press the MENU button briefl y, the display
highlights the volume “level” previously set;
- press button + o – to adjust;
- press the MENU button briefl y to return to
the main page or hold it down to return to
the standard page.
Page 58 of 223
56
3
Scheduled maintenance (Service)
This function allows you to view when service is
due according to the mileage done.
To view this information, proceed as follows:
- briefl y press the MENU button: the display
shows when service is due in kilometres
or miles depending on the unit that was
previously set (see the chapter “Unit of
measure”);
- press the MENU button briefl y to return to
the menu page or hold it down to return to
the standard screen page.
WARNING: According to the Scheduled
Maintenance Plan, the vehicle must be
serviced every 10,000 km (or 6,000 mi). This
information is automatically displayed when the
electronic key is inserted in the ignition block,
starting from 2,000 km (or 1,200 mi) following
the service due date. The information will be
displayed in kilometres or miles depending on
the unit of measure set. When approaching the
scheduled maintenance (“Service”) due date,
inserting the electronic key in the ignition block,
a message will appear on the display followed
by the kilometres/miles left until the service due
date. Contact an Authorised Service Centre of
the Manufacturer’s Network where the staff
will perform the service operations according to
the Scheduled Maintenance or Annual Inspection
Plan and reset the mileage counter (Reset).
Buzzer reactivation for SBR (Seat Belt
Reminder) signalling (Seat belt beep)(where
provided)
This function is displayed only after the system
has been deactivated by an Authorised Service
Centre of the Manufacturer’s Network.
Automatic activation of the Day Running
Lights (where provided)
If this function is active, when the low-beams go
off, the DRLs come on, and vice versa, when the
low-beams come on the DRLs go off.
Exit menu
Select this item to return to the standard screen
page.