tow Alfa Romeo 8C 2010 Owner handbook (in English)
[x] Cancel search | Manufacturer: ALFA ROMEO, Model Year: 2010, Model line: 8C, Model: Alfa Romeo 8C 2010Pages: 223, PDF Size: 14.35 MB
Page 7 of 223
00 800 2532 8200Alfa8Care
INTRODUCTION
5
SERVICE
The information contained in this manual is
limited to those instructions and indications
that are strictly required for the use and good
preservation of the vehicle.
The Owner will certainly obtain greater
satisfaction and the best results from the vehicle
by following these instructions carefully.
We also advise you to have all the maintenance
services and inspections carried out by
the Authorised Service Centres of the
Manufacturer’s Network, where you will fi nd
specialised staff and suitable equipment.
Contact the dedicated Alfa8Care Customer
Number for the location of the Authorised
Service Centres of the Manufacturer’s
Network.“Q-SELECT”
The vehicle may come equipped with a
mechanical gearbox system with dry double-
plate clutch, controlled by an electro-hydraulic
system by means of the paddles on the steering
wheel.
Although the system can be used in “automatic”
mode, “Q-select” should not be considered as an
automatic gearbox. Therefore, for correct use,
carefully follow the instructions in the relative
section of this manual.AUDIO AND IT SYSTEMS
The vehicle is equipped with the following
systems:
- Becker car stereo and CD player with
Bluetooth voice controls and MP3 reader.
- Bose HI-FI system with 8 high-performance
speakers (optional).
- iPod connection (optional).
- 3D pictogram navigation system with route
display (optional).
TOWING THE VEHICLE
The vehicle has not been designed, developed
and homologated to be used as a towing vehicle
for other means (e.g. trailers, caravans, etc.)
and nothing can be loaded on the roof; fi tting
structures such as bars or roof-racks may damage
the vehicle.
Page 36 of 223
34
2
WARNING: If you have to tow the vehicle with
2 wheels raised, ensure that the ignition key
is in the STOP position. Otherwise, with VDC
activated, the relative control unit will store a
malfunction, resulting in the illumination of the
warning lights
on the instrument panel and
on the display: this requires the intervention
of an Authorised Service Centre of the
Manufacturer’s Network to correct the system
malfunction.
WARNING: In low- and medium-grip conditions
(e.g., rain, snow, ice, sand, etc.) it is advisable
not to use SPORT mode, even with the VDC
activated.
WARNING: Driving on parabolic curves will
deactivate the system.
ASR SYSTEM (ELECTRONIC ANTI-
SKID DEVICE)The ASR system avoids driving wheels skidding
during acceleration through the engine control
unit (spark advance delay, engine throttle
opening reduction and fuel injection cut) and the
rear brakes.
The action of the ASR system enhances vehicle
stability and improves active safety while driving,
specially under the following conditions:
inside wheel skidding when cornering due
to dynamic load variations or excessive
acceleration
excessive power transmitted to the
wheels, also in relation to the road surface
conditions acceleration on slippery, snow-covered or icy
roads
grip loss on wet road surface
(aquaplaning).
In normal conditions (SPORT mode off), the ASR
system increases stability in low and medium
grip conditions, while with SPORT mode active
the system favours traction, thereby optimising
vehicle performance on dry asphalt.
Page 100 of 223
98
4
HIGH BEAMS
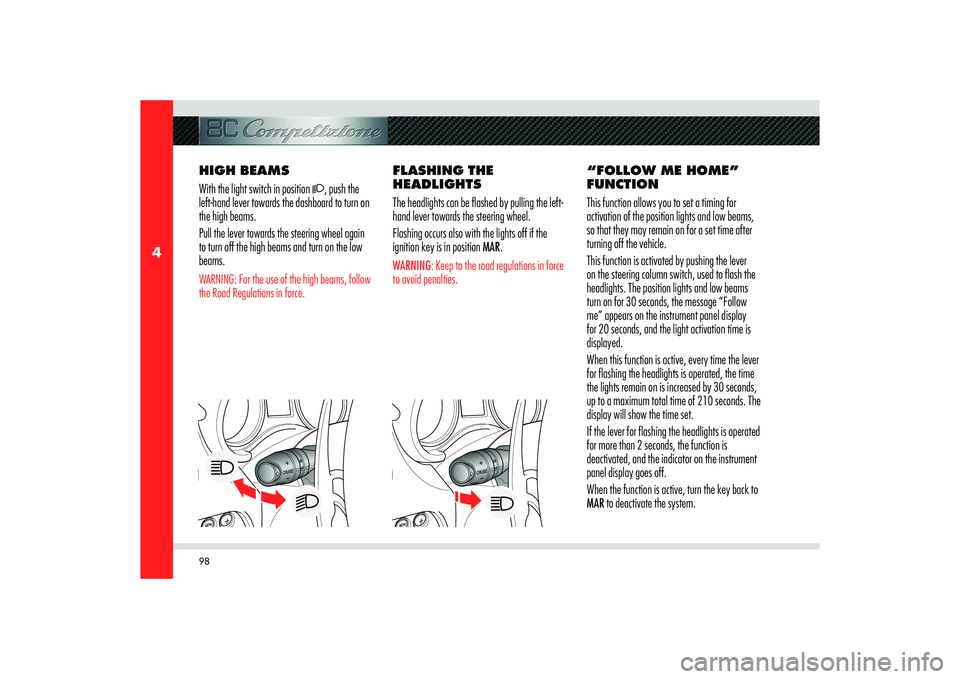
With the light switch in position
, push the
left-hand lever towards the dashboard to turn on
the high beams.
Pull the lever towards the steering wheel again
to turn off the high beams and turn on the low
beams.
WARNING: For the use of the high beams, follow
the Road Regulations in force.
FLASHING THE
HEADLIGHTS
The headlights can be flashed by pulling the left-
hand lever towards the steering wheel.
Flashing occurs also with the lights off if the
ignition key is in position MAR.WARNING: Keep to the road regulations in force
to avoid penalties.
“FOLLOW ME HOME”
FUNCTION
This function allows you to set a timing for
activation of the position lights and low beams,
so that they may remain on for a set time after
turning off the vehicle.
This function is activated by pushing the lever
on the steering column switch, used to flash the
headlights. The position lights and low beams
turn on for 30 seconds, the message “Follow
me” appears on the instrument panel display
for 20 seconds, and the light activation time is
displayed.
When this function is active, every time the lever
for flashing the headlights is operated, the time
the lights remain on is increased by 30 seconds,
up to a maximum total time of 210 seconds. The
display will show the time set.
If the lever for flashing the headlights is operated
for more than 2 seconds, the function is
deactivated, and the indicator on the instrument
panel display goes off.
When the function is active, turn the key back to
MAR to deactivate the system.
Page 101 of 223
99
4
BAECD
BEFORE YOU DRIVE
WINDSCREEN
WASHER/WIPERS
AND HEADLIGHT
WASHERThe windscreen wiper and washer only works
with the ignition key turned to MAR.
WINDSCREEN WIPER
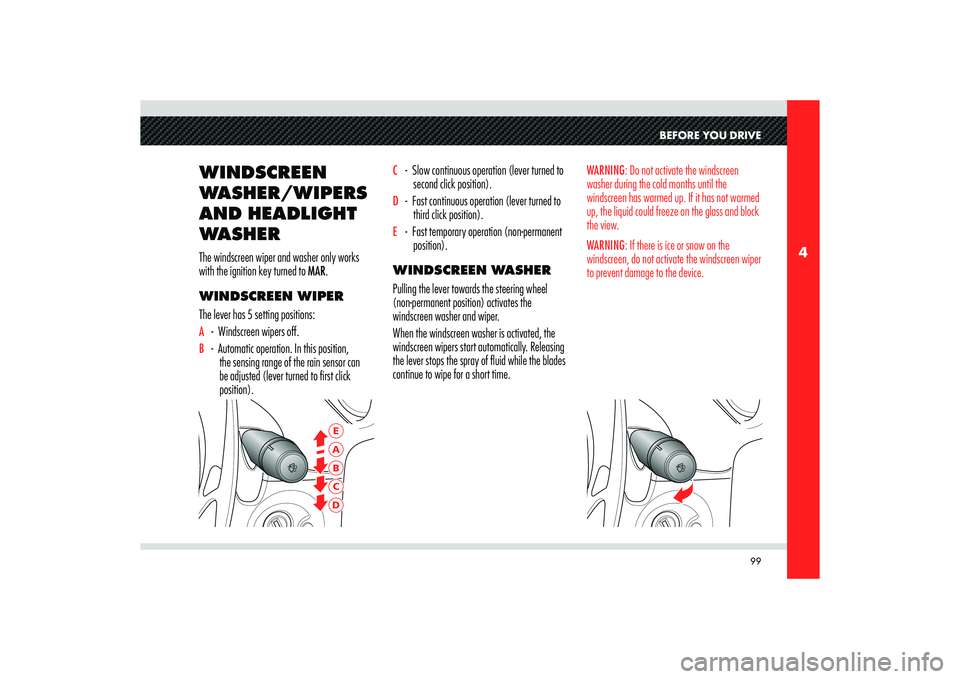
The lever has 5 setting positions:A - Windscreen wipers off.B - Automatic operation. In this position,
the sensing range of the rain sensor can
be adjusted (lever turned to first click
position).
C - Slow continuous operation (lever turned to
second click position).D - Fast continuous operation (lever turned to
third click position).E - Fast temporary operation (non-permanent
position).
WINDSCREEN WASHER
Pulling the lever towards the steering wheel
(non-permanent position) activates the
windscreen washer and wiper.
When the windscreen washer is activated, the
windscreen wipers start automatically. Releasing
the lever stops the spray of fluid while the blades
continue to wipe for a short time.
WARNING: Do not activate the windscreen
washer during the cold months until the
windscreen has warmed up. If it has not warmed
up, the liquid could freeze on the glass and block
the view.
WARNING: If there is ice or snow on the
windscreen, do not activate the windscreen wiper
to prevent damage to the device.
Page 116 of 223
114
5
MAR
STARTING THE
ENGINE
CAUTION
Hold the brake pedal depressed
when starting the engine.
CAUTION
It is dangerous to operate the
engine in an enclosed space. The engine
consumes oxygen and discharges
carbon dioxide, carbon monoxide and
other toxic gases.
WARNING: Before start-up, switch off the
electrical devices with a high power consumption
(air-conditioning and heating system, heated
rear window, headlights, etc.).
WARNING: Do not start the engine if the fuel
level in the tank is low.
1) Make sure that the parking brake is applied
and that the doors are closed.
2) Hold the brake pedal depressed when
starting the engine.
3) Do not depress the accelerator pedal.
4) Set the gear to neutral by pulling both
paddles UP and DOWN towards the
steering wheel and check that the gear
display indicates N not fl ashing.
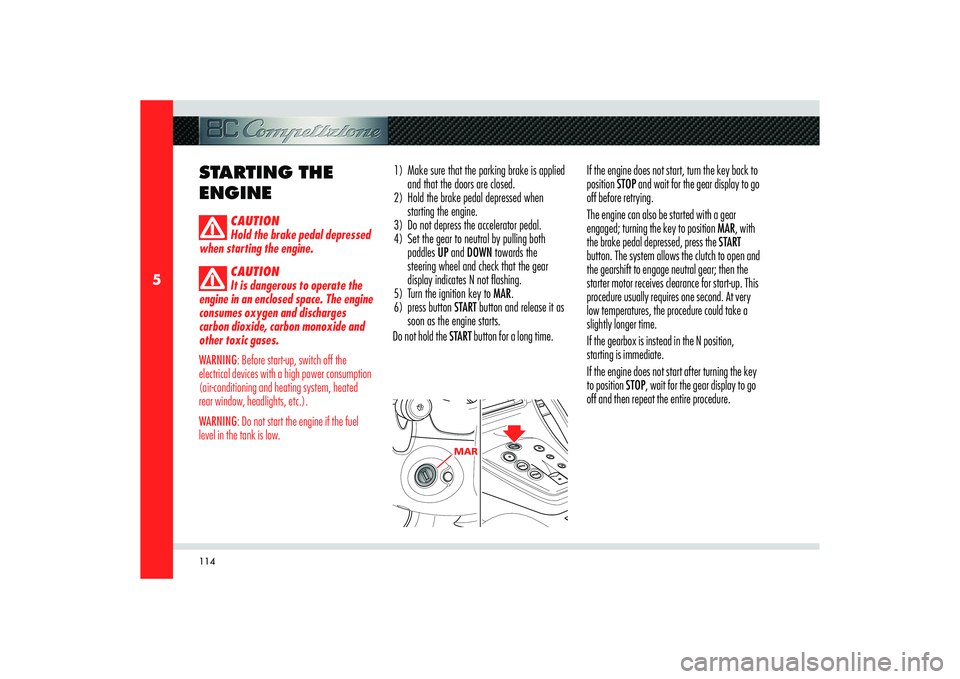
5) Turn the ignition key to MAR.
6) press button START button and release it as
soon as the engine starts.
Do not hold the START button for a long time.If the engine does not start, turn the key back to
position STOP and wait for the gear display to go
off before retrying.
The engine can also be started with a gear
engaged; turning the key to position MAR, with
the brake pedal depressed, press the START
button. The system allows the clutch to open and
the gearshift to engage neutral gear; then the
starter motor receives clearance for start-up. This
procedure usually requires one second. At very
low temperatures, the procedure could take a
slightly longer time.
If the gearbox is instead in the N position,
starting is immediate.
If the engine does not start after turning the key
to position STOP, wait for the gear display to go
off and then repeat the entire procedure.
Page 120 of 223
118
5
If the symbol
remains on, there is a system
failure. This condition is also indicated by a beep
when the key is turned to position MAR.
WARNING: Contact an Authorised Service
Centre of the Manufacturer’s Network to have
the malfunction corrected.
OPERATION WITH THE
ENGINE OFF
After completing the “system start-up” stage,
the gear currently engaged will appear on the
display:
- N (Neutral)
- R (Reverse)
- D(1
st).
If the indication flashes (may also occur with N)
it means that the gear is not properly engaged or
is disengaged; therefore, request neutral (N) and
then the desired gear.CAUTION
If a horizontal dash appears on
the display, there is a system failure.
When the engine is off, 1st gear, reverse (R) and
neutral (N) can be engaged. Keeping the brake
pedal pressed during the request, you must
proceed as follows:
- N (Neutral): pull both paddles found behind
the steering wheel.
- R (Reverse): press button
C.
- Engaging 1
st gear: pull the UP paddle
towards the steering wheel.
CAUTION
To engage reverse gear, hold
the button C down until the letter R is
displayed.
WARNING: Immediately release the paddles
UP, DOWN and the button R after the gearshift
request. A prolonged manoeuvre may cause
the failure warning light
and the buzzer
to activate. Do not operate the system with the
engine off, to prevent discharging the battery.
Avoid useless gearshifting with the engine off, to
prevent overheating of the pump.
Page 121 of 223
119
5
USING THE VEHICLE
DRIVING THE VEHICLE
With the engine running, the vehicle stationary
and the brake pedal pressed, release the brake
and depress the accelerator to start off.
With the engine on and the vehicle stationary,
you can shift directly from 1
st gear to R (reverse
gear), by pressing the button C, and from reverse
gear to 1
st gear by pulling the paddle
B UP
towards the steering wheel.
WARNING: Reverse gear engagement is
accompanied by a safety acoustic signal, which
sounds intermittently for the entire reversing
manoeuvre. When shifting from reverse to 1
st gear, if the
system automatically engages 2nd gear, it
indicates that jamming has occurred with 1
st
gear. Therefore, this is not a failure, as it falls
within the logic of the system operation.
For the same reason, the system automatically
engages neutral (N) in case of jamming
when shifting from 1
st gear to reverse. During
prolonged stops with the engine running, it is
advisable to keep the gearshift in neutral (N).Hill Holder Strategy
The Hill Holder system helps the driver when
starting-off on an uphill slope. It activates only
following a vehicle stop when the brake pedal
is released, keeping the vehicle stationary for a
moment, so as to allow the driver to move from
the brake to the accelerator pedal.
The system is capable of varying its activation
time depending on the road slope. This time
ranges from a minimum (0.06 seconds)
on downhill stretches and a maximum (1.2
seconds) on uphill stretches, so that the driver
will not perceive the vehicle as “braking”
downhill.
The function that measures the gradient is active
only at speeds over 8 km/h, therefore gradient
changes at lower speeds will not be detected.
Example: if you are driving uphill and you make
a manoeuvre to change your driving direction,
the system will not detect a gradient change,
and its maximum activation time will remain 1.2
seconds.
WARNING: If, on downhill slopes, you let the
vehicle move in neutral (N), when you request
a gearshift UP, the gear engaged will depend on
the current speed of the vehicle. For safety reasons, the system activates the
warning buzzer and automatically engages
neutral (N) when, with the vehicle stationary,
the engine running and a gear engaged:
- the brake pedal or the accelerator are not
depressed for over 1 minute
- the brake pedal is depressed for more than
10 minutes
- the door is opened without depressing the
brake pedal or the accelerator
- the engine compartment lid is opened.WARNING: The warning buzzer is activated
even if the clutch overheats during the “pickup”
manoeuvre. In these cases, you must start off
immediately or release the accelerator pedal and
depress the brake pedal.
Page 137 of 223
135
5
USING THE VEHICLE
ANTI-POLLUTION
DEVICES Even if the vehicle is equipped with anti-pollution
devices, the environment deserves the greatest
respect from every one of us.
By following a few simple rules, the vehicle
driver can avoid damaging the environment and
very often can reduce fuel consumption as well.
In this regard, some useful information is listed
here below; please read it carefully.
The correct operation of the anti-pollution devices
not only assures respect for the environment, but
also has an impact on vehicle performance.
So, keeping these devices in good working
conditions is the first rule for driving that is both
ecologically sound and economical.
The first precaution is to follow the Scheduled
Maintenance plan scrupulously. Always use unleaded fuel.
If starting is difficult, do not make prolonged
attempts.
Especially avoid push starts, towing or hill starts:
these are all manoeuvres that can damage
catalytic converters.
Use an auxiliary battery only when making an
emergency start.
While driving, if the engine does not run
smoothly, you may continue driving but reducing
engine performance to a minimum; you should
then contact an Authorised Service Centre
of the Manufacturer’s Network as soon as
possible.
Never run the engine, even if only for testing,
with one or more spark plugs disconnected.
Do not warm up the engine letting it idle before
starting off, except in the event of very low
outside temperatures and, even then, for no
longer than 30 seconds.
CAUTION
During normal operation the
catalyst converter generates high
temperatures. Do not, therefore, park
the vehicle on flammable materials
(e.g. grass, dry leaves, pine needles,
etc.): risk of fire!
Do not install heat guards and do not remove
those already fitted to the catalytic converter and
to the exhaust manifold.
Do not spray anything on the catalytic converter,
lambda probe and exhaust manifold.
CAUTION
Failure to comply with these
rules can lead to fire hazards.
Page 147 of 223
6
Emergency starting ............................................................................................................146
If a tyre gets a puncture ..................................................................................................... 147
If an exterior light goes out .................................................................................................149
If an interior light goes out .................................................................................................. 153
If the battery is fl at ........................................................................................................... 168
If you have to jack up the vehicle ........................................................................................ 169
If you have to tow the vehicle ............................................................................................ 170
In the event of an accident ................................................................................................. 171
IN AN EMERGENCY
Page 149 of 223
147
6
ABIN AN EMERGENCY
TOOLKIT
The vehicle is equipped with the following tools:
- toolkit, housed in the luggage compartment
- box with electric compressor, jack and
tools for fi tting the spare wheel (optional),
located inside the spare wheel itself.
The toolkit, housed under the floor panel,
contains:
- 8 + 10 open end wrench
- 13 + 17 open end wrench
- double slot + cross-head screwdriver
- tow hook
- Electric parking brake actuator release tool
IF A TYRE GETS A
PUNCTURE PRECAUTIONS IN THE
EVENT OF A PUNCTURE
If a tyre gets a puncture, you can make a first
emergency repair using the tyre repair kit
provided.
This kit allows repairing tyre punctures of up to
6 mm (7/32 in); the kit can be used in any
atmospheric condition.
Do not remove the foreign body (e.g. screw or
nail) from the punctured tyre.
Take the repair kit out of the bag found in the
luggage compartment and position it near the
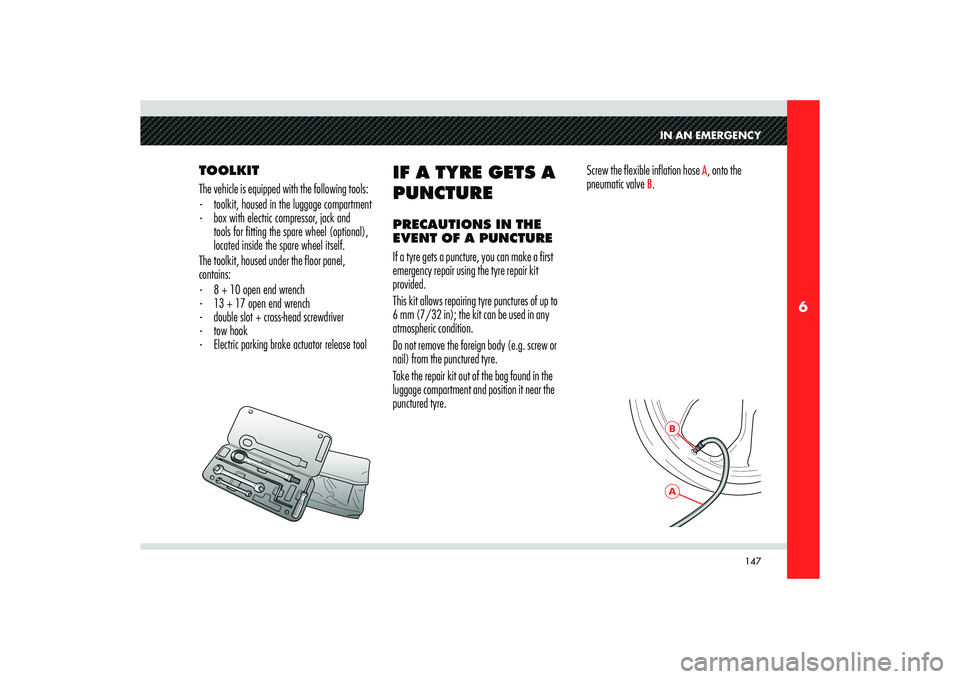
punctured tyre.Screw the flexible inflation hose
A, onto the
pneumatic valve
B.