door lock Alfa Romeo Brera/Spider 2006 Owner handbook (in English)
[x] Cancel search | Manufacturer: ALFA ROMEO, Model Year: 2006, Model line: Brera/Spider, Model: Alfa Romeo Brera/Spider 2006Pages: 267, PDF Size: 7.21 MB
Page 35 of 267
33
SAFETY
DEVICES
WARNING
LIGHTS AND
MESSAGES
IN AN
EMERGENCY
CAR
MAINTENANCE
TECHNICAL
SPECIFICATIONS
INDEX
DASHBOARD
AND
CONTROLS
CORRECT USE
OF THE CAR
Driver’s door unlocking
(Unlock Fda)
With this function it is possible to unlock
only the driver’s door by pressing the
electronic key button
Ë.
With this function active (ON) it is how-
ever possible to unlock the other doors
by pressing the door unlock button on
central console.
To activate/deactivate (ON/OFF) this
function proceed as follows:
❒briefly press button MENU: the dis-
play will show ONor OFF (ac-
cording to previous setting);
❒press button +or –for setting as re-
quired;
❒briefly press button MENUto go
back to the menu screen or press the
button for long to go back to the
standard screen.Automatic central door locking
(Door lock)
When activated (ON), this function
locks automatically the doors when the
car speed exceeds 20 km/h.
To activate/deactivate (ON/OFF) this
function proceed as follows:
❒briefly press buttonMENU: the dis-
play will show ONor OFF (ac-
cording to previous setting);
❒press button +or –for setting as re-
quired;
❒briefly press buttonMENUto go
back to the menu screen or press the
button for long to go back to the
standard screen.
When the function is on, the button
round led is on
q. Independent boot unlocking
(Indep. Boot)
Opening the boot with the remote con-
trol (press button
`is always pos-
sible. The option “Independent boot” en-
ables or disables the button set on the
armrest. More particularly: with “Indep.
Boot ON” the button is always off. With
“Indep. Boot OFF” the button is always
on and pressing it will unlock the boot if
doors are unlocked.
To activate independent boot function (by
deactivating the armrest button) (ON)
or to deactivate it (OFF), proceed as fol-
lows:
❒briefly press button MENU: the dis-
play will show ONor OFF (ac-
cording to previous setting);
❒press button +or –for setting as re-
quired;
❒briefly press button MENUto go
back to the menu screen or press the
button for long to go back to the
standard screen.
Page 44 of 267
Lumbar adjustment
(where provided)
Turn the knob Duntil obtaining the re-
quired position.
Back rest angle adjustment
(where provided)
Use lever E. Pulling the lever upwards
the seat will bend back by one position.
Pushing the lever downwards the seat
will bend forward.
Tilting the back rest
To get to the rear seats, pull handle F:
the back rest will tilt and the seat can
slide forward.
Bringing back the back rest the seat will
return automatically to its original posi-
tion (mechanical memory).
After bringing the back rest to its origi-
nal position check tat it firmly locked.
Check also that the seat is firmly locked
in the runners by trying to move it back
and forth.
42
SAFETY
DEVICES
WARNING
LIGHTS AND
MESSAGES
IN AN
EMERGENCY
CAR
MAINTENANCE
TECHNICAL
SPECIFICATIONS
INDEX
DASHBOARD
AND
CONTROLS
CORRECT USE
OF THE CAR
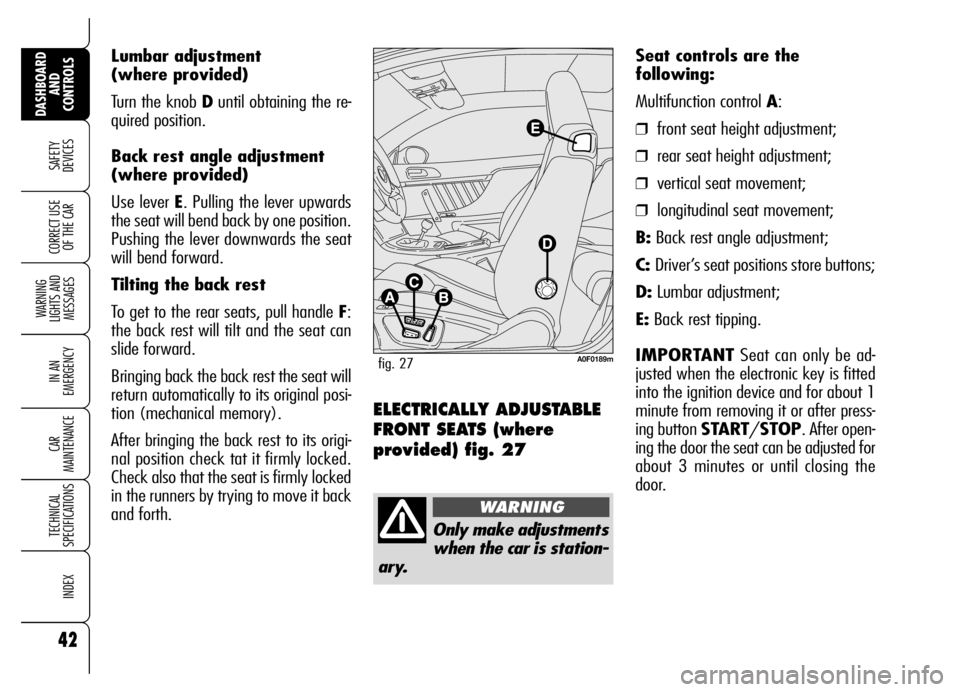
ELECTRICALLY ADJUSTABLE
FRONT SEATS (where
provided) fig. 27
Seat controls are the
following:
Multifunction control A:
❒front seat height adjustment;
❒rear seat height adjustment;
❒vertical seat movement;
❒longitudinal seat movement;
B:Back rest angle adjustment;
C:Driver’s seat positions store buttons;
D:Lumbar adjustment;
E:Back rest tipping.
IMPORTANTSeat can only be ad-
justed when the electronic key is fitted
into the ignition device and for about 1
minute from removing it or after press-
ing button START/STOP. After open-
ing the door the seat can be adjusted for
about 3 minutes or until closing the
door.
Only make adjustments
when the car is station-
ary.
WARNING
A0F0189mfig. 27
Page 45 of 267
43
SAFETY
DEVICES
WARNING
LIGHTS AND
MESSAGES
IN AN
EMERGENCY
CAR
MAINTENANCE
TECHNICAL
SPECIFICATIONS
INDEX
DASHBOARD
AND
CONTROLS
CORRECT USE
OF THE CARSeat warming
(where provided)
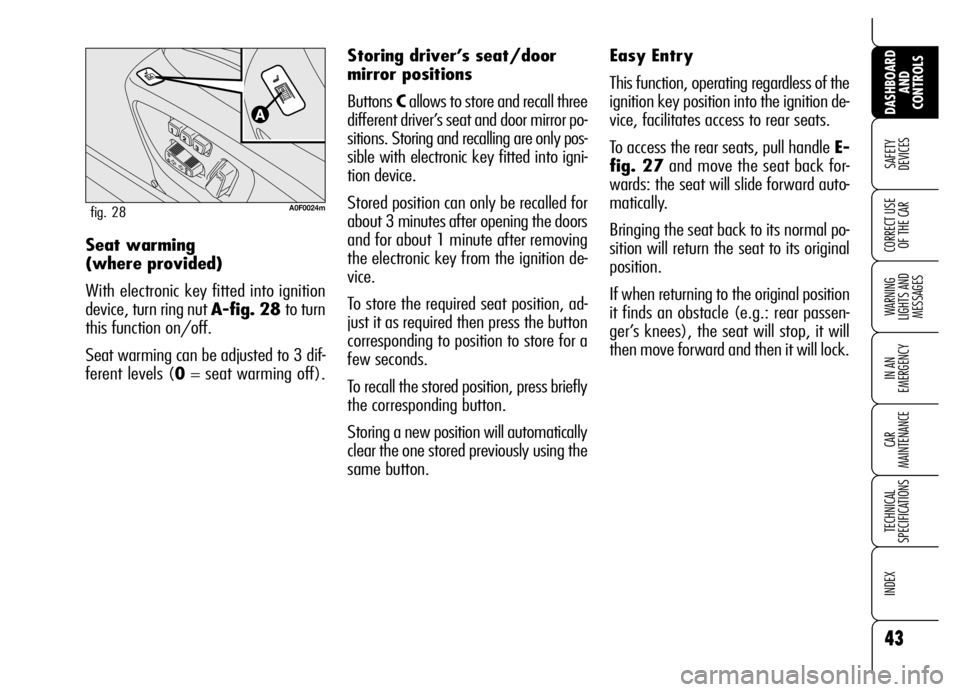
With electronic key fitted into ignition
device, turn ring nut A-fig. 28 to turn
this function on/off.
Seat warming can be adjusted to 3 dif-
ferent levels (0= seat warming off).
A0F0024mfig. 28
Easy Entry
This function, operating regardless of the
ignition key position into the ignition de-
vice, facilitates access to rear seats.
To access the rear seats, pull handle E-
fig. 27and move the seat back for-
wards: the seat will slide forward auto-
matically.
Bringing the seat back to its normal po-
sition will return the seat to its original
position.
If when returning to the original position
it finds an obstacle (e.g.: rear passen-
ger’s knees), the seat will stop, it will
then move forward and then it will lock. Storing driver’s seat/door
mirror positions
Buttons Callows to store and recall three
different driver’s seat and door mirror po-
sitions. Storing and recalling are only pos-
sible with electronic key fitted into igni-
tion device.
Stored position can only be recalled for
about 3 minutes after opening the doors
and for about 1 minute after removing
the electronic key from the ignition de-
vice.
To store the required seat position, ad-
just it as required then press the button
corresponding to position to store for a
few seconds.
To recall the stored position, press briefly
the corresponding button.
Storing a new position will automatically
clear the one stored previously using the
same button.
Page 49 of 267
47
SAFETY
DEVICES
WARNING
LIGHTS AND
MESSAGES
IN AN
EMERGENCY
CAR
MAINTENANCE
TECHNICAL
SPECIFICATIONS
INDEX
DASHBOARD
AND
CONTROLS
CORRECT USE
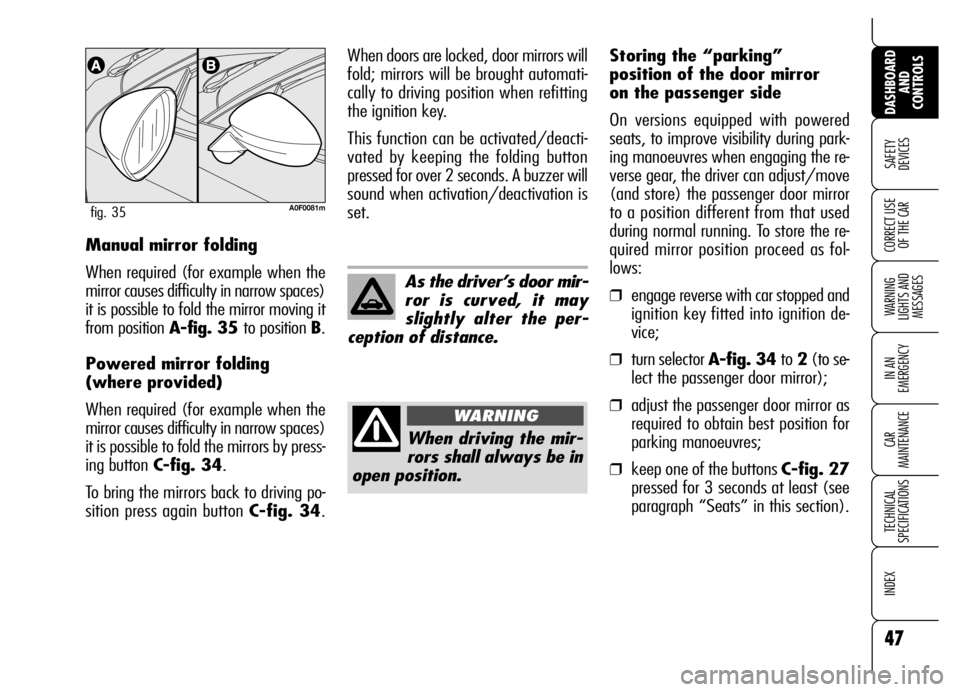
OF THE CARManual mirror folding
When required (for example when the
mirror causes difficulty in narrow spaces)
it is possible to fold the mirror moving it
from position A-fig. 35 to position B.
Powered mirror folding
(where provided)
When required (for example when the
mirror causes difficulty in narrow spaces)
it is possible to fold the mirrors by press-
ing button C-fig. 34.
To bring the mirrors back to driving po-
sition press again button C-fig. 34.
A0F0081mfig. 35
As the driver’s door mir-
ror is curved, it may
slightly alter the per-
ception of distance.
When driving the mir-
rors shall always be in
open position.
WARNING
When doors are locked, door mirrors will
fold; mirrors will be brought automati-
cally to driving position when refitting
the ignition key.
This function can be activated/deacti-
vated by keeping the folding button
pressed for over 2 seconds. A buzzer will
sound when activation/deactivation is
set.Storing the “parking”
position of the door mirror
on the passenger side
On versions equipped with powered
seats, to improve visibility during park-
ing manoeuvres when engaging the re-
verse gear, the driver can adjust/move
(and store) the passenger door mirror
to a position different from that used
during normal running. To store the re-
quired mirror position proceed as fol-
lows:
❒engage reverse with car stopped and
ignition key fitted into ignition de-
vice;
❒turn selector A-fig. 34 to2(to se-
lect the passenger door mirror);
❒adjust the passenger door mirror as
required to obtain best position for
parking manoeuvres;
❒keep one of the buttons C-fig. 27
pressed for 3 seconds at least (see
paragraph “Seats” in this section).
Page 78 of 267
76
SAFETY
DEVICES
WARNING
LIGHTS AND
MESSAGES
IN AN
EMERGENCY
CAR
MAINTENANCE
TECHNICAL
SPECIFICATIONS
INDEX
DASHBOARD
AND
CONTROLS
CORRECT USE
OF THE CAR
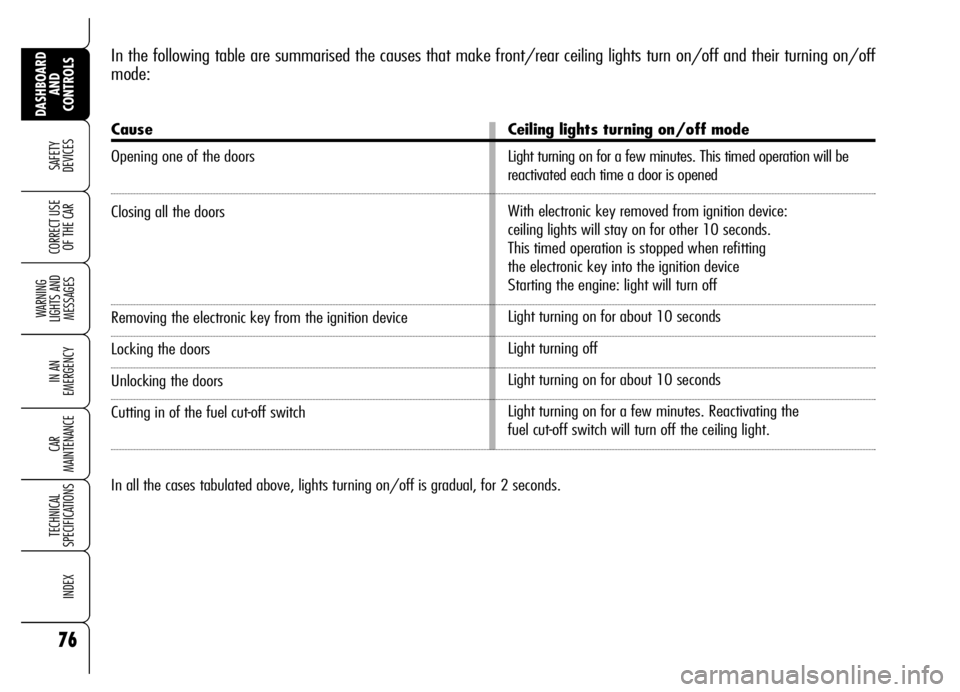
In the following table are summarised the causes that make front/rear ceiling lights turn on/off and their turning on/off
mode:
Cause
Opening one of the doors
Closing all the doors
Removing the electronic key from the ignition device
Locking the doors
Unlocking the doors
Cutting in of the fuel cut-off switch
Ceiling lights turning on/off mode
Light turning on for a few minutes. This timed operation will be
reactivated each time a door is opened
With electronic key removed from ignition device:
ceiling lights will stay on for other 10 seconds.
This timed operation is stopped when refitting
the electronic key into the ignition device
Starting the engine: light will turn off
Light turning on for about 10 seconds
Light turning off
Light turning on for about 10 seconds
Light turning on for a few minutes. Reactivating the
fuel cut-off switch will turn off the ceiling light.
In all the cases tabulated above, lights turning on/off is gradual, for 2 seconds.
Page 80 of 267
78
SAFETY
DEVICES
WARNING
LIGHTS AND
MESSAGES
IN AN
EMERGENCY
CAR
MAINTENANCE
TECHNICAL
SPECIFICATIONS
INDEX
DASHBOARD
AND
CONTROLS
CORRECT USE
OF THE CAR
If central door locking
has been activated
from inside the car and after a
crash the fuel cut-off switch
cannot activate automatic door
unlocking, it will not be pos-
sible to get into the car. In any
case, door opening from the
outside depends on door con-
ditions after the crash: if a
door is badly damaged it will
be impossible to open it. In this
event try to open one of the
other doors.
WARNINGDoor unlocking in the event of
a crash
In the event of a crash that triggers the
fuel cut-off switch, the doors will unlock
automatically to enable getting into the
car and at the same time the passen-
ger’s compartment light will turn on. It
is however always possible to open the
doors from the passenger’s compart-
ment by means of the internal door han-
dles. If, after a crash no fuel leaks or
damages to the electric devices (e.g.
headlights) are found and the car can
be started again, reset the fuel cut-off
switch and the power supply cut-off
switch (where provided). Follow the in-
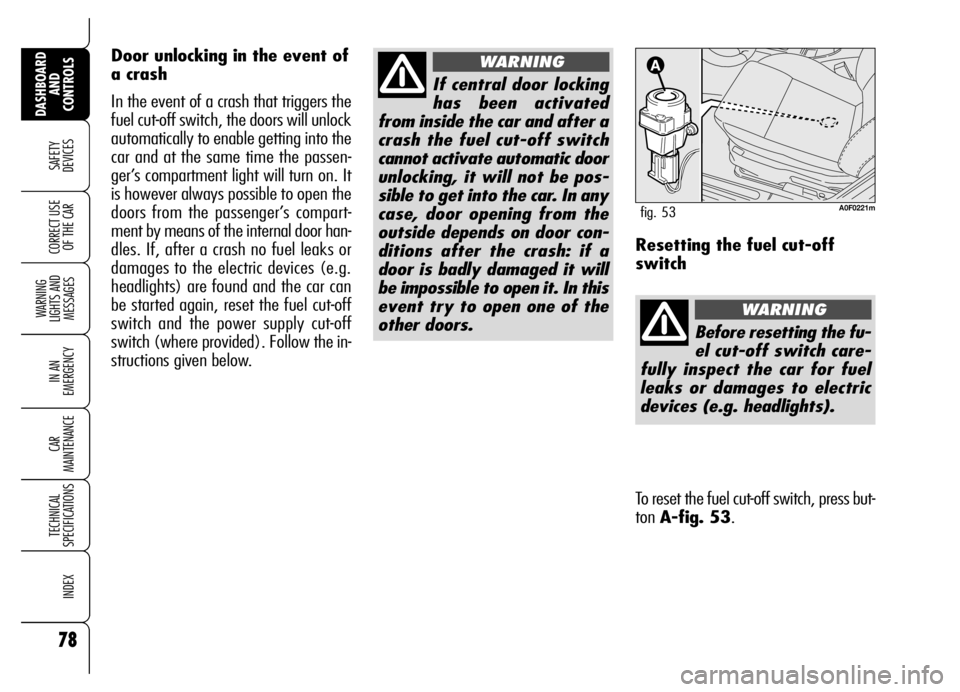
structions given below.Resetting the fuel cut-off
switch
Before resetting the fu-
el cut-off switch care-
fully inspect the car for fuel
leaks or damages to electric
devices (e.g. headlights).
WARNING
To reset the fuel cut-off switch, press but-
ton A-fig. 53.
A0F0221mfig. 53
Page 88 of 267
86
SAFETY
DEVICES
WARNING
LIGHTS AND
MESSAGES
IN AN
EMERGENCY
CAR
MAINTENANCE
TECHNICAL
SPECIFICATIONS
INDEX
DASHBOARD
AND
CONTROLS
CORRECT USE
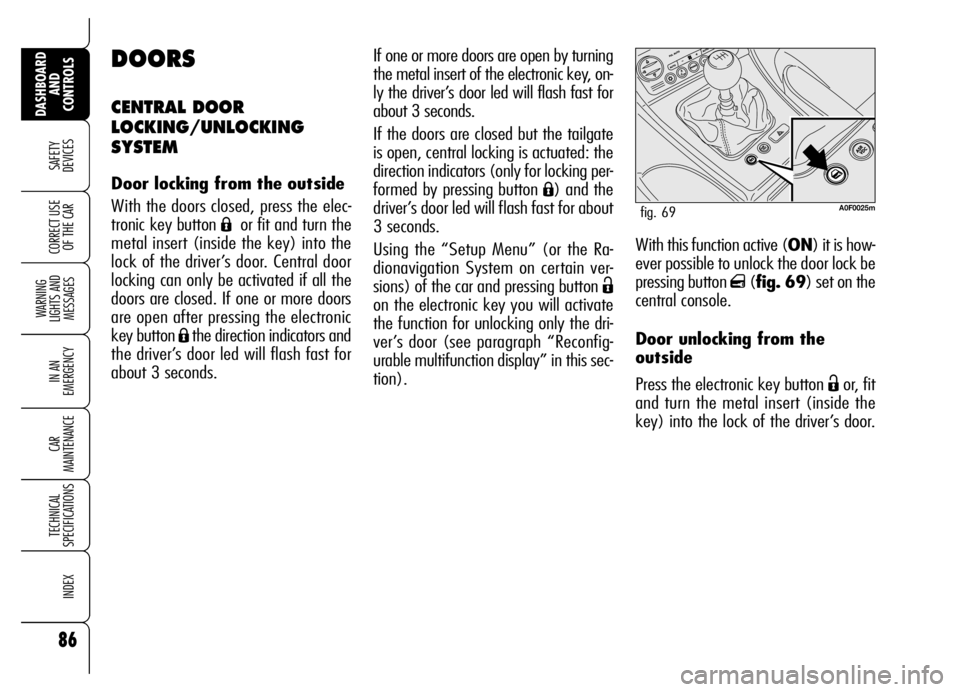
OF THE CARWith this function active (ON) it is how-
ever possible to unlock the door lock be
pressing button
q(fig. 69) set on the
central console.
Door unlocking from the
outside
Press the electronic key button
Ëor, fit
and turn the metal insert (inside the
key) into the lock of the driver’s door.
DOORS
CENTRAL DOOR
LOCKING/UNLOCKING
SYSTEM
Door locking from the outside
With the doors closed, press the elec-
tronic key button
Áor fit and turn the
metal insert (inside the key) into the
lock of the driver’s door. Central door
locking can only be activated if all the
doors are closed. If one or more doors
are open after pressing the electronic
key button
Áthe direction indicators and
the driver’s door led will flash fast for
about 3 seconds.
A0F0025mfig. 69
If one or more doors are open by turning
the metal insert of the electronic key, on-
ly the driver’s door led will flash fast for
about 3 seconds.
If the doors are closed but the tailgate
is open, central locking is actuated: the
direction indicators (only for locking per-
formed by pressing button
Á) and the
driver’s door led will flash fast for about
3 seconds.
Using the “Setup Menu” (or the Ra-
dionavigation System on certain ver-
sions) of the car and pressing button
Ë
on the electronic key you will activate
the function for unlocking only the dri-
ver’s door (see paragraph “Reconfig-
urable multifunction display” in this sec-
tion).
Page 89 of 267
Using the “Setup Menu” (or the Ra-
dionavigation System on certain ver-
sions) of the car it is possible to activate
automatic door locking when exceeding
20 km/h (see paragraph “Reconfig-
urable multifunction display” in this sec-
tion).
Button
qwill be deactivated by locking
the doors by remote control, revolving
plug or automatic locking after about
2.5 minutes and it will be reactivated
after pressing the key button
Ëturning
the key metal insert into the driver’s
door lock or fitting the key into the ig-
nition device. IMPORTANT With central locking sys-
tem on, pulling the internal door handle
will unlock all the doors. Lacking pow-
er (blown fuse, battery disconnected,
etc.) it is however possible to lock the
doors manually.
IMPORTANTAfter disconnecting the
battery or failing the protection fuse,
door locking/unlocking mechanism shall
be “initialised” again, proceed as fol-
lows:❒close all the doors;
❒press remote control button Áor but-
ton
qon the central console;
❒press remote control button Ëor but-
ton
qon the central console.
87
SAFETY
DEVICES
WARNING
LIGHTS AND
MESSAGES
IN AN
EMERGENCY
CAR
MAINTENANCE
TECHNICAL
SPECIFICATIONS
INDEX
DASHBOARD
AND
CONTROLS
CORRECT USE
OF THE CAR
Door locking/unlocking from
the inside
Press button
q(fig. 69) to lock/ un-
lock all the doors.
The button has a round led showing the
door condition (locked or unlocked).
When doors are locked the button led is
on: pressing the button again will obtain
central unlocking of the doors and turn-
ing off of the led. With key removed,
the led will turn off 2 minutes after.
When doors are unlocked, the button
led is off and pressing the button will ob-
tain central locking of the doors. Door
locking is activated only if all the doors
are perfectly closed.
Page 90 of 267
88
SAFETY
DEVICES
WARNING
LIGHTS AND
MESSAGES
IN AN
EMERGENCY
CAR
MAINTENANCE
TECHNICAL
SPECIFICATIONS
INDEX
DASHBOARD
AND
CONTROLS
CORRECT USE
OF THE CAR
IMPORTANTIn the event the anti-
crushing function is activated 5 times in
only 1 minute, the system will auto-
matically enter the “recovery” mode
(self-protection). To restore correct sys-
tem operation, press the control button:
the window will close jerkily till complete
closing. If no malfunction is present, the
window returns to its normal operation
automatically; otherwise contact Alfa
Romeo Authorized Services.
IMPORTANTAfter switching the en-
gine off, power windows will be active
for about 3 minutes and they will de-
activate when opening a door.IMPORTANT Power windows are pro-
vided with “automatic continuous op-
eration” device for opening and closing
the window. Just press briefly the upper
or lower part of the button to
open/close the window automatically:
press the button again (the upper or the
lower part of the button, it doesn't mat-
ter) to stop the window at the required
height.
IMPORTANTKeeping the door lock-
ing/unlocking button on the remote
control pressed for about 2 seconds will
obtain automatic window opening/clos-
ing. Keep the remote control button
pressed until opening/closing the win-
dow completely otherwise the window
will stop at the height it has when you
release the button.POWER WINDOWS
Power windows are fitted with anti-
crushing safety device. The electronic
control unit that conrols the system can
detect the presence of an obstacle in the
last 20 cm of the window closing stroke.
When an obstacle is detected, the safe-
ty system will stop the window and re-
verse its stroke.
Page 91 of 267
89
SAFETY
DEVICES
WARNING
LIGHTS AND
MESSAGES
IN AN
EMERGENCY
CAR
MAINTENANCE
TECHNICAL
SPECIFICATIONS
INDEX
DASHBOARD
AND
CONTROLS
CORRECT USE
OF THE CAR
The system complies
with the forthcoming
Standard 2000/4/ EC
concerning the safety of pas-
sengers leaning out of the pas-
senger compartment.
For all versions, after unlocking the
doors, keeping the remote control but-
ton pressed for about 2 seconds will ob-
tain window and sunroof (where pro-
vided) opening.
A0F0051mfig. 70
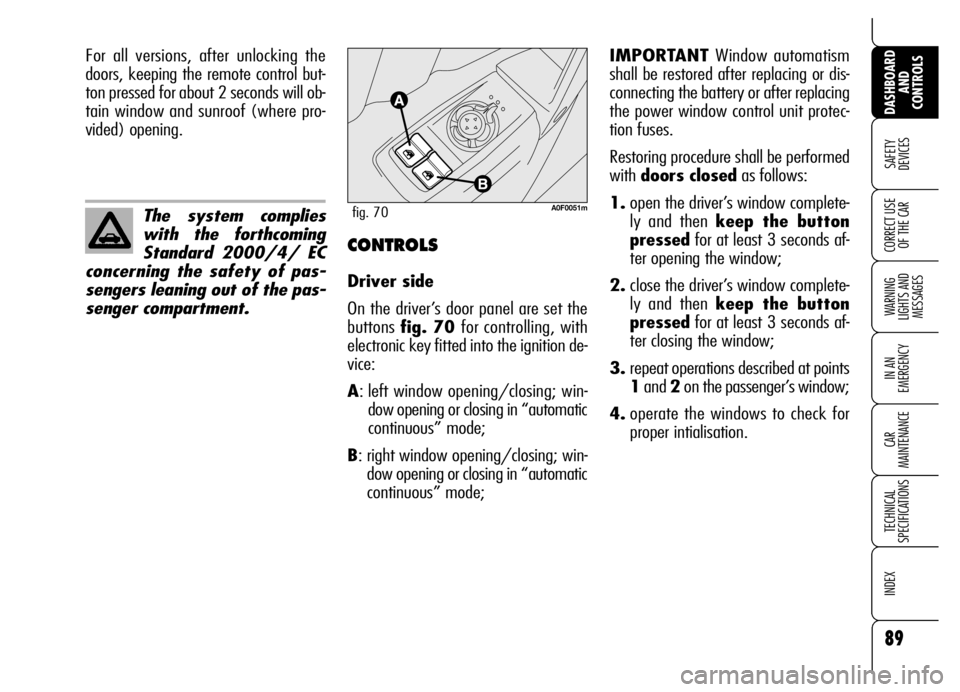
CONTROLS
Driver side
On the driver’s door panel are set the
buttons fig. 70 for controlling, with
electronic key fitted into the ignition de-
vice:
A: left window opening/closing; win-
dow opening or closing in “automatic
continuous” mode;
B: right window opening/closing; win-
dow opening or closing in “automatic
continuous” mode;IMPORTANTWindow automatism
shall be restored after replacing or dis-
connecting the battery or after replacing
the power window control unit protec-
tion fuses.
Restoring procedure shall be performed
with doors closedas follows:
1.open the driver’s window complete-
ly and then keep the button
pressedfor at least 3 seconds af-
ter opening the window;
2.close the driver’s window complete-
ly and then keep the button
pressedfor at least 3 seconds af-
ter closing the window;
3.repeat operations described at points
1and 2on the passenger’s window;
4.operate the windows to check for
proper intialisation.