tires Alfa Romeo Giulia 2018 User Guide
[x] Cancel search | Manufacturer: ALFA ROMEO, Model Year: 2018, Model line: Giulia, Model: Alfa Romeo Giulia 2018Pages: 260, PDF Size: 6 MB
Page 168 of 260

Warning!
Never have any smoking materials lit in or
near the vehicle when the fuel door is open
or the tank is being filled.
Never add fuel when the engine is running.
This is in violation of most state and federal
fire regulations and may cause the MIL to
turn on.
A fire may result if gasoline is pumped
into a portable container that is inside of a
vehicle. You could be burned. Always place
gas containers on the ground while filling.
Note: If the filler compartment is
washed with a pressure washer, keep it at
a distance of at least 8 inches (20 cm).
VEHICLE LOADING
Certification Label
As required by National Highway Traffic
Safety Administration regulations, your
vehicle has a certification label affixed to
the driver's side door or pillar.
This label contains the month and year of
manufacture, Gross Vehicle Weight
Rating (GVWR), Gross Axle Weight
Rating (GAWR) front and rear, and
Vehicle Identification Number (VIN).
A Month-Day-Hour (MDH) number is
included on this label and indicates the
Month, Day and Hour of manufacture.
The bar code that appears on the bottom
of the label is your VIN.
Gross Vehicle Weight Rating
(GVWR)
The GVWR is the total permissible
weight of your vehicle including driver,
passengers, vehicle, options and cargo.
The label also specifies maximum
capacities of front and rear axle systems
(GAWR). Total load must be limited so
GVWR and front and rear GAWR are not
exceeded.
Payload
The payload of a vehicle is defined as the
allowable load weight a truck can carry,
including the weight of the driver, all
passengers, options and cargo.
Gross Axle Weight Rating (GAWR)
The GAWR is the maximum permissible
load on the front and rear axles. The load
must be distributed in the cargo area so
that the GAWR of each axle is not
exceeded.
Each axle GAWR is determined by the
components in the system with the
lowest load carrying capacity (axle,
springs, tires or wheels). Heavier axles or
suspension components sometimes
specified by purchasers for increased
durability does not necessarily increase
the vehicle's GVWR.
Tire Size
The tire size on the Vehicle Certification
Label represents the actual tire size on
your vehicle. Replacement tires must be
equal to the load capacity of this tire size.
Rim Size
This is the rim size that is appropriate for
the tire size listed.
Inflation Pressure
This is the cold tire inflation pressure for
your vehicle for all loading conditions up
to full GAWR.
166
STARTING AND OPERATING
Page 170 of 260
SUGGESTIONS FOR DRIVING
Saving Fuel
Below are some suggestions which may
help you save fuel and lower the amount
of harmful emissions released into the
atmosphere.
Vehicle Maintenance
Checks and operations should be carried
out in accordance with the Maintenance
Plan. Refer to "Scheduled Servicing" in
"Servicing And Maintenance" for further
information.
Tires
Check the tire pressures at least once
every four weeks: if the pressure is too
low, consumption levels increase as
resistance to rolling is higher.
Unnecessary Loads
Do not travel with an overloaded trunk.
The weight of the vehicle and its
arrangement greatly affect fuel
consumption and stability.
Electric Devices
Use electrical systems only for the
amount of time needed. The rear window
defroster, additional headlights,
windshield wipers and heater blower fan
require a considerable amount of energy;
increasing the current uptake increases
fuel consumption (by up to +25% when
city driving).Climate Control System
Using the climate control system will
increase consumption: use standard
ventilation when the temperature
outside permits.
Devices for Aerodynamic Control
The use of non-certified devices for
aerodynamic control may adversely
affect air drag and consumption levels.
Driving Style
Starting
Do not warm up the engine at low or high
revs when the vehicle is stationary; this
causes the engine to warm up more
slowly, thereby increasing fuel
consumption and emissions. It is
therefore advisable to drive off
immediately, slowly, avoiding high
speeds: by doing this the engine will
warm up more quickly.
Unnecessary Actions
Avoid revving up when starting at traffic
lights or before stopping the engine.
This action is unnecessary and causes
increased fuel consumption and pollution.
Gear Selection
Use a high gear when traffic and road
conditions allow it. Using a low gear for
faster acceleration will increase fuel
consumption. Improper use of a high gear
increases consumption, emissions and
engine wear.Max. Speed
Fuel consumption considerably increases
as speed increases. Maintain a constant
speed, avoiding unnecessary braking and
acceleration, which cost in terms of both
fuel consumption and emissions.
Acceleration
Accelerating violently severely affects
consumption and emissions: acceleration
should be gradual and should not exceed
the maximum torque.
Conditions Of Use
Cold Starting
Short trips and frequent cold starts will
not allow the engine to reach optimum
operating temperature. This results in a
significant increase in consumption
levels (from +15 to +30% in city driving)
and emissions.
Traffic And Road Conditions
High fuel consumption is caused by heavy
traffic, for instance when travelling in
traffic with frequent use of low gears or
in cities with many traffic lights. Winding
mountain roads and rough road surfaces
also adversely affect consumption.
Stops In Traffic
During prolonged stops (e.g. railway
crossings) turn off the engine.
168
STARTING AND OPERATING
Page 186 of 260
If you are unsure of the condition of the
tire or the wheel.
Keep Tire Service Kit away from open
flames or heat sources.
A loose Tire Service Kit thrown forward in
a collision or hard stop could endanger the
occupants of the vehicle. Always stow the
Tire Service Kit in the place provided. Failure
to follow these warnings can result in
injuries that are serious or fatal to you, your
passengers, and others around you.
Take care not to allow the contents of
Tire Service Kit to come in contact with hair,
eyes, or clothing. Tire Service Kit sealant is
harmful if inhaled, swallowed, or absorbed
through the skin. It causes skin, eye, and
respiratory irritation. Flush immediately
with plenty of water if there is any contact
with eyes or skin. Change clothing as soon
as possible, if there is any contact with
clothing.
Tire Service Kit Sealant solution contains
latex. In case of an allergic reaction or rash,
consult a physician immediately. Keep Tire
Service Kit out of reach of children. If
swallowed, rinse mouth immediately with
plenty of water and drink plenty of water.
Do not induce vomiting! Consult a physician
immediately.
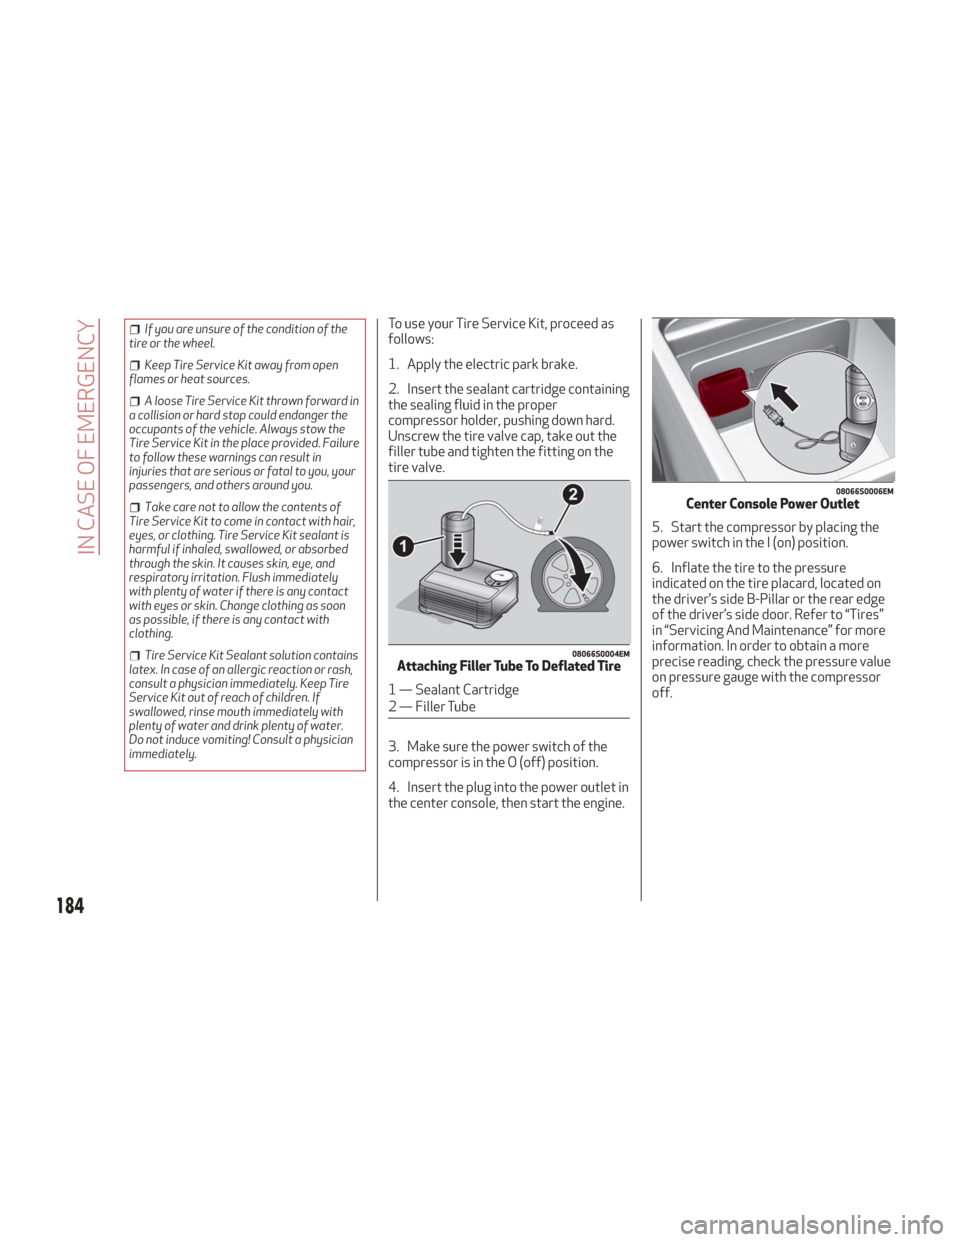
To use your Tire Service Kit, proceed as
follows:
1. Apply the electric park brake.
2. Insert the sealant cartridge containing
the sealing fluid in the proper
compressor holder, pushing down hard.
Unscrew the tire valve cap, take out the
filler tube and tighten the fitting on the
tire valve.
3. Make sure the power switch of the
compressor is in the O (off) position.
4. Insert the plug into the power outlet in
the center console, then start the engine. 5. Start the compressor by placing the
power switch in the I (on) position.
6. Inflate the tire to the pressure
indicated on the tire placard, located on
the driver’s side B-Pillar or the rear edge
of the driver’s side door. Refer to “Tires”
in “Servicing And Maintenance” for more
information. In order to obtain a more
precise reading, check the pressure value
on pressure gauge with the compressor
off.
08066S0004EMAttaching Filler Tube To Deflated Tire
1 — Sealant Cartridge
2 — Filler Tube
08066S0006EMCenter Console Power Outlet
184
IN CASE OF EMERGENCY
Page 195 of 260
SERVICING AND MAINTENANCE
Correct servicing permits the
performance of the vehicle to be
maintained over time, as well as limited
running costs and safeguarding the
efficiency of the safety systems.
This chapter explains how.SCHEDULED SERVICING.......194
ENGINE COMPARTMENT .......198
BATTERY RECHARGING ........201
DEALER SERVICE ............202
RAISING THE VEHICLE .........208
TIRES .................. .208
DEPARTMENT OF TRANSPORTATION
UNIFORM TIRE QUALITY GRADES . .224
STORING THE VEHICLE........225
BODYWORK...............226
INTERIORS ............... .228
193
Page 210 of 260
Frequency Of Oil Changes
In normal vehicle operating conditions, it
is not necessary to change the
transmission oil.
Caution!
If a transmission fluid leak occurs, visit an
authorized dealer immediately. Severe
transmission damage may occur. An
authorized dealer has the proper tools to
adjust the fluid level accurately.
Replacing The Battery
If necessary, replace the battery with
another battery with the same
specifications. It is advised to contact an
authorized dealer for replacement.
Follow the battery manufacturer's
instructions for maintenance.
Note:It will not be possible to open the
trunk with a key or by pressing the button
in the passenger compartment when the
battery is disconnected. So, always
position the manual trunk opening strap
on the trunk lock before disconnecting
the battery. The procedure is described in
the "Storing The Vehicle" section in this
chapter.
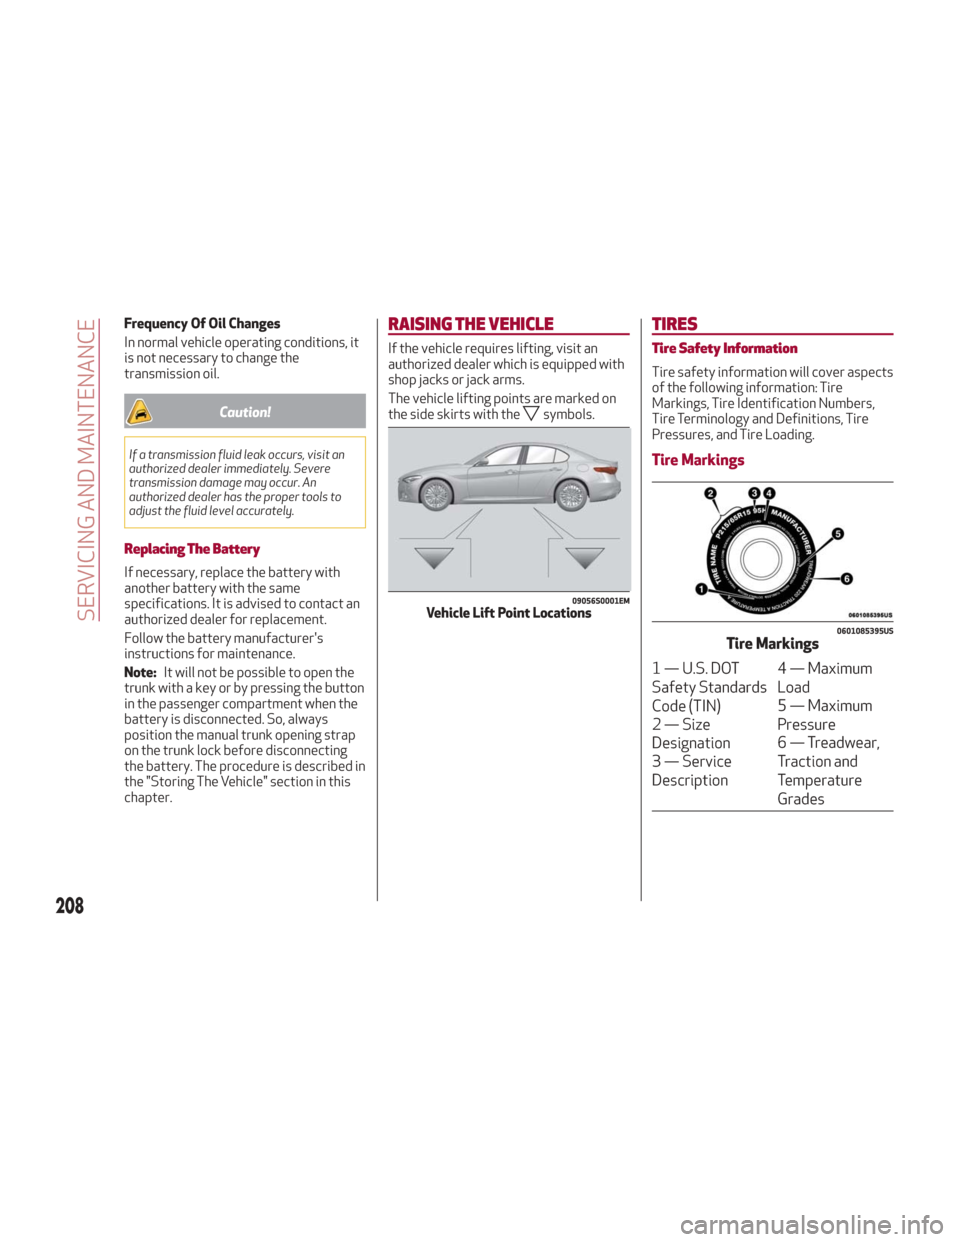
RAISING THE VEHICLE
If the vehicle requires lifting, visit an
authorized dealer which is equipped with
shop jacks or jack arms.
The vehicle lifting points are marked on
the side skirts with the
symbols.
TIRES
Tire Safety Information
Tire safety information will cover aspects
of the following information: Tire
Markings, Tire Identification Numbers,
Tire Terminology and Definitions, Tire
Pressures, and Tire Loading.
Tire Markings
09056S0001EMVehicle Lift Point Locations
0601085395USTire Markings
1 — U.S. DOT
Safety Standards
Code (TIN) 4 — Maximum
Load
2 — Size
Designation 5 — Maximum
Pressure
3 — Service
Description 6 — Treadwear,
Traction and
Temperature
Grades
208
SERVICING AND MAINTENANCE
Page 211 of 260
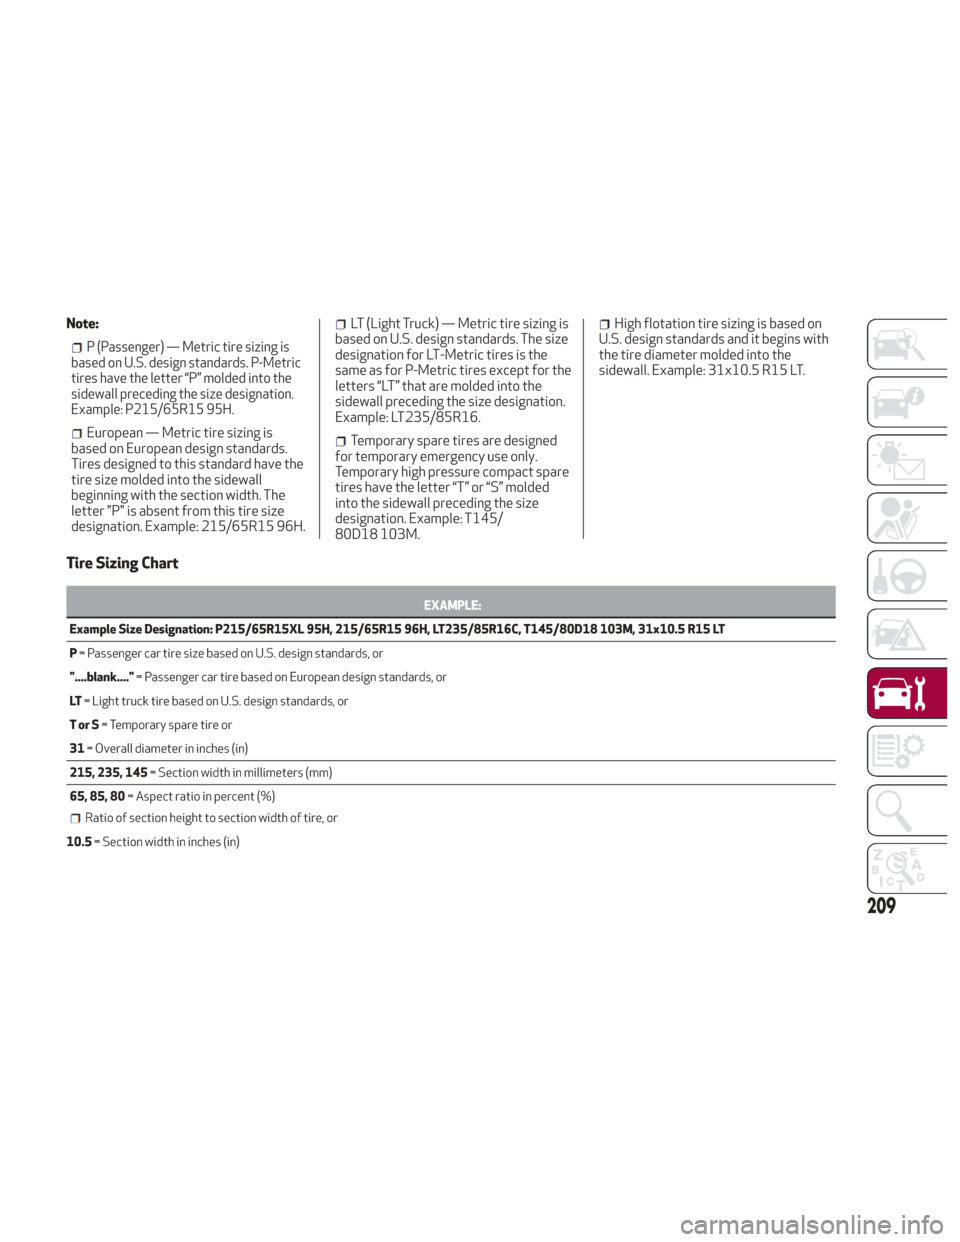
Note:
P (Passenger) — Metric tire sizing is
based on U.S. design standards. P-Metric
tires have the letter “P” molded into the
sidewall preceding the size designation.
Example: P215/65R15 95H.
European — Metric tire sizing is
based on European design standards.
Tires designed to this standard have the
tire size molded into the sidewall
beginning with the section width. The
letter "P" is absent from this tire size
designation. Example: 215/65R15 96H.
LT (Light Truck) — Metric tire sizing is
based on U.S. design standards. The size
designation for LT-Metric tires is the
same as for P-Metric tires except for the
letters “LT” that are molded into the
sidewall preceding the size designation.
Example: LT235/85R16.
Temporary spare tires are designed
for temporary emergency use only.
Temporary high pressure compact spare
tires have the letter “T” or “S” molded
into the sidewall preceding the size
designation. Example: T145/
80D18 103M.
High flotation tire sizing is based on
U.S. design standards and it begins with
the tire diameter molded into the
sidewall. Example: 31x10.5 R15 LT.
Tire Sizing Chart
EXAMPLE:
Example Size Designation: P215/65R15XL 95H, 215/65R15 96H, LT235/85R16C, T145/80D18 103M, 31x10.5 R15 LT
P =
Passenger car tire size based on U.S. design standards, or
"....blank...." = Passenger car tire based on European design standards, or
LT = Light truck tire based on U.S. design standards, or
TorS = Temporary spare tire or
31 = Overall diameter in inches (in)
215, 235, 145 = Section width in millimeters (mm)
65, 85, 80 = Aspect ratio in percent (%)
Ratio of section height to section width of tire, or
10.5= Section width in inches (in)
209
Page 213 of 260

Tire Identification Number (TIN)
The TIN may be found on one or both
sides of the tire; however, the date code
may only be on one side. Tires with whitesidewalls will have the full TIN, including
the date code, located on the white
sidewall side of the tire. Look for the TIN
on the outboard side of black sidewall
tires as mounted on the vehicle. If the TINis not found on the outboard side, then
you will find it on the inboard side of the
tire.
EXAMPLE:
DOT MA L9 ABCD 0301
DO
T= Department of Transportation
This symbol certifies that the tire is in compliance with the U.S. Department of Transportation tire safety standards and is approved for highway
use
MA = Code representing the tire manufacturing location (two digits)
L9 = Code representing the tire size (two digits)
ABCD = Code used by the tire manufacturer (one to four digits)
03 = Number representing the week in which the tire was manufactured (two digits)
03 means the 3rd week
01= Number representing the year in which the tire was manufactured (two digits)
01 means the year 2001
Prior to July 2000, tire manufacturers were only required to have one number to represent the year in which the tire was manufactured. Example:
031 could represent the 3rd week of 1981 or 1991
211
Page 215 of 260

Tire And Loading Information Placard
This placard tells you important
information about the:
1. Number of people that can be carried
in the vehicle.
2. Total weight your vehicle can carry.
3. Tire size designed for your vehicle.
4. Cold tire inflation pressures for the
front, rear, and spare tires.
Loading
The vehicle maximum load on the tire
must not exceed the load carrying
capacity of the tire on your vehicle. You
will not exceed the tire's load carrying
capacity if you adhere to the loading
conditions, tire size, and cold tire
inflation pressures specified on the Tire
and Loading Information placard in
“Vehicle Loading” in the “Starting And
Operating” section of this manual.Note:
Under a maximum loaded vehicle
condition, gross axle weight ratings
(GAWRs) for the front and rear axles
must not be exceeded. For further
information on GAWRs, vehicle loading,
and trailer towing, refer to “Vehicle
Loading” in the “Starting And Operating”
section of this manual.
To determine the maximum loading
conditions of your vehicle, locate the
statement “The combined weight of
occupants and cargo should never
exceed XXX kg or XXX lbs” on the Tire
and Loading Information placard. The
combined weight of occupants,
cargo/luggage and trailer tongue weight
(if applicable) should never exceed the
weight referenced here.
Steps For Determining Correct Load
Limit—
(1) Locate the statement “The
combined weight of occupants and
cargo should never exceed XXX kg or
XXX lbs.” on your vehicle's placard.
(2) Determine the combined weight
of the driver and passengers that will
be riding in your vehicle.
(3) Subtract the combined weight of
the driver and passengers from
XXX kg or XXX lbs. (4) The resulting figure equals the
available amount of cargo and
luggage load capacity. For example,
if “XXX” amount equals 1400 lbs. and
there will be five 150 lb passengers
in your vehicle, the amount of
available cargo and luggage load
capacity is 650 lbs. (1400-750
(5x150) = 650 lbs.)
(5) Determine the combined weight
of luggage and cargo being loaded on
the vehicle. That weight may not
safely exceed the available cargo and
luggage load capacity calculated in
Step 4.
(6) If your vehicle will be towing a
trailer, load from your trailer will be
transferred to your vehicle. Consult
this manual to determine how this
reduces the available cargo and
luggage load capacity of your vehicle.
GUID-054900418-high.tifTire And Loading Information Placard
213
Page 217 of 260

Warning!
Overloading of your tires is dangerous. Overloading can cause tire failure, affect vehicle handling, and increase your stopping distance. Use tires
of the recommended load capacity for your vehicle. Never overload them.
215
Page 218 of 260
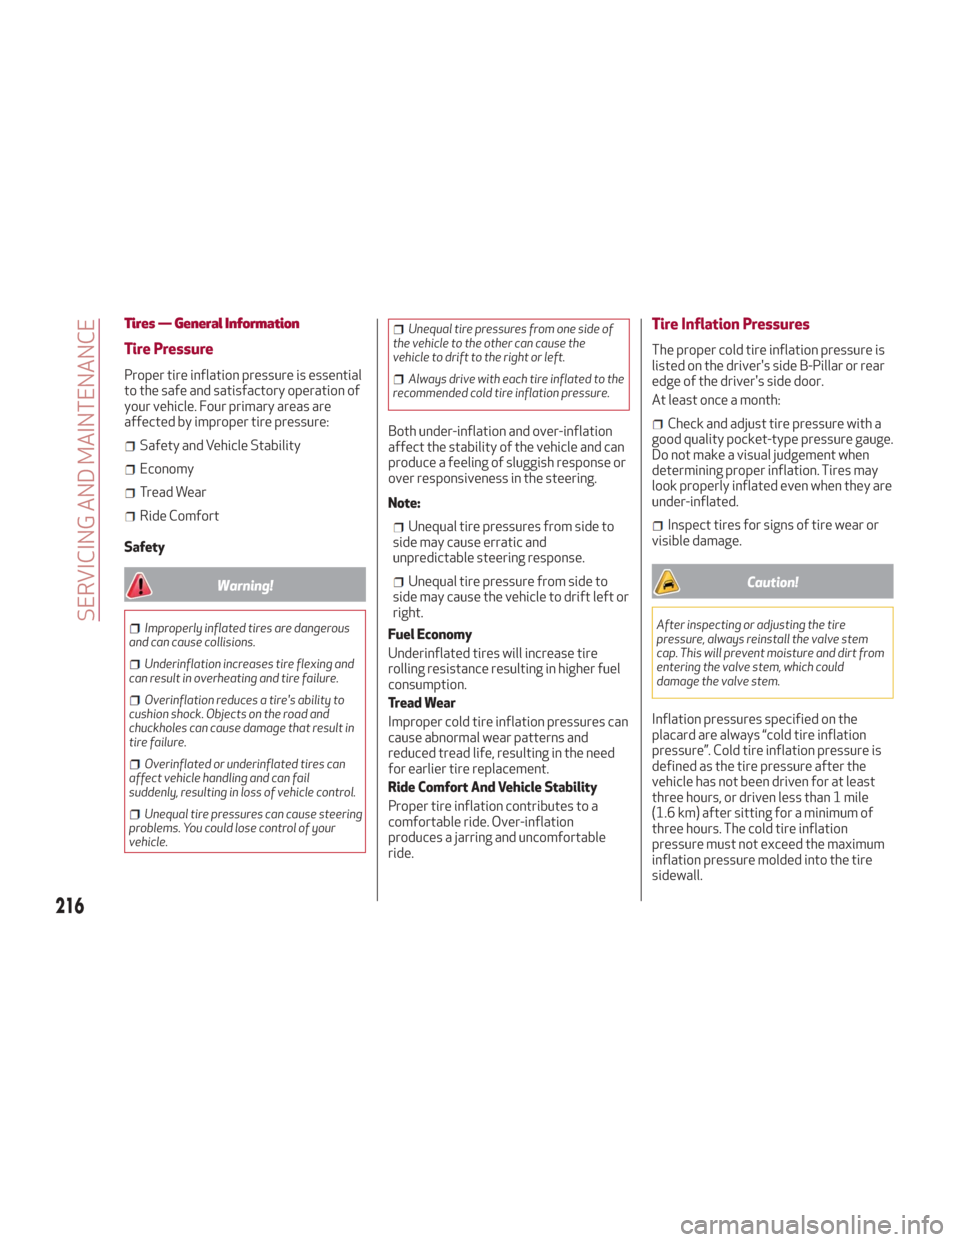
Tires — General Information
Tire Pressure
Proper tire inflation pressure is essential
to the safe and satisfactory operation of
your vehicle. Four primary areas are
affected by improper tire pressure:
Safety and Vehicle Stability
Economy
Tread Wear
Ride Comfort
Safety
Warning!
Improperly inflated tires are dangerous
and can cause collisions.
Underinflation increases tire flexing and
can result in overheating and tire failure.
Overinflation reduces a tire's ability to
cushion shock. Objects on the road and
chuckholes can cause damage that result in
tire failure.
Overinflated or underinflated tires can
affect vehicle handling and can fail
suddenly, resulting in loss of vehicle control.
Unequal tire pressures can cause steering
problems. You could lose control of your
vehicle.
Unequal tire pressures from one side of
the vehicle to the other can cause the
vehicle to drift to the right or left.
Always drive with each tire inflated to the
recommended cold tire inflation pressure.
Both under-inflation and over-inflation
affect the stability of the vehicle and can
produce a feeling of sluggish response or
over responsiveness in the steering.
Note:
Unequal tire pressures from side to
side may cause erratic and
unpredictable steering response.
Unequal tire pressure from side to
side may cause the vehicle to drift left or
right.
Fuel Economy
Underinflated tires will increase tire
rolling resistance resulting in higher fuel
consumption.
Tread Wear
Improper cold tire inflation pressures can
cause abnormal wear patterns and
reduced tread life, resulting in the need
for earlier tire replacement.
Ride Comfort And Vehicle Stability
Proper tire inflation contributes to a
comfortable ride. Over-inflation
produces a jarring and uncomfortable
ride.
Tire Inflation Pressures
The proper cold tire inflation pressure is
listed on the driver's side B-Pillar or rear
edge of the driver's side door.
At least once a month:
Check and adjust tire pressure with a
good quality pocket-type pressure gauge.
Do not make a visual judgement when
determining proper inflation. Tires may
look properly inflated even when they are
under-inflated.
Inspect tires for signs of tire wear or
visible damage.
Caution!
After inspecting or adjusting the tire
pressure, always reinstall the valve stem
cap. This will prevent moisture and dirt from
entering the valve stem, which could
damage the valve stem.
Inflation pressures specified on the
placard are always “cold tire inflation
pressure”. Cold tire inflation pressure is
defined as the tire pressure after the
vehicle has not been driven for at least
three hours, or driven less than 1 mile
(1.6 km) after sitting for a minimum of
three hours. The cold tire inflation
pressure must not exceed the maximum
inflation pressure molded into the tire
sidewall.
216
SERVICING AND MAINTENANCE