engine Alfa Romeo Giulia 2019 Owner's Manual
[x] Cancel search | Manufacturer: ALFA ROMEO, Model Year: 2019, Model line: Giulia, Model: Alfa Romeo Giulia 2019Pages: 232, PDF Size: 4.87 MB
Page 4 of 232
READ THIS CAREFULLY
REFUELLINGDo not use petrol containing methanol or ethanol E85. Using these mixtures may cause misfiring and driving issues, as well as damage vital
components of the supply system.
For further details on the use of the correct fuel see the "Refuelling the vehicle" paragraph in the "Starting and driving" chapter.
STARTING THE ENGINE
Versions with mechanical gearbox
Make sure the electric parking brake is engaged, press the clutch pedal and then press the ignition button briefly.
Versions with automatic transmission
Make sure that the electric parking brake is engaged and that the transmission is in P (Park) or N (Neutral), press the brake pedal and then press the
ignition device button.
PARKING ON FLAMMABLE MATERIAL
The catalytic converter develops high temperatures during operation. Do not park the car on grass, dry leaves, pine needles or other flammable
material: fire hazard.
RESPECTING THE ENVIRONMENT
The vehicle is fitted with a system that carries out a continuous diagnosis of the emission-related components in order to help protect the
environment.
ELECTRICAL ACCESSORIES
If, after buying the vehicle, you decide to add electrical accessories (with the risk of gradually draining the battery), contact an Alfa Romeo
Dealership. They can calculate the overall electrical requirement and check that the vehicle's electric system can support the required load.
SCHEDULED SERVICING
Correct maintenance of the car is essential for ensuring that it maintains its performance and its safety features, its environmental friendliness and
low running costs for a long time to come.
Page 7 of 232
SYMBOLS
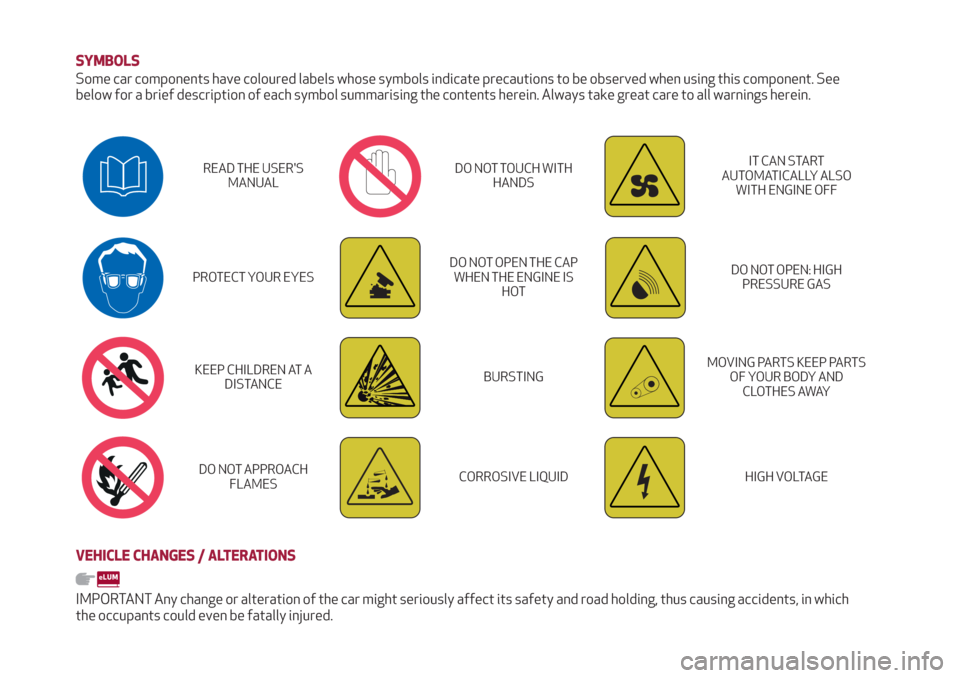
Some car components have coloured labels whose symbols indicate precautions to be observed when using this component. See
below for a brief description of each symbol summarising the contents herein. Always take great care to all warnings herein.
READ THE USER'S
MANUALDO NOT TOUCH WITH
HANDSIT CAN START
AUTOMATICALLY ALSO
WITH ENGINE OFF
PROTECT YOUR EYESDO NOT OPEN THE CAP
WHEN THE ENGINE IS
HOTDO NOT OPEN: HIGH
PRESSURE GAS
KEEP CHILDREN AT A
DISTANCEBURSTINGMOVING PARTS KEEP PARTS
OF YOUR BODY AND
CLOTHES AWAY
DO NOT APPROACH
FLAMESCORROSIVE LIQUIDHIGH VOLTAGE
VEHICLE CHANGES / ALTERATIONS
IMPORTANT Any change or alteration of the car might seriously affect its safety and road holding, thus causing accidents, in which
the occupants could even be fatally injured.
Page 11 of 232
In-depth knowledge of your new vehicle starts here.
The handbook that you are reading simply and directly explains
how it is made and how it works.
That’s why we advise you to read it seated comfortably on board,
so that you can see immediately what is described here for
yourself.
KNOWING YOUR CAR
INSTRUMENT PANEL............................10
RIGHT HAND DRIVE VERSION......................11
THEKEYS...................................12
IGNITION DEVICE..............................13
ENGINE IMMOBILIZER...........................14
ALARM SYSTEM ...............................15
DOORS.....................................16
SEATS.....................................19
HEADRESTS.................................23
STEERING WHEEL..............................24
REAR VIEW MIRRORS...........................25
EXTERNAL LIGHTS .............................26
INTERIOR LIGHTS..............................31
WINDSCREEN WIPER . ...........................31
CLIMATE CONTROL.............................33
WINDOW WINDERS.............................35
ELECTRIC SUNROOF............................36
BONNET....................................38
TAILGATE...................................39
ROOF RACK / SKI RACK..........................41
Page 15 of 232
IGNITION DEVICE
OPERATION
1) 2) 3) 4) 5)
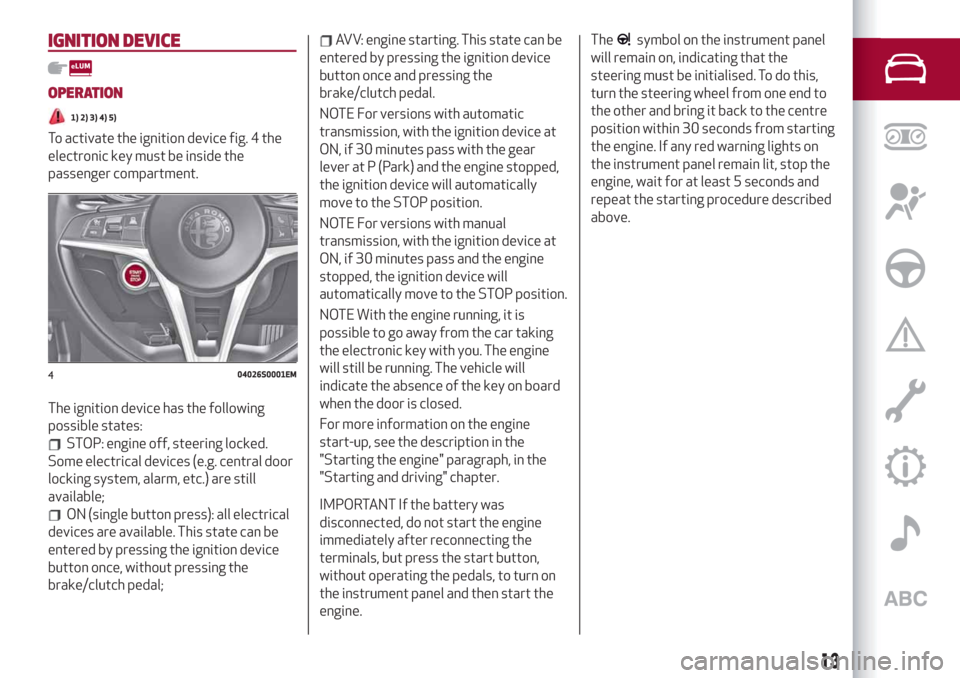
To activate the ignition device fig. 4 the
electronic key must be inside the
passenger compartment.
The ignition device has the following
possible states:
STOP: engine off, steering locked.
Some electrical devices (e.g. central door
locking system, alarm, etc.) are still
available;
ON (single button press): all electrical
devices are available. This state can be
entered by pressing the ignition device
button once, without pressing the
brake/clutch pedal;
AVV: engine starting. This state can be
entered by pressing the ignition device
button once and pressing the
brake/clutch pedal.
NOTE For versions with automatic
transmission, with the ignition device at
ON, if 30 minutes pass with the gear
lever at P (Park) and the engine stopped,
the ignition device will automatically
move to the STOP position.
NOTE For versions with manual
transmission, with the ignition device at
ON, if 30 minutes pass and the engine
stopped, the ignition device will
automatically move to the STOP position.
NOTE With the engine running, it is
possible to go away from the car taking
the electronic key with you. The engine
will still be running. The vehicle will
indicate the absence of the key on board
when the door is closed.
For more information on the engine
start-up, see the description in the
"Starting the engine" paragraph, in the
"Starting and driving" chapter.
IMPORTANT If the battery was
disconnected, do not start the engine
immediately after reconnecting the
terminals, but press the start button,
without operating the pedals, to turn on
the instrument panel and then start the
engine.The
symbol on the instrument panel
will remain on, indicating that the
steering must be initialised. To do this,
turn the steering wheel from one end to
the other and bring it back to the centre
position within 30 seconds from starting
the engine. If any red warning lights on
the instrument panel remain lit, stop the
engine, wait for at least 5 seconds and
repeat the starting procedure described
above.
404026S0001EM
13
Page 16 of 232
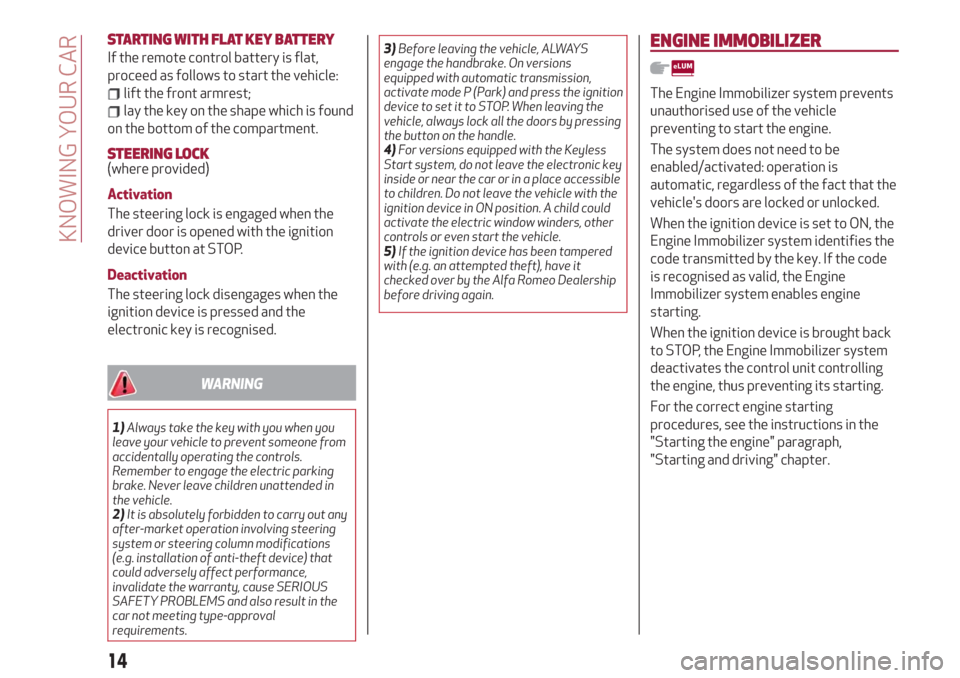
STARTING WITH FLAT KEY BATTERY
If the remote control battery is flat,
proceed as follows to start the vehicle:
lift the front armrest;
lay the key on the shape which is found
on the bottom of the compartment.
STEERING LOCK(where provided)
Activation
The steering lock is engaged when the
driver door is opened with the ignition
device button at STOP.
Deactivation
The steering lock disengages when the
ignition device is pressed and the
electronic key is recognised.
WARNING
1)Always take the key with you when you
leave your vehicle to prevent someone from
accidentally operating the controls.
Remember to engage the electric parking
brake. Never leave children unattended in
the vehicle.
2)It is absolutely forbidden to carry out any
after-market operation involving steering
system or steering column modifications
(e.g. installation of anti-theft device) that
could adversely affect performance,
invalidate the warranty, cause SERIOUS
SAFETY PROBLEMS and also result in the
car not meeting type-approval
requirements.3)Before leaving the vehicle, ALWAYS
engage the handbrake. On versions
equipped with automatic transmission,
activate mode P (Park) and press the ignition
device to set it to STOP. When leaving the
vehicle, always lock all the doors by pressing
the button on the handle.
4)For versions equipped with the Keyless
Start system, do not leave the electronic key
inside or near the car or in a place accessible
to children. Do not leave the vehicle with the
ignition device in ON position. A child could
activate the electric window winders, other
controls or even start the vehicle.
5)If the ignition device has been tampered
with (e.g. an attempted theft), have it
checked over by the Alfa Romeo Dealership
before driving again.
ENGINE IMMOBILIZER
The Engine Immobilizer system prevents
unauthorised use of the vehicle
preventing to start the engine.
The system does not need to be
enabled/activated: operation is
automatic, regardless of the fact that the
vehicle's doors are locked or unlocked.
When the ignition device is set to ON, the
Engine Immobilizer system identifies the
code transmitted by the key. If the code
is recognised as valid, the Engine
Immobilizer system enables engine
starting.
When the ignition device is brought back
to STOP, the Engine Immobilizer system
deactivates the control unit controlling
the engine, thus preventing its starting.
For the correct engine starting
procedures, see the instructions in the
"Starting the engine" paragraph,
"Starting and driving" chapter.
14
KNOWING YOUR CAR
Page 17 of 232
Irregular operation
If, during starting, the key code is not
correctly recognised, the
icon is
displayed on the instrument panel (see
the instructions in the "Warning lights and
messages" paragraph, "Knowing the
instrument panel" chapter). This
condition leads to the engine switching
off after 2 seconds. In this case, bring the
ignition device to STOP and then to ON; if
it is still blocked, try with the other keys
provided. If it is still not possible to start
the engine, contact an Alfa Romeo
Dealership.
If the
icon is displayed while driving,
this means that the system is running a
self-diagnosis (e.g. due to a voltage drop).
If the display persists, contact an Alfa
Romeo Dealership.
ALARMSYSTEM
(where provided)
Activation of the alarm triggers the
acoustic warning and the direction
indicators.
IMPORTANT The alarm is adapted to
meet requirements in various countries.
SWITCHING ON THE ALARM
With the doors, bonnet and tailgate
closed and the ignition device turned to
STOP, point the electronic key towards
the vehicle and press and release button
.
Except on some versions for specific
markets, the system produces a visual
and acoustic warning and enables door
locking.
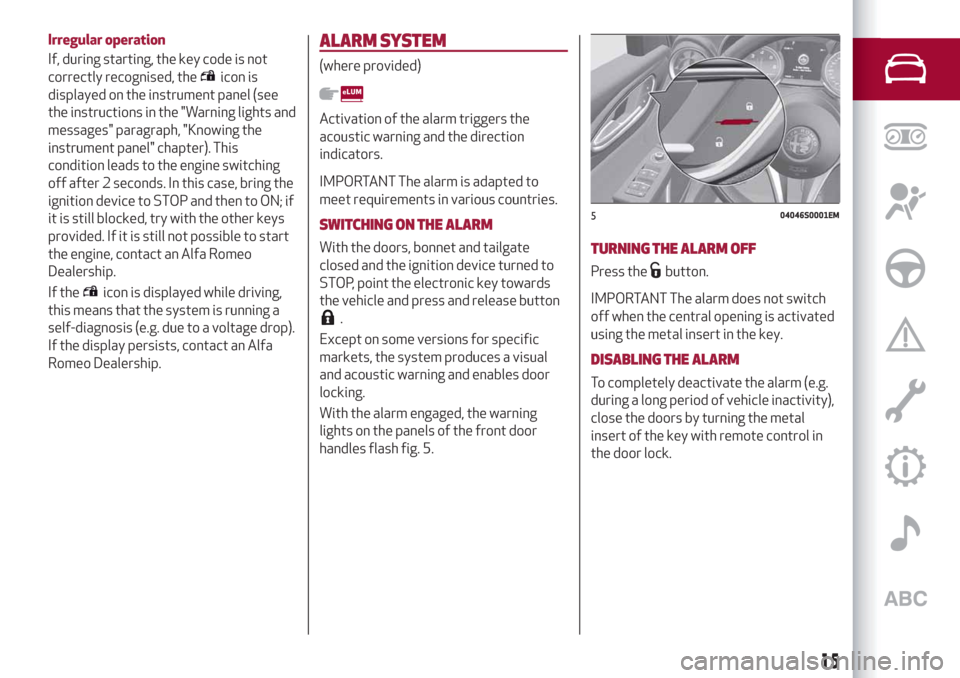
With the alarm engaged, the warning
lights on the panels of the front door
handles flash fig. 5.
TURNING THE ALARM OFF
Press thebutton.
IMPORTANT The alarm does not switch
off when the central opening is activated
using the metal insert in the key.
DISABLING THE ALARM
To completely deactivate the alarm (e.g.
during a long period of vehicle inactivity),
close the doors by turning the metal
insert of the key with remote control in
the door lock.
504046S0001EM
15
Page 22 of 232
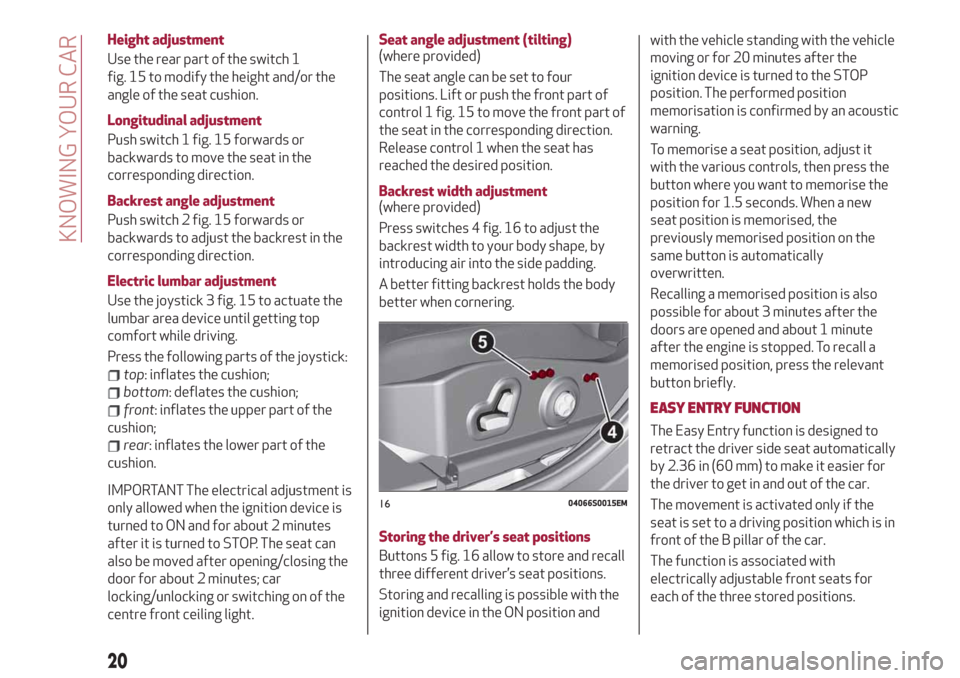
Height adjustment
Use the rear part of the switch 1
fig. 15 to modify the height and/or the
angle of the seat cushion.
Longitudinal adjustment
Push switch 1 fig. 15 forwards or
backwards to move the seat in the
corresponding direction.
Backrest angle adjustment
Push switch 2 fig. 15 forwards or
backwards to adjust the backrest in the
corresponding direction.
Electric lumbar adjustment
Use the joystick 3 fig. 15 to actuate the
lumbar area device until getting top
comfort while driving.
Press the following parts of the joystick:
top: inflates the cushion;
bottom: deflates the cushion;
front: inflates the upper part of the
cushion;
rear: inflates the lower part of the
cushion.
IMPORTANT The electrical adjustment is
only allowed when the ignition device is
turned to ON and for about 2 minutes
after it is turned to STOP. The seat can
also be moved after opening/closing the
door for about 2 minutes; car
locking/unlocking or switching on of the
centre front ceiling light.
Seat angle adjustment (tilting)
(where provided)
The seat angle can be set to four
positions. Lift or push the front part of
control 1 fig. 15 to move the front part of
the seat in the corresponding direction.
Release control 1 when the seat has
reached the desired position.
Backrest width adjustment
(where provided)
Press switches 4 fig. 16 to adjust the
backrest width to your body shape, by
introducing air into the side padding.
A better fitting backrest holds the body
better when cornering.
Storing the driver’s seat positions
Buttons 5 fig. 16 allow to store and recall
three different driver’s seat positions.
Storing and recalling is possible with the
ignition device in the ON position andwith the vehicle standing with the vehicle
moving or for 20 minutes after the
ignition device is turned to the STOP
position. The performed position
memorisation is confirmed by an acoustic
warning.
To memorise a seat position, adjust it
with the various controls, then press the
button where you want to memorise the
position for 1.5 seconds. When a new
seat position is memorised, the
previously memorised position on the
same button is automatically
overwritten.
Recalling a memorised position is also
possible for about 3 minutes after the
doors are opened and about 1 minute
after the engine is stopped. To recall a
memorised position, press the relevant
button briefly.
EASY ENTRY FUNCTION
The Easy Entry function is designed to
retract the driver side seat automatically
by 2.36 in (60 mm) to make it easier for
the driver to get in and out of the car.
The movement is activated only if the
seat is set to a driving position which is in
front of the B pillar of the car.
The function is associated with
electrically adjustable front seats for
each of the three stored positions.
1604066S0015EM
20
KNOWING YOUR CAR
Page 23 of 232
The Easy Entry function can be
activated/deactivated using the Connect
system.
Activating entrance mode
With the door open and the starter device
at STOP, the driver side seat will be in a
position retracted by 2.36 in (60 mm)
with respect to the driving position set by
the user.
When the door is closed and the starter
device is in the ON position, the seat will
automatically return to the set driving
position.
NOTE If the seat is moved manually while
it is still in retracted position, it will
remain in the new set position when the
car is entered again.
Activating exit mode
In order to help the driver get out of the
car, the driver side seat will move back by
2.36 in (60 mm) when the starter device
is in STOP mode and the driver side door
is opened.
NOTE Pressing any button on the seat
memory or control panel will immediately
interrupt the automatic positioning
function (antipanic function). The
operation must be repeated to complete
the function.FRONT AND REAR SEAT ELECTRIC
HEATING
(where provided)
Front seats
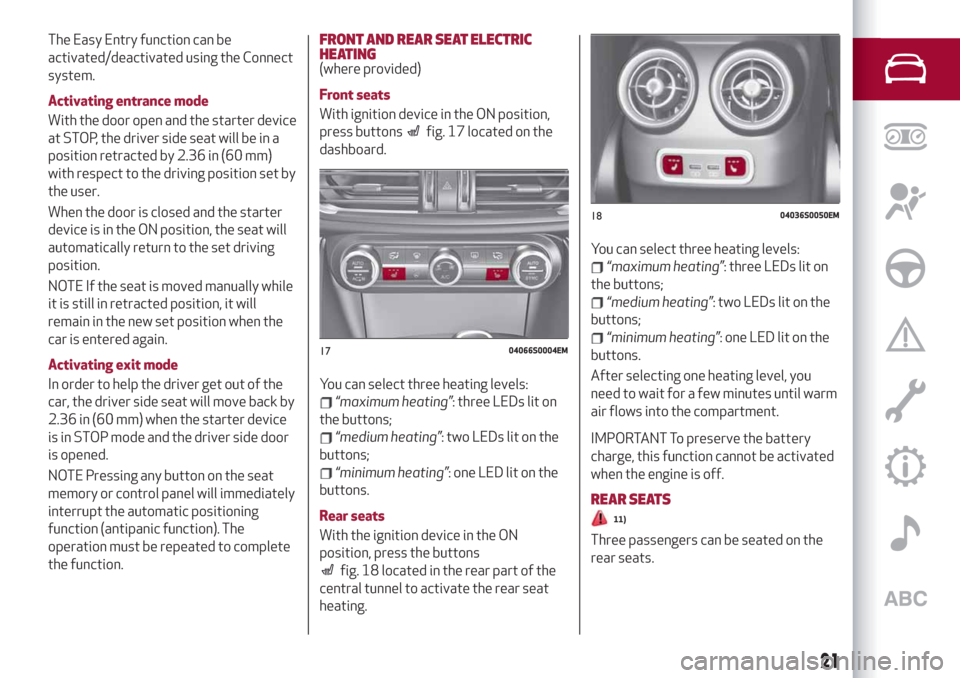
With ignition device in the ON position,
press buttons
fig. 17 located on the
dashboard.
You can select three heating levels:
“maximum heating”: three LEDs lit on
the buttons;
“medium heating”: two LEDs lit on the
buttons;
“minimum heating”: one LED lit on the
buttons.
Rear seats
With the ignition device in the ON
position, press the buttons
fig. 18 located in the rear part of the
central tunnel to activate the rear seat
heating.You can select three heating levels:
“maximum heating”: three LEDs lit on
the buttons;
“medium heating”: two LEDs lit on the
buttons;
“minimum heating”: one LED lit on the
buttons.
After selecting one heating level, you
need to wait for a few minutes until warm
air flows into the compartment.
IMPORTANT To preserve the battery
charge, this function cannot be activated
when the engine is off.
REAR SEATS
11)
Three passengers can be seated on the
rear seats.
1704066S0004EM
1804036S0050EM
21
Page 26 of 232
STEERING WHEEL
14) 15)
ADJUSTMENTS
The steering wheel can be adjusted both
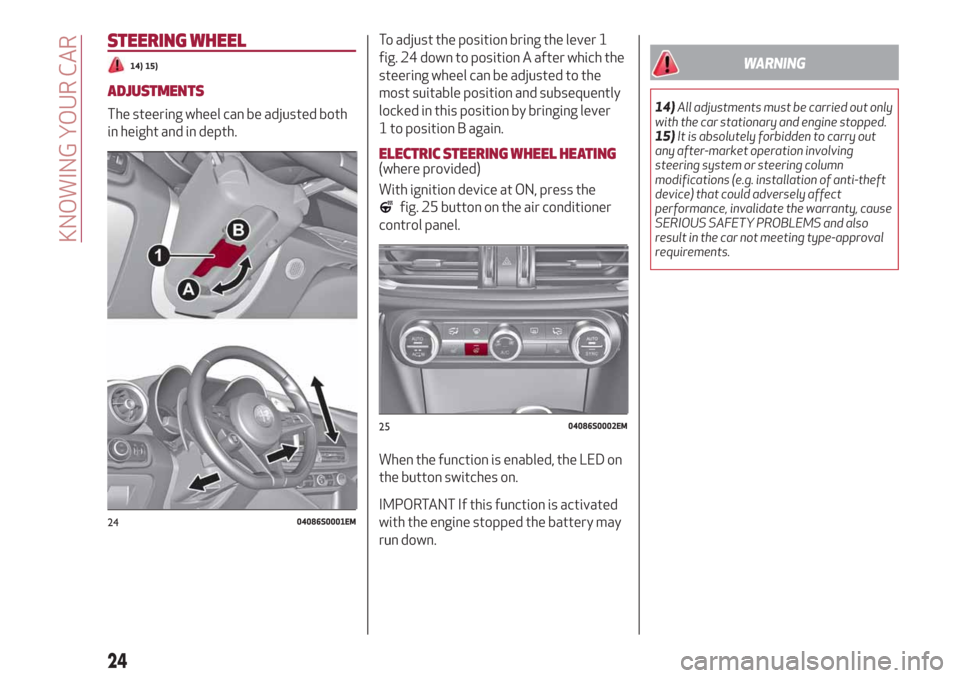
in height and in depth.To adjust the position bring the lever 1
fig. 24 down to position A after which the
steering wheel can be adjusted to the
most suitable position and subsequently
locked in this position by bringing lever
1 to position B again.
ELECTRIC STEERING WHEEL HEATING(where provided)
With ignition device at ON, press the
fig. 25 button on the air conditioner
control panel.
When the function is enabled, the LED on
the button switches on.
IMPORTANT If this function is activated
with the engine stopped the battery may
run down.
WARNING
14)All adjustments must be carried out only
with the car stationary and engine stopped.
15)It is absolutely forbidden to carry out
any after-market operation involving
steering system or steering column
modifications (e.g. installation of anti-theft
device) that could adversely affect
performance, invalidate the warranty, cause
SERIOUS SAFETY PROBLEMS and also
result in the car not meeting type-approval
requirements.
2404086S0001EM
2504086S0002EM
24
KNOWING YOUR CAR
Page 29 of 232
AUTO FUNCTION (Dusk sensor)
This is implemented by an infrared LED
sensor on the windscreen that works in
conjunction with the rain sensor. It is able
to detect variations in the outside light
level based on the light sensitivity set
through the Connect system.
The dusk sensor sensitivity can be
adjusted according to 3 levels: level
1=minimum sensitivity, level 2=average
sensitivity, level 3=maximum sensitivity.
The higher the sensitivity set, the lesser
is the external light variation needed to
switch the lights on (e.g. with a setting on
level 3 at sunset the headlights come on
earlier than levels 1 and 2).
Function activation
Turn the light switch to AUTO.
IMPORTANT The function can only be
activated with the ignition device at ON.
Function deactivation
Turn the light switch to a position other
than AUTO.
DIPPED HEADLIGHTS
Turn the light switch toto switch on
the side lights, the lights on the
instrument panel and the dipped beam
headlights.
The
warning light switches on in the
instrument panel.
DAYTIME RUNNING LIGHTS (DRL) AND
SIDE LIGHTS (Daytime Running Lights)
(where provided)
17) 18)
With the ignition device turned to ON and
the light switch turned to theOposition,
the daytime running lights, the rear light
clusters and the number plate lights are
automatically activated.
Where provided, if the direction
indicators are operated, the brightness
of the corresponding DRL will be
decreased as long as the direction
indicators are on.
Where provided, the DRL can be
activated/deactivated from Connect
system, by selecting the following
functions in sequence on the main MENU:
"Settings", "Lights" and "Daytime Running
Lights".
IMPORTANT In markets where DRL use is
not required, these lights work as side
lights and they are switched on and off
jointly with the main beam headlights.
FRONT FOG LIGHTS
(where provided)
The fog light switch is integrated with the
light switch.
Press the
button to turn on the fog
lights with side lights and dipped beam
headlights on.To turn off the fog lights, press the
button again or turn the switch to the
Oposition.
The fog lights are switched on with the
dipped beam headlights or DRL on (the
latter work as side lights) and are
switched on when switching on the main
beam headlights but not when the main
beam headlights are flashed only.
If the fog lights are not switched off
before stopping the engine, the next time
the engine is started they will switch on
again.
Cornering lights
(where provided)
The fog lights perform cornering
function. This function allows to
illuminate the road or a corner better by
lighting the corresponding fog light.
The cornering function can be
deactivated on the Connect system by
selecting the following functions in
sequence on the main menu: "Settings",
"Lights" and "Cornering Lights".
REAR FOG LIGHT
The rear fog light switch is integrated
with the light switch.
Press the
button to switch the light
on/off.
The rear fog light switches on only when
the dipped beam headlights or fog lights
27