air conditioning ALFA ROMEO GIULIA 2021 Owners Manual
[x] Cancel search | Manufacturer: ALFA ROMEO, Model Year: 2021, Model line: GIULIA, Model: ALFA ROMEO GIULIA 2021Pages: 284, PDF Size: 8.87 MB
Page 13 of 284

11
SAFETY
ACTIVE SAFETY SYSTEMS ..................... 141
Anti-Lock Brake System (ABS) ........... 141
Active Torque Vectoring (ATV) —
If Equipped ...........................................142 Dynamic Steering Torque (DST) .........142
Drive Train Control (DTC) System —
If Equipped ...........................................142 Electronic Stability Control (ESC) ........142
Hill Start Assist (HSA)...........................143
Panic Brake Assist (PBA) .....................143
Traction Control System (TCS) ............144
AUXILIARY DRIVING SYSTEMS .............. 144
Blind Spot Monitoring (BSM) System —
If Equipped ..........................................145 Active Blind Spot Assist (ABSA) System —
If Equipped ..........................................147 Driver Attention Assist (DAA) System —
If Equipped ...........................................150 Forward Collision Warning (FCW)
System ..................................................151 Tire Pressure Monitoring
System (TPMS) ..................................... 156
OCCUPANT RESTRAINT SYSTEMS ....... 159
Occupant Restraint Systems
Features ..............................................159 Important Safety Precautions .............159
Seat Belt Systems ............................... 159
Supplemental Restraint
Systems (SRS)...................................... 165 Child Restraints....................................174
SAFETY TIPS .......................................... 187
Transporting Passengers .................... 187
Transporting Pets ............................... 187
Safety Checks You Should Make
Inside The Vehicle .............................. 187 Periodic Safety Checks You Should
Make Outside The Vehicle .................. 188 Exhaust Gas ......................................... 189
Carbon Monoxide Warnings................ 189
IN CASE OF EMERGENCY
HAZARD WARNING FLASHERS ............. 190SOS - EMERGENCY CALL ...................... 190
TIRE SERVICE KIT .................................. 194
Description ........................................... 194
Inflation Procedure .............................. 195
Checking And Restoring Tire
Pressure ............................................... 197 Sealant Cartridge Replacement ......... 197
JUMP STARTING .................................... 198
Remote Battery Connection Posts ..... 198
Jump Starting....................................... 199
Bump Starting...................................... 200
IF YOUR ENGINE OVERHEATS ............... 200
MANUAL PARK RELEASE ....................... 201
TOWING A DISABLED VEHICLE ............. 201
Rear Wheel Drive (RWD) Models........ 202
All Wheel Drive (AWD) Models ............ 202
TOW EYES............................................... 202ENHANCED ACCIDENT
RESPONSE SYSTEM (EARS) .................. 203EVENT DATA RECORDER (EDR) ............ 203 SERVICING AND MAINTENANCE
SCHEDULED SERVICING ....................... 204
Periodic Checks................................... 204
Heavy Usage Of The Vehicle............... 204
Maintenance Plan — 2.0L Engine ...... 205
Maintenance Plan — 2.9L Engine ...... 208
ENGINE COMPARTMENT....................... 211
Checking Levels — 2.0L Engine ......... 211
Checking Levels — 2.9L Engine ........ 212
Engine Oil............................................. 213
Engine Coolant .................................... 214
Washer Fluid For Windshield/
Headlights............................................ 214 Brake Fluid .......................................... 214
Automatic Transmission Activation
System Oil ............................................ 214 Useful Advice For Extending
The Life Of Your Battery ...................... 214 Battery ................................................. 215
Pressure Washing ............................... 215
BATTERY RECHARGING......................... 215
Important Notes .................................. 215
VEHICLE MAINTENANCE ....................... 217
Engine Oil............................................. 217
Engine Oil Filter ................................... 217
Engine Air Cleaner............................... 217
Air Conditioning System
Maintenance ....................................... 217 Lubricating Moving Parts Of
The Bodywork ...................................... 218 Windshield Wiper ................................ 218
21_GA_OM_EN_USC_t.book Page 11
Page 51 of 284

49
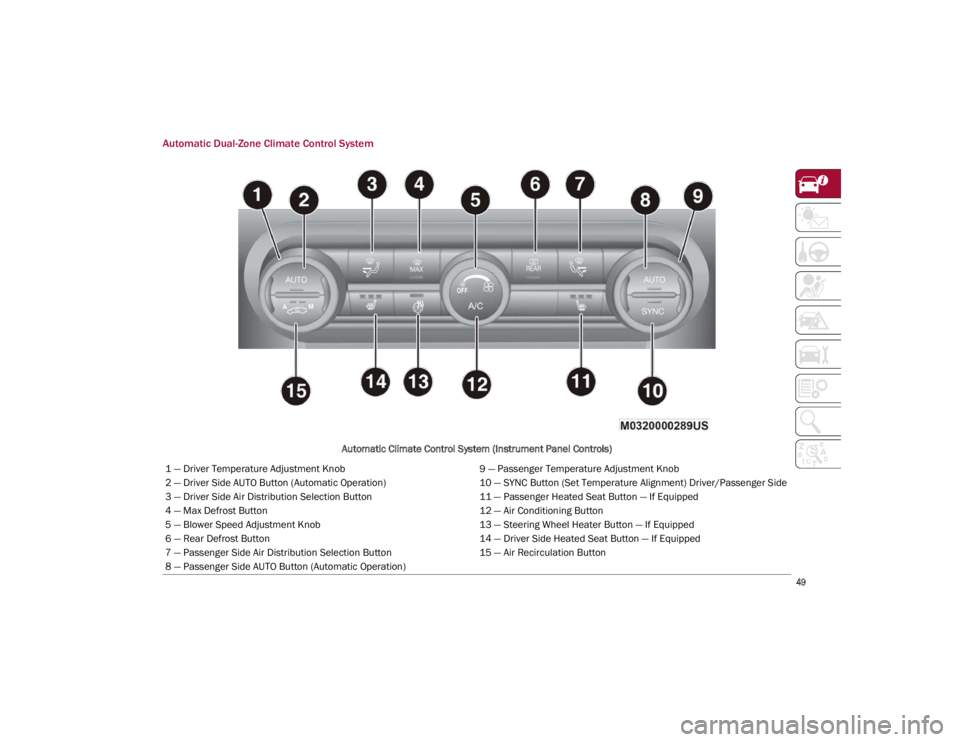
Automatic Dual-Zone Climate Control System
Automatic Climate Control System (Instrument Panel Controls)
1 — Driver Temperature Adjustment Knob 9 — Passenger Temperature Adjustment Knob
2 — Driver Side AUTO Button (Automatic Operation) 10 — SYNC Button (Set Temperature Alignment) Driver/Passenger Side
3 — Driver Side Air Distribution Selection Button 11 — Passenger Heated Seat Button — If Equipped
4 — Max Defrost Button 12 — Air Conditioning Button
5 — Blower Speed Adjustment Knob 13 — Steering Wheel Heater Button — If Equipped
6 — Rear Defrost Button 14 — Driver Side Heated Seat Button — If Equipped
7 — Passenger Side Air Distribution Selection Button 15 — Air Recirculation Button
8 — Passenger Side AUTO Button (Automatic Operation)
21_GA_OM_EN_USC_t.book Page 49
Page 219 of 284

217
VEHICLE MAINTENANCE
The following pages contain instructions on
the required maintenance from the technical
personnel who designed the vehicle.
In addition to these specific maintenance
instructions specified for routine scheduled
servicing, there are other components which
may require periodic maintenance or replace-
ment over the vehicle’s life cycle.
Engine Oil
Engine Oil Level Check
To ensure correct engine lubrication, the oil
must always be kept at the appropriate level.
Check the oil level at regular intervals, for
example every 1,864 miles (3,000 km).
It must be checked once full operating
temperature is reached.
The vehicle must also be parked on as level a
surface as possible.
The engine oil level can be checked using the
Information and Entertainment system. To
access the function, activate the main menu
(MENU button) and select the following
options in sequence: “Applications”; “My Car”;
“Oil level”. Changing The Engine Oil
For the correct servicing intervals
Ú
page 204.
Choice Of Engine Oil Type
To ensure optimal performance and maximum
protection in all operating conditions, it is
advisable to only use certified engine oils
Ú
page 267.
Additives For Engine Oil
It is strongly recommended not to use addi -
tives (other than leak detection dyes) with the
engine oil.
The engine oil is a product designed specially
for the vehicle and its performance may be
deteriorated through the use of further addi -
tives.
Disposal Of Used Engine Oil And Filters
For disposal of used engine oil and filters,
consult the appropriate local regulations.
NOTE:
Inappropriate disposal of used engine oil may
seriously harm the environment.
Engine Oil Filter
The engine oil filter should be replaced with a
new filter at every engine oil change.
Engine Oil Filter Selection
A full-flow type disposable oil filter should be
used for replacement. The quality of replace -
ment filters varies considerably. Only high
quality Mopar certified filters should be used.
Engine Air Cleaner
Engine Air Cleaner Filter Selection
The quality of replacement filters varies
considerably. Only high quality Mopar certified
filters should be used.
Air Conditioning System Maintenance
To ensure the best possible performance, the
air conditioning system must be checked and
undergo maintenance at an authorized dealer
at the beginning of the summer.
CAUTION!
Do not use chemicals to clean the air
conditioning system, since the internal
components may be damaged. This kind of
damage is not covered by warranty.
21_GA_OM_EN_USC_t.book Page 217
Page 220 of 284

SERVICING AND MAINTENANCE
218
Replace The Cabin Air Cleaner
For the correct servicing intervals
Ú
page 204. For cabin air cleaner replace -
ment, contact an authorized dealer.
Lubricating Moving Parts Of The Bodywork
Ensure that the locks and bodywork junction
points, including components such as the seat
guides, door hinges (and rollers), trunk and hood
are periodically lubricated with lithium-based
grease to ensure correct, silent operation and to
protect them from rust and wear.
Thoroughly clean the components, eliminating
every trace of dirt and dust. After lubricating,
eliminate excess oil and grease. Also pay
particular attention to the hood closing
devices, to ensure correct operation. During
operations on the hood, to be carried out with
the engine cold, also remember to check,
clean and lubricate the locking, release and
safety devices. Lubricate the external lock barrels twice a
year. Apply a small amount of high-quality
lubricant directly into the lock barrel.
If necessary, contact an authorized dealer as
soon as possible.
Windshield Wiper
Periodically clean the windshield and rear
window and rubber profile of the windshield
wiper blades, using a sponge or a soft cloth
and a non-abrasive detergent. This eliminates
the salt or impurities accumulated when
driving.
Prolonged operation of the windshield window
wipers with dry glass may cause the deteriora
-
tion of the blades, in addition to abrasion of
the surface of the glass. To eliminate the impu -
rities on the dry glass, always operate the
windshield washers.
In the event of very low outdoor temperatures,
below 0°F (-17.8°C) , ensure that the move -
ment of the rubber part in contact with the
glass is not obstructed. Use a suitable deicing
product to release it if required.
Avoid using the windshield wipers to remove
frost or ice.
Also avoid contact of the rubber profile of the
blades with petroleum derivatives such as
engine oil, gas, etc.
NOTE:
The life of the windshield wiper blades varies
according to the usage frequency. In any case,
it is advised to replace the blades approxi
-
mately once a year. When the blades are worn,
noise, marks on the glass or streaks of water
may be noticed. In the presence of these
conditions, clean the windshield wiper blades
or, if necessary, replace them.
Raising The Windshield Wiper Blades
(“Service Position” Function)
The “service position” function allows the
driver to replace the windshield wiper blades
more easily. It is also recommended to acti -
vate this function when it is snowing and to
make it easier to remove any dirt deposits in
the area where the blades are normally posi -
tioned, when washing.
Activation Of The Function
To activate this function, disable the wind -
shield wiper before setting the ignition device
to OFF.
This function can only be activated within two
minutes of placing the ignition in OFF.
WARNING!
Use only refrigerants and compressor lubricants
approved by FCA US LLC for your air conditioning
system. Some unapproved refrigerants are
flammable and can explode, injuring you. Other
unapproved refrigerants or lubricants can cause
the system to fail, requiring costly repairs. Refer
to Warranty Information Book, located in your
owner’s information kit, for further warranty
information.
WARNING!
Driving with worn windshield wiper blades
is a serious hazard, because visibility is
reduced in bad weather conditions.
21_GA_OM_EN_USC_t.book Page 218
Page 253 of 284

251
If the battery is not disconnected from the
electrical system, check its state of charge
every 30 days.
Clean and protect the painted parts using
protective wax.
Clean and protect the shiny metal parts
using special compounds available
commercially.
Sprinkle talcum powder on the windshield
wiper rubber blades, and lift them off the
glass.
Cover the vehicle with a fabric or perforated
plastic sheet, paying particular care not to
damage the painted surface by dragging
any dust that may have accumulated on it.
Do not use compact plastic sheets, as they
do not allow humidity to evaporate from the
surface of the vehicle.
Inflate tires to +7.25 psi (+0.5 bar) above
the standard prescribed pressure and
check it periodically.
Do not drain the engine cooling system.
Any time the vehicle is left inactive for two
weeks or more, operate the air conditioning
system with engine idling for at least five
minutes, setting external air and with fan
set to maximum speed. This operation will
ensure appropriate lubrication for the
system, thus minimizing the possibility of
damage to the compressor when the
system is operated again.
NOTE:
After placing the ignition in STOP and having
closed the driver side door, wait at least one
minute before disconnecting the electrical
supply from the battery. When reconnecting
the electrical supply to the battery, make sure
that the ignition is in the STOP position and the
driver side door is closed. Manual Trunk Opening Device
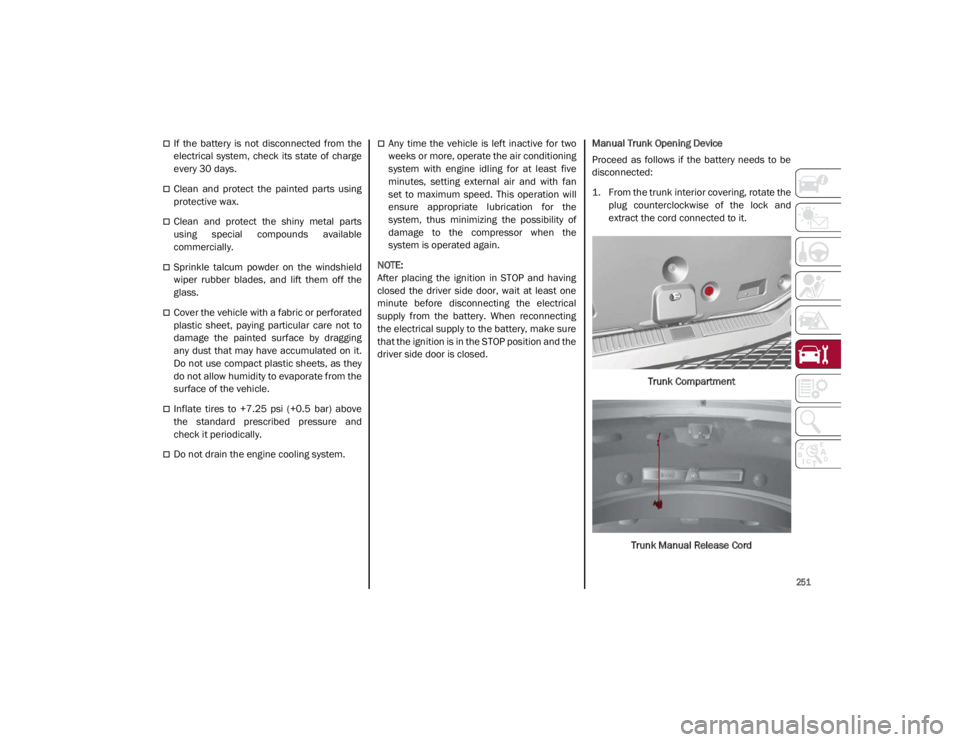
Proceed as follows if the battery needs to be
disconnected:
1. From the trunk interior covering, rotate the
plug counterclockwise of the lock and
extract the cord connected to it.
Trunk Compartment
Trunk Manual Release Cord
21_GA_OM_EN_USC_t.book Page 251