headlights ALFA ROMEO GIULIA 2021 Owners Manual
[x] Cancel search | Manufacturer: ALFA ROMEO, Model Year: 2021, Model line: GIULIA, Model: ALFA ROMEO GIULIA 2021Pages: 284, PDF Size: 8.87 MB
Page 10 of 284

8
DEAR CUSTOMER
READ THIS CAREFULLY
Refueling..................................................... 2
Starting The Engine .................................... 2
Parking On Flammable Material ............... 2
Respecting The Environment .................... 2
Electrical Accessories ................................ 2
Scheduled Servicing .................................. 2
VEHICLE CHANGES / ALTERATIONS
Accessories Purchased By The Owner ...... 3
Installing Electrical/Electronic Devices .... 3
Radio Transmitters And Mobile Phones ... 4
HOW TO USE THIS MANUAL
Operating Instructions ............................... 5
Warnings And Cautions.............................. 5
Symbols Key ............................................... 6
Symbols ...................................................... 6
Symbol Glossary
GETTING TO KNOW YOUR VEHICLE
KEYS..........................................................16
Key Fob .................................................. 16
ENGINE IMMOBILIZER SYSTEM ..............18
IGNITION SWITCH .....................................19
Keyless Push Button Ignition ................ 19
REMOTE START — IF EQUIPPED .............20
How To Use Remote Start ..................... 20
To Exit Remote Start Mode ................... 21 Remote Start Comfort Systems —
If Equipped ............................................. 21
VEHICLE SECURITY SYSTEM —
IF EQUIPPED............................................. 21
To Arm The System................................ 21
To Disarm The System .......................... 21
Volumetric/Anti-Lift Protection —
If Equipped ............................................. 22
DOORS ...................................................... 22
Power Door Locks.................................. 22
Locking The Doors With A Depleted
Battery .................................................... 23 Passive Entry System ........................... 24
Automatic Door Locks —
If Equipped ............................................ 26 Child-Protection Door Lock System —
Rear Doors ............................................. 26
STEERING WHEEL.................................... 26
Manual Tilt/Telescoping Steering
Column ................................................... 26 Heated Steering Wheel —
If Equipped ............................................. 27
DRIVER MEMORY SETTINGS —
IF EQUIPPED ............................................ 28
Programming The Memory Feature ..... 28
Memory Position Recall ........................ 28
SEATS ....................................................... 29
Sparco Racing Seats (Quadrifoglio
Vehicles) — If Equipped ......................... 29 Manual Adjustment (Rear Seats) ......... 30
Power Adjustment (Front Seats)........... 32
Heated Seats — If Equipped ................ 33
Head Restraints .................................... 35
MIRRORS .................................................. 36
Automatic Dimming Mirror.................... 36 Vanity Mirror ...........................................37
Outside Power Mirrors ...........................37
Power Folding Outside Mirrors ..............38
Outside Automatic Dimming Mirrors —
If Equipped .............................................38 Heated Mirrors ......................................38
UNIVERSAL GARAGE DOOR OPENER
(HOMELINK®) ..........................................38
Before You Begin Programming
HomeLink® ............................................39 Erasing All The HomeLink®
Channels ................................................. 39 Identifying Whether You Have A
Rolling Code Or Non-Rolling Code
Device .....................................................39 Programming HomeLink® To A
Garage Door Opener ..............................39 Programming HomeLink® To A
Miscellaneous Device ............................ 40 Reprogramming A Single HomeLink®
Button .....................................................40 Canadian/Gate Operator
Programming .......................................... 41
EXTERIOR LIGHTS ....................................42
Headlight Switch .................................... 42
Daytime Running Lights (DRLs) ............42
High Beam Headlights ...........................42
Automatic Headlights ............................ 42
Flash-To-Pass .........................................43
Automatic High Beam Headlights —
If Equipped .............................................43 Parking Lights .........................................43
Headlight Off Delay ................................43
Rear Fog Light ........................................44
21_GA_OM_EN_USC_t.book Page 8
Page 13 of 284

11
SAFETY
ACTIVE SAFETY SYSTEMS ..................... 141
Anti-Lock Brake System (ABS) ........... 141
Active Torque Vectoring (ATV) —
If Equipped ...........................................142 Dynamic Steering Torque (DST) .........142
Drive Train Control (DTC) System —
If Equipped ...........................................142 Electronic Stability Control (ESC) ........142
Hill Start Assist (HSA)...........................143
Panic Brake Assist (PBA) .....................143
Traction Control System (TCS) ............144
AUXILIARY DRIVING SYSTEMS .............. 144
Blind Spot Monitoring (BSM) System —
If Equipped ..........................................145 Active Blind Spot Assist (ABSA) System —
If Equipped ..........................................147 Driver Attention Assist (DAA) System —
If Equipped ...........................................150 Forward Collision Warning (FCW)
System ..................................................151 Tire Pressure Monitoring
System (TPMS) ..................................... 156
OCCUPANT RESTRAINT SYSTEMS ....... 159
Occupant Restraint Systems
Features ..............................................159 Important Safety Precautions .............159
Seat Belt Systems ............................... 159
Supplemental Restraint
Systems (SRS)...................................... 165 Child Restraints....................................174
SAFETY TIPS .......................................... 187
Transporting Passengers .................... 187
Transporting Pets ............................... 187
Safety Checks You Should Make
Inside The Vehicle .............................. 187 Periodic Safety Checks You Should
Make Outside The Vehicle .................. 188 Exhaust Gas ......................................... 189
Carbon Monoxide Warnings................ 189
IN CASE OF EMERGENCY
HAZARD WARNING FLASHERS ............. 190SOS - EMERGENCY CALL ...................... 190
TIRE SERVICE KIT .................................. 194
Description ........................................... 194
Inflation Procedure .............................. 195
Checking And Restoring Tire
Pressure ............................................... 197 Sealant Cartridge Replacement ......... 197
JUMP STARTING .................................... 198
Remote Battery Connection Posts ..... 198
Jump Starting....................................... 199
Bump Starting...................................... 200
IF YOUR ENGINE OVERHEATS ............... 200
MANUAL PARK RELEASE ....................... 201
TOWING A DISABLED VEHICLE ............. 201
Rear Wheel Drive (RWD) Models........ 202
All Wheel Drive (AWD) Models ............ 202
TOW EYES............................................... 202ENHANCED ACCIDENT
RESPONSE SYSTEM (EARS) .................. 203EVENT DATA RECORDER (EDR) ............ 203 SERVICING AND MAINTENANCE
SCHEDULED SERVICING ....................... 204
Periodic Checks................................... 204
Heavy Usage Of The Vehicle............... 204
Maintenance Plan — 2.0L Engine ...... 205
Maintenance Plan — 2.9L Engine ...... 208
ENGINE COMPARTMENT....................... 211
Checking Levels — 2.0L Engine ......... 211
Checking Levels — 2.9L Engine ........ 212
Engine Oil............................................. 213
Engine Coolant .................................... 214
Washer Fluid For Windshield/
Headlights............................................ 214 Brake Fluid .......................................... 214
Automatic Transmission Activation
System Oil ............................................ 214 Useful Advice For Extending
The Life Of Your Battery ...................... 214 Battery ................................................. 215
Pressure Washing ............................... 215
BATTERY RECHARGING......................... 215
Important Notes .................................. 215
VEHICLE MAINTENANCE ....................... 217
Engine Oil............................................. 217
Engine Oil Filter ................................... 217
Engine Air Cleaner............................... 217
Air Conditioning System
Maintenance ....................................... 217 Lubricating Moving Parts Of
The Bodywork ...................................... 218 Windshield Wiper ................................ 218
21_GA_OM_EN_USC_t.book Page 11
Page 16 of 284
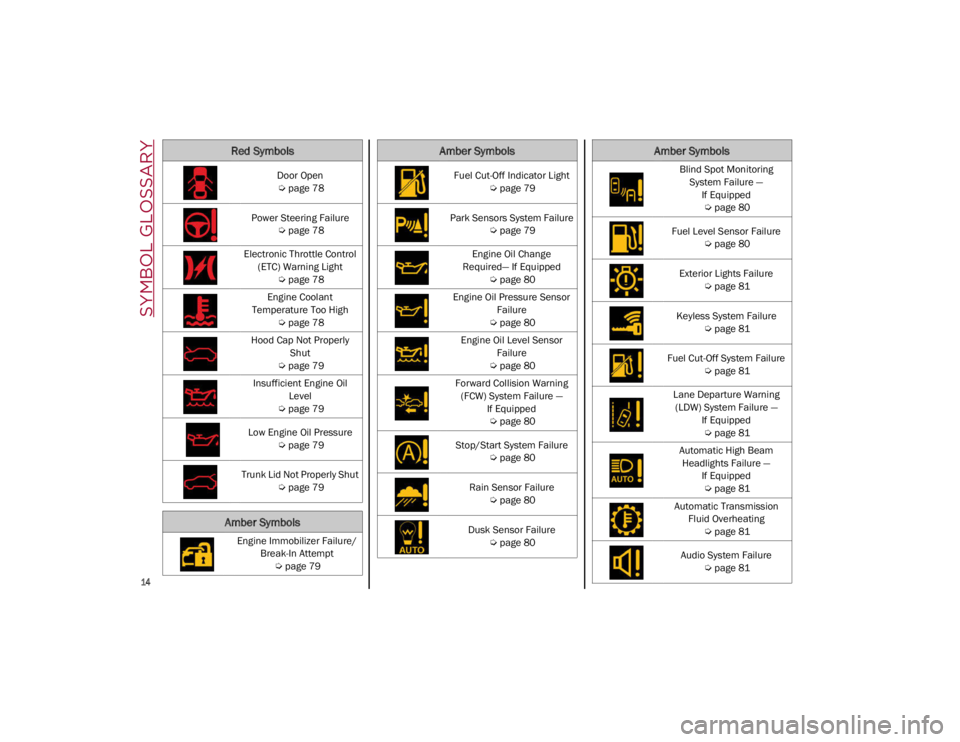
SYMBOL GLOSSARY
14
Door Open
Ú
page 78
Power Steering Failure
Ú
page 78
Electronic Throttle Control (ETC) Warning Light
Ú
page 78
Engine Coolant
Temperature Too High
Ú
page 78
Hood Cap Not Properly Shut
Ú
page 79
Insufficient Engine Oil Level
Ú
page 79
Low Engine Oil Pressure
Ú
page 79
Trunk Lid Not Properly Shut
Ú
page 79
Amber Symbols
Engine Immobilizer Failure/
Break-In Attempt
Ú
page 79
Red Symbols
Fuel Cut-Off Indicator Light
Ú
page 79
Park Sensors System Failure
Ú
page 79
Engine Oil Change
Required— If Equipped
Ú
page 80
Engine Oil Pressure Sensor Failure
Ú
page 80
Engine Oil Level Sensor Failure
Ú
page 80
Forward Collision Warning (FCW) System Failure — If Equipped
Ú
page 80
Stop/Start System Failure
Ú
page 80
Rain Sensor Failure
Ú
page 80
Dusk Sensor Failure
Ú
page 80
Amber Symbols
Blind Spot Monitoring
System Failure — If Equipped
Ú
page 80
Fuel Level Sensor Failure
Ú
page 80
Exterior Lights Failure
Ú
page 81
Keyless System Failure
Ú
page 81
Fuel Cut-Off System Failure
Ú
page 81
Lane Departure Warning (LDW) System Failure — If Equipped
Ú
page 81
Automatic High Beam Headlights Failure — If Equipped
Ú
page 81
Automatic Transmission Fluid Overheating
Ú
page 81
Audio System Failure
Ú
page 81
Amber Symbols
21_GA_OM_EN_USC_t.book Page 14
Page 17 of 284
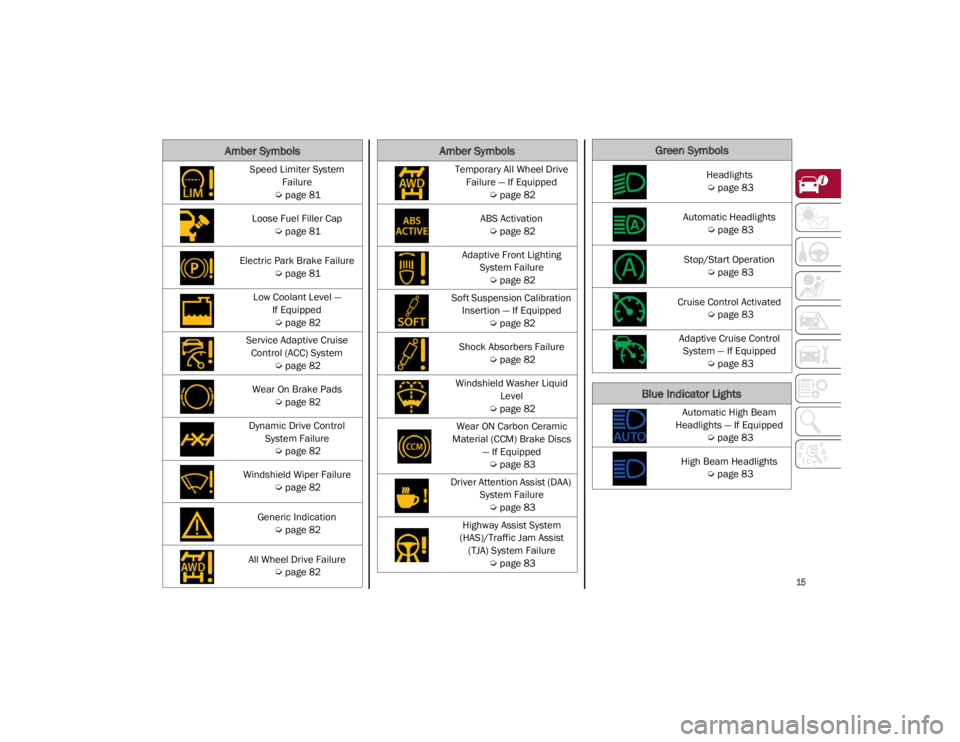
15
Speed Limiter System Failure
Ú
page 81
Loose Fuel Filler Cap
Ú
page 81
Electric Park Brake Failure
Ú
page 81
Low Coolant Level — If Equipped
Ú
page 82
Service Adaptive Cruise Control (ACC) System
Ú
page 82
Wear On Brake Pads
Ú
page 82
Dynamic Drive Control System Failure
Ú
page 82
Windshield Wiper Failure
Ú
page 82
Generic Indication
Ú
page 82
All Wheel Drive Failure
Ú
page 82
Amber Symbols
Temporary All Wheel Drive
Failure — If Equipped
Ú
page 82
ABS Activation
Ú
page 82
Adaptive Front Lighting System Failure
Ú
page 82
Soft Suspension Calibration Insertion — If Equipped
Ú
page 82
Shock Absorbers Failure
Ú
page 82
Windshield Washer Liquid Level
Ú
page 82
Wear ON Carbon Ceramic
Material (CCM) Brake Discs — If Equipped
Ú
page 83
Driver Attention Assist (DAA) System Failure
Ú
page 83
Highway Assist System
(HAS)/Traffic Jam Assist (TJA) System Failure
Ú
page 83
Amber SymbolsGreen Symbols
Headlights
Ú
page 83
Automatic Headlights
Ú
page 83
Stop/Start Operation
Ú
page 83
Cruise Control Activated
Ú
page 83
Adaptive Cruise Control System — If Equipped
Ú
page 83
Blue Indicator Lights
Automatic High Beam
Headlights — If Equipped
Ú
page 83
High Beam Headlights
Ú
page 83
21_GA_OM_EN_USC_t.book Page 15
Page 44 of 284

GETTING TO KNOW YOUR VEHICLE
42
EXTERIOR LIGHTS
Headlight Switch
The headlight switch is located on the left side
of the instrument panel, next to the steering
wheel. The headlight switch controls the oper-
ation of the headlights, parking lights, instru -
ment panel lights, instrument panel light
dimming, interior lights and rear fog lights.
In addition, there are buttons for the Park -
Sense system and Engine Stop/Start
Ú
page 86.
Headlight Switch The instrument panel and the various controls
on the dashboard will be illuminated when the
exterior lights are turned on.
To turn on the headlights, rotate the headlight
switch clockwise. When the headlight switch is
on, the parking lights, taillights, license plate
light and instrument panel lights are also turned
on. To turn off the headlights, rotate the head
-
light switch back to the O (off) position.
Daytime Running Lights (DRLs)
The Daytime Running Lights (DRLs) (low inten -
sity) come on automatically whenever the igni -
tion is placed in the ON/RUN position, and the
headlight switch is turned to the position,
and the dusk sensor detects sufficient
external light.
If the turn signals are operated, the brightness
of the corresponding Daytime Running Lights
will be decreased as long as the turn signals
are on.
The DRL can be activated/deactivated from
the radio system, by selecting the following
functions in sequence on the main MENU:
1. “Settings.”
2. “Lights.”
3. “Daytime Running Lights.”
NOTE:
The Daytime Running Lights cannot be deacti -
vated in Canadian markets.
High Beam Headlights
Push the multifunction lever towards the
instrument panel to switch the headlights to
high beams. The headlight switch must be
turned to the (auto) or (on) position.
The High Beam Indicator on the instrument
panel will illuminate when the high beams are
on.
Multifunction Lever
Pulling the multifunction lever back will turn
the low beams on.
Automatic Headlights
This system automatically turns the headlights
on or off according to ambient light levels. To
turn the system on, rotate the headlight switch
to the (AUTO) position.
NOTE:
The function can only operate with the ignition
placed in the ON/RUN position.
1 — ParkSense Button
2 — Parking Light, Daylight Running Lights,
Headlight Switch
3 — Instrument Panel Dimmer
4 — Rear Fog Light Button
5 — Engine Stop/Start Button
21_GA_OM_EN_USC_t.book Page 42
Page 45 of 284

43
To turn the automatic headlights off, turn the
headlight switch out of the (AUTO) position.
Flash-To-Pass
You can signal another vehicle with your head-
lights by lightly pulling the multifunction lever
toward you. This will cause the high beam
headlights to turn on, and remain on, until the
lever is released.
Automatic High Beam Headlights — If
Equipped
The Automatic High Beam Headlights system
provides increased forward lighting at night by
automating high beam control through the use
of a camera mounted on the windshield. This
camera detects vehicle specific light and auto -
matically switches from high beams to low
beams until the approaching vehicle is out of
view.
This function is enabled with the radio system,
and can only be activated with the light switch
turned to (auto).
If the high beam headlights are on, the blue
icon/warning light will illuminate in the
instrument panel.
When the speed is higher than 25 mph
(40 km/h) and the function is active, the lights
will turn off if the multifunction lever is pushed
again. When the speed is lower than 15 mph
(25 km/h) and the function is active, the func
-
tion switches the high beam headlights off.
If the high beam headlights are operated
quickly again (pushing the multifunction lever
towards the instrument panel), the warning
light/icon will illuminate in the instrument
panel, and the high beam headlights will turn
on constantly until the speed exceeds 25 mph
(40 km/h).
When the speed of 25 mph (40 km/h) is
exceeded again, the automatic functioning is
reactivated.
If the multifunction lever is pushed again with
the Automatic High Beam Headlights acti -
vated, the Automatic High Beam Headlights
function deactivates.
To deactivate the automatic headlight function,
rotate the headlight switch to the position.
NOTE:
If the system recognizes heavy traffic areas,
the automatic functions remain disabled
independently of the vehicle’s speed.
The Automatic High Beam functionality may
also be influenced by:
• Reflections on road signs
• Dim headlights from oncoming traffic
• Poor weather conditions •
Presence of dirt or other obstructions on
the sensor
• Damage to the windshield
Parking Lights
To turn on the parking lights and instrument
panel lights, rotate the headlight switch clock -
wise to the position. All of the parking lights
will turn on for eight minutes, and opening the
door activates an audible warning.
To leave only the lights on one side (right/left)
illuminated, move the multifunction lever
(located on the left side of the steering wheel)
to the side that you want to remain on. With
the parking lights on, the warning light on
the instrument panel will illuminate.
To turn off the parking lights, rotate the head -
light switch back to the O (off) position.
Headlight Off Delay
To assist when exiting the vehicle, the “Head -
light Off Delay” feature will leave the head -
lights on for up to 90 seconds. This delay is
initiated when the ignition is placed in the OFF
position while the headlight switch is on, and
then the headlight switch is cycled off. Head -
light delay can be canceled by either turning
on the headlights or side lights, or by placing
the ignition in the ON position.
21_GA_OM_EN_USC_t.book Page 43
Page 46 of 284
GETTING TO KNOW YOUR VEHICLE
44
The function can be activated from the radio
system by selecting the following functions in
sequence on the main menu:
1. “Settings.”
2. “Lights.”
3. “Headlight Off Delay.”
Rear Fog Light
The rear fog lights may be operated as desired
when visibility is poor due to fog. The rear fog
light button is integrated with the headlight
switch.
Push the button to turn the rear fog lights
on/off.
The lights can be turned off by pushing the
button again or by turning the headlight switch
to the O (off) position and holding it there for a
few seconds.
NOTE:
The headlight switch must first be turned to
the parking lights or headlights position before
the rear fog light button can be pushed.
When the engine is stopped with the rear fog
lights on, they will remain off the next time the
engine is started.
Adaptive Frontlight System (AFS Function) —
If Equipped
This is a system combined with Xenon head-
lights (Bi-Xenon 35 W headlamp if equipped)
which directs the headlights horizontally, and
continuously and automatically adapts them
to the driving conditions around bends or
when cornering.
The system directs the headlights to light up
the road in the best way, taking into account
the speed of the vehicle and the bend or
corner angle, as well as the speed at which the
steering wheel is turned.
The adaptive lights are automatically activated
when the vehicle is started.
Turn Signals
Move the multifunction lever up or down to
activate the turn signals. The arrows on each
side of the instrument cluster flash to show
proper operation.
The or turn signal will blink on the instru -
ment panel.
Lane Change Assist
Lightly push the lever up or down once, without
moving beyond the detent, and the turn signal
will flash five times then automatically turn off.
To turn off the flashing before the end of the
cycle, move the lever in the opposite direction
until the first click (about half way).
Static Bending Light Function (SBL) — If
Equipped
The SBL function utilizes Light Emitting Diodes
(LEDs) in order to better illuminate the street
and increase the light angle while turning. This
function is enabled by rotating the light switch
to position (on) or (auto). The SBL LEDs
activate when the speed is below 25 mph
(40 km/h) and the steering radius is below
0.3 miles (500 m).
This function can be activated/deactivated on
the radio system by selecting the following
functions in sequence on the main menu:
1. “Settings.”
2. “Lights.”
3. “Cornering Lights.”
INTERIOR LIGHTS
Courtesy lights are turned on when the front
doors are opened or when the dimmer control
is rotated to its farthest upward position. The
glove compartment light turns on automati -
cally when the glove compartment is opened
and turn off when it is closed. The door cour -
tesy lights illuminate when one of the front
doors is opened, and turn off when it is closed.
The trunk courtesy lights turn on automatically
when the trunk is opened and turn off when it
is closed. All of these lights turn on and off
regardless of the ignition status.
21_GA_OM_EN_USC_t.book Page 44
Page 48 of 284
GETTING TO KNOW YOUR VEHICLE
46
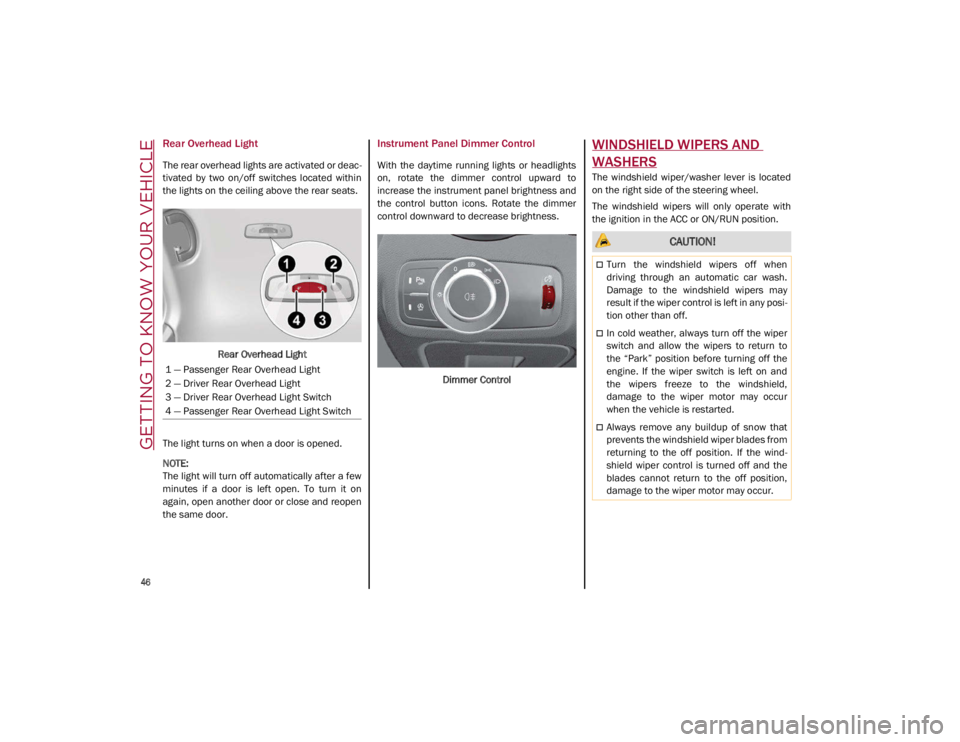
Rear Overhead Light
The rear overhead lights are activated or deac-
tivated by two on/off switches located within
the lights on the ceiling above the rear seats.
Rear Overhead Light
The light turns on when a door is opened.
NOTE:
The light will turn off automatically after a few
minutes if a door is left open. To turn it on
again, open another door or close and reopen
the same door.
Instrument Panel Dimmer Control
With the daytime running lights or headlights
on, rotate the dimmer control upward to
increase the instrument panel brightness and
the control button icons. Rotate the dimmer
control downward to decrease brightness.
Dimmer Control
WINDSHIELD WIPERS AND
WASHERS
The windshield wiper/washer lever is located
on the right side of the steering wheel.
The windshield wipers will only operate with
the ignition in the ACC or ON/RUN position.
1 — Passenger Rear Overhead Light
2 — Driver Rear Overhead Light
3 — Driver Rear Overhead Light Switch
4 — Passenger Rear Overhead Light Switch
CAUTION!
Turn the windshield wipers off when
driving through an automatic car wash.
Damage to the windshield wipers may
result if the wiper control is left in any posi -
tion other than off.
In cold weather, always turn off the wiper
switch and allow the wipers to return to
the “Park” position before turning off the
engine. If the wiper switch is left on and
the wipers freeze to the windshield,
damage to the wiper motor may occur
when the vehicle is restarted.
Always remove any buildup of snow that
prevents the windshield wiper blades from
returning to the off position. If the wind -
shield wiper control is turned off and the
blades cannot return to the off position,
damage to the wiper motor may occur.
21_GA_OM_EN_USC_t.book Page 46
Page 79 of 284
77
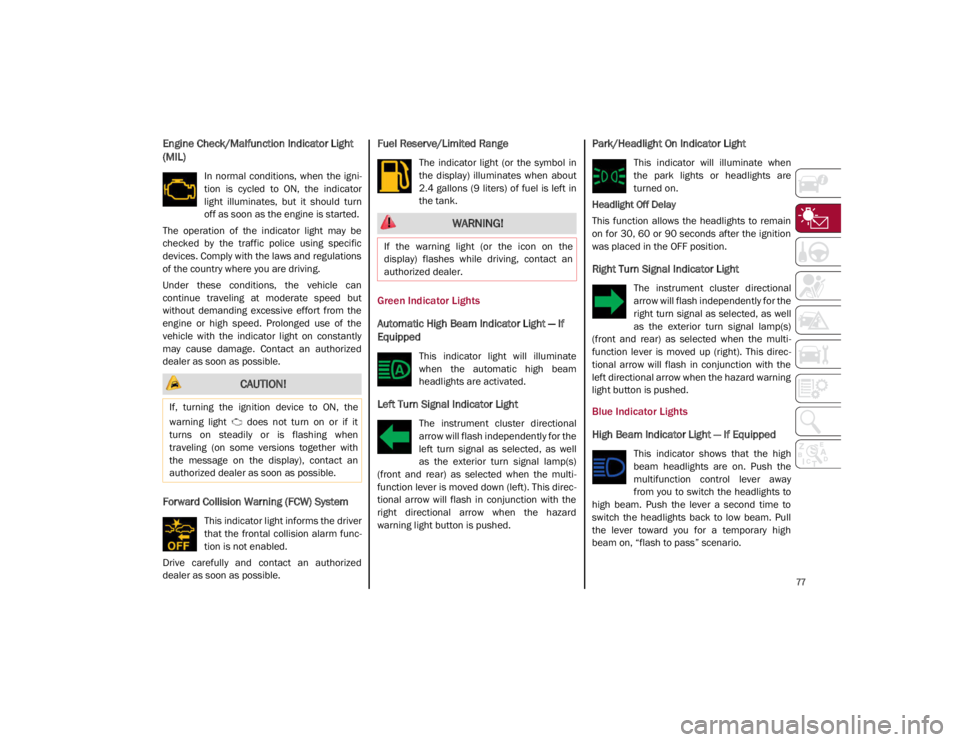
Engine Check/Malfunction Indicator Light
(MIL)
In normal conditions, when the igni-
tion is cycled to ON, the indicator
light illuminates, but it should turn
off as soon as the engine is started.
The operation of the indicator light may be
checked by the traffic police using specific
devices. Comply with the laws and regulations
of the country where you are driving.
Under these conditions, the vehicle can
continue traveling at moderate speed but
without demanding excessive effort from the
engine or high speed. Prolonged use of the
vehicle with the indicator light on constantly
may cause damage. Contact an authorized
dealer as soon as possible.
Forward Collision Warning (FCW) System
This indicator light informs the driver
that the frontal collision alarm func -
tion is not enabled.
Drive carefully and contact an authorized
dealer as soon as possible.
Fuel Reserve/Limited Range
The indicator light (or the symbol in
the display) illuminates when about
2.4 gallons (9 liters) of fuel is left in
the tank.
Green Indicator Lights
Automatic High Beam Indicator Light — If
Equipped
This indicator light will illuminate
when the automatic high beam
headlights are activated.
Left Turn Signal Indicator Light
The instrument cluster directional
arrow will flash independently for the
left turn signal as selected, as well
as the exterior turn signal lamp(s)
(front and rear) as selected when the multi -
function lever is moved down (left). This direc -
tional arrow will flash in conjunction with the
right directional arrow when the hazard
warning light button is pushed.
Park/Headlight On Indicator Light
This indicator will illuminate when
the park lights or headlights are
turned on.
Headlight Off Delay
This function allows the headlights to remain
on for 30, 60 or 90 seconds after the ignition
was placed in the OFF position.
Right Turn Signal Indicator Light
The instrument cluster directional
arrow will flash independently for the
right turn signal as selected, as well
as the exterior turn signal lamp(s)
(front and rear) as selected when the multi -
function lever is moved up (right). This direc -
tional arrow will flash in conjunction with the
left directional arrow when the hazard warning
light button is pushed.
Blue Indicator Lights
High Beam Indicator Light — If Equipped
This indicator shows that the high
beam headlights are on. Push the
multifunction control lever away
from you to switch the headlights to
high beam. Push the lever a second time to
switch the headlights back to low beam. Pull
the lever toward you for a temporary high
beam on, “flash to pass” scenario.
CAUTION!
If, turning the ignition device to ON, the
warning light does not turn on or if it
turns on steadily or is flashing when
traveling (on some versions together with
the message on the display), contact an
authorized dealer as soon as possible.
WARNING!
If the warning light (or the icon on the
display) flashes while driving, contact an
authorized dealer.
21_GA_OM_EN_USC_t.book Page 77
Page 83 of 284
81
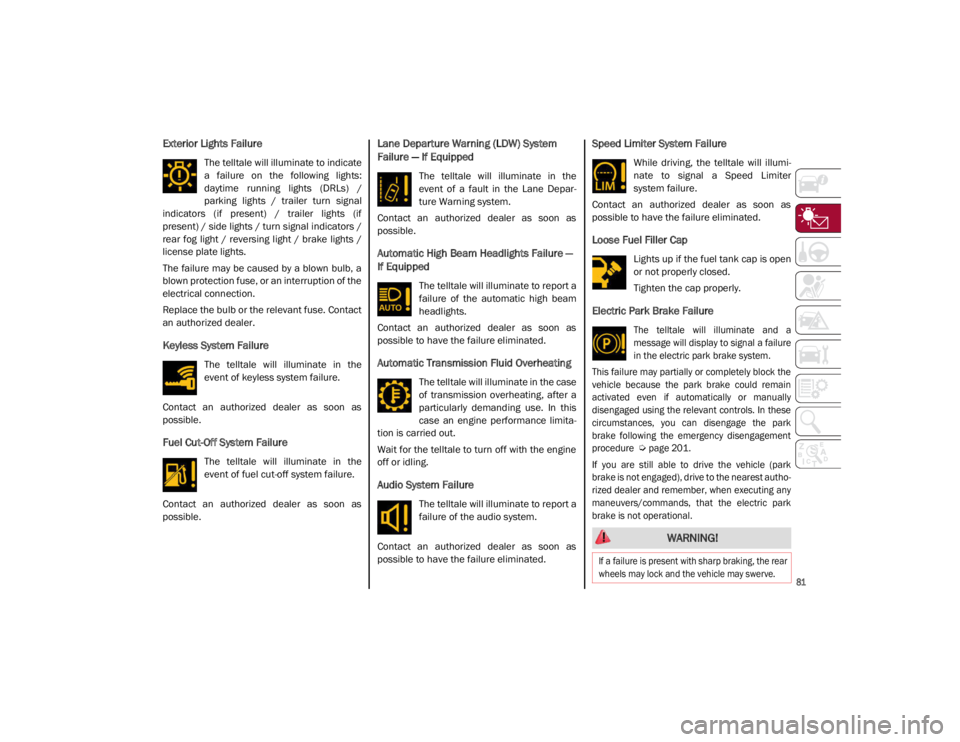
Exterior Lights Failure
The telltale will illuminate to indicate
a failure on the following lights:
daytime running lights (DRLs) /
parking lights / trailer turn signal
indicators (if present) / trailer lights (if
present) / side lights / turn signal indicators /
rear fog light / reversing light / brake lights /
license plate lights.
The failure may be caused by a blown bulb, a
blown protection fuse, or an interruption of the
electrical connection.
Replace the bulb or the relevant fuse. Contact
an authorized dealer.
Keyless System Failure
The telltale will illuminate in the
event of keyless system failure.
Contact an authorized dealer as soon as
possible.
Fuel Cut-Off System Failure
The telltale will illuminate in the
event of fuel cut-off system failure.
Contact an authorized dealer as soon as
possible.
Lane Departure Warning (LDW) System
Failure — If Equipped
The telltale will illuminate in the
event of a fault in the Lane Depar -
ture Warning system.
Contact an authorized dealer as soon as
possible.
Automatic High Beam Headlights Failure —
If Equipped
The telltale will illuminate to report a
failure of the automatic high beam
headlights.
Contact an authorized dealer as soon as
possible to have the failure eliminated.
Automatic Transmission Fluid Overheating
The telltale will illuminate in the case
of transmission overheating, after a
particularly demanding use. In this
case an engine performance limita -
tion is carried out.
Wait for the telltale to turn off with the engine
off or idling.
Audio System Failure
The telltale will illuminate to report a
failure of the audio system.
Contact an authorized dealer as soon as
possible to have the failure eliminated.
Speed Limiter System Failure
While driving, the telltale will illumi -
nate to signal a Speed Limiter
system failure.
Contact an authorized dealer as soon as
possible to have the failure eliminated.
Loose Fuel Filler Cap
Lights up if the fuel tank cap is open
or not properly closed.
Tighten the cap properly.
Electric Park Brake Failure
The telltale will illuminate and a
message will display to signal a failure
in the electric park brake system.
This failure may partially or completely block the
vehicle because the park brake could remain
activated even if automatically or manually
disengaged using the relevant controls. In these
circumstances, you can disengage the park
brake following the emergency disengagement
procedure
Ú
page 201.
If you are still able to drive the vehicle (park
brake is not engaged), drive to the nearest autho -
rized dealer and remember, when executing any
maneuvers/commands, that the electric park
brake is not operational.
WARNING!
If a failure is present with sharp braking, the rear
wheels may lock and the vehicle may swerve.
21_GA_OM_EN_USC_t.book Page 81