ignition ALFA ROMEO GIULIA 2023 Owners Manual
[x] Cancel search | Manufacturer: ALFA ROMEO, Model Year: 2023, Model line: GIULIA, Model: ALFA ROMEO GIULIA 2023Pages: 248, PDF Size: 9.62 MB
Page 10 of 248
8
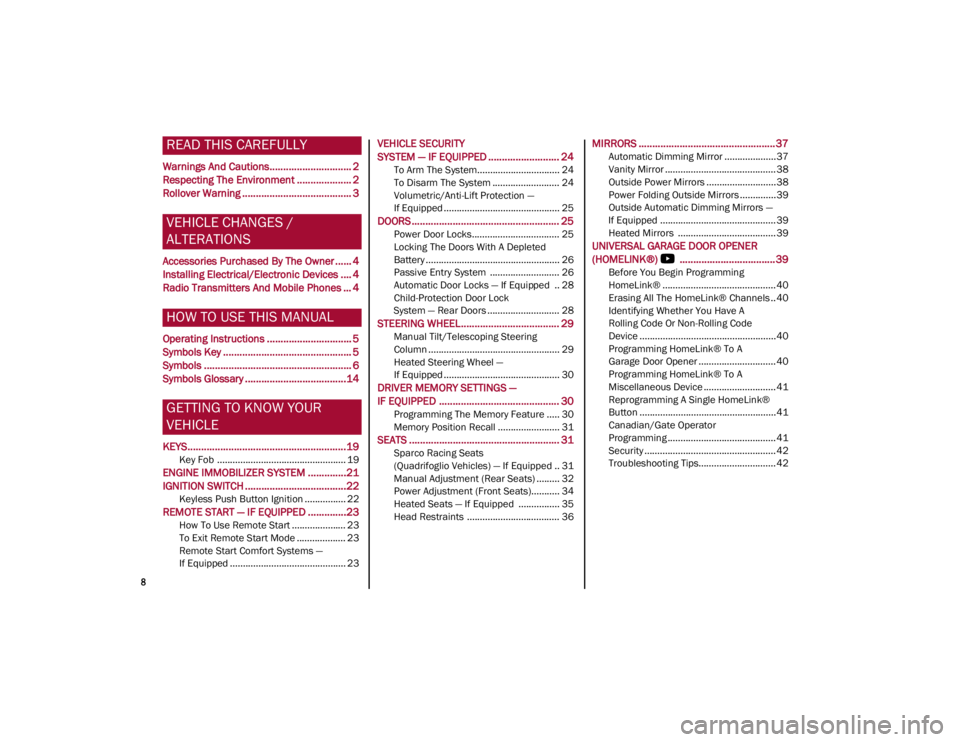
READ THIS CAREFULLY
Warnings And Cautions.............................. 2
Respecting The Environment .................... 2
Rollover Warning ........................................ 3
VEHICLE CHANGES /
ALTERATIONS
Accessories Purchased By The Owner ...... 4
Installing Electrical/Electronic Devices .... 4
Radio Transmitters And Mobile Phones ... 4
HOW TO USE THIS MANUAL
Operating Instructions ............................... 5
Symbols Key ............................................... 5
Symbols ...................................................... 6
Symbols Glossary .....................................14
GETTING TO KNOW YOUR
VEHICLE
KEYS..........................................................19
Key Fob .................................................. 19
ENGINE IMMOBILIZER SYSTEM ..............21
IGNITION SWITCH .....................................22
Keyless Push Button Ignition ................ 22
REMOTE START — IF EQUIPPED ..............23
How To Use Remote Start ..................... 23
To Exit Remote Start Mode ................... 23
Remote Start Comfort Systems —
If Equipped ............................................. 23
VEHICLE SECURITY
SYSTEM — IF EQUIPPED .......................... 24
To Arm The System................................ 24
To Disarm The System .......................... 24
Volumetric/Anti-Lift Protection —
If Equipped ............................................. 25
DOORS ...................................................... 25
Power Door Locks.................................. 25
Locking The Doors With A Depleted
Battery .................................................... 26 Passive Entry System ........................... 26
Automatic Door Locks — If Equipped .. 28
Child-Protection Door Lock
System — Rear Doors ............................ 28
STEERING WHEEL.................................... 29
Manual Tilt/Telescoping Steering
Column ................................................... 29 Heated Steering Wheel —
If Equipped ............................................. 30
DRIVER MEMORY SETTINGS —
IF EQUIPPED ............................................ 30
Programming The Memory Feature ..... 30
Memory Position Recall ........................ 31
SEATS ....................................................... 31
Sparco Racing Seats
(Quadrifoglio Vehicles) — If Equipped .. 31 Manual Adjustment (Rear Seats) ......... 32
Power Adjustment (Front Seats)........... 34
Heated Seats — If Equipped ................ 35
Head Restraints .................................... 36
MIRRORS ..................................................37
Automatic Dimming Mirror ....................37
Vanity Mirror ...........................................38
Outside Power Mirrors ...........................38
Power Folding Outside Mirrors ..............39
Outside Automatic Dimming Mirrors —
If Equipped .............................................39 Heated Mirrors ......................................39
UNIVERSAL GARAGE DOOR OPENER
(HOMELINK®)
S ...................................39
Before You Begin Programming
HomeLink® ............................................40 Erasing All The HomeLink® Channels ..40
Identifying Whether You Have A
Rolling Code Or Non-Rolling Code
Device .....................................................40 Programming HomeLink® To A
Garage Door Opener ..............................40 Programming HomeLink® To A
Miscellaneous Device ............................ 41 Reprogramming A Single HomeLink®
Button .....................................................41 Canadian/Gate Operator
Programming .......................................... 41 Security ...................................................42
Troubleshooting Tips..............................42
23_GA_OM_EN_USC_t.book Page 8
Page 21 of 248
19
In this section, you will find important information
to help you become familiar with the features
needed to operate your vehicle, and how they
function.
KEYS
KEY FOB
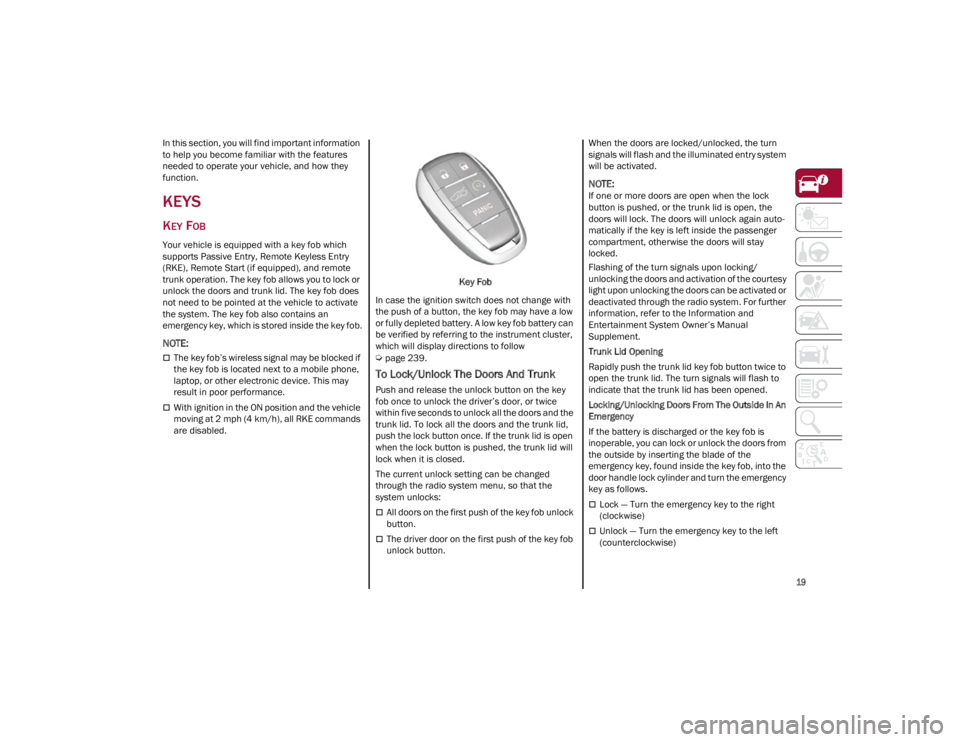
Your vehicle is equipped with a key fob which
supports Passive Entry, Remote Keyless Entry
(RKE), Remote Start (if equipped), and remote
trunk operation. The key fob allows you to lock or
unlock the doors and trunk lid. The key fob does
not need to be pointed at the vehicle to activate
the system. The key fob also contains an
emergency key, which is stored inside the key fob.
NOTE:
The key fob’s wireless signal may be blocked if
the key fob is located next to a mobile phone,
laptop, or other electronic device. This may
result in poor performance.
With ignition in the ON position and the vehicle
moving at 2 mph (4 km/h), all RKE commands
are disabled. Key Fob
In case the ignition switch does not change with
the push of a button, the key fob may have a low
or fully depleted battery. A low key fob battery can
be verified by referring to the instrument cluster,
which will display directions to follow
Ú
page 239.
To Lock/Unlock The Doors And Trunk
Push and release the unlock button on the key
fob once to unlock the driver’s door, or twice
within five seconds to unlock all the doors and the
trunk lid. To lock all the doors and the trunk lid,
push the lock button once. If the trunk lid is open
when the lock button is pushed, the trunk lid will
lock when it is closed.
The current unlock setting can be changed
through the radio system menu, so that the
system unlocks:
All doors on the first push of the key fob unlock
button.
The driver door on the first push of the key fob
unlock button. When the doors are locked/unlocked, the turn
signals will flash and the illuminated entry system
will be activated.
NOTE:
If one or more doors are open when the lock
button is pushed, or the trunk lid is open, the
doors will lock. The doors will unlock again auto
-
matically if the key is left inside the passenger
compartment, otherwise the doors will stay
locked.
Flashing of the turn signals upon locking/
unlocking the doors and activation of the courtesy
light upon unlocking the doors can be activated or
deactivated through the radio system. For further
information, refer to the Information and
Entertainment System Owner’s Manual
Supplement.
Trunk Lid Opening
Rapidly push the trunk lid key fob button twice to
open the trunk lid. The turn signals will flash to
indicate that the trunk lid has been opened.
Locking/Unlocking Doors From The Outside In An
Emergency
If the battery is discharged or the key fob is
inoperable, you can lock or unlock the doors from
the outside by inserting the blade of the
emergency key, found inside the key fob, into the
door handle lock cylinder and turn the emergency
key as follows.
Lock — Turn the emergency key to the right
(clockwise)
Unlock — Turn the emergency key to the left
(counterclockwise)
23_GA_OM_EN_USC_t.book Page 19
Page 22 of 248
GETTING TO KNOW YOUR VEHICLE
20
Key Left Vehicle Feature — If Equipped
If a valid key fob is no longer detected inside the
vehicle while the vehicle’s ignition system is in
the ON/RUN or START position, the message
“Key Fob Has Left The Vehicle” will be shown in
the instrument cluster display along with an
interior chime. An exterior audible and visual alert
will also be activated to warn the driver.
The vehicle’s horn will rapidly chirp three times
along with a single flash of the vehicle’s exterior
lights.
NOTE:
The doors have to be open and then closed in
order for the vehicle to detect a key fob; the
Key Left Vehicle feature will not activate until
all of the doors are closed.
These alerts will not be activated in situations
where the vehicle’s engine is left running with
the key fob inside.
Replacing The Battery In The Key Fob
The recommended replacement battery is one
CR2032 battery.
NOTE:
Customers are recommended to use a battery
obtained from Mopar®. Aftermarket coin
battery dimensions may not meet the original
OEM coin battery dimensions.
Perchlorate Material — special handling may
apply. See
www.dtsc.ca.gov/hazardouswaste/
perchlorate
for further information.
Do not touch the battery terminals that are on
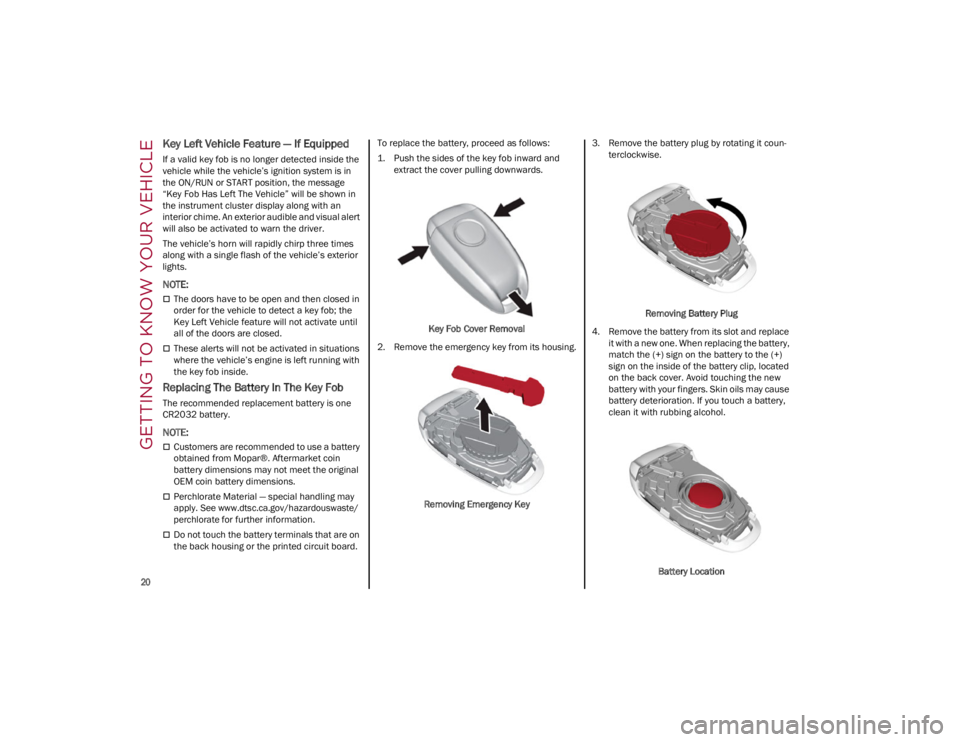
the back housing or the printed circuit board. To replace the battery, proceed as follows:
1. Push the sides of the key fob inward and
extract the cover pulling downwards.
Key Fob Cover Removal
2. Remove the emergency key from its housing.
Removing Emergency Key 3. Remove the battery plug by rotating it coun
-
terclockwise.
Removing Battery Plug
4. Remove the battery from its slot and replace it with a new one. When replacing the battery,
match the (+) sign on the battery to the (+)
sign on the inside of the battery clip, located
on the back cover. Avoid touching the new
battery with your fingers. Skin oils may cause
battery deterioration. If you touch a battery,
clean it with rubbing alcohol.
Battery Location
23_GA_OM_EN_USC_t.book Page 20
Page 23 of 248
21
Proceed in reverse order to reassemble the key
fob.
Programming And Requesting Additional
Key Fobs
Programming the key fob may be performed by an
authorized dealer.
NOTE:
Once a key fob is programmed to a vehicle, it
cannot be repurposed and reprogrammed to
another vehicle.
Only key fobs that are programmed to the
vehicle electronics can be used to start and
operate the vehicle.Duplication of key fobs may be performed at an
authorized dealer. This procedure consists of
programming a blank key fob to the vehicle
electronics. A blank key fob is one that has never
been programmed.
NOTE:
When having the Engine Immobilizer system
serviced, bring all vehicle keys with you to an
authorized dealer.
Keys must be ordered to the correct key cut to
match the vehicle locks.
For Quadrifoglio models, if you need a
replacement key fob, contact an authorized
dealer.
ENGINE IMMOBILIZER
SYSTEM
The Engine Immobilizer system prevents
unauthorized vehicle operation by disabling the
engine. The system does not need to be armed or
activated. Operation is automatic, regardless of
whether the vehicle is locked or unlocked.
The system uses a key fob, keyless push button
ignition and a Radio Frequency (RF) receiver to
prevent unauthorized vehicle operation.
Therefore, only key fobs that are programmed to the vehicle can be used to start and operate the
vehicle. The system will shut the engine off in two
seconds if an invalid key fob is used to start the
engine.
After placing the ignition switch in the ON/RUN
position, the Vehicle Security Light will turn on for
three seconds for a bulb check. If the light
remains on after the bulb check, it indicates that
there is a problem with the electronics. In
addition, if the light begins to flash after the bulb
check, it indicates that someone used an invalid
key fob to start the engine. Either of these
conditions will result in the engine being shut off
after two seconds.
If the Vehicle Security Light turns on during
normal vehicle operation (vehicle running for
longer than 10 seconds), it indicates that there is
a fault in the electronics. Should this occur, have
the vehicle serviced as soon as possible by an
authorized dealer.
All of the key fobs provided with your new vehicle
have been programmed to the vehicle
electronics.
NOTE:
A key fob that has not been programmed is also
considered an invalid key
Ú
page 239.
WARNING!
The integrated key fob contains a coin cell
battery. Do not ingest the battery; there is a
chemical burn hazard. If the coin cell battery
is swallowed, it can cause severe internal
burns in just two hours and can lead to
death.
If you think a battery may have been
swallowed or placed inside any part of the
body, seek immediate medical attention.
Keep new and used batteries away from
children. If the battery compartment does
not close securely, stop using the product
and keep it away from children.
CAUTION!
The battery replacement operation must be done
with care, in order not to damage the key fob.
WARNING!
Always remove the key fobs from the vehicle
and lock all doors when leaving the vehicle
unattended.
Always remember to place the ignition in the
OFF position.
CAUTION!
The Engine Immobilizer system is not
compatible with some aftermarket Remote
Start systems. Use of these systems may
result in vehicle starting problems and loss of
security protection.
23_GA_OM_EN_USC_t.book Page 21
Page 24 of 248
GETTING TO KNOW YOUR VEHICLE
22
IGNITION SWITCH
KEYLESS PUSH BUTTON IGNITION
This feature allows the driver to operate the
ignition switch with the push of a button as long
as the key fob is in the passenger compartment.
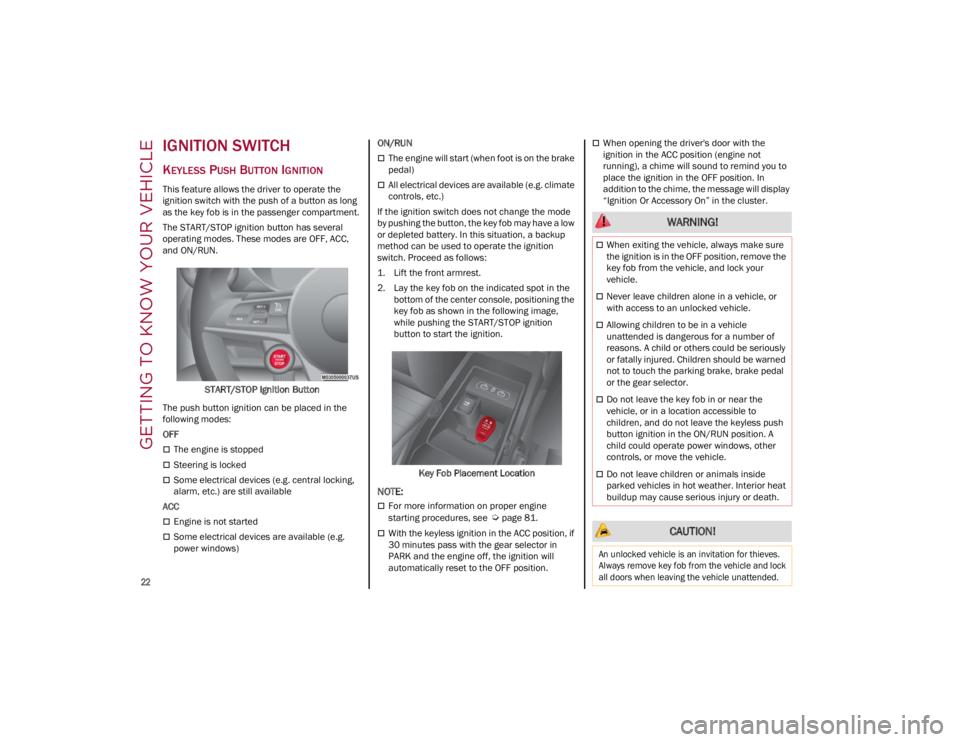
The START/STOP ignition button has several
operating modes. These modes are OFF, ACC,
and ON/RUN.START/STOP Ignition Button
The push button ignition can be placed in the
following modes:
OFF
The engine is stopped
Steering is locked
Some electrical devices (e.g. central locking,
alarm, etc.) are still available
ACC
Engine is not started
Some electrical devices are available (e.g.
power windows) ON/RUN
The engine will start (when foot is on the brake
pedal)
All electrical devices are available (e.g. climate
controls, etc.)
If the ignition switch does not change the mode
by pushing the button, the key fob may have a low
or depleted battery. In this situation, a backup
method can be used to operate the ignition
switch. Proceed as follows:
1. Lift the front armrest.
2. Lay the key fob on the indicated spot in the bottom of the center console, positioning the
key fob as shown in the following image,
while pushing the START/STOP ignition
button to start the ignition.
Key Fob Placement Location
NOTE:
For more information on proper engine
starting procedures, see
Ú
page 81.
With the keyless ignition in the ACC position, if
30 minutes pass with the gear selector in
PARK and the engine off, the ignition will
automatically reset to the OFF position.
When opening the driver's door with the
ignition in the ACC position (engine not
running), a chime will sound to remind you to
place the ignition in the OFF position. In
addition to the chime, the message will display
“Ignition Or Accessory On” in the cluster.
WARNING!
When exiting the vehicle, always make sure
the ignition is in the OFF position, remove the
key fob from the vehicle, and lock your
vehicle.
Never leave children alone in a vehicle, or
with access to an unlocked vehicle.
Allowing children to be in a vehicle
unattended is dangerous for a number of
reasons. A child or others could be seriously
or fatally injured. Children should be warned
not to touch the parking brake, brake pedal
or the gear selector.
Do not leave the key fob in or near the
vehicle, or in a location accessible to
children, and do not leave the keyless push
button ignition in the ON/RUN position. A
child could operate power windows, other
controls, or move the vehicle.
Do not leave children or animals inside
parked vehicles in hot weather. Interior heat
buildup may cause serious injury or death.
CAUTION!
An unlocked vehicle is an invitation for thieves.
Always remove key fob from the vehicle and lock
all doors when leaving the vehicle unattended.
23_GA_OM_EN_USC_t.book Page 22
Page 25 of 248
23
REMOTE START —
IF EQUIPPED
This system uses the key fob to start the
engine conveniently from outside the
vehicle while still maintaining security.
NOTE:
Obstructions between the vehicle and key fob
may reduce this range
Ú
page 239.
HOW TO USE REMOTE START
Push the Remote Start button on the key fob
twice within five seconds. The vehicle doors will
lock, the turn signals will flash twice, and the horn
will chirp twice. Pushing the Remote Start button
a third time shuts the engine off.
NOTE:
With Remote Start, the engine will only run for
15 minutes.
Remote Start can only be used twice.
If an engine fault is present or fuel level is low,
the vehicle will start and then shut down in 10
seconds.
The park lamps will turn on and remain on
during Remote Start mode.
For security, power window operation is
disabled when the vehicle is in the Remote
Start mode.
The ignition must be placed in the ACC position
before the Remote Start sequence can be
repeated for a third cycle.
All of the following conditions must be met before
the engine will remote start:
Gear selector in PARK
Doors closed
Hood closed
Trunk closed
Hazard switch off
Brake switch inactive (brake pedal not
pressed)
Battery at an acceptable charge level
Panic button not pushed
System not disabled from previous Remote
Start event
Vehicle Security system indicator flashing
Ignition in OFF position
Fuel level meets minimum requirement
Vehicle Security system is not signaling an
intrusion
Malfunction Indicator Light (MIL) is not
illuminated
TO EXIT REMOTE START MODE
To drive the vehicle after starting the Remote
Start system, either push and release the unlock
button on the key fob to unlock the doors, or
unlock the vehicle using Passive Entry via the
door handles, and disarm the Vehicle Security
system (if equipped). Then, prior to the end of the
15 minute cycle, push and release the START/
STOP ignition button while pressing the brake
pedal.
The Remote Start system will turn the engine off
with another push and release of the Remote
Start button on the key fob, or if the engine is
allowed to run for the entire 15 minute cycle.
REMOTE START COMFORT SYSTEMS —
I
F EQUIPPED
When Remote Start is activated, the heated
steering wheel and front heated seat features will
automatically activate when ambient
temperature is less than 39°F (4°C). These
features will stay on through the duration of
Remote Start.
NOTE:
This feature can be activated through the radio
system. Refer to the Information and Entertain -
ment System Owner’s Manual Supplement for
further information.
WARNING!
Do not start or run an engine in a closed
garage or confined area. Exhaust gas
contains Carbon Monoxide (CO) which is
odorless and colorless. Carbon Monoxide is
poisonous and can cause serious injury or
death when inhaled.
Keep key fobs away from children. Operation
of the Remote Start system, windows, door
locks or other controls could cause serious
injury or death.
23_GA_OM_EN_USC_t.book Page 23
Page 26 of 248

GETTING TO KNOW YOUR VEHICLE
24
VEHICLE SECURITY
SYSTEM — IF EQUIPPED
The Vehicle Security system monitors the vehicle
doors, hood, trunk, and the keyless push button
ignition for unauthorized operation. It also
monitors movement inside the passenger
compartment (volumetric protection — if
equipped), cutting of battery cables, and
unexpected lifting/tilting of the vehicle (anti-lift
protection — if equipped).
While the Vehicle Security system is armed,
interior switches for door locks and trunk release
are disabled.
If something triggers the alarm, the Vehicle
Security system will provide the following audible
and visible signals:
The horn will pulse
The turn signals will flash
The Vehicle Security Light in the instrument
cluster will flash
NOTE:
The Vehicle Security system is activated by the
Engine Immobilizer system, which is automati-
cally activated when you get out of the vehicle
with the key fob and lock the doors.
TO ARM THE SYSTEM
Follow these steps to arm the Vehicle Security
system:
1. Make sure the vehicle’s ignition is placed in the OFF position.
2. Perform one of the following methods to lock the vehicle:
• Push the lock button on the interior power
door lock switch with the driver and/or passenger door open.
• Push the lock button on the exterior
Passive Entry door handle with a valid keyfob available in the same exterior zone
Ú
page 26.
• Push the lock button on the key fob.
3. If any doors (or trunk lid) are open, close them.
TO DISARM THE SYSTEM
The Vehicle Security system can be disarmed
using any of the following methods:
Push the unlock button on the key fob.
Grab the Passive Entry door handle to unlock
the door
Ú
page 26.
Cycle the ignition out of the OFF position to
disarm the system.
NOTE:
The driver's door key cylinder and trunk button
on the key fob cannot arm or disarm the
Vehicle Security system. Use of the door key
cylinder when the system is armed will sound
the alarm when the door is opened.
When the Vehicle Security system is armed,
the interior power door lock switches will not
unlock the doors.
The Vehicle Security system is designed to
protect your vehicle. However, you can create
conditions where the system will give you a false
alarm. If one of the previously described arming
sequences has occurred, the Vehicle Security
system will arm, regardless of whether you are in
the vehicle or not. If you remain in the vehicle and
open a door, the alarm will sound. If this occurs,
disarm the Vehicle Security system.
If the Vehicle Security system is armed and the
battery becomes disconnected, the Vehicle
Security system will remain armed when the
battery is reconnected; the exterior lights will
flash, and the horn will sound. If this occurs,
disarm the Vehicle Security system.
NOTE:
The alarm does not disarm when the doors are
unlocked by inserting the blade of the emergency
key (found inside the key fob) into the door
handle lock cylinder.
23_GA_OM_EN_USC_t.book Page 24
Page 29 of 248
27
NOTE:
Either the driver door only or all doors will
unlock when you grab hold of the front driver’s
door handle, depending on the selected
setting in the radio. Refer to the Information
and Entertainment System Owner’s Manual
Supplement for Passive Entry settings.
All doors will unlock when the front passenger
door handle is grabbed regardless of the
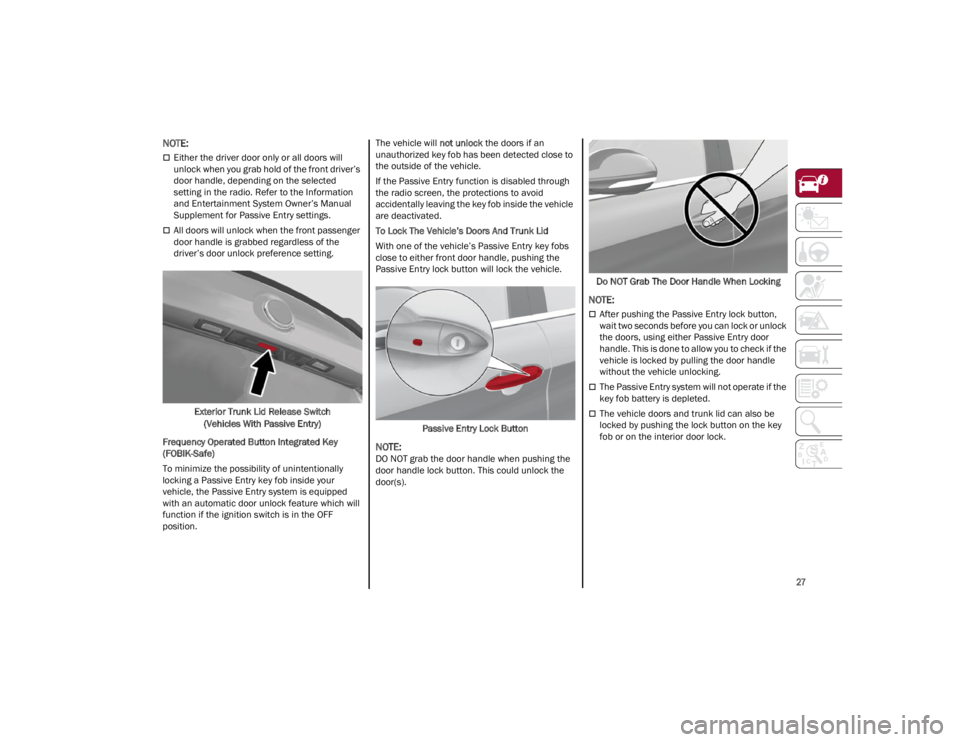
driver’s door unlock preference setting.Exterior Trunk Lid Release Switch (Vehicles With Passive Entry)
Frequency Operated Button Integrated Key
(FOBIK-Safe)
To minimize the possibility of unintentionally
locking a Passive Entry key fob inside your
vehicle, the Passive Entry system is equipped
with an automatic door unlock feature which will
function if the ignition switch is in the OFF
position. The vehicle will
not unlock the doors if an
unauthorized key fob has been detected close to
the outside of the vehicle.
If the Passive Entry function is disabled through
the radio screen, the protections to avoid
accidentally leaving the key fob inside the vehicle
are deactivated.
To Lock The Vehicle’s Doors And Trunk Lid
With one of the vehicle’s Passive Entry key fobs
close to either front door handle, pushing the
Passive Entry lock button will lock the vehicle.
Passive Entry Lock Button
NOTE:
DO NOT grab the door handle when pushing the
door handle lock button. This could unlock the
door(s). Do NOT Grab The Door Handle When Locking
NOTE:
After pushing the Passive Entry lock button,
wait two seconds before you can lock or unlock
the doors, using either Passive Entry door
handle. This is done to allow you to check if the
vehicle is locked by pulling the door handle
without the vehicle unlocking.
The Passive Entry system will not operate if the
key fob battery is depleted.
The vehicle doors and trunk lid can also be
locked by pushing the lock button on the key
fob or on the interior door lock.
23_GA_OM_EN_USC_t.book Page 27
Page 32 of 248
GETTING TO KNOW YOUR VEHICLE
30
HEATED STEERING WHEEL — IF EQUIPPED
The steering wheel contains a heating
element that helps warm your hands in
cold weather. The heated steering
wheel has only one temperature setting.
The heated steering wheel may not turn on when
it is already warm.
NOTE:
Quadrifoglio vehicles equipped with Sparco
Racing Seats will not be equipped with the
heated steering wheel feature.
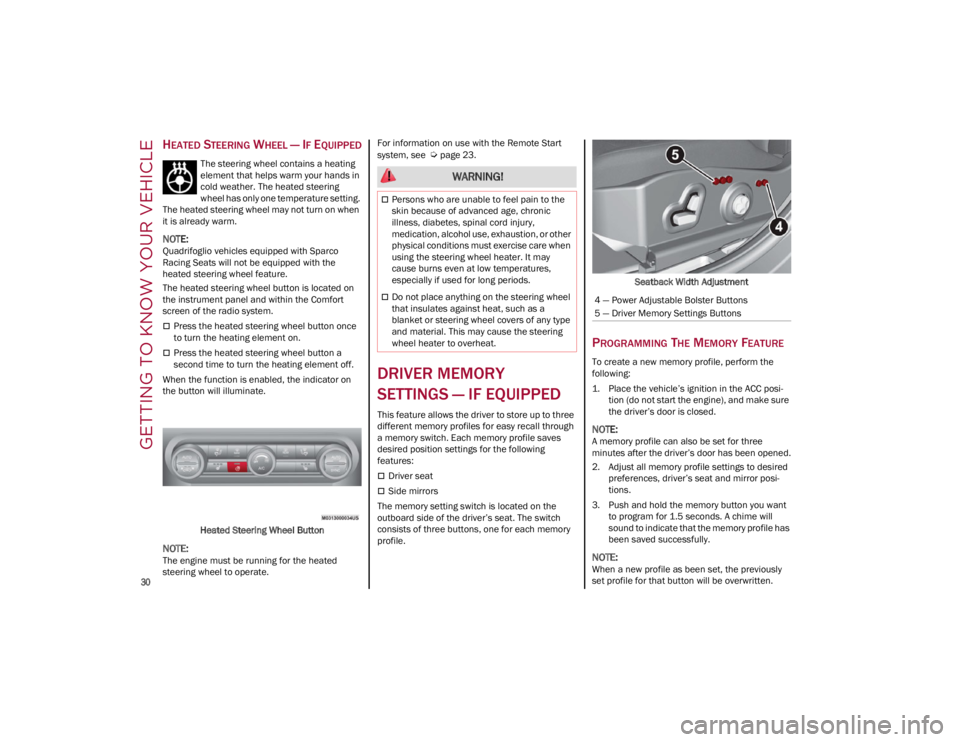
The heated steering wheel button is located on
the instrument panel and within the Comfort
screen of the radio system.
Press the heated steering wheel button once
to turn the heating element on.
Press the heated steering wheel button a
second time to turn the heating element off.
When the function is enabled, the indicator on
the button will illuminate.
Heated Steering Wheel Button
NOTE:
The engine must be running for the heated
steering wheel to operate. For information on use with the Remote Start
system, see
Ú
page 23.
DRIVER MEMORY
SETTINGS — IF EQUIPPED
This feature allows the driver to store up to three
different memory profiles for easy recall through
a memory switch. Each memory profile saves
desired position settings for the following
features:
Driver seat
Side mirrors
The memory setting switch is located on the
outboard side of the driver’s seat. The switch
consists of three buttons, one for each memory
profile. Seatback Width Adjustment
PROGRAMMING THE MEMORY FEATURE
To create a new memory profile, perform the
following:
1. Place the vehicle’s ignition in the ACC posi
-
tion (do not start the engine), and make sure
the driver’s door is closed.
NOTE:
A memory profile can also be set for three
minutes after the driver’s door has been opened.
2. Adjust all memory profile settings to desired preferences, driver’s seat and mirror posi -
tions.
3. Push and hold the memory button you want to program for 1.5 seconds. A chime will
sound to indicate that the memory profile has
been saved successfully.
NOTE:
When a new profile as been set, the previously
set profile for that button will be overwritten.
WARNING!
Persons who are unable to feel pain to the
skin because of advanced age, chronic
illness, diabetes, spinal cord injury,
medication, alcohol use, exhaustion, or other
physical conditions must exercise care when
using the steering wheel heater. It may
cause burns even at low temperatures,
especially if used for long periods.
Do not place anything on the steering wheel
that insulates against heat, such as a
blanket or steering wheel covers of any type
and material. This may cause the steering
wheel heater to overheat.4 — Power Adjustable Bolster Buttons
5 — Driver Memory Settings Buttons
23_GA_OM_EN_USC_t.book Page 30
Page 33 of 248
31
MEMORY POSITION RECALL
To recall a previously set position, push and
release the memory profile button assigned to
the desired positions.
NOTE:
Memory position recall can be done for approxi-
mately three minutes after the doors have been
opened, and for approximately one minute after
the ignition is placed in the OFF position.
SEATS
Seats are a part of the Occupant Restraint system
of the vehicle.
SPARCO RACING SEATS
(QUADRIFOGLIO VEHICLES) — IF EQUIPPED
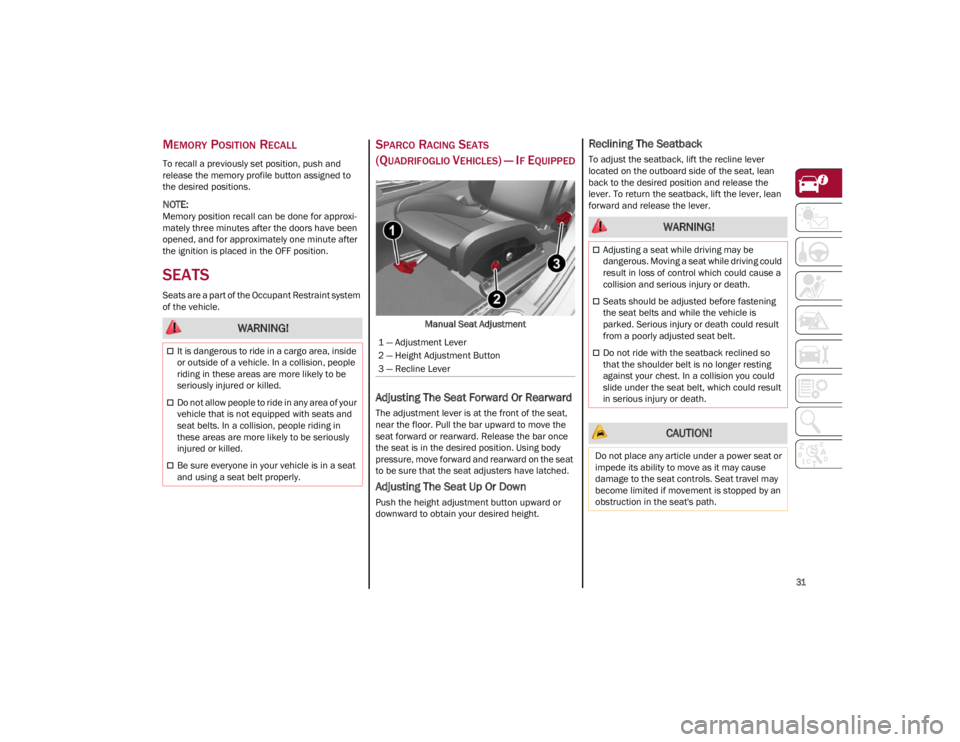
Manual Seat Adjustment
Adjusting The Seat Forward Or Rearward
The adjustment lever is at the front of the seat,
near the floor. Pull the bar upward to move the
seat forward or rearward. Release the bar once
the seat is in the desired position. Using body
pressure, move forward and rearward on the seat
to be sure that the seat adjusters have latched.
Adjusting The Seat Up Or Down
Push the height adjustment button upward or
downward to obtain your desired height.
Reclining The Seatback
To adjust the seatback, lift the recline lever
located on the outboard side of the seat, lean
back to the desired position and release the
lever. To return the seatback, lift the lever, lean
forward and release the lever.
WARNING!
It is dangerous to ride in a cargo area, inside
or outside of a vehicle. In a collision, people
riding in these areas are more likely to be
seriously injured or killed.
Do not allow people to ride in any area of your
vehicle that is not equipped with seats and
seat belts. In a collision, people riding in
these areas are more likely to be seriously
injured or killed.
Be sure everyone in your vehicle is in a seat
and using a seat belt properly.
1 — Adjustment Lever
2 — Height Adjustment Button
3 — Recline Lever
WARNING!
Adjusting a seat while driving may be
dangerous. Moving a seat while driving could
result in loss of control which could cause a
collision and serious injury or death.
Seats should be adjusted before fastening
the seat belts and while the vehicle is
parked. Serious injury or death could result
from a poorly adjusted seat belt.
Do not ride with the seatback reclined so
that the shoulder belt is no longer resting
against your chest. In a collision you could
slide under the seat belt, which could result
in serious injury or death.
CAUTION!
Do not place any article under a power seat or
impede its ability to move as it may cause
damage to the seat controls. Seat travel may
become limited if movement is stopped by an
obstruction in the seat's path.
23_GA_OM_EN_USC_t.book Page 31