instrument cluster ALFA ROMEO GIULIA 2023 Owners Manual
[x] Cancel search | Manufacturer: ALFA ROMEO, Model Year: 2023, Model line: GIULIA, Model: ALFA ROMEO GIULIA 2023Pages: 248, PDF Size: 9.62 MB
Page 11 of 248
9
EXTERIOR LIGHTS ....................................42
Headlight Switch .................................... 42
Daytime Running Lights (DRLs) ............ 43
High Beam Headlights ........................... 43
Automatic Headlights ........................... 43
Flash-To-Pass ......................................... 43
Automatic High Beam Headlights —
If Equipped ............................................. 44 Parking Lights ........................................ 44
Headlight Off Delay ................................ 44
Rear Fog Light ........................................ 44
Adaptive Frontlight System
(AFS Function) — If Equipped ................ 45 Turn Signals ........................................... 45
Lane Change Assist ............................... 45
Static Bending Light Function
(SBL) — If Equipped ............................... 45
INTERIOR LIGHTS .....................................45
Front Map Reading Lights ..................... 45
Interior Ambient Lighting ....................... 46
Rear Overhead Light .............................. 46
Instrument Panel Dimmer Control ....... 46
WINDSHIELD WIPERS AND WASHERS....47
Windshield Wiper Operation ................. 47
Rain Sensing Wipers.............................. 48
Headlight Washers — If Equipped......... 48
CLIMATE CONTROL .................................48
Automatic Dual-Zone Climate Control
System ................................................... 49
INTERIOR STORAGE AND EQUIPMENT....55
Glove Compartment .............................. 55
Center Console ...................................... 55
Power Outlet........................................... 56
Wireless Charging Pad — If Equipped... 57
POWER WINDOWS................................... 57
Power Window Controls .........................57
Auto-Up Feature With Anti-Pinch
Protection ............................................... 58 Power Window System Initialization .....58
Wind Buffeting .......................................58
POWER SUNROOF —
IF EQUIPPED ............................................ 58
Power Sunroof ........................................ 58
Opening And Closing The Sunroof ........59
Venting Sunroof......................................59
Sunshade Operation ..............................59
Pinch Protect Feature ............................59
Re-Initialization Procedure ....................59
Sunroof Maintenance ............................60
HOOD ...................................................... 60
Opening The Hood ................................. 60
Closing The Hood ...................................61
TRUNK ...................................................... 61
Opening...................................................61
Closing ....................................................62
Trunk Re-Initialization ............................62
Trunk Specifications .............................62
ENVIRONMENTAL PROTECTION
SYSTEMS ................................................. 63
ACTIVE AERODYNAMIC SPOILER
(QUADRIFOGLIO VEHICLES) .................... 63
Carbon Fiber Active Aero Front
Spoiler .....................................................63
GETTING TO KNOW YOUR
INSTRUMENT PANEL
INSTRUMENT PANEL FEATURES ............ 64
Instrument Cluster ................................ 64
Tachometer............................................ 65
Engine Oil Temperature Gauge ............ 65
Fuel Level Gauge ................................... 66
Speedometer ......................................... 66
INSTRUMENT CLUSTER DISPLAY ........... 66
Instrument Cluster Display
Description ............................................. 66 Reconfigurable Instrument Cluster
Display .................................................... 66 Reconfigurable Display Items ............... 66
Customer Programmable Settings ....... 69
WARNING LIGHTS AND MESSAGES
ON THE INSTRUMENT PANEL ................. 70
Red Warning Lights ............................... 71
Amber Warning Lights ........................... 72
Green Indicator Lights........................... 74
Blue Indicator Lights ............................. 74
Red Symbols .......................................... 74
Amber Symbols ...................................... 76
Green Symbols ...................................... 79
Blue Symbols ......................................... 79
ONBOARD DIAGNOSTIC SYSTEM ........... 79
Onboard Diagnostic System (OBD II)
Cybersecurity ......................................... 80
EMISSIONS INSPECTION AND
MAINTENANCE PROGRAMS .................... 80
23_GA_OM_EN_USC_t.book Page 9
Page 21 of 248
19
In this section, you will find important information
to help you become familiar with the features
needed to operate your vehicle, and how they
function.
KEYS
KEY FOB
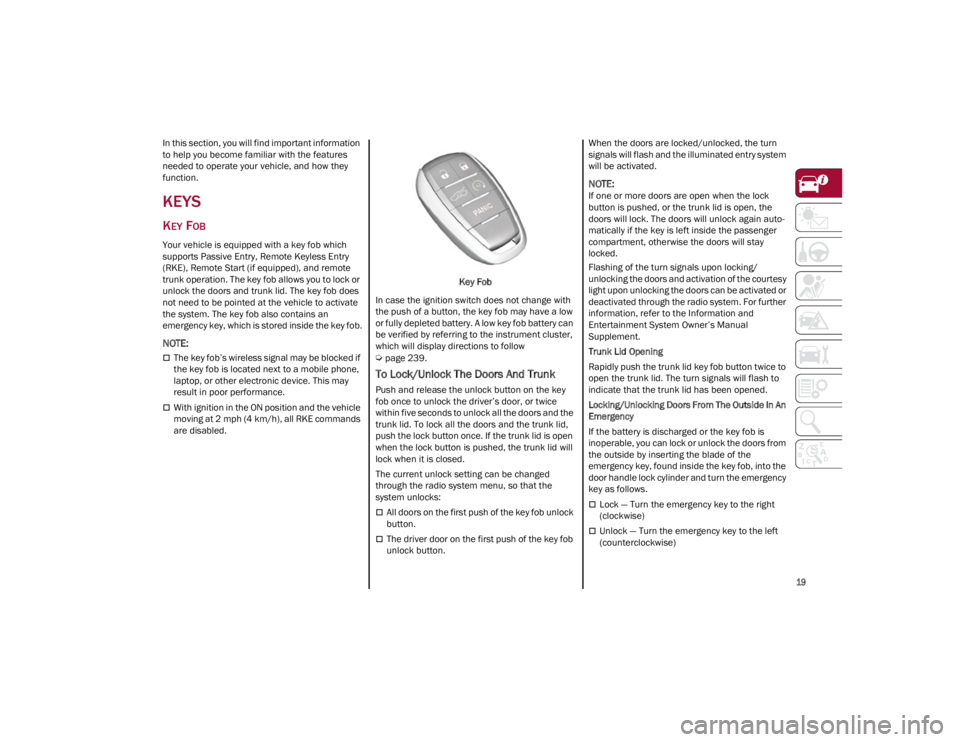
Your vehicle is equipped with a key fob which
supports Passive Entry, Remote Keyless Entry
(RKE), Remote Start (if equipped), and remote
trunk operation. The key fob allows you to lock or
unlock the doors and trunk lid. The key fob does
not need to be pointed at the vehicle to activate
the system. The key fob also contains an
emergency key, which is stored inside the key fob.
NOTE:
The key fob’s wireless signal may be blocked if
the key fob is located next to a mobile phone,
laptop, or other electronic device. This may
result in poor performance.
With ignition in the ON position and the vehicle
moving at 2 mph (4 km/h), all RKE commands
are disabled. Key Fob
In case the ignition switch does not change with
the push of a button, the key fob may have a low
or fully depleted battery. A low key fob battery can
be verified by referring to the instrument cluster,
which will display directions to follow
Ú
page 239.
To Lock/Unlock The Doors And Trunk
Push and release the unlock button on the key
fob once to unlock the driver’s door, or twice
within five seconds to unlock all the doors and the
trunk lid. To lock all the doors and the trunk lid,
push the lock button once. If the trunk lid is open
when the lock button is pushed, the trunk lid will
lock when it is closed.
The current unlock setting can be changed
through the radio system menu, so that the
system unlocks:
All doors on the first push of the key fob unlock
button.
The driver door on the first push of the key fob
unlock button. When the doors are locked/unlocked, the turn
signals will flash and the illuminated entry system
will be activated.
NOTE:
If one or more doors are open when the lock
button is pushed, or the trunk lid is open, the
doors will lock. The doors will unlock again auto
-
matically if the key is left inside the passenger
compartment, otherwise the doors will stay
locked.
Flashing of the turn signals upon locking/
unlocking the doors and activation of the courtesy
light upon unlocking the doors can be activated or
deactivated through the radio system. For further
information, refer to the Information and
Entertainment System Owner’s Manual
Supplement.
Trunk Lid Opening
Rapidly push the trunk lid key fob button twice to
open the trunk lid. The turn signals will flash to
indicate that the trunk lid has been opened.
Locking/Unlocking Doors From The Outside In An
Emergency
If the battery is discharged or the key fob is
inoperable, you can lock or unlock the doors from
the outside by inserting the blade of the
emergency key, found inside the key fob, into the
door handle lock cylinder and turn the emergency
key as follows.
Lock — Turn the emergency key to the right
(clockwise)
Unlock — Turn the emergency key to the left
(counterclockwise)
23_GA_OM_EN_USC_t.book Page 19
Page 22 of 248
GETTING TO KNOW YOUR VEHICLE
20
Key Left Vehicle Feature — If Equipped
If a valid key fob is no longer detected inside the
vehicle while the vehicle’s ignition system is in
the ON/RUN or START position, the message
“Key Fob Has Left The Vehicle” will be shown in
the instrument cluster display along with an
interior chime. An exterior audible and visual alert
will also be activated to warn the driver.
The vehicle’s horn will rapidly chirp three times
along with a single flash of the vehicle’s exterior
lights.
NOTE:
The doors have to be open and then closed in
order for the vehicle to detect a key fob; the
Key Left Vehicle feature will not activate until
all of the doors are closed.
These alerts will not be activated in situations
where the vehicle’s engine is left running with
the key fob inside.
Replacing The Battery In The Key Fob
The recommended replacement battery is one
CR2032 battery.
NOTE:
Customers are recommended to use a battery
obtained from Mopar®. Aftermarket coin
battery dimensions may not meet the original
OEM coin battery dimensions.
Perchlorate Material — special handling may
apply. See
www.dtsc.ca.gov/hazardouswaste/
perchlorate
for further information.
Do not touch the battery terminals that are on
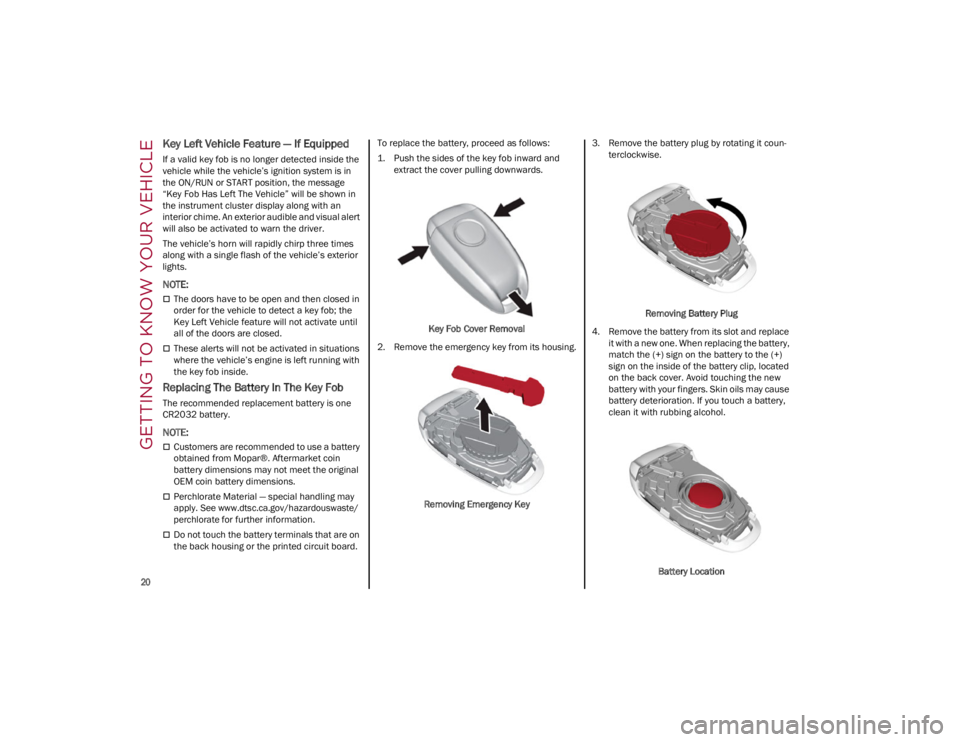
the back housing or the printed circuit board. To replace the battery, proceed as follows:
1. Push the sides of the key fob inward and
extract the cover pulling downwards.
Key Fob Cover Removal
2. Remove the emergency key from its housing.
Removing Emergency Key 3. Remove the battery plug by rotating it coun
-
terclockwise.
Removing Battery Plug
4. Remove the battery from its slot and replace it with a new one. When replacing the battery,
match the (+) sign on the battery to the (+)
sign on the inside of the battery clip, located
on the back cover. Avoid touching the new
battery with your fingers. Skin oils may cause
battery deterioration. If you touch a battery,
clean it with rubbing alcohol.
Battery Location
23_GA_OM_EN_USC_t.book Page 20
Page 26 of 248
GETTING TO KNOW YOUR VEHICLE
24
VEHICLE SECURITY
SYSTEM — IF EQUIPPED
The Vehicle Security system monitors the vehicle
doors, hood, trunk, and the keyless push button
ignition for unauthorized operation. It also
monitors movement inside the passenger
compartment (volumetric protection — if
equipped), cutting of battery cables, and
unexpected lifting/tilting of the vehicle (anti-lift
protection — if equipped).
While the Vehicle Security system is armed,
interior switches for door locks and trunk release
are disabled.
If something triggers the alarm, the Vehicle
Security system will provide the following audible
and visible signals:
The horn will pulse
The turn signals will flash
The Vehicle Security Light in the instrument
cluster will flash
NOTE:
The Vehicle Security system is activated by the
Engine Immobilizer system, which is automati-
cally activated when you get out of the vehicle
with the key fob and lock the doors.
TO ARM THE SYSTEM
Follow these steps to arm the Vehicle Security
system:
1. Make sure the vehicle’s ignition is placed in the OFF position.
2. Perform one of the following methods to lock the vehicle:
• Push the lock button on the interior power
door lock switch with the driver and/or passenger door open.
• Push the lock button on the exterior
Passive Entry door handle with a valid keyfob available in the same exterior zone
Ú
page 26.
• Push the lock button on the key fob.
3. If any doors (or trunk lid) are open, close them.
TO DISARM THE SYSTEM
The Vehicle Security system can be disarmed
using any of the following methods:
Push the unlock button on the key fob.
Grab the Passive Entry door handle to unlock
the door
Ú
page 26.
Cycle the ignition out of the OFF position to
disarm the system.
NOTE:
The driver's door key cylinder and trunk button
on the key fob cannot arm or disarm the
Vehicle Security system. Use of the door key
cylinder when the system is armed will sound
the alarm when the door is opened.
When the Vehicle Security system is armed,
the interior power door lock switches will not
unlock the doors.
The Vehicle Security system is designed to
protect your vehicle. However, you can create
conditions where the system will give you a false
alarm. If one of the previously described arming
sequences has occurred, the Vehicle Security
system will arm, regardless of whether you are in
the vehicle or not. If you remain in the vehicle and
open a door, the alarm will sound. If this occurs,
disarm the Vehicle Security system.
If the Vehicle Security system is armed and the
battery becomes disconnected, the Vehicle
Security system will remain armed when the
battery is reconnected; the exterior lights will
flash, and the horn will sound. If this occurs,
disarm the Vehicle Security system.
NOTE:
The alarm does not disarm when the doors are
unlocked by inserting the blade of the emergency
key (found inside the key fob) into the door
handle lock cylinder.
23_GA_OM_EN_USC_t.book Page 24
Page 47 of 248
45
ADAPTIVE FRONTLIGHT SYSTEM
(AFS F
UNCTION) — IF EQUIPPED
This is a system combined with Xenon headlights
(Bi-Xenon 35 W headlamp if equipped) which
directs the headlights horizontally, and contin -
uously and automatically adapts them to the
driving conditions around bends or when
cornering.
The system directs the headlights to light up the
road in the best way, taking into account the
speed of the vehicle and the bend or corner
angle, as well as the speed at which the steering
wheel is turned.
The adaptive lights are automatically activated
when the vehicle is started.
TURN SIGNALS
Move the multifunction lever up or down to
activate the turn signals. The arrows on each side
of the instrument cluster flash to show proper
operation.
The or turn signal will blink on the
instrument panel.
LANE CHANGE ASSIST
Lightly push the lever up or down once, without
moving beyond the detent, and the turn signal will
flash five times then automatically turn off.
To turn off the flashing before the end of the
cycle, move the lever in the opposite direction
until the first click (about half way).
STATIC BENDING LIGHT FUNCTION
(SBL) — IF EQUIPPED
The SBL function utilizes Light Emitting Diodes
(LEDs) in order to better illuminate the street and
increase the light angle while turning. This
function is enabled by rotating the light switch to
position (on) or (AUTO). The SBL LEDs
activate when the speed is below 25 mph
(40 km/h) and the steering radius is below
0.3 miles (500 m).
This function can be activated/deactivated on the
radio system by selecting the following functions
in sequence on the main menu:
1. Settings
2. Lights
3. Cornering Lights
INTERIOR LIGHTS
Courtesy lights are turned on when the front
doors are opened or when the dimmer control is
rotated to its farthest upward position. The glove
compartment light turns on automatically when
the glove compartment is opened and turn off
when it is closed. The door courtesy lights
illuminate when one of the front doors is opened,
and turn off when it is closed. The trunk courtesy
lights turn on automatically when the trunk is
opened and turn off when it is closed. All of these
lights turn on and off regardless of the ignition
status.
FRONT MAP READING LIGHTS
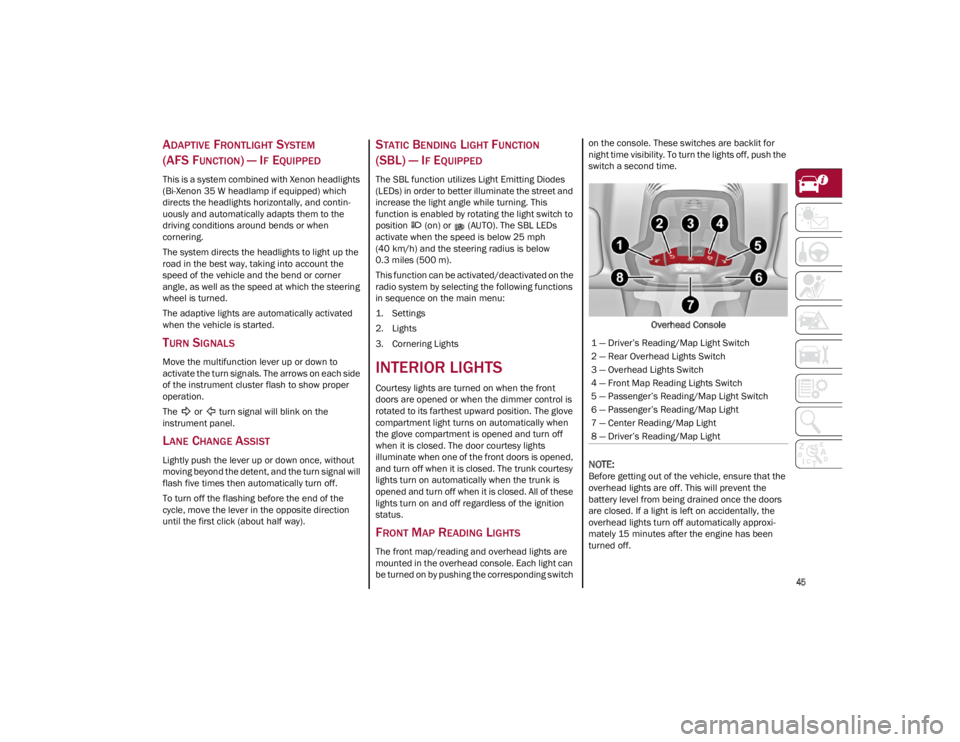
The front map/reading and overhead lights are
mounted in the overhead console. Each light can
be turned on by pushing the corresponding switch on the console. These switches are backlit for
night time visibility. To turn the lights off, push the
switch a second time.
Overhead Console
NOTE:
Before getting out of the vehicle, ensure that the
overhead lights are off. This will prevent the
battery level from being drained once the doors
are closed. If a light is left on accidentally, the
overhead lights turn off automatically approxi -
mately 15 minutes after the engine has been
turned off.
1 — Driver’s Reading/Map Light Switch
2 — Rear Overhead Lights Switch
3 — Overhead Lights Switch
4 — Front Map Reading Lights Switch
5 — Passenger’s Reading/Map Light Switch
6 — Passenger’s Reading/Map Light
7 — Center Reading/Map Light
8 — Driver’s Reading/Map Light
23_GA_OM_EN_USC_t.book Page 45
Page 66 of 248
64
GETTING TO KNOW YOUR INSTRUMENT PANEL
This section gives you all the information you need to understand and use the instrument panel correctly.
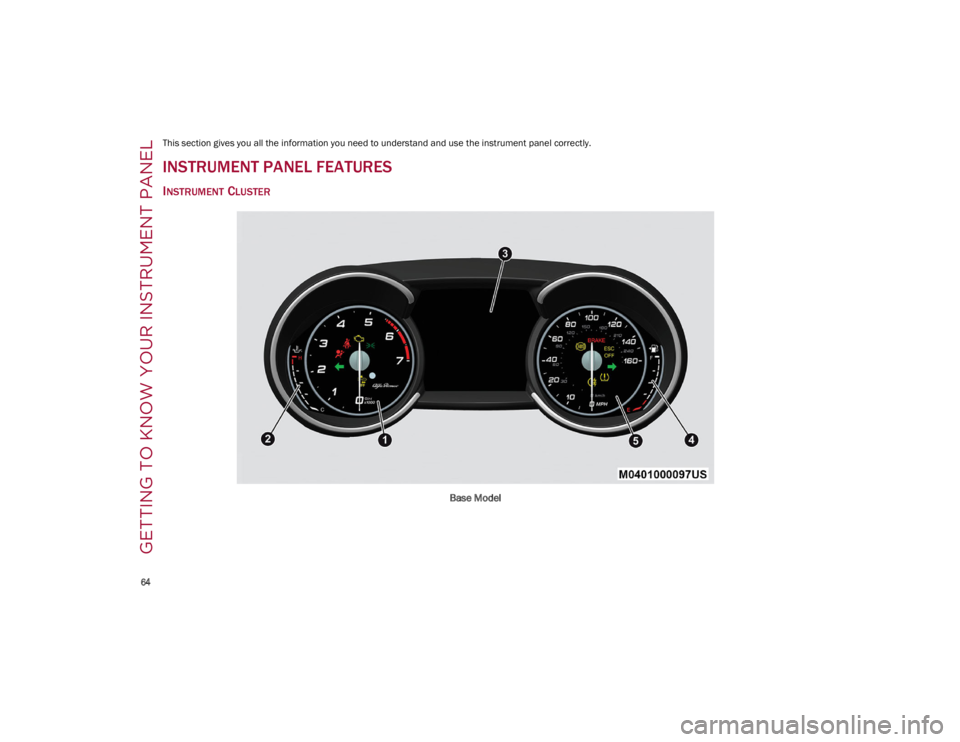
INSTRUMENT PANEL FEATURES
INSTRUMENT CLUSTER
Base Model
23_GA_OM_EN_USC_t.book Page 64
Page 68 of 248
GETTING TO KNOW YOUR INSTRUMENT PANEL
66
FUEL LEVEL GAUGE
The digital fuel gauge monitors the amount of
fuel in the tank.
When the Fuel Level warning light turns on, a
low fuel message is displayed, and a chime will
sound when 2.3 Gallons (9.0 L) of fuel are left in
the tank.
As fuel is consumed, the white notch indicators
will disappear. The last one will become red,
together with the indication "E" (for empty) illumi-
nating beneath the Fuel Level Warning Light to
indicate fuel must be added immediately.
Fuel Level Gauge
NOTE:
If the low fuel warning light turns on, refuel the
vehicle at your nearest fuel station.
SPEEDOMETER
The speedometer shows the vehicle speed in
miles per hour and/or kilometers per hour
(mph/km/h).
INSTRUMENT CLUSTER
DISPLAY
INSTRUMENT CLUSTER DISPLAY
D
ESCRIPTION
This vehicle is equipped with a driver interactive
display that is located in the instrument cluster.
When one or more of the doors have been
opened or closed and the ignition is in the OFF
position, the instrument cluster will display the
vehicle mileage for a few seconds.
RECONFIGURABLE INSTRUMENT CLUSTER
D
ISPLAY
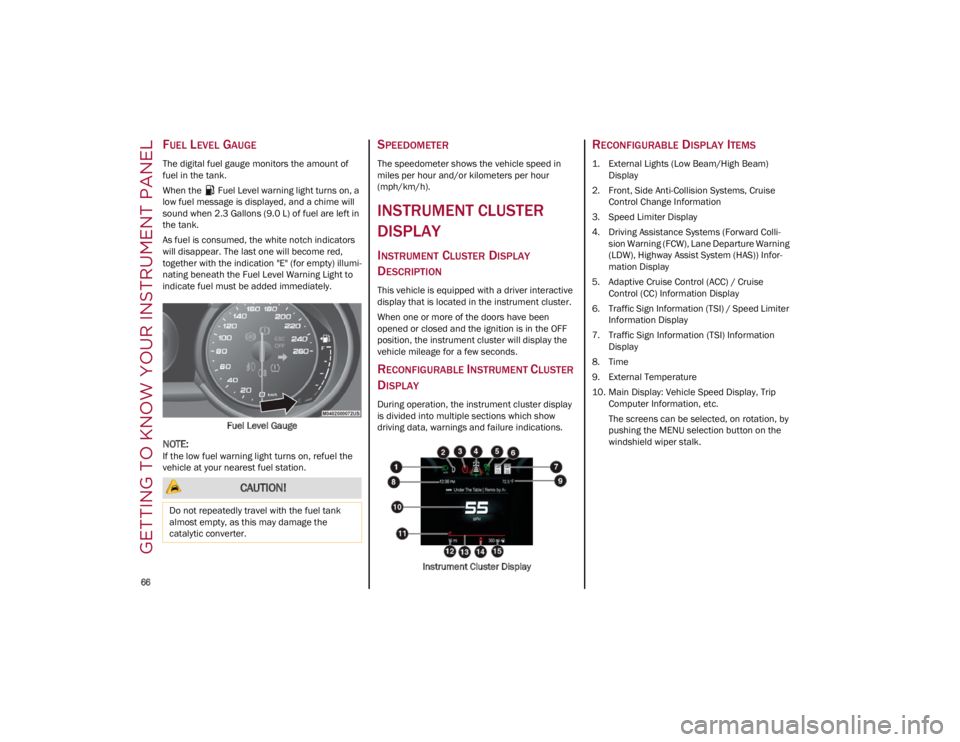
During operation, the instrument cluster display
is divided into multiple sections which show
driving data, warnings and failure indications.
Instrument Cluster Display
RECONFIGURABLE DISPLAY ITEMS
1. External Lights (Low Beam/High Beam)Display
2. Front, Side Anti-Collision Systems, Cruise Control Change Information
3. Speed Limiter Display
4. Driving Assistance Systems (Forward Colli -
sion Warning (FCW), Lane Departure Warning
(LDW), Highway Assist System (HAS)) Infor -
mation Display
5. Adaptive Cruise Control (ACC) / Cruise Control (CC) Information Display
6. Traffic Sign Information (TSI) / Speed Limiter Information Display
7. Traffic Sign Information (TSI) Information Display
8. Time
9. External Temperature
10. Main Display: Vehicle Speed Display, Trip Computer Information, etc.
The screens can be selected, on rotation, by
pushing the MENU selection button on the
windshield wiper stalk.
CAUTION!
Do not repeatedly travel with the fuel tank
almost empty, as this may damage the
catalytic converter.
23_GA_OM_EN_USC_t.book Page 66
Page 69 of 248
67
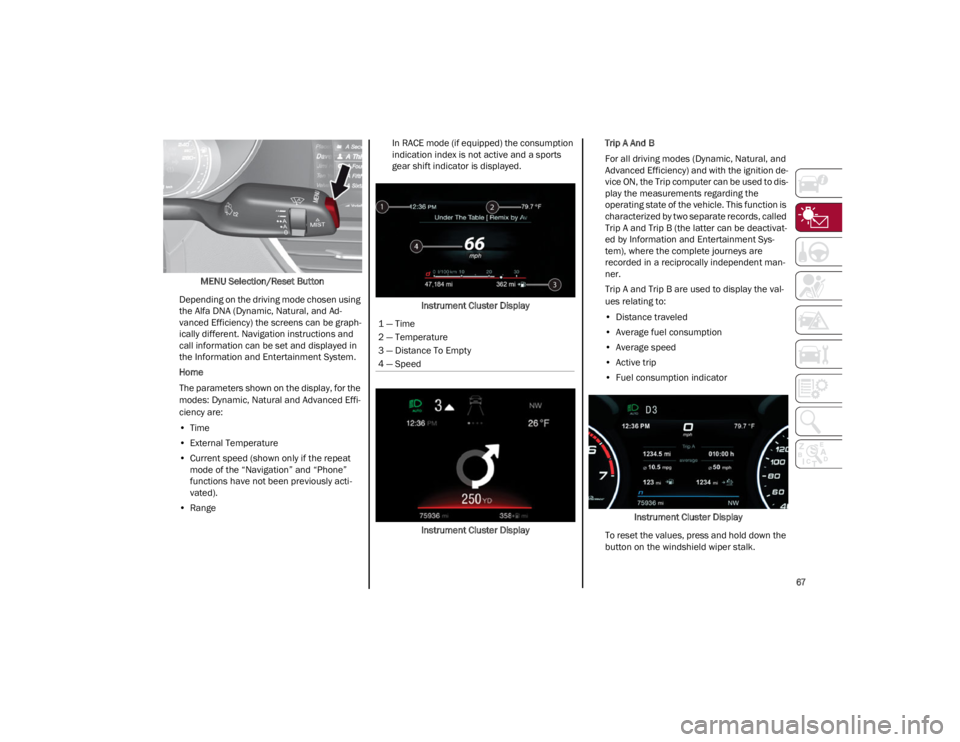
MENU Selection/Reset Button
Depending on the driving mode chosen using
the Alfa DNA (Dynamic, Natural, and Ad -
vanced Efficiency) the screens can be graph -
ically different. Navigation instructions and
call information can be set and displayed in
the Information and Entertainment System.
Home
The parameters shown on the display, for the
modes: Dynamic, Natural and Advanced Effi -
ciency are:
• Time
• External Temperature
• Current speed (shown only if the repeat
mode of the “Navigation” and “Phone”
functions have not been previously acti-vated).
• Range In RACE mode (if equipped) the consumption
indication index is not active and a sports
gear shift indicator is displayed.
Instrument Cluster Display
Instrument Cluster Display Trip A And B
For all driving modes (Dynamic, Natural, and
Advanced Efficiency) and with the ignition de
-
vice ON, the Trip computer can be used to dis -
play the measurements regarding the
operating state of the vehicle. This function is
characterized by two separate records, called
Trip A and Trip B (the latter can be deactivat -
ed by Information and Entertainment Sys -
tem), where the complete journeys are
recorded in a reciprocally independent man -
ner.
Trip A and Trip B are used to display the val -
ues relating to:
• Distance traveled
• Average fuel consumption
• Average speed
• Active trip
• Fuel consumption indicator
Instrument Cluster Display
To reset the values, press and hold down the
button on the windshield wiper stalk.
1 — Time
2 — Temperature
3 — Distance To Empty
4 — Speed
23_GA_OM_EN_USC_t.book Page 67
Page 72 of 248
GETTING TO KNOW YOUR INSTRUMENT PANEL
70
Units & Language
The following settings can be modified under the
“Units & Language” menu:
Units: select US, Metric, or Custom. The
custom option allows for individual selection of
the unit measures
Language: change the language of the system
Restore Unit & Language Settings: restores the
factory settings
To access and change the setting, turn and push
the Rotary Pad or press the desired setting on the
touchscreen.
Clock & Date
The following settings can be modified under the
“Clock & Date” menu:
Sync With GPS Time (if equipped): activates or
deactivates the clock synchronization through
the GPS. If the function is deactivated, the
options Set Time and Set Date are enabled
Set Time: set the time manually
Time Format: set the time format to either a
12-hour or a 24-hour clock
Set Date: set the date manually
Restore Clock & Date Settings: restores the
factory settings
To access and change the setting, turn and push
the Rotary Pad or press the desired setting on the
touchscreen. Cluster
The following settings can be modified when this
mode is selected:
Warning Buzzer Volume: set the volume of the
warning buzzer on seven levels
Trip B: activate or deactivate the Trip function
Show Phone Info: activate/deactivate
repetition of the phone function screens also
on the instrument panel display
Show Audio Info: activate/deactivate
repetition of the audio function screens (Radio
and Media) also on the instrument panel
display
Show Nav Info (if equipped): activate/
deactivate repetition of the navigator function
screens also on the instrument panel display
Digital speed on all screens: activate/deacti
-
vating of digital speed on the instrument panel
display screens other than the main screen
Consumption Bar: activate/deactivate the
consumption baron the display screens of the
instrument panel where it is available
Performance pages: choose, for each driving
mode, one of the two alternative contents
displayed in the screen
Custom areas: select which content to display
in each of the three customizable areas on the
display of the instrument panel: time, date,
outside temperature, radio information,
compass
Restore Cluster Settings: deletes the current
settings and restores the factory settings To access and change the setting, turn and push
the Rotary Pad or press the desired setting on the
touchscreen.
WARNING LIGHTS AND
MESSAGES ON THE
INSTRUMENT PANEL
The following pages consist of warning lights and
messages.
NOTE:
The warning light turns on together with a
dedicated message and/or chime when
applicable. These indications are precau
-
tionary and as such must not be considered as
exhaustive and/or alternative to the
information contained in the Owner’s Manual,
which you are advised to read carefully in all
cases. Always refer to the information in this
section in the event of a failure indication.
The failure indicators appearing on the display
are divided into two categories: very serious
and less serious faults. Serious faults are
indicated by a repeated and prolonged
warning "cycle.” Less serious faults are
indicated by a warning "cycle" with a shorter
duration. You can stop the warning cycle in
both cases by pushing the button located on
the windshield wiper stalk. The instrument
panel warning light will stay on until the cause
of the failure is eliminated.
23_GA_OM_EN_USC_t.book Page 70
Page 76 of 248
GETTING TO KNOW YOUR INSTRUMENT PANEL
74
The operation of the indicator light may be
checked by the traffic police using specific
devices. Comply with the laws and regulations of
the country where you are driving.
Under these conditions, the vehicle can continue
traveling at moderate speed but without
demanding excessive effort from the engine or
high speed. Prolonged use of the vehicle with the
indicator light on constantly may cause damage.
Contact an authorized dealer as soon as
possible.
Forward Collision Warning (FCW) System
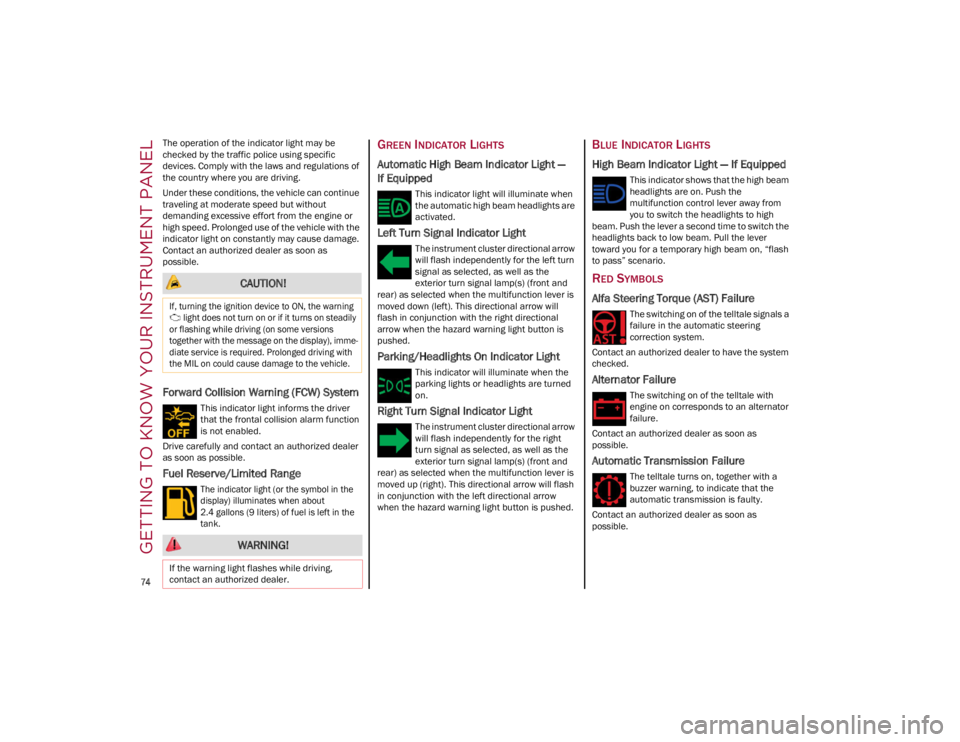
This indicator light informs the driver
that the frontal collision alarm function
is not enabled.
Drive carefully and contact an authorized dealer
as soon as possible.
Fuel Reserve/Limited Range
The indicator light (or the symbol in the
display) illuminates when about
2.4 gallons (9 liters) of fuel is left in the
tank.
GREEN INDICATOR LIGHTS
Automatic High Beam Indicator Light —
If Equipped
This indicator light will illuminate when
the automatic high beam headlights are
activated.
Left Turn Signal Indicator Light
The instrument cluster directional arrow
will flash independently for the left turn
signal as selected, as well as the
exterior turn signal lamp(s) (front and
rear) as selected when the multifunction lever is
moved down (left). This directional arrow will
flash in conjunction with the right directional
arrow when the hazard warning light button is
pushed.
Parking/Headlights On Indicator Light
This indicator will illuminate when the
parking lights or headlights are turned
on.
Right Turn Signal Indicator Light
The instrument cluster directional arrow
will flash independently for the right
turn signal as selected, as well as the
exterior turn signal lamp(s) (front and
rear) as selected when the multifunction lever is
moved up (right). This directional arrow will flash
in conjunction with the left directional arrow
when the hazard warning light button is pushed.
BLUE INDICATOR LIGHTS
High Beam Indicator Light — If Equipped
This indicator shows that the high beam
headlights are on. Push the
multifunction control lever away from
you to switch the headlights to high
beam. Push the lever a second time to switch the
headlights back to low beam. Pull the lever
toward you for a temporary high beam on, “flash
to pass” scenario.
RED SYMBOLS
Alfa Steering Torque (AST) Failure
The switching on of the telltale signals a
failure in the automatic steering
correction system.
Contact an authorized dealer to have the system
checked.
Alternator Failure
The switching on of the telltale with
engine on corresponds to an alternator
failure.
Contact an authorized dealer as soon as
possible.
Automatic Transmission Failure
The telltale turns on, together with a
buzzer warning, to indicate that the
automatic transmission is faulty.
Contact an authorized dealer as soon as
possible.
CAUTION!
If, turning the ignition device to ON, the warning light does not turn on or if it turns on steadily
or flashing while driving (on some versions
together with the message on the display), imme -
diate service is required. Prolonged driving with
the MIL on could cause damage to the vehicle.
WARNING!
If the warning light flashes while driving,
contact an authorized dealer.
23_GA_OM_EN_USC_t.book Page 74