run flat ALFA ROMEO GIULIA 2023 Owners Manual
[x] Cancel search | Manufacturer: ALFA ROMEO, Model Year: 2023, Model line: GIULIA, Model: ALFA ROMEO GIULIA 2023Pages: 248, PDF Size: 9.62 MB
Page 2 of 248
This Owner’s Manual illustrates and describes the operation of features and equipment that are either standard or optional on this
vehicle. This manual may also include a description of features and equipment that are no longer available or were not ordered on this
vehicle. Please disregard any features and equipment described in this manual that are not on this vehicle. FCA US LLC reserves the
right to make changes in design and specifications, and/or make additions to or improvements to its products without imposing any
obligation upon itself to install them on products previously manufactur\
ed.
With respect to any vehicles sold in Canada, the name FCA US LLC shall be deemed to be deleted and the name FCA Canada Inc. used
in substitution therefore. The driver’s primary responsibility is the safe operation of the vehicle. Driving while distracted can result in loss of vehicle control,
resulting in an accident and personal injury. FCA US LLC strongly recommends that the driver use extreme caution when using any
device or feature that may take their attention off the road. Use of any electrical devices, such as cellular telephones, computers, portable
radios, vehicle navigation or other devices, by the driver while the vehicle is moving is dangerous and could lead to a serious accident.
Texting while driving is also dangerous and should never be done while the vehicle is moving. If you find yourself unable to devote your
full attention to vehicle operation, pull off the road to a safe location and stop your vehicle. Some states or provinces prohibit the use of
cellular telephones or texting while driving. It is always the driver’s responsibility to comply with all local laws.
This Owner’s Manual has been prepared to help you get acquainted with your new Alfa Romeo
brand vehicle and to provide a convenient
reference source for common questions.
Not all features shown in this manual may apply to your vehicle. For add\
itional information, visit www.alfaromeousa.com (USA),
www.alfaromeo.ca (Canada) or your local Alfa Romeo brand dealer.
This Owner’s Manual is intended to familiarize you with the important features of your vehicle. Your most up-to-date Owner’s Manual,
Navigation/Uconnect manuals and Warranty Booklet can be found by visiting the website on the back cover.
U.S. Residents: If you are the first registered retail owner of your vehicle, you may obtain a complimentary printed copy of the Warranty
Booklet by calling 844-253-2872 or by contacting your dealer. Replacement kits can be purchased by visiting www.techauthority.com.
Canadian Residents: If you are the first registered retail owner of your vehicle, you may obtain a complimentary printed copy of the War -
ranty Booklet or purchase a replacement kit by calling 1-800-387-1143 or by contacting your dealer.
WARNING: Operating, servicing and maintaining a passenger vehicle or off-highway motor
vehicle can expose you to chemicals including engine exhaust, carbon monoxide, phthalates,
and lead, which are known to the State of California to cause cancer and\
birth defects or other
reproductive harm. To minimize exposure, avoid breathing exhaust, do not idle the engine
except as necessary, service your vehicle in a well-ventilated area and wear gloves or
wash your hands frequently when servicing your vehicle. For more informa\
tion go to
www.P65Warnings.ca.gov/passenger-vehicle .DRIVING AND ALCOHOL
Drunk driving is one of the most frequent causes of accidents. Your driving ability can be seriously impaired with blood alcohol levels \
far
below the legal minimum. If you are drinking, don’t drive. Ride with \
a designated non-drinking driver, call a cab, a rideshare, a friend, or
use public transportation.
WARNING
Driving after drinking can lead to an accident. Your perceptions are less sharp, your reflexes are slower and your judgment is impaired
when you have been drinking. Never drink and then drive.
ROADSIDE ASSISTANCE
24 HOURS, 7 DAYS A WEEK AT YOUR SERVICE.
CALL 1-855-299-1368 OR VISIT ALFAROMEO.RSAHELP.COM (USA)
SERVICES: Flat Tire Service, Out Of Gas/Fuel Delivery, Battery Jump Assistance, Lockout Service and Towing Service
Please see the Customer Assistance chapter in this Owner’s Manual for further information.
FCA US LLC reserves the right to modify the terms or discontinue the Roadside Assistance Program at any time. The Roadside Assistance Program is subject to restrictions and conditions of use, that are
determined solely by FCA US LLC.
Page 13 of 248
11
LANE KEEPING ASSIST (LKA) SYSTEM —
IF EQUIPPED .......................................... 120
Turning Lane Keeping Assist On
Or Off .................................................... 120 Lane Keeping Assist Warning
Message ...............................................121
REAR BACK UP CAMERA / DYNAMIC
GRIDLINES ............................................. 123 REFUELING THE VEHICLE ..................... 124
Refueling Procedure ...........................124
VEHICLE LOADING ................................. 125
Certification Label................................ 125
TRAILER TOWING................................... 126
SUGGESTIONS FOR DRIVING................ 126
Saving Fuel ...........................................126
Driving Style .........................................127
Conditions Of Use ................................ 127
Transporting Passengers ....................127
Transporting Animals...........................127
Exhaust Gas .........................................128
Performance — Quadrifoglio ...............128
SAFETY
ACTIVE SAFETY SYSTEMS ..................... 129
Anti-Lock Brake System (ABS) ........... 129
Active Torque Vectoring (ATV) —
If Equipped ...........................................129 Dynamic Steering Torque (DST) .........130
Drive Train Control (DTC) System —
If Equipped ...........................................130 Electronic Stability Control (ESC) ........130
Hill Start Assist (HSA)...........................131
Panic Brake Assist (PBA) .....................131
Traction Control System (TCS) ............131
AUXILIARY DRIVING SYSTEMS .............. 132
Blind Spot Monitoring (BSM)
System — If Equipped ........................ 132 Active Blind Spot Assist (ABSA)
System — If Equipped ........................ 134 Driver Attention Assist (DAA)
System — If Equipped ......................... 137 Forward Collision Warning Plus
(FCW+) System — If Equipped ............ 138 Tire Pressure Monitoring System
(TPMS).................................................. 142
OCCUPANT RESTRAINT SYSTEMS ....... 144
Occupant Restraint Systems
Features .............................................. 144 Important Safety Precautions ............ 144
Seat Belt Systems .............................. 144
Supplemental Restraint Systems
(SRS) .................................................... 149 Child Restraints ................................... 158
SAFETY TIPS........................................... 166
Transporting Passengers .................... 166
Transporting Pets ................................ 166
Connected Vehicles ............................ 166
Safety Checks You Should Make
Inside The Vehicle .............................. 167 Periodic Safety Checks You Should
Make Outside The Vehicle .................. 168 Exhaust Gas ........................................ 168
Carbon Monoxide Warnings ............... 168
IN CASE OF EMERGENCY
HAZARD WARNING FLASHERS ............ 169
SOS EMERGENCY CALL —
IF EQUIPPED ......................................... 169TIRE SERVICE KIT .................................. 171
Description ........................................... 171
Inflation Procedure .............................. 172
Checking And Restoring Tire
Pressure ............................................... 174 Sealant Cartridge Replacement ......... 174
Run Flat Tires — If Equipped ................. 174
JUMP STARTING ................................... 175
Remote Battery Connection Posts ..... 175
Jump Starting Procedure .................... 177
Bump Starting...................................... 178
IF YOUR ENGINE OVERHEATS ............... 178
MANUAL PARK RELEASE....................... 179
TOWING A DISABLED VEHICLE ............. 179
Rear Wheel Drive (RWD) Models ........ 179
All Wheel Drive (AWD) Models ............ 180
TOW EYES ............................................. 180
ENHANCED ACCIDENT RESPONSE
SYSTEM (EARS) .................................... 181 EVENT DATA RECORDER (EDR) ............ 181
SERVICING AND MAINTENANCE
SCHEDULED SERVICING ....................... 182
Periodic Checks ................................... 182
Heavy Usage Of The Vehicle ............... 182
Maintenance Plan — 2.0L Engine ...... 183
Maintenance Plan — 2.9L Engine ...... 185
23_GA_OM_EN_USC_t.book Page 11
Page 28 of 248
GETTING TO KNOW YOUR VEHICLE
26
LOCKING THE DOORS WITH A DEPLETED
B
ATTERY
Proceed as follows to lock the doors if the vehicle
battery is depleted.
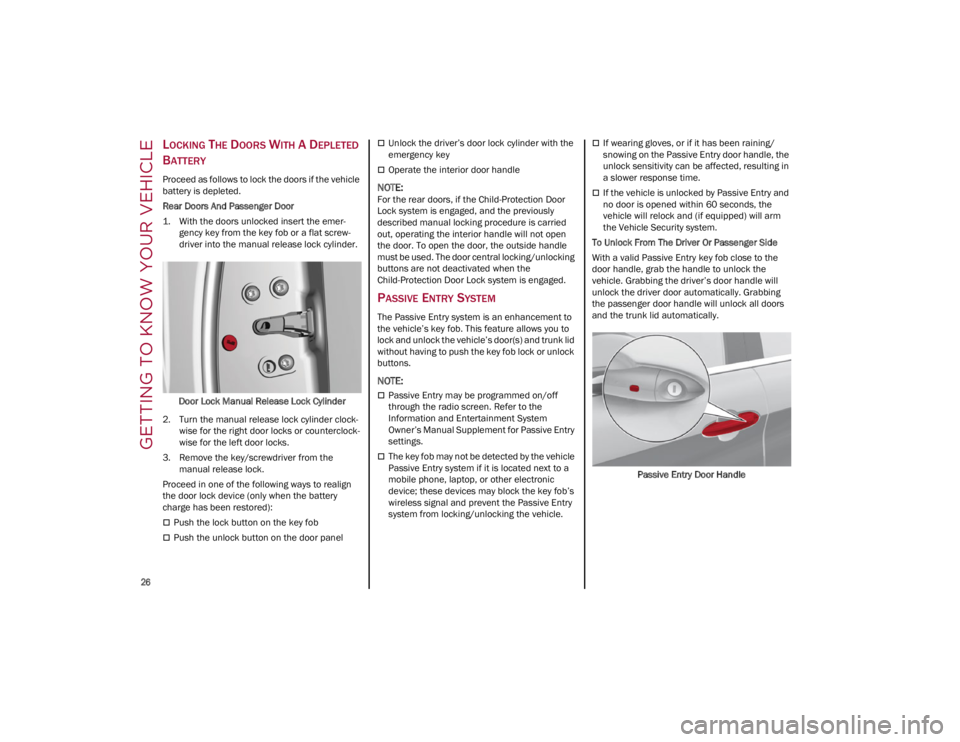
Rear Doors And Passenger Door
1. With the doors unlocked insert the emer -
gency key from the key fob or a flat screw -
driver into the manual release lock cylinder.
Door Lock Manual Release Lock Cylinder
2. Turn the manual release lock cylinder clock -
wise for the right door locks or counterclock -
wise for the left door locks.
3. Remove the key/screwdriver from the manual release lock.
Proceed in one of the following ways to realign
the door lock device (only when the battery
charge has been restored):
Push the lock button on the key fob
Push the unlock button on the door panel
Unlock the driver’s door lock cylinder with the
emergency key
Operate the interior door handle
NOTE:
For the rear doors, if the Child-Protection Door
Lock system is engaged, and the previously
described manual locking procedure is carried
out, operating the interior handle will not open
the door. To open the door, the outside handle
must be used. The door central locking/unlocking
buttons are not deactivated when the
Child-Protection Door Lock system is engaged.
PASSIVE ENTRY SYSTEM
The Passive Entry system is an enhancement to
the vehicle’s key fob. This feature allows you to
lock and unlock the vehicle’s door(s) and trunk lid
without having to push the key fob lock or unlock
buttons.
NOTE:
Passive Entry may be programmed on/off
through the radio screen. Refer to the
Information and Entertainment System
Owner’s Manual Supplement for Passive Entry
settings.
The key fob may not be detected by the vehicle
Passive Entry system if it is located next to a
mobile phone, laptop, or other electronic
device; these devices may block the key fob’s
wireless signal and prevent the Passive Entry
system from locking/unlocking the vehicle.
If wearing gloves, or if it has been raining/
snowing on the Passive Entry door handle, the
unlock sensitivity can be affected, resulting in
a slower response time.
If the vehicle is unlocked by Passive Entry and
no door is opened within 60 seconds, the
vehicle will relock and (if equipped) will arm
the Vehicle Security system.
To Unlock From The Driver Or Passenger Side
With a valid Passive Entry key fob close to the
door handle, grab the handle to unlock the
vehicle. Grabbing the driver’s door handle will
unlock the driver door automatically. Grabbing
the passenger door handle will unlock all doors
and the trunk lid automatically.
Passive Entry Door Handle
23_GA_OM_EN_USC_t.book Page 26
Page 30 of 248
GETTING TO KNOW YOUR VEHICLE
28
To Unlock/Enter The Trunk
With one of the vehicle’s Passive Entry key fobs
close to the trunk, push the trunk lid release
button.Trunk Lid Release Button
NOTE:
If the key fob is left inside of the trunk, and an
attempt is made to close it from outside, the
trunk lid will not lock. With the doors locked,
the trunk lid unlocked, and the key fob
detected inside the vehicle, the trunk lid will
unlock again and the lights will flash twice.
Before driving, make sure the trunk lid is
closed correctly. To Lock The Trunk
With a valid Passive Entry key fob close to the
vehicle, push the Passive Entry trunk lid button,
which is located next to the exterior trunk lid
release button. All doors and the trunk lid will
lock. Door locking will activate the alarm as well.
NOTE:
The trunk lid may still be locked by pushing the
lock button on the key fob, pushing a Passive
Entry lock button on the front door handles, or
pushing the lock button on the interior door panel
of the vehicle
Ú
page 239.
AUTOMATIC DOOR LOCKS — IF EQUIPPED
The auto door lock feature default condition is
enabled. When enabled, the door locks will lock
automatically when the vehicle's speed exceeds
12 mph (20 km/h). The auto door lock feature is
enabled/disabled through the radio screen.
Refer to the Information and Entertainment
System Owner’s Manual Supplement for further
information.
CHILD-PROTECTION DOOR LOCK
S
YSTEM — REAR DOORS
To provide a safer environment for small children
riding in the rear seats, the rear doors are
equipped with a Child-Protection Door Lock
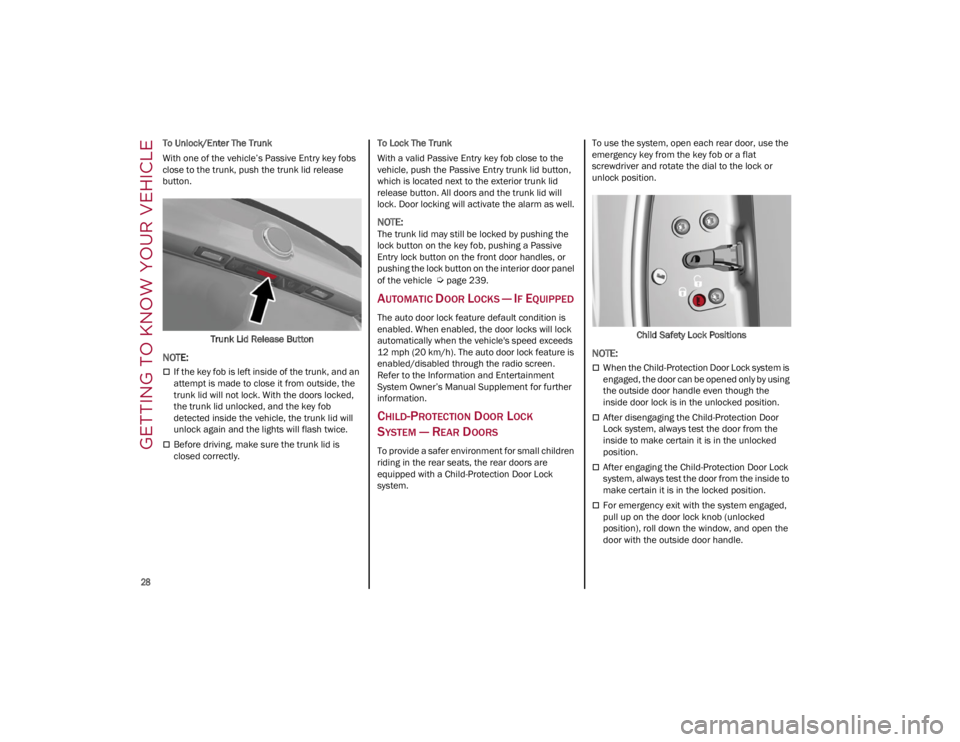
system. To use the system, open each rear door, use the
emergency key from the key fob or a flat
screwdriver and rotate the dial to the lock or
unlock position.
Child Safety Lock Positions
NOTE:
When the Child-Protection Door Lock system is
engaged, the door can be opened only by using
the outside door handle even though the
inside door lock is in the unlocked position.
After disengaging the Child-Protection Door
Lock system, always test the door from the
inside to make certain it is in the unlocked
position.
After engaging the Child-Protection Door Lock
system, always test the door from the inside to
make certain it is in the locked position.
For emergency exit with the system engaged,
pull up on the door lock knob (unlocked
position), roll down the window, and open the
door with the outside door handle.
23_GA_OM_EN_USC_t.book Page 28
Page 90 of 248
STARTING AND OPERATING
88
(Continued)
(Continued)
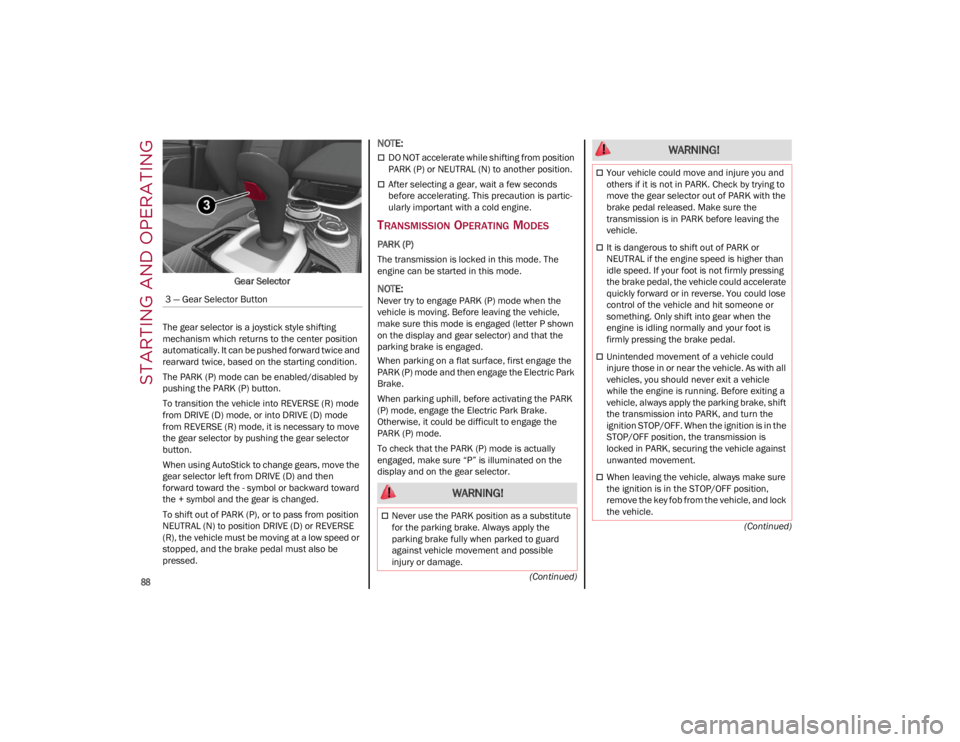
Gear Selector
The gear selector is a joystick style shifting
mechanism which returns to the center position
automatically. It can be pushed forward twice and
rearward twice, based on the starting condition.
The PARK (P) mode can be enabled/disabled by
pushing the PARK (P) button.
To transition the vehicle into REVERSE (R) mode
from DRIVE (D) mode, or into DRIVE (D) mode
from REVERSE (R) mode, it is necessary to move
the gear selector by pushing the gear selector
button.
When using AutoStick to change gears, move the
gear selector left from DRIVE (D) and then
forward toward the - symbol or backward toward
the + symbol and the gear is changed.
To shift out of PARK (P), or to pass from position
NEUTRAL (N) to position DRIVE (D) or REVERSE
(R), the vehicle must be moving at a low speed or
stopped, and the brake pedal must also be
pressed.
NOTE:
DO NOT accelerate while shifting from position
PARK (P) or NEUTRAL (N) to another position.
After selecting a gear, wait a few seconds
before accelerating. This precaution is partic -
ularly important with a cold engine.
TRANSMISSION OPERATING MODES
PARK (P)
The transmission is locked in this mode. The
engine can be started in this mode.
NOTE:
Never try to engage PARK (P) mode when the
vehicle is moving. Before leaving the vehicle,
make sure this mode is engaged (letter P shown
on the display and gear selector) and that the
parking brake is engaged.
When parking on a flat surface, first engage the
PARK (P) mode and then engage the Electric Park
Brake.
When parking uphill, before activating the PARK
(P) mode, engage the Electric Park Brake.
Otherwise, it could be difficult to engage the
PARK (P) mode.
To check that the PARK (P) mode is actually
engaged, make sure “P” is illuminated on the
display and on the gear selector.
3 — Gear Selector Button
WARNING!
Never use the PARK position as a substitute
for the parking brake. Always apply the
parking brake fully when parked to guard
against vehicle movement and possible
injury or damage.
Your vehicle could move and injure you and
others if it is not in PARK. Check by trying to
move the gear selector out of PARK with the
brake pedal released. Make sure the
transmission is in PARK before leaving the
vehicle.
It is dangerous to shift out of PARK or
NEUTRAL if the engine speed is higher than
idle speed. If your foot is not firmly pressing
the brake pedal, the vehicle could accelerate
quickly forward or in reverse. You could lose
control of the vehicle and hit someone or
something. Only shift into gear when the
engine is idling normally and your foot is
firmly pressing the brake pedal.
Unintended movement of a vehicle could
injure those in or near the vehicle. As with all
vehicles, you should never exit a vehicle
while the engine is running. Before exiting a
vehicle, always apply the parking brake, shift
the transmission into PARK, and turn the
ignition STOP/OFF. When the ignition is in the
STOP/OFF position, the transmission is
locked in PARK, securing the vehicle against
unwanted movement.
When leaving the vehicle, always make sure
the ignition is in the STOP/OFF position,
remove the key fob from the vehicle, and lock
the vehicle.
WARNING!
23_GA_OM_EN_USC_t.book Page 88
Page 147 of 248
145
(Continued)
Enhanced Seat Belt Use Reminder
System (BeltAlert)
Driver And Passenger BeltAlert — If EquippedBeltAlert is a feature intended to remind
the driver and outboard front seat
passenger (if equipped with outboard
front passenger seat BeltAlert) to buckle
their seat belts. The BeltAlert feature is active
whenever the ignition switch is in the ON/RUN
position.
Initial Indication
If the driver is unbuckled when the ignition switch
is first in the ON/RUN position, a chime will signal
for a few seconds. If the driver or outboard front
seat passenger (if equipped with outboard front
passenger seat BeltAlert) is unbuckled when the
ignition switch is first in the ON/RUN position the
Seat Belt Reminder Light will turn on and remain
on until both outboard front seat belts are
buckled. The outboard front passenger seat
BeltAlert is not active when an outboard front
passenger seat is unoccupied.
BeltAlert Warning Sequence
The BeltAlert warning sequence is activated when
the vehicle is moving above a specified vehicle
speed range and the driver or outboard front seat
passenger is unbuckled (if equipped with
outboard front passenger seat BeltAlert) (the
outboard front passenger seat BeltAlert is not
active when the outboard front passenger seat is
unoccupied). The BeltAlert warning sequence
starts by blinking the Seat Belt Reminder Light
and sounding an intermittent chime. Once the
BeltAlert warning sequence has completed, the
Seat Belt Reminder Light will remain on until the
seat belts are buckled. The BeltAlert warning sequence may repeat based on vehicle speed
until the driver and occupied outboard front seat
passenger seat belts are buckled. The driver
should instruct all occupants to buckle their seat
belts.
Change Of Status
If the driver or outboard front seat passenger (if
equipped with outboard front passenger seat
BeltAlert) unbuckles their seat belt while the
vehicle is traveling, the BeltAlert warning
sequence will begin until the seat belts are
buckled again.
The outboard front passenger seat BeltAlert is not
active when the outboard front passenger seat is
unoccupied. BeltAlert may be triggered when an
animal or other items are placed on the outboard
front passenger seat or when the seat is folded
flat (if equipped). It is recommended that pets be
restrained in the rear seat (if equipped) in pet
harnesses or pet carriers that are secured by seat
belts, and cargo is properly stowed.
Lap/Shoulder Belts
All seating positions in your vehicle are equipped
with lap/shoulder belts.
The seat belt webbing retractor will lock only
during very sudden stops or collisions. This
feature allows the shoulder part of the seat belt to
move freely with you under normal conditions.
However, in a collision the seat belt will lock and
reduce your risk of striking the inside of the
vehicle or being thrown out of the vehicle.
WARNING!
Relying on the air bags alone could lead to
more severe injuries in a collision. The air
bags work with your seat belt to restrain you
properly. In some collisions, the air bags
won’t deploy at all. Always wear your seat
belt even though you have air bags.
In a collision, you and your passengers can
suffer much greater injuries if you are not
properly buckled up. You can strike the
interior of your vehicle or other passengers,
or you can be thrown out of the vehicle.
Always be sure you and others in your vehicle
are buckled up properly.
It is dangerous to ride in a cargo area, inside
or outside of a vehicle. In a collision, people
riding in these areas are more likely to be
seriously injured or killed.
Do not allow people to ride in any area of
your vehicle that is not equipped with seats
and seat belts.
Be sure everyone in your vehicle is in a seat
and using a seat belt properly. Occupants,
including the driver, should always wear their
seat belts whether or not an air bag is also
provided at their seating position to minimize
the risk of severe injury or death in the event
of a crash.
23_GA_OM_EN_USC_t.book Page 145
Page 152 of 248
SAFETY
150
Air Bag System Components
Occupant Restraint Controller (ORC)
Air Bag Warning Light
Steering Wheel and Column
Instrument Panel
Knee Impact Bolsters
Driver and Front Passenger Air Bags
Seat Belt Buckle Switch
Supplemental Side Air Bags
Supplemental Knee Air Bags
Front and Side Impact Sensors
Seat Belt Pretensioners
Seat Track Position Sensors
Air Bag Warning Light
The Occupant Restraint Controller
(ORC) monitors the readiness of the
electronic parts of the air bag system
whenever the ignition switch is in the
START or ON/RUN position. If the ignition switch
is in the OFF position or in the ACC position, the
air bag system is not on and the air bags will not
inflate.
The ORC contains a backup power supply system
that may deploy the air bag system even if the
battery loses power or it becomes disconnected
prior to deployment.
The ORC turns on the Air Bag Warning Light in the
instrument panel for approximately four to eight
seconds for a self-check when the ignition switch
is first in the ON/RUN position. After the
self-check, the Air Bag Warning Light will turn off.
If the ORC detects a malfunction in any part of the
system, it turns on the Air Bag Warning Light, either momentarily or continuously. A single
chime will sound to alert you if the light comes on
again after initial startup.
The ORC also includes diagnostics that will
illuminate the instrument panel Air Bag Warning
Light if a malfunction is detected that could affect
the air bag system. The diagnostics also record
the nature of the malfunction. While the air bag
system is designed to be maintenance free, if any
of the following occurs, have an authorized dealer
service the air bag system immediately.
The Air Bag Warning Light does not come on
during the four to eight seconds when the
ignition switch is first in the ON/RUN position.
The Air Bag Warning Light remains on after the
four to eight-second interval.
The Air Bag Warning Light comes on intermit
-
tently or remains on while driving.
NOTE:
If the speedometer, tachometer, or any engine
related gauges are not working, the Occupant
Restraint Controller (ORC) may also be disabled.
In this condition the air bags may not be ready to
inflate for your protection. Have an authorized
dealer service the air bag system immediately.
Redundant Air Bag Warning Light
If a fault with the Air Bag Warning Light
is detected, which could affect the
Supplemental Restraint System (SRS),
the Redundant Air Bag Warning Light
will illuminate on the instrument panel. The
Redundant Air Bag Warning Light will stay on until
the fault is cleared. In addition, a single chime will
sound to alert you that the Redundant Air Bag
Warning Light has come on and a fault has been
detected. If the Redundant Air Bag Warning Light
comes on intermittently or remains on while
driving have an authorized dealer service the
vehicle immediately.
For additional information regarding the
Redundant Air Bag Warning Light, see
Ú
page 70.
Front Air Bags
This vehicle has front air bags and lap/shoulder
belts for both the driver and front passenger. The
front air bags are a supplement to the seat belt
restraint systems. The driver front air bag is
mounted in the center of the steering wheel. The
passenger front air bag is mounted in the
instrument panel, above the glove compartment.
The words “SRS AIRBAG” or “AIRBAG” are
embossed on the air bag covers.
WARNING!
Ignoring the Air Bag Warning Light in your
instrument panel could mean you won’t have
the air bag system to protect you in a collision.
If the light does not come on as a bulb check
when the ignition is first turned on, stays on
after you start the vehicle, or if it comes on as
you drive, have an authorized dealer service
the air bag system immediately.
23_GA_OM_EN_USC_t.book Page 150
Page 159 of 248
157
(Continued)
If a reset procedure step is not completed within 60 seconds, then the turn signal lights will blink and the reset procedure must be performed again in order
to be successful.
Maintaining Your Air Bag System
Event Data Recorder (EDR)
This vehicle is equipped with an event data
recorder (EDR). The main purpose of an EDR is to
record, in certain crash or near crash-like
situations, such as an air bag deployment or
hitting a road obstacle, data that will assist in
understanding how a vehicle’s systems
performed. The EDR is designed to record data
related to vehicle dynamics and safety systems for a short period of time, typically 30 seconds or
less. The EDR in this vehicle is designed to record
such data as:
How various systems in your vehicle were
operating;
Whether or not the driver and passenger safety
belts were buckled/fastened;
How far (if at all) the driver was depressing the
accelerator and/or brake pedal; and,
How fast the vehicle was traveling.
These data can help provide a better
understanding of the circumstances in which
crashes and injuries occur.
NOTE:
EDR data are recorded by your vehicle only if a
non-trivial crash situation occurs; no data are
recorded by the EDR under normal driving condi -
tions and no personal data (e.g., name, gender,
age, and crash location) are recorded. However,
other parties, such as law enforcement, could
combine the EDR data with the type of personally
identifying data routinely acquired during a crash
investigation.
12. Turn ignition ACC/ON/RUN. (Entire sequence needs to be completed
within one minute or sequence will need to be repeated). System is now reset and the engine may be started.
Turn hazard flashers OFF (Manually).
Customer Action
NOTE:
Each step MUST BE held for at least two seconds
Customer Will See
WARNING!
Modifications to any part of the air bag system
could cause it to fail when you need it. You
could be injured if the air bag system is not
there to protect you. Do not modify the
components or wiring, including adding any
kind of badges or stickers to the steering wheel
hub trim cover or the upper passenger side of
the instrument panel. Do not modify the front
fascia/bumper, vehicle body structure, or add
aftermarket side steps or running boards.
It is dangerous to try to repair any part of the air
bag system yourself. Be sure to tell anyone who
works on your vehicle that it has an air bag
system.
Do not attempt to modify any part of your air
bag system. The air bag may inflate accidentally
or may not function properly if modifications
are made. Take your vehicle to an authorized
dealer for any air bag system service. If your
seat, including your trim cover and cushion,
needs to be serviced in any way (including
removal or loosening/tightening of seat
attachment bolts), take the vehicle to an
authorized dealer. Only manufacturer approved
seat accessories may be used. If it is necessary
to modify the air bag system for persons with
disabilities, contact an authorized dealer.
WARNING!
23_GA_OM_EN_USC_t.book Page 157
Page 170 of 248

SAFETY
168
PERIODIC SAFETY CHECKS YOU SHOULD
M
AKE OUTSIDE THE VEHICLE
Tires
Examine tires for excessive tread wear and
uneven wear patterns. Check for stones, nails,
glass, or other objects lodged in the tread or
sidewall. Inspect the tread for cuts and cracks.
Inspect sidewalls for cuts, cracks, and bulges.
Check the wheel nuts for tightness. Check the
tires (including spare) for proper cold inflation
pressure.
Lights
Have someone observe the operation of brake
lights and exterior lights while you work the
controls. Check turn signal and high beam
indicator lights on the instrument panel.
Door Latches
Check for proper closing, latching, and locking.
Fluid Leaks
Check area under the vehicle after overnight
parking for fuel, coolant, oil, or other fluid leaks.
Also, if gasoline fumes are detected or if fuel or
brake fluid leaks are suspected the cause should
be located and corrected immediately.
EXHAUST GAS
The best protection against carbon monoxide
entry into the vehicle body is a properly
maintained engine exhaust system.
Whenever a change is noticed in the sound of the
exhaust system, when exhaust fumes can be
detected inside the vehicle, or when the
underside or rear of the vehicle is damaged, have
an authorized dealer inspect the complete
exhaust system and adjacent body areas for
broken, damaged, deteriorated, or mispositioned
parts. Open seams or loose connections could permit exhaust fumes to seep into the passenger
compartment. In addition, inspect the exhaust
system each time the vehicle is raised for
lubrication or oil change. Replace as required.
CARBON MONOXIDE WARNINGS
It is recommended to only use mild soap and
water to clean your floor mats. After cleaning,
always check your floor mat has been
properly installed and is secured to your
vehicle using the floor mat fasteners by
lightly pulling mat.
WARNING!
WARNING!
Exhaust gases can injure or kill. They contain
carbon monoxide (CO), which is colorless and
odorless. Breathing it can make you
unconscious and can eventually poison you. To
avoid breathing (CO), follow these safety tips:
Do not run the engine in a closed garage or in
confined areas any longer than needed to
move your vehicle in or out of the area.
If you are required to drive with the trunk/
liftgate/rear doors open, make sure that all
windows are closed and the climate control
BLOWER switch is set at high speed. DO NOT
use the recirculation mode.
If it is necessary to sit in a parked vehicle with
the engine running, adjust your heating or
cooling controls to force outside air into the
vehicle. Set the blower at high speed.
WARNING!
Carbon monoxide (CO) in exhaust gases is
deadly. Follow the precautions below to
prevent carbon monoxide poisoning:
Do not inhale exhaust gases. They contain
carbon monoxide, a colorless and odorless
gas, which can kill. Never run the engine in a
closed area, such as a garage, and never sit
in a parked vehicle with the engine running
for an extended period. If the vehicle is
stopped in an open area with the engine
running for more than a short period, adjust
the ventilation system to force fresh, outside
air into the vehicle.
Guard against carbon monoxide with proper
maintenance. Have the exhaust system
inspected every time the vehicle is raised.
Have any abnormal conditions repaired
promptly. Until repaired, drive with all side
windows fully open.
When exiting the vehicle, always make sure
the ignition is in the OFF position, remove the
key fob from the vehicle, and lock your
vehicle.
23_GA_OM_EN_USC_t.book Page 168
Page 171 of 248
169
Have a flat tire or a burnt-out bulb?
At times, a problem such as these may interfere
with your driving experience.
The section on emergencies can help you to deal
with critical situations independently.
HAZARD WARNING
FLASHERS
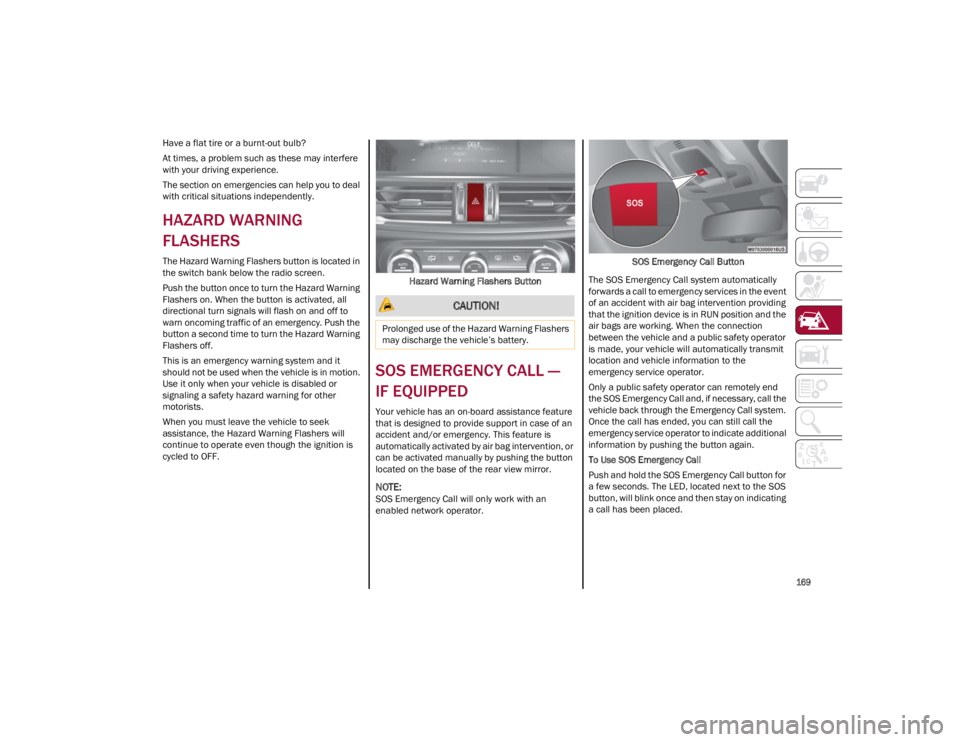
The Hazard Warning Flashers button is located in
the switch bank below the radio screen.
Push the button once to turn the Hazard Warning
Flashers on. When the button is activated, all
directional turn signals will flash on and off to
warn oncoming traffic of an emergency. Push the
button a second time to turn the Hazard Warning
Flashers off.
This is an emergency warning system and it
should not be used when the vehicle is in motion.
Use it only when your vehicle is disabled or
signaling a safety hazard warning for other
motorists.
When you must leave the vehicle to seek
assistance, the Hazard Warning Flashers will
continue to operate even though the ignition is
cycled to OFF.Hazard Warning Flashers Button
SOS EMERGENCY CALL —
IF EQUIPPED
Your vehicle has an on-board assistance feature
that is designed to provide support in case of an
accident and/or emergency. This feature is
automatically activated by air bag intervention, or
can be activated manually by pushing the button
located on the base of the rear view mirror.
NOTE:
SOS Emergency Call will only work with an
enabled network operator. SOS Emergency Call Button
The SOS Emergency Call system automatically
forwards a call to emergency services in the event
of an accident with air bag intervention providing
that the ignition device is in RUN position and the
air bags are working. When the connection
between the vehicle and a public safety operator
is made, your vehicle will automatically transmit
location and vehicle information to the
emergency service operator.
Only a public safety operator can remotely end
the SOS Emergency Call and, if necessary, call the
vehicle back through the Emergency Call system.
Once the call has ended, you can still call the
emergency service operator to indicate additional
information by pushing the button again.
To Use SOS Emergency Call
Push and hold the SOS Emergency Call button for
a few seconds. The LED, located next to the SOS
button, will blink once and then stay on indicating
a call has been placed.
CAUTION!
Prolonged use of the Hazard Warning Flashers
may discharge the vehicle’s battery.
23_GA_OM_EN_USC_t.book Page 169