weight ALFA ROMEO GIULIA 2023 Owners Manual
[x] Cancel search | Manufacturer: ALFA ROMEO, Model Year: 2023, Model line: GIULIA, Model: ALFA ROMEO GIULIA 2023Pages: 248, PDF Size: 9.62 MB
Page 14 of 248
12
ENGINE COMPARTMENT....................... 187
Checking Levels — 2.0L Engine .......... 187
Checking Levels — 2.9L Engine .........188
Engine Oil ............................................. 188
Engine Coolant ..................................... 189
Washer Fluid For Windshield/
Headlights ............................................ 189 Brake Fluid ...........................................190
Automatic Transmission Activation
System Oil ............................................ 190 Useful Advice For Extending The Life
Of Your Battery ..................................... 190 Battery ..................................................190
Pressure Washing ................................ 191
BATTERY RECHARGING......................... 191
Important Notes ...................................191
VEHICLE MAINTENANCE ....................... 192
Engine Oil ............................................. 192
Engine Oil Filter ....................................192
Engine Air Cleaner ............................... 192
Air Conditioning System
Maintenance ........................................192 Lubricating Moving Parts Of The
Bodywork ..............................................193 Windshield Wiper .................................193
Exhaust System ...................................194
Engine Cooling System ........................ 195
Braking System ....................................196
Automatic Transmission ......................196
Replacing The Battery ......................... 196
Fuses ................................................... 197
Bulb Replacement ............................... 202
TIRES ..................................................... 206
Tire Safety Information ....................... 206
Tires — General Information .............. 212
Spare Tires — If Equipped .................. 216
Wheel And Wheel Trim Care ............... 217
Tire Types ............................................. 217
Snow Traction Devices ........................ 218
Tire Rotation Recommendations........ 219
DEPARTMENT OF TRANSPORTATION
UNIFORM TIRE QUALITY GRADES ........ 219
Treadwear ............................................ 219
Traction Grades ................................... 220
Temperature Grades ........................... 220
STORING THE VEHICLE ......................... 220
BODYWORK ............................................ 221
Protection Against Atmospheric
Agents .................................................. 221 Corrosion Warranty.............................. 221
Preserving The Bodywork.................... 221
INTERIORS.............................................. 222
Seats And Fabric Parts........................ 222
Leather Seats ...................................... 222
Plastic And Coated Parts .................... 223
Alcantara Parts — If Equipped ............ 223
Genuine Leather Surfaces —
If Equipped ........................................... 223 Carbon Fiber Parts .............................. 223
TECHNICAL SPECIFICATIONS
VEHICLE IDENTIFICATION NUMBER
(VIN) ....................................................... 224
Vehicle Identification Number (VIN)
Plate ..................................................... 224
ENGINE .................................................. 224
POWER SUPPLY ..................................... 225 TRANSMISSION ..................................... 225BRAKES.................................................. 226
SUSPENSION ......................................... 226
STEERING SYSTEM ............................... 226DIMENSIONS — 2.0L ENGINE ............... 227
DIMENSIONS — 2.9L Engine ................ 228
WEIGHTS — 2.0L ENGINE ..................... 229
WEIGHTS — 2.9L ENGINE ..................... 229
FUEL REQUIREMENTS .......................... 230
Reformulated Gasoline....................... 230
Gasoline/Oxygenate Blends ............... 230
CNG And LP Fuel System
Modifications ....................................... 230 Methylcyclopentadienyl Manganese
Tricarbonyl (MMT) In Gasoline ........... 230 Materials Added To Fuel ..................... 230
Fuel System Cautions ......................... 231
FLUID CAPACITIES ................................. 231
2.0L Engine ......................................... 231
2.9L V6 Engine .................................... 232
ENGINE FLUIDS AND LUBRICANTS ...... 233
CHASSIS FLUIDS AND LUBRICANTS..... 234 PERFORMANCE — 2.0L ENGINE........... 235PERFORMANCE — 2.9L ENGINE........... 235
23_GA_OM_EN_USC_t.book Page 12
Page 127 of 248
125
Opening The Fuel Filler Door
To refuel proceed as follows:
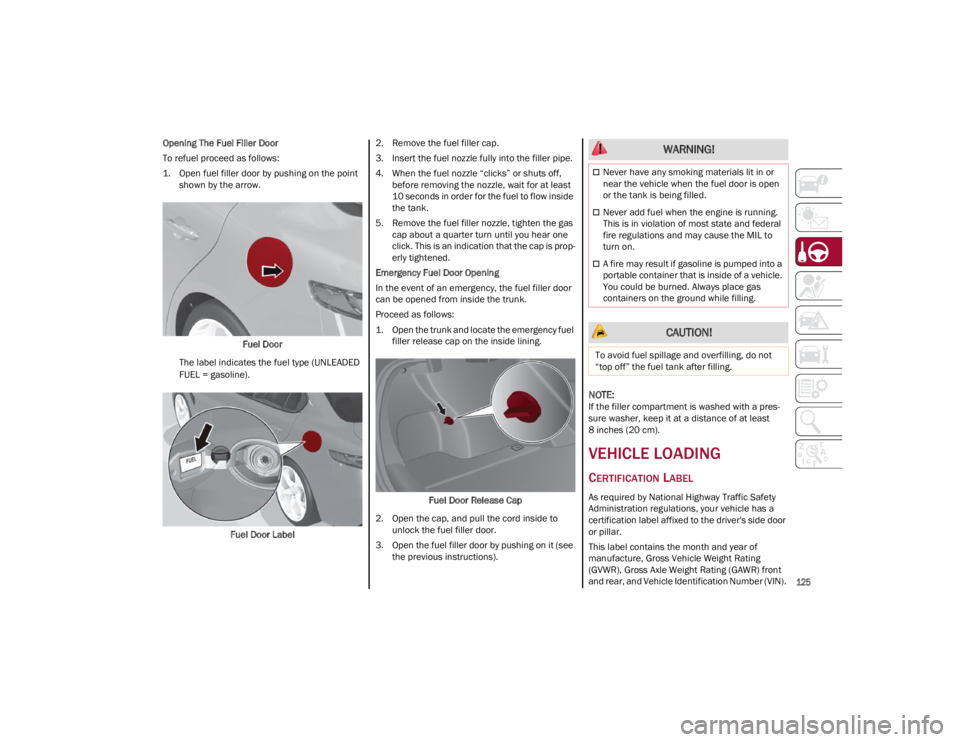
1. Open fuel filler door by pushing on the point shown by the arrow.
Fuel Door
The label indicates the fuel type (UNLEADED
FUEL = gasoline).
Fuel Door Label 2. Remove the fuel filler cap.
3. Insert the fuel nozzle fully into the filler pipe.
4. When the fuel nozzle “clicks” or shuts off,
before removing the nozzle, wait for at least
10 seconds in order for the fuel to flow inside
the tank.
5. Remove the fuel filler nozzle, tighten the gas cap about a quarter turn until you hear one
click. This is an indication that the cap is prop -
erly tightened.
Emergency Fuel Door Opening
In the event of an emergency, the fuel filler door
can be opened from inside the trunk.
Proceed as follows:
1. Open the trunk and locate the emergency fuel filler release cap on the inside lining.
Fuel Door Release Cap
2. Open the cap, and pull the cord inside to unlock the fuel filler door.
3. Open the fuel filler door by pushing on it (see the previous instructions).
NOTE:
If the filler compartment is washed with a pres -
sure washer, keep it at a distance of at least
8 inches (20 cm).
VEHICLE LOADING
CERTIFICATION LABEL
As required by National Highway Traffic Safety
Administration regulations, your vehicle has a
certification label affixed to the driver's side door
or pillar.
This label contains the month and year of
manufacture, Gross Vehicle Weight Rating
(GVWR), Gross Axle Weight Rating (GAWR) front
and rear, and Vehicle Identification Number (VIN).
WARNING!
Never have any smoking materials lit in or
near the vehicle when the fuel door is open
or the tank is being filled.
Never add fuel when the engine is running.
This is in violation of most state and federal
fire regulations and may cause the MIL to
turn on.
A fire may result if gasoline is pumped into a
portable container that is inside of a vehicle.
You could be burned. Always place gas
containers on the ground while filling.
CAUTION!
To avoid fuel spillage and overfilling, do not
“top off” the fuel tank after filling.
23_GA_OM_EN_USC_t.book Page 125
Page 128 of 248
STARTING AND OPERATING
126
A Month-Day-Hour (MDH) number is included on
this label and indicates the Month, Day and Hour
of manufacture. The bar code that appears on
the bottom of the label is your VIN.
Gross Vehicle Weight Rating (GVWR)
The GVWR is the total permissible weight of your
vehicle including driver, passengers, vehicle,
options and cargo. The label also specifies
maximum capacities of front and rear axle
systems (GAWR). Total load must be limited so
GVWR and front and rear GAWR are not
exceeded.
Payload
The payload of a vehicle is defined as the
allowable load weight a truck can carry, including
the weight of the driver, all passengers, options
and cargo.
Gross Axle Weight Rating (GAWR)
The GAWR is the maximum permissible load on
the front and rear axles. The load must be
distributed in the cargo area so that the GAWR of
each axle is not exceeded.
Each axle GAWR is determined by the
components in the system with the lowest load
carrying capacity (axle, springs, tires or wheels).
Heavier axles or suspension components
sometimes specified by purchasers for increased
durability do not necessarily increase the
vehicle's GVWR.
Tire Size
The tire size on the Vehicle Certification Label
represents the actual tire size on your vehicle.
Replacement tires must be equal to the load
capacity of this tire size.
Rim Size
This is the rim size that is appropriate for the tire
size listed.
Inflation Pressure
This is the cold tire inflation pressure for your
vehicle for all loading conditions up to full GAWR.
Curb Weight
The curb weight of a vehicle is defined as the total
weight of the vehicle with all fluids, including
vehicle fuel, at full capacity conditions, and with
no occupants or cargo loaded into the vehicle.
The front and rear curb weight values are
determined by weighing your vehicle on a
commercial scale before any occupants or cargo
are added.
Loading
The actual total weight and the weight of the front
and rear of your vehicle at the ground can best be
determined by weighing it when it is loaded and
ready for operation.
The entire vehicle should first be weighed on a
commercial scale to ensure that the GVWR has
not been exceeded. The weight on the front and
rear of the vehicle should then be determined
separately to be sure that the load is properly
distributed over the front and rear axle. Weighing
the vehicle may show that the GAWR of either the
front or rear axles has been exceeded but the
total load is within the specified GVWR. If so,
weight must be shifted from front to rear or rear
to front as appropriate until the specified weight
limitations are met. Store the heavier items down
low and be sure that the weight is distributed
equally. Stow all loose items securely before
driving.Improper weight distributions can have an
adverse effect on the way your vehicle steers and
handles and the way the brakes operate.
TRAILER TOWING
Trailer towing is not recommended for this
vehicle.
SUGGESTIONS FOR
DRIVING
SAVING FUEL
The following are some suggestions which may
help you save fuel and lower the amount of
harmful emissions released into the atmosphere.
Vehicle Maintenance
Checks and operations should be carried out in
accordance with the Maintenance Plan
Ú
page 182.
Tires
Check the tire pressures at least once every four
weeks: if the pressure is too low, consumption
levels increase as resistance to rolling is higher.
WARNING!
Do not load your vehicle any heavier than the
GVWR or the maximum front and rear GAWR. If
you do, parts on your vehicle can break, or it
can change the way your vehicle handles. This
could cause you to lose control. Overloading
can shorten the life of your vehicle.
23_GA_OM_EN_USC_t.book Page 126
Page 129 of 248
127
Unnecessary Loads
Do not travel with an overloaded trunk. The
weight of the vehicle and its arrangement greatly
affect fuel consumption and stability.
Electric Devices
Use electrical systems only for the amount of time
needed. The rear window defroster, additional
headlights, windshield wipers and heater blower
fan require a considerable amount of energy;
increasing the current uptake increases fuel
consumption (by up to +25% when city driving).
Climate Control System
Using the climate control system will increase
consumption: use standard ventilation when the
temperature outside permits.
Devices for Aerodynamic Control
The use of non-certified devices for aerodynamic
control may adversely affect air drag and
consumption levels.
DRIVING STYLE
Starting
Do not warm up the engine at low or high revs
when the vehicle is stationary; this causes the
engine to warm up more slowly, thereby
increasing fuel consumption and emissions. It is
therefore advisable to drive off immediately,
slowly, avoiding high speeds: by doing this the
engine will warm up more quickly.
Unnecessary Actions
Avoid revving up when starting at traffic lights or
before stopping the engine. This action is
unnecessary and causes increased fuel
consumption and pollution.Gear Selection
Use a high gear when traffic and road conditions
allow it. Using a low gear for faster acceleration
will increase fuel consumption. Improper use of a
high gear increases consumption, emissions and
engine wear.
Maximum Speed
Fuel consumption considerably increases as
speed increases. Maintain a constant speed,
avoiding unnecessary braking and acceleration,
which cost in terms of both fuel consumption and
emissions.
Acceleration
Accelerating violently severely affects
consumption and emissions: acceleration should
be gradual and should not exceed the maximum
torque.
CONDITIONS OF USE
Cold Starting
Short trips and frequent cold starts will not allow
the engine to reach optimum operating
temperature. This results in a significant increase
in consumption levels (from +15 to +30% in city
driving) and emissions.
Traffic And Road Conditions
High fuel consumption is caused by heavy traffic,
for instance when traveling in traffic with frequent
use of low gears or in cities with many traffic
lights. Winding mountain roads and rough road
surfaces also adversely affect consumption.
Stops In Traffic
During prolonged stops (e.g. railway crossings),
turn off the engine.
TRANSPORTING PASSENGERS
TRANSPORTING ANIMALS
The intervention of the airbags may be dangerous
for an animal on the front seat. It is therefore
advised to arrange animals on the rear seat
inside dedicated cages restrained by the
vehicle’s seat belts.
Keep in mind that, in the event of a sudden
braking or an accident, an inadequately
restrained animal may be projected within the
passenger compartment, risking injury to the
animal itself and the other occupants of the
vehicle.
WARNING!
It is extremely dangerous to leave children in
a parked vehicle when the temperature
outside is very high. The heat inside the
passenger compartment may have serious,
or even fatal, consequences.
Never travel in the trunk of the vehicle. In the
event of an accident, anyone inside the trunk
would be at greater risk of serious or even
fatal injury.
Ensure that all the occupants of the vehicle
wear their seat belts correctly and that any
children are positioned correctly on the
dedicated child restraint systems.
23_GA_OM_EN_USC_t.book Page 127
Page 160 of 248
SAFETY
158
To read data recorded by an EDR, special
equipment is required, and access to the vehicle
or the EDR is needed. In addition to the vehicle
manufacturer, other parties, such as law
enforcement, that have the special equipment,
can read the information if they have access to
the vehicle or the EDR.
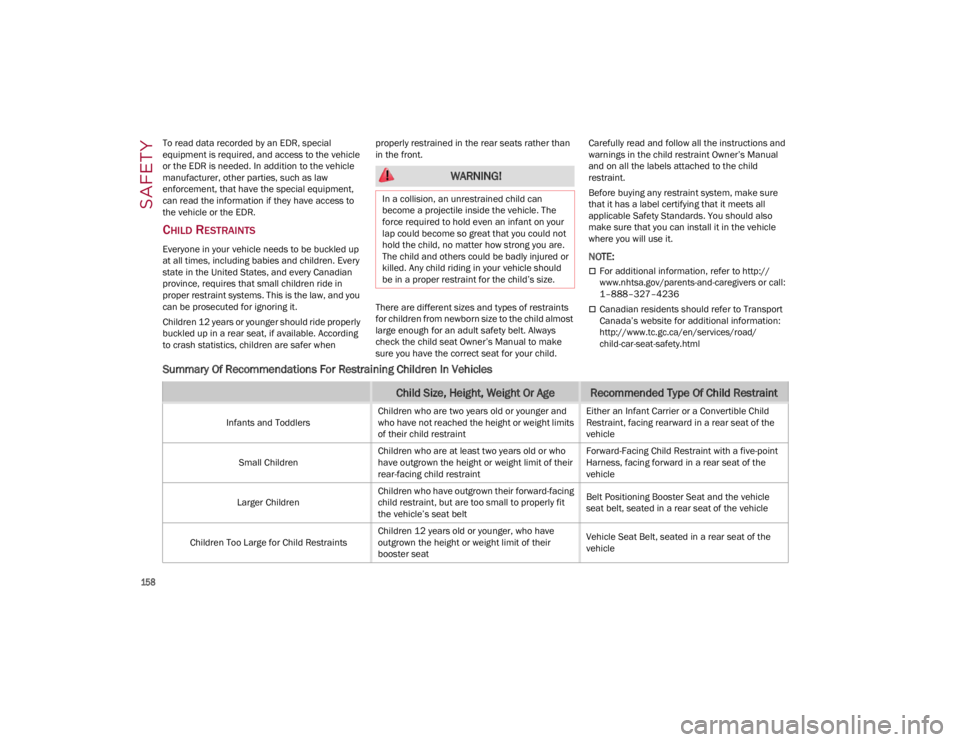
CHILD RESTRAINTS
Everyone in your vehicle needs to be buckled up
at all times, including babies and children. Every
state in the United States, and every Canadian
province, requires that small children ride in
proper restraint systems. This is the law, and you
can be prosecuted for ignoring it.
Children 12 years or younger should ride properly
buckled up in a rear seat, if available. According
to crash statistics, children are safer when
properly restrained in the rear seats rather than
in the front.
There are different sizes and types of restraints
for children from newborn size to the child almost
large enough for an adult safety belt. Always
check the child seat Owner’s Manual to make
sure you have the correct seat for your child. Carefully read and follow all the instructions and
warnings in the child restraint Owner’s Manual
and on all the labels attached to the child
restraint.
Before buying any restraint system, make sure
that it has a label certifying that it meets all
applicable Safety Standards. You should also
make sure that you can install it in the vehicle
where you will use it.
NOTE:
For additional information, refer to
http://
www.nhtsa.gov/parents-and-caregivers
or call:
1–888–327–4236
Canadian residents should refer to Transport
Canada’s website for additional information:
http://www.tc.gc.ca/en/services/road/
child-car-seat-safety.html
Summary Of Recommendations For Restraining Children In Vehicles
WARNING!
In a collision, an unrestrained child can
become a projectile inside the vehicle. The
force required to hold even an infant on your
lap could become so great that you could not
hold the child, no matter how strong you are.
The child and others could be badly injured or
killed. Any child riding in your vehicle should
be in a proper restraint for the child’s size.
Child Size, Height, Weight Or AgeRecommended Type Of Child Restraint
Infants and Toddlers Children who are two years old or younger and
who have not reached the height or weight limits
of their child restraint Either an Infant Carrier or a Convertible Child
Restraint, facing rearward in a rear seat of the
vehicle
Small Children Children who are at least two years old or who
have outgrown the height or weight limit of their
rear-facing child restraint Forward-Facing Child Restraint with a five-point
Harness, facing forward in a rear seat of the
vehicle
Larger Children Children who have outgrown their forward-facing
child restraint, but are too small to properly fit
the vehicle’s seat belt Belt Positioning Booster Seat and the vehicle
seat belt, seated in a rear seat of the vehicle
Children Too Large for Child Restraints Children 12 years old or younger, who have
outgrown the height or weight limit of their
booster seat Vehicle Seat Belt, seated in a rear seat of the
vehicle
23_GA_OM_EN_USC_t.book Page 158
Page 161 of 248
159
(Continued)
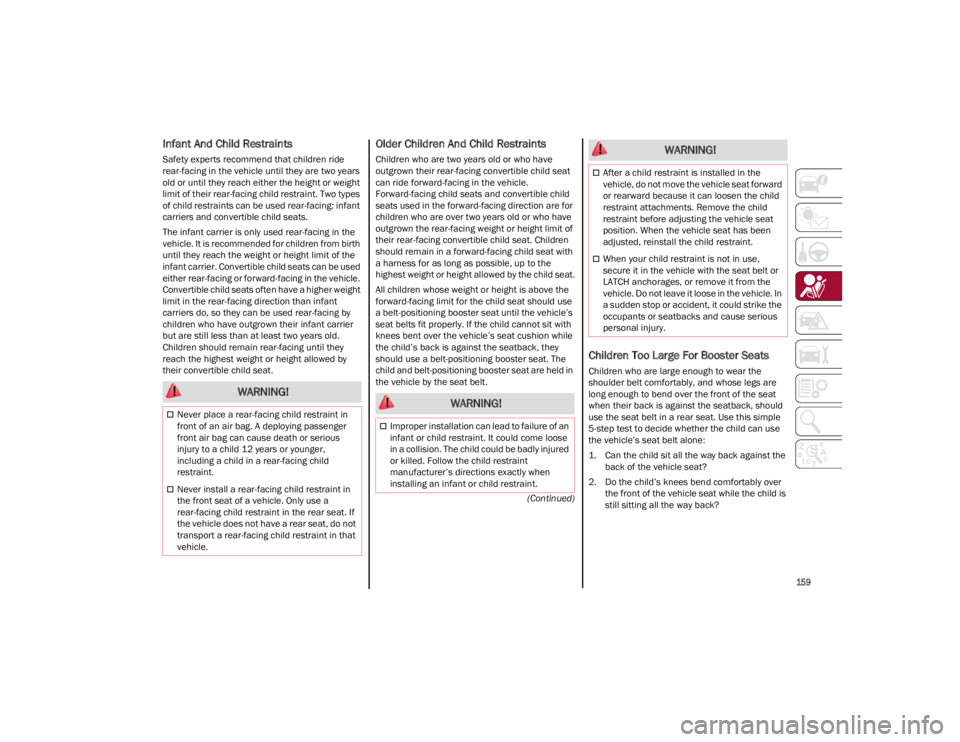
Infant And Child Restraints
Safety experts recommend that children ride
rear-facing in the vehicle until they are two years
old or until they reach either the height or weight
limit of their rear-facing child restraint. Two types
of child restraints can be used rear-facing: infant
carriers and convertible child seats.
The infant carrier is only used rear-facing in the
vehicle. It is recommended for children from birth
until they reach the weight or height limit of the
infant carrier. Convertible child seats can be used
either rear-facing or forward-facing in the vehicle.
Convertible child seats often have a higher weight
limit in the rear-facing direction than infant
carriers do, so they can be used rear-facing by
children who have outgrown their infant carrier
but are still less than at least two years old.
Children should remain rear-facing until they
reach the highest weight or height allowed by
their convertible child seat.
Older Children And Child Restraints
Children who are two years old or who have
outgrown their rear-facing convertible child seat
can ride forward-facing in the vehicle.
Forward-facing child seats and convertible child
seats used in the forward-facing direction are for
children who are over two years old or who have
outgrown the rear-facing weight or height limit of
their rear-facing convertible child seat. Children
should remain in a forward-facing child seat with
a harness for as long as possible, up to the
highest weight or height allowed by the child seat.
All children whose weight or height is above the
forward-facing limit for the child seat should use
a belt-positioning booster seat until the vehicle’s
seat belts fit properly. If the child cannot sit with
knees bent over the vehicle’s seat cushion while
the child’s back is against the seatback, they
should use a belt-positioning booster seat. The
child and belt-positioning booster seat are held in
the vehicle by the seat belt.
Children Too Large For Booster Seats
Children who are large enough to wear the
shoulder belt comfortably, and whose legs are
long enough to bend over the front of the seat
when their back is against the seatback, should
use the seat belt in a rear seat. Use this simple
5-step test to decide whether the child can use
the vehicle’s seat belt alone:
1. Can the child sit all the way back against the back of the vehicle seat?
2. Do the child’s knees bend comfortably over the front of the vehicle seat while the child is
still sitting all the way back?
WARNING!
Never place a rear-facing child restraint in
front of an air bag. A deploying passenger
front air bag can cause death or serious
injury to a child 12 years or younger,
including a child in a rear-facing child
restraint.
Never install a rear-facing child restraint in
the front seat of a vehicle. Only use a
rear-facing child restraint in the rear seat. If
the vehicle does not have a rear seat, do not
transport a rear-facing child restraint in that
vehicle.
WARNING!
Improper installation can lead to failure of an
infant or child restraint. It could come loose
in a collision. The child could be badly injured
or killed. Follow the child restraint
manufacturer’s directions exactly when
installing an infant or child restraint.
After a child restraint is installed in the
vehicle, do not move the vehicle seat forward
or rearward because it can loosen the child
restraint attachments. Remove the child
restraint before adjusting the vehicle seat
position. When the vehicle seat has been
adjusted, reinstall the child restraint.
When your child restraint is not in use,
secure it in the vehicle with the seat belt or
LATCH anchorages, or remove it from the
vehicle. Do not leave it loose in the vehicle. In
a sudden stop or accident, it could strike the
occupants or seatbacks and cause serious
personal injury.
WARNING!
23_GA_OM_EN_USC_t.book Page 159
Page 162 of 248
SAFETY
160
3. Does the shoulder belt cross the child’s
shoulder between the neck and arm?
4. Is the lap part of the belt as low as possible, touching the child’s thighs and not the
stomach?
5. Can the child stay seated like this for the whole trip? If the answer to any of these questions was “no”,
then the child still needs to use a booster seat in
this vehicle. If the child is using the lap/shoulder
belt, check seat belt fit periodically and make
sure the seat belt buckle is latched. A child’s
squirming or slouching can move the belt out of
position. If the shoulder belt contacts the face or
neck, move the child closer to the center of the
vehicle, or use a booster seat to position the seat
belt on the child correctly.
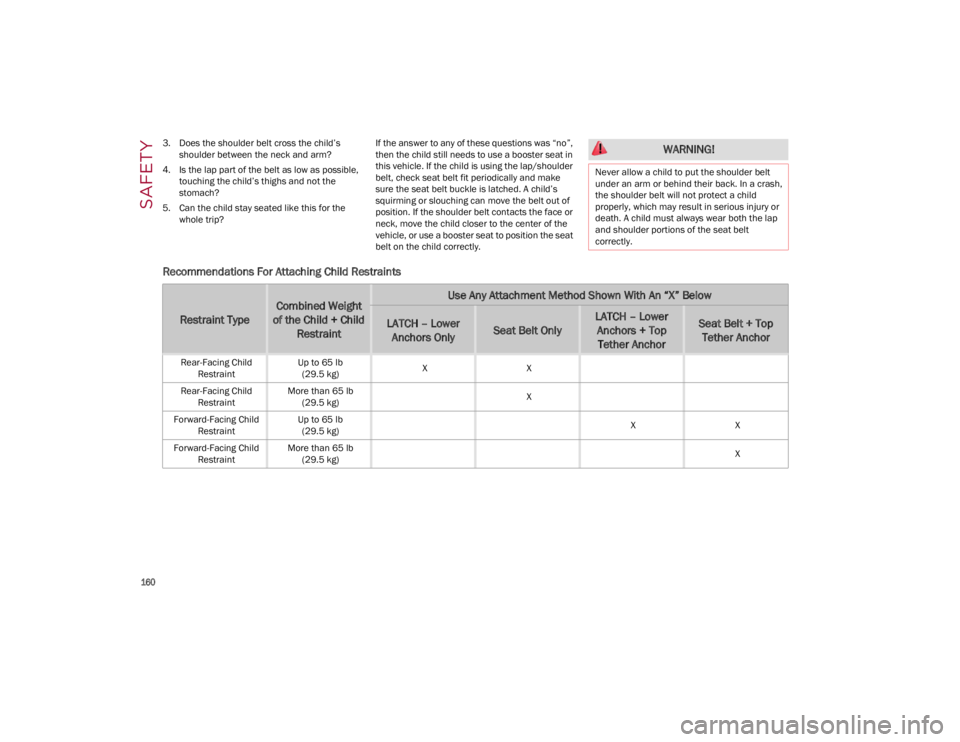
Recommendations For Attaching Child Restraints
WARNING!
Never allow a child to put the shoulder belt
under an arm or behind their back. In a crash,
the shoulder belt will not protect a child
properly, which may result in serious injury or
death. A child must always wear both the lap
and shoulder portions of the seat belt
correctly.
Restraint Type
Combined Weight
of the Child + Child RestraintUse Any Attachment Method Shown With An “X” Below
LATCH – Lower Anchors OnlySeat Belt Only
LATCH – Lower Anchors + Top Tether AnchorSeat Belt + Top Tether Anchor
Rear-Facing Child Restraint Up to 65 lb
(29.5 kg) X
X
Rear-Facing Child Restraint More than 65 lb
(29.5 kg) X
Forward-Facing Child Restraint Up to 65 lb
(29.5 kg) X
X
Forward-Facing Child Restraint More than 65 lb
(29.5 kg) X
23_GA_OM_EN_USC_t.book Page 160
Page 163 of 248
161
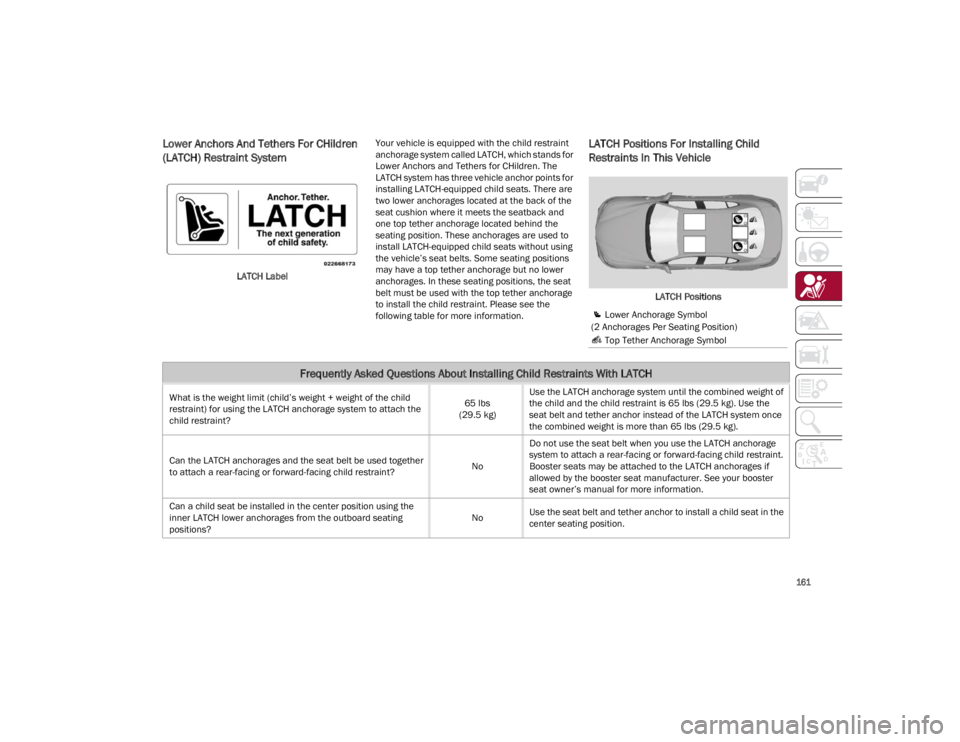
Lower Anchors And Tethers For CHildren
(LATCH) Restraint System
LATCH LabelYour vehicle is equipped with the child restraint
anchorage system called LATCH, which stands for
Lower Anchors and Tethers for CHildren. The
LATCH system has three vehicle anchor points for
installing LATCH-equipped child seats. There are
two lower anchorages located at the back of the
seat cushion where it meets the seatback and
one top tether anchorage located behind the
seating position. These anchorages are used to
install LATCH-equipped child seats without using
the vehicle’s seat belts. Some seating positions
may have a top tether anchorage but no lower
anchorages. In these seating positions, the seat
belt must be used with the top tether anchorage
to install the child restraint. Please see the
following table for more information.
LATCH Positions For Installing Child
Restraints In This Vehicle
LATCH Positions
Lower Anchorage Symbol
(2 Anchorages Per Seating Position)
Top Tether Anchorage Symbol
Frequently Asked Questions About Installing Child Restraints With LATCH
What is the weight limit (child’s weight + weight of the child
restraint) for using the LATCH anchorage system to attach the
child restraint? 65 lbs
(29.5 kg) Use the LATCH anchorage system until the combined weight of
the child and the child restraint is 65 lbs (29.5 kg). Use the
seat belt and tether anchor instead of the LATCH system once
the combined weight is more than 65 lbs (29.5 kg).
Can the LATCH anchorages and the seat belt be used together
to attach a rear-facing or forward-facing child restraint? NoDo not use the seat belt when you use the LATCH anchorage
system to attach a rear-facing or forward-facing child restraint. Booster seats may be attached to the LATCH anchorages if
allowed by the booster seat manufacturer. See your booster
seat owner’s manual for more information.
Can a child seat be installed in the center position using the
inner LATCH lower anchorages from the outboard seating
positions? No
Use the seat belt and tether anchor to install a child seat in the
center seating position.
23_GA_OM_EN_USC_t.book Page 161
Page 166 of 248
SAFETY
164
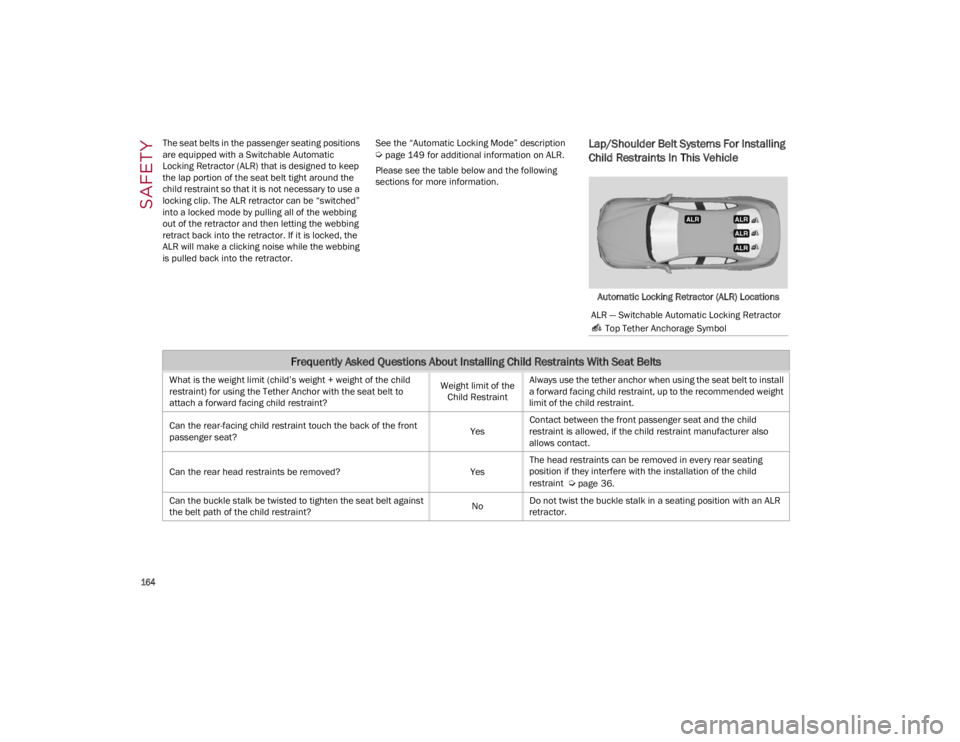
The seat belts in the passenger seating positions
are equipped with a Switchable Automatic
Locking Retractor (ALR) that is designed to keep
the lap portion of the seat belt tight around the
child restraint so that it is not necessary to use a
locking clip. The ALR retractor can be “switched”
into a locked mode by pulling all of the webbing
out of the retractor and then letting the webbing
retract back into the retractor. If it is locked, the
ALR will make a clicking noise while the webbing
is pulled back into the retractor.
See the “Automatic Locking Mode” description
Ú
page 149 for additional information on ALR.
Please see the table below and the following
sections for more information.Lap/Shoulder Belt Systems For Installing
Child Restraints In This Vehicle
Automatic Locking Retractor (ALR) Locations
ALR — Switchable Automatic Locking Retractor Top Tether Anchorage Symbol
Frequently Asked Questions About Installing Child Restraints With Seat Belts
What is the weight limit (child’s weight + weight of the child
restraint) for using the Tether Anchor with the seat belt to
attach a forward facing child restraint? Weight limit of the
Child Restraint Always use the tether anchor when using the seat belt to install
a forward facing child restraint, up to the recommended weight
limit of the child restraint.
Can the rear-facing child restraint touch the back of the front
passenger seat? YesContact between the front passenger seat and the child
restraint is allowed, if the child restraint manufacturer also
allows contact.
Can the rear head restraints be removed? YesThe head restraints can be removed in every rear seating
position if they interfere with the installation of the child
restraint
Ú
page 36.
Can the buckle stalk be twisted to tighten the seat belt against
the belt path of the child restraint? NoDo not twist the buckle stalk in a seating position with an ALR
retractor.
23_GA_OM_EN_USC_t.book Page 164
Page 211 of 248
209
Tire Loading And Tire Pressure
NOTE:
The proper cold tire inflation pressure is listed on
the driver’s side B-pillar or the rear edge of the
driver's side door.
Check the inflation pressure of each tire,
including the spare tire (if equipped), at least
monthly and inflate to the recommended
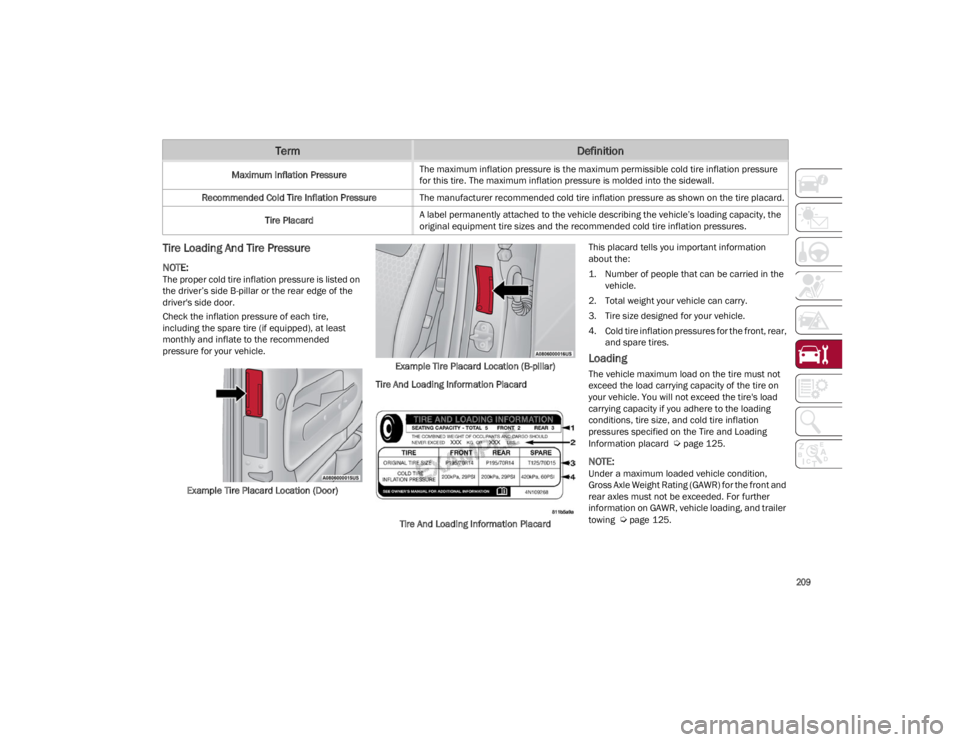
pressure for your vehicle.Example Tire Placard Location (Door) Example Tire Placard Location (B-pillar)
Tire And Loading Information Placard
Tire And Loading Information Placard This placard tells you important information
about the:
1. Number of people that can be carried in the
vehicle.
2. Total weight your vehicle can carry.
3. Tire size designed for your vehicle.
4. Cold tire inflation pressures for the front, rear, and spare tires.
Loading
The vehicle maximum load on the tire must not
exceed the load carrying capacity of the tire on
your vehicle. You will not exceed the tire's load
carrying capacity if you adhere to the loading
conditions, tire size, and cold tire inflation
pressures specified on the Tire and Loading
Information placard
Ú
page 125.
NOTE:
Under a maximum loaded vehicle condition,
Gross Axle Weight Rating (GAWR) for the front and
rear axles must not be exceeded. For further
information on GAWR, vehicle loading, and trailer
towing
Ú
page 125.
Maximum Inflation Pressure
The maximum inflation pressure is the maximum permissible cold tire inflation pressure
for this tire. The maximum inflation pressure is molded into the sidewall.
Recommended Cold Tire Inflation Pressure The manufacturer recommended cold tire inflation pressure as shown on the tire placard.
Tire Placard A label permanently attached to the vehicle describing the vehicle’s loading capacity, the
original equipment tire sizes and the recommended cold tire inflation pressures.
TermDefinition
23_GA_OM_EN_USC_t.book Page 209