steering wheel Alfa Romeo Giulietta 2015 Owner's Manual
[x] Cancel search | Manufacturer: ALFA ROMEO, Model Year: 2015, Model line: Giulietta, Model: Alfa Romeo Giulietta 2015Pages: 288, PDF Size: 7.34 MB
Page 11 of 288
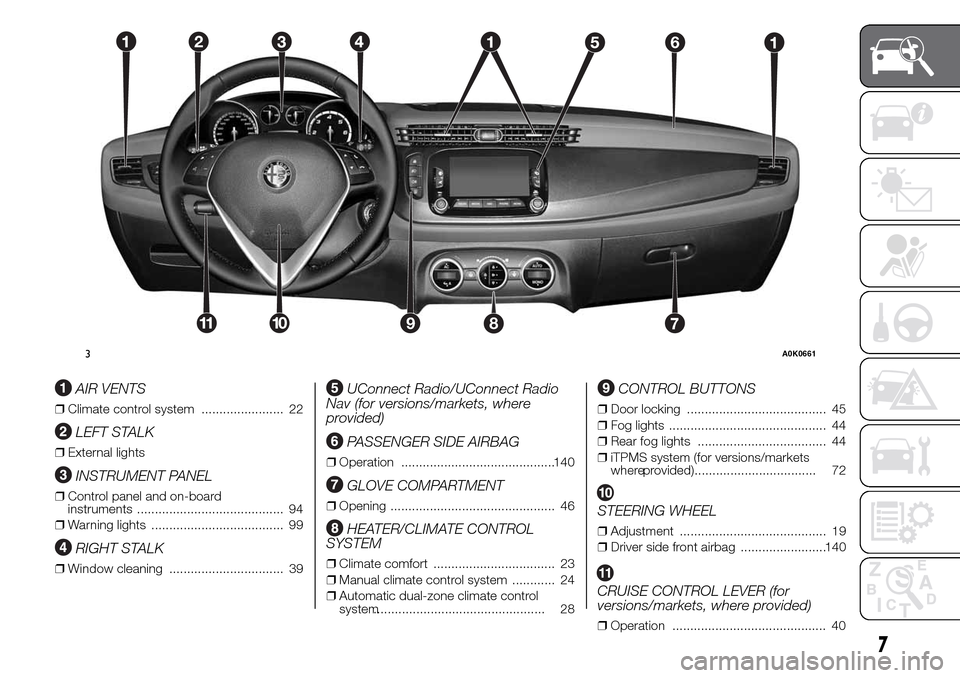
AIR VENTS
❒Climate control system ....................... 22
LEFT STALK
❒External lights
INSTRUMENT PANEL
❒Control panel and on-board
instruments ......................................... 94
❒Warning lights ..................................... 99
RIGHT STALK
❒Window cleaning ................................ 39
UConnect Radio/UConnect Radio
Nav (for versions/markets, where
provided)
PASSENGER SIDE AIRBAG
❒Operation ...........................................140
GLOVE COMPARTMENT
❒Opening .............................................. 46
HEATER/CLIMATE CONTROL
SYSTEM
❒Climate comfort .................................. 23
❒Manual climate control system ............ 24
❒Automatic dual-zone climate control
system................................................ 28
CONTROL BUTTONS
❒Door locking ....................................... 45
❒Fog lights ............................................ 44
❒Rear fog lights .................................... 44
❒iTPMS system (for versions/markets
whereprovided).................................. 72
STEERING WHEEL
❒Adjustment ......................................... 19
❒Driver side front airbag ........................140
126
7111089
3A0K0661
7
CRUISE CONTROL LEVER (for
versions/markets, where provided)
❒Operation ........................................... 40
Page 13 of 288
GETTING TO KNOW YOUR CAR
In-depth knowledge of your new car
starts here.
The booklet that you are reading simply
and directly explains how it is made
and how it works.
That’s why we advise you to read it
seated comfortably on board, so that
you can see what is described here for
yourself.SYMBOLS ...................................... 10
ALFA ROMEO CODE SYSTEM ....... 10
THE KEYS....................................... 11
ALARM ........................................... 14
IGNITION DEVICE ........................... 15
SEATS ............................................ 17
HEAD RESTRAINTS ........................ 18
STEERING WHEEL ......................... 19
REAR VIEW MIRRORS .................... 20
CLIMATE CONTROL ....................... 22
CLIMATIC COMFORT ..................... 23
MANUAL CLIMATE CONTROL........ 24
AUTOMATIC DUAL ZONE
CLIMATE CONTROL ....................... 28
EXTERNAL LIGHTS......................... 35
WINDOW CLEANING ...................... 38
CRUISE CONTROL ......................... 40
ROOF LIGHTS ................................ 42
CONTROLS .................................... 44
INTERIOR FITTINGS ....................... 46
ELECTRIC SUN ROOF .................... 49
DOORS ........................................... 51
ELECTRIC WINDOWS .................... 53
LUGGAGE COMPARTMENT ........... 56
BONNET ......................................... 59
ROOF RACK/SKI RACK .................. 60
HEADLIGHTS.................................. 61ESC SYSTEM ................................. 62
“ALFA DNA” SYSTEM (CAR
DYNAMIC CONTROL SYSTEM) ...... 66
START&STOP SYSTEM .................. 69
ITPMS (INDIRECT TYRE
PRESSURE MONITORING
SYSTEM) ........................................ 72
EOBD SYSTEM (EUROPEAN ON
BOARD DIAGNOSIS) ...................... 74
DUAL PINION ACTIVE STEERING... 74
WIRING FOR RADIO SYSTEM ........ 75
ACCESSORIES PURCHASED BY
THE OWNER .................................. 76
PARKING SENSORS....................... 77
REFUELLING THE CAR .................. 80
PROTECTING THE
ENVIRONMENT .............................. 81
9
Page 20 of 288
STEERING LOCK
Engagement
When the key is at STOP, remove the
key and turn the steering wheel until
it locks.
Disengagement
Move the steering wheel slightly and
turn the ignition key to MAR-ON.
4) 5)
WARNING
2) If the ignition device has been
tampered with (e.g. an attempted
theft), have it checked over by a
Alfa Romeo Dealership as soon as
possible.
3) When getting out of the car,
always remove the key to prevent
someone from accidentally
activating the controls.
Remember to engage the
handbrake. Engage 1
stgear if the
car is parked uphill or reverse if
the car is parked downhill. Never
leave children unattended in the
car.4) It is absolutely forbidden to carry
out any after-market operation
involving steering system or
steering column modifications
(e.g.: installation of anti-theft
device). This could badly affect
performance and safety,
invalidate the warranty and also
result in the non-compliance
of the car with approval
requirements.
5) Never remove the key while the
car is moving. The steering wheel
will lock as soon as it is turned.
This holds true for cars being
towed as well.
SEATS
FRONT SEATS
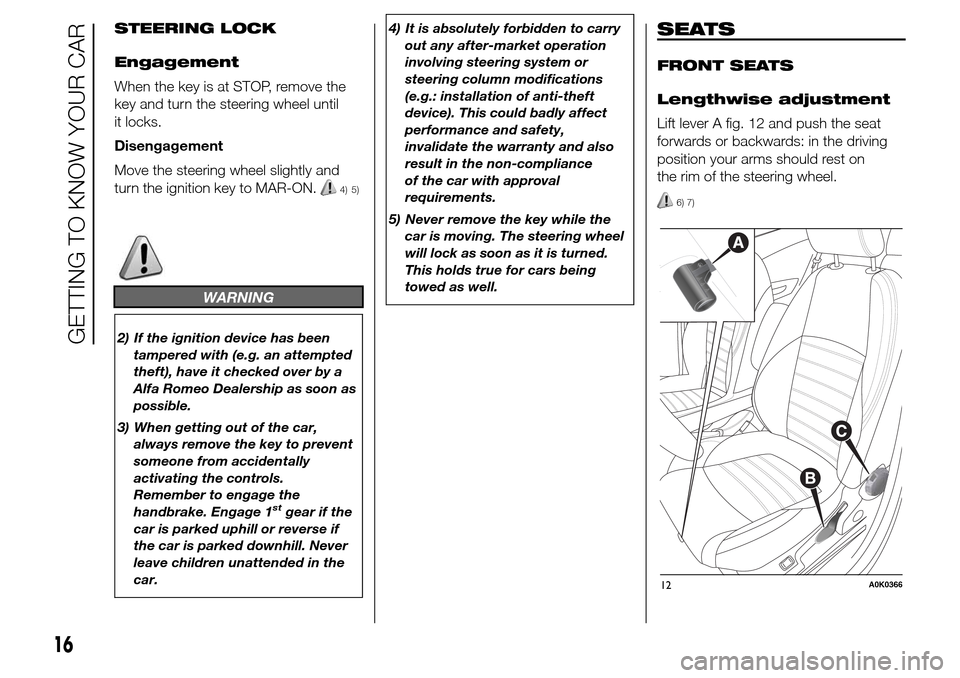
Lengthwise adjustment
Lift lever A fig. 12 and push the seat
forwards or backwards: in the driving
position your arms should rest on
the rim of the steering wheel.
6) 7)
12A0K0366
16
GETTING TO KNOW YOUR CAR
Page 23 of 288
“Anti-Whiplash” device
The head restraints are equipped with
an “Anti-Whiplash” device, which
reduces the distance between head
and head restraint in the event of a rear
impact, thus mitigating the “whiplash”
effect.
The head restraint may move when the
backrest is pressed by the occupant's
torso or hand: this behaviour is caused
by the system and should not be
considered a malfunction.
REAR
Two height-adjustable head restraints
are provided for the back seats (for the
adjustment see the previous
paragraph).
On some versions a head restraint is
also provided for the central seat.
Proceed as follows to remove the head
restraints:
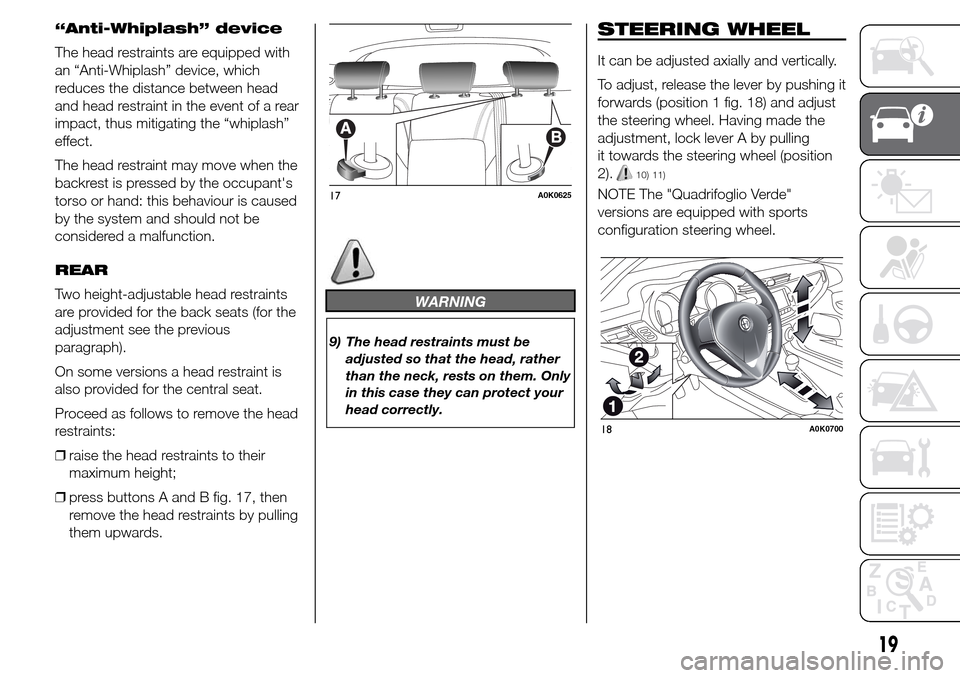
❒raise the head restraints to their
maximum height;
❒press buttons A and B fig. 17, then
remove the head restraints by pulling
them upwards.
WARNING
9) The head restraints must be
adjusted so that the head, rather
than the neck, rests on them. Only
in this case they can protect your
head correctly.
STEERING WHEEL
It can be adjusted axially and vertically.
To adjust, release the lever by pushing it
forwards (position 1 fig. 18) and adjust
the steering wheel. Having made the
adjustment, lock lever A by pulling
it towards the steering wheel (position
2).
10) 11)
NOTE The "Quadrifoglio Verde"
versions are equipped with sports
configuration steering wheel.17A0K0625
18A0K0700
19
Page 24 of 288
WARNING
10) Any adjustment of the steering
wheel position must be carried
out only with the car stationary
and the engine turned off.
11) It is absolutely forbidden to carry
out any after-market operation
involving steering system or
steering column modifications
(e.g. installation of anti-theft
device) that could adversely affect
performance and safety,
invalidate the warranty and also
result in the car not meeting
type-approval requirements.
REAR VIEW
MIRRORS
INTERNAL MIRROR
The rear view mirror has two different
positions: normal or anti-glare.
Adjustment
The mirror must be adjusted starting
from the normal position, with the lever
A fig. 19 towards the windscreen
(daytime use).
To prevent dazzling effects due to
following cars, the mirror can be moved
into the anti-glare position by moving
the lever A towards the back of the car.Electrochromic interior
mirror
(for versions/markets, where provided)
The electrochromic rear view mirror
fig. 20 comes with an adjustment
device to automatically prevent dazzling
effects due to following cars. This
function is set as default.
When reverse gear is engaged, the
mirror is automatically set for daytime
use.
When reverse gear is engaged, the
mirror is automatically set for daytime
use.
19A0K0549
20A0K0550
20
GETTING TO KNOW YOUR CAR
Page 41 of 288
MAIN BEAM HEADLIGHTS
To activate the main beam headlights,
with ring nut A fig. 31 at
, pull the
stalk towards the steering wheel
beyond the end of travel position. The
warning light switches on in the
instrument panel.
When the stalk is pulled towards the
steering wheel again, beyond the end
of travel position, the main beam
headlights deactivate, the dipped beam
headlights reactivate and the
warning light switches off.
It is not possible to switch on the main
beam headlights constantly if automatic
light control is active.
FLASHING
To do this, pull the stalk towards the
steering wheel (unstable position)
regardless of the position of ring nut A
fig. 31. The
warning light switches
on in the instrument panel.
REAR FOG LIGHTS
For the activation and deactivation of
the rear fog lights, refer to the
"Controls" section.DIRECTION INDICATORS
Bring the stalk to the (stable) position:
❒upwards: activates right direction
indicator;
❒downwards: activates left direction
indicator.
Warning light
orwill blink on the
instrument panel.
The direction indicators are switched off
automatically when the steering wheel
is straightened.
"Lane change" function
If you wish to signal a lane change,
place the left stalk in the unstable
position for less than half a second. The
direction indicator on the side selected
will flash five times and then switch
off automatically.
“FOLLOW ME HOME”
DEVICE
This device allows you to illuminate the
area in front of the car for a certain
amount of time.Activation
With the key turned to STOP or
removed, pull stalk A towards the
steering wheel within 2 minutes from
when the engine is turned off.
Each time the stalk is moved, the lights
stay on for an extra 30 seconds up to
a maximum of 210 seconds; then
the lights are switched off automatically.
Also, each time the stalk is operated,
the
warning light on the
instrument panel switches on. The
display shows the time set for the
function and the corresponding
graphics.
The warning light comes on when the
lever is operated and stays on until
the function is automatically
deactivated. Each movement of the
stalk only increases the amount of time
the lights stay on.
Deactivation
Keep the stalk pulled towards the
steering wheel for more than 2
seconds.
37
Page 43 of 288
AUTOrain sensor activation (for
versions/markets, where
provided) (the windscreen wipers
adapt the operating speed
automatically to suit the intensity
of the rain)
intermittent operation;
continuous slow operation;
continuous fast operation.
Move the stalk upwards (unstable
position) to limit operation to the time
for which the stalk is held in this
position. When released, the stalk will
return to its default position and the
wiper will be automatically stopped.
"Smart washing"
function
Pull the lever towards the steering
wheel (unstable position) to operate the
windscreen washer. Keep the stalk
pulled for more than half a second to
operate the windscreen washer jet and
wiper automatically with a single
movement.
The wiper stops working three strokes
after the stalk is released. A further
stroke after approximately 6 seconds
completes the cycle.RAIN SENSOR
(for versions/markets, where provided)
This is an infrared LED sensor fitted
on the car windscreen fig. 33.
It is able to detect the presence of rain
and consequently manage windscreen
wiping in accordance with the amount
of water on the windscreen.
Activation
The sensor is activated when ring nut A
fig. 32 is turned to “automatic” position
(“AUTO” control): the windscreen wiper
stroke frequency is thus adjusted in
accordance with the amount of water
on the windscreen.
This frequency can vary from no stroke
(no rain - windscreen dry) up to the
2
ndconstant speed operation (heavy
rain - windscreen wet).The sensitivity of the rain sensor can be
adjusted through the Setup menu
(see paragraph “Menu Items” in the
“Knowing the instrument panel”
section).
If the engine is stopped with the lever in
“automatic” position, when it is next
started no wiping cycle will take place
even if it is raining. This prevents
accidental activation of the rain sensor
when the engine is started (e.g. when
the windscreen is being washed by
hand or the wipers are stuck to the
windscreen when there is ice).
To restore automatic operation of the
rain sensor, turn the ring nut on the
right stalk A fig. 32 from automatic
position (AUTO) toOposition and then
turn A ring nut back to the AUTO
position.
When the rain sensor is reactivated
using any of the manoeuvres described
above, reactivation is indicated by a
single stroke of the windscreen wipers,
regardless of the condition of the
windscreen.
If the sensitivity is changed whilst the
rain sensor is operating, a windscreen
wiper stroke is carried out to confirm
the change.
33A0K0558
39
Page 66 of 288
ESC SYSTEM
IN BRIEF
The ESC system improves the
directional control and stability of the
car in various driving conditions.
The ESC system corrects the car’s
understeer and oversteer, distributing
the brake force on the appropriate
wheels. The torque supplied by
the engine can also be reduced in
order to maintain control of the car.
30) 31) 32) 33) 34)
The ESC system uses sensors installed
on the car to determine the trajectory
that the driver intends to follow and
compares it with the car’s effective
trajectory. When the real trajectory
deviates from the desired trajectory, the
ESC system intervenes to counter the
car’s understeer or oversteer.
❒Oversteer: occurs when the car is
turning more than it should according
to the angle of the steering wheel.
❒Understeer: occurs when the car is
turning less than it should according
to the angle of the steering wheel.The ESC system also includes the
following systems:
❒EBD
❒ABS
❒CBC
❒ASR
❒HILL HOLDER
❒HBA
❒MSR
❒DST
❒“ELECTRONIC Q2” (“E-Q2”)
❒"PRE-FILL" (RAB - Ready Alert
Brake)
SYSTEM ACTIVATION
The ESC system switches on
automatically when the engine is
started and cannot be switched off.
SYSTEM INTERVENTION
This is indicated by the flashing of the
warning light on the instrument
panel, to inform the driver that the car is
in critical stability and grip conditions.EBD SYSTEM
The EBD system is an integral part of
the ESC system and intervenes during
braking, distributing the brake force
optimally between front and rear
wheels.
This guarantees greater braking stability
for the car, preventing sudden locking
of the rear wheels and the consequent
instability of the car.
ABS
This system, which is an integral part of
the braking system, prevents one or
more wheels from locking and slipping
in all road surface conditions,
irrespective of the intensity of the
braking action, ensuring that the car
can be controlled even during
emergency braking and optimising
stopping distances.
The system intervenes when braking
and the wheels are about to lock,
typically in emergency braking or
low-grip conditions, when locking may
be more frequent.
The system also improves control and
stability of the car when braking on a
surface where the grip of the left and
right wheels varies, or on corners.
62
GETTING TO KNOW YOUR CAR
Page 68 of 288
IMPORTANT There may be situations
on small gradients (less than 8%),
with car laden, in which the Hill Holder
system may not activate, causing a
slight reversing motion and increasing
the risk of collision with another vehicle
or object. The driver is, in any case,
responsible for safe driving.
HBA (Hydraulic Brake
Assist) SYSTEM
45) 46) 47)
The HBA system is designed to
improve the car's braking capacity
during emergency braking. The system
detects emergency braking by
monitoring the speed and force with
which the brake pedal is pressed, and
consequently applies the optimal brake
pressure. This can reduce the braking
distance: the HBA system therefore
completes the ABS.
Maximum assistance from the HBA
system is obtained by pressing the
brake pedal very quickly. In addition,
the brake pedal should be pressed
continuously during braking, avoiding
intermittent presses, to get the most
out of the system.
Do not reduce pressure on the brake
pedal until braking is not necessary
anymore.The HBA system is deactivated when
the brake pedal is released.
MSR (Motor
Schleppmoment
Regelung) SYSTEM
This system is an integral part of the
ABS, that intervenes, if there is a
sudden downshifting, restoring torque
to the engine, thereby preventing
excessive drive at the drive wheels
which, especially in poor grip
conditions, could lead to a loss in
stability of the car.
DST SYSTEM (Dynamic
Steering Torque)
This function integrates Dual Pinion
active steering into the operation of
ESC. For particular manoeuvres, the
ESC system controls the steering
to actuate a steering torque and assist
the driver in the best possible way.
The system operates the brakes and
steering in a coordinated manner to
increase the suspension and safety
level of the car as a whole. The steering
provides additional torque on the
steering wheel.“ELECTRONIC Q2”
SYSTEM (“E-Q2”)
The "Electronic Q2" system intervenes
during acceleration on corners, braking
the inner drive wheel and thus
increasing the traction of the outer
wheel (which bears more of the car’s
weight): the torque is thus distributed
optimally between the drive wheels
in accordance with the driving
conditions and road surface, permitting
particularly effective, sporty driving.
"PRE-FILL" SYSTEM
(RAB - Ready Alert
Brake)
(only with 'Dynamic" mode activated)
This function activates automatically
if the accelerator pedal is released
rapidly, reducing the brake pad travel
(both at front and back), with the aim of
preparing the braking system and
enhancing its responsiveness, thus
reducing the stopping distance in the
event of subsequent braking.
64
GETTING TO KNOW YOUR CAR
Page 71 of 288
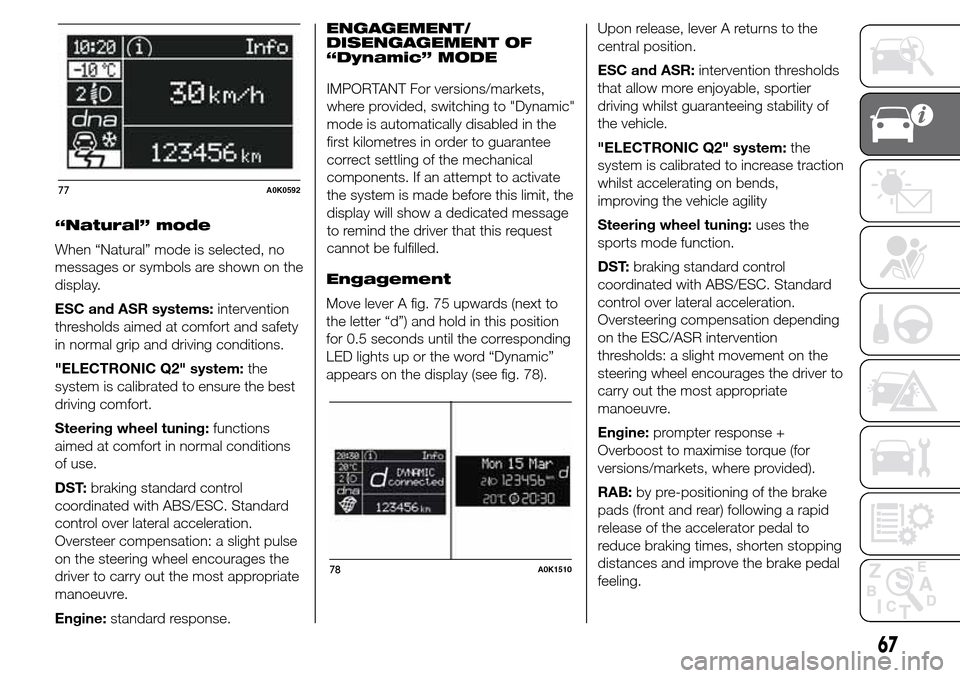
“Natural” mode
When “Natural” mode is selected, no
messages or symbols are shown on the
display.
ESC and ASR systems:intervention
thresholds aimed at comfort and safety
in normal grip and driving conditions.
"ELECTRONIC Q2" system:the
system is calibrated to ensure the best
driving comfort.
Steering wheel tuning:functions
aimed at comfort in normal conditions
of use.
DST:braking standard control
coordinated with ABS/ESC. Standard
control over lateral acceleration.
Oversteer compensation: a slight pulse
on the steering wheel encourages the
driver to carry out the most appropriate
manoeuvre.
Engine:standard response.ENGAGEMENT/
DISENGAGEMENT OF
“Dynamic” MODE
Engagement
Move lever A fig. 75 upwards (next to
the letter “d”) and hold in this position
for 0.5 seconds until the corresponding
LED lights up or the word “Dynamic”
appears on the display (see fig. 78).Upon release, lever A returns to the
central position.
ESC and ASR:intervention thresholds
that allow more enjoyable, sportier
driving whilst guaranteeing stability of
the vehicle.
"ELECTRONIC Q2" system:the
system is calibrated to increase traction
whilst accelerating on bends,
improving the vehicle agility
Steering wheel tuning:uses the
sports mode function.
DST:braking standard control
coordinated with ABS/ESC. Standard
control over lateral acceleration.
Oversteering compensation depending
on the ESC/ASR intervention
thresholds: a slight movement on the
steering wheel encourages the driver to
carry out the most appropriate
manoeuvre.
Engine:prompter response +
Overboost to maximise torque (for
versions/markets, where provided).
RAB:by pre-positioning of the brake
pads (front and rear) following a rapid
release of the accelerator pedal to
reduce braking times, shorten stopping
distances and improve the brake pedal
feeling.
77A0K0592
78A0K1510
67
IMPORTANT For versions/markets,
where provided, switching to "Dynamic"
mode is automatically disabled in the
first kilometres in order to guarantee
correct settling of the mechanical
components. If an attempt to activate
the system is made before this limit, the
display will show a dedicated message
to remind the driver that this request
cannot be fulfilled.