Alfa Romeo GT 2005 Owner handbook (in English)
Manufacturer: ALFA ROMEO, Model Year: 2005, Model line: GT, Model: Alfa Romeo GT 2005Pages: 307, PDF Size: 6.05 MB
Page 141 of 307

GETTING TO KNOW YOUR CAR
139fig. 133
A0A0112b
Unlocking the doors using the remote con-
trol, the roof light turns on gradually and tim-
ing is activated automatically for about 15
seconds. Locking the doors with the remote
control the roof light turns off gradually.
The lights are turned off moving the igni-
tion key to MAR(with the doors closed).
With switch (A) in the central position
(1), both lights are turned on when a door
is opened.
Pressing switch (A) to the left (position
0), the lights stay off (OFFposition).
Pressing switch (A) to the right (position
2) both lights stay on.
Switch (B) turns the lights on individually.
Pressing switch (B) to the left (position
0) the left light is turned on. Pressing the
switch to the right (position 2) the right light
is turned on.
With switch (B) in the central position (po-
sition1) the lights stay off.IMPORTANTTurning the ignition key to
STOP, turning the roof light on is only pos-
sible for 15 minutes; after which the system
turns it off to avoid draining the battery.
IMPORTANTBefore leaving the car,
make sure that both switches are in the cen-
tral position. By so doing, the roof lights will
turn off when the doors are closed. Forget-
ting a door open the lights will turn off au-
tomatically after a few seconds.COURTESY LIGHTS (fig. 133)
On the back of the driver’s or passenger’s
sun visor, opening the cover (A) the roof
lights turn on (B) at the side of the courtesy
mirror, with the ignition key at MAR. These
lights allow use of the courtesy mirror when
the light is poor.
IMPORTANTTurning the ignition key to
STOPthe lights can be activated only for
15 minutes: after which the system turns
them off to avoid draining the battery.
Page 142 of 307

GETTING TO KNOW YOUR CAR
140
REAR ROOF LIGHT (fig. 134)
IMPORTANTWhen a door is opened,
the roof light turns on and timing of about
3 minutes is activated automatically, after
which it goes off; closing the doors (within
the 3 minutes) a second timing of about 7
seconds is activated to allow vehicle start-
ing.
Unlocking the doors using the remote con-
trol, the roof light turns on gradually and tim-
ing is activated automatically for about 15
seconds. Locking the doors with the remote
control the roof light turns off gradually.
The light turns off in any case turning the
ignition key to MAR(with the door
closed).PUDDLE LIGHTS (fig. 135)
(for versions/markets where
applicable)
The light (A) housed in the doors turns on
when the associated door is opened, re-
gardless of the position of the ignition key.
fig. 134
A0A0633b
On the light there is a switch with three
positions.
When switch (A) is in the central posi-
tion (0) the light turns on automatically
when a door is opened.
Moving the switch to the right (position 1)
the light stays off.
Moving the switch to the left (position 2)
the light stays on.
IMPORTANTTurning the ignition key to
STOPthe roof light can be turned on for on-
ly 15 minutes; after which it is turned off to
avoid draining the battery.
IMPORTANTBefore leaving the car,
make sure that the switch (A) is in the cen-
tral position (0), so that the roof light turns
off when the doors are closed.
fig. 135
A0A0243b
Page 143 of 307

GETTING TO KNOW YOUR CAR
141
Do not use the ashtray as
waste paper basket: it
might set on fire in contact
with cigarette stubs.
Always ensure that the
cigar lighter has turned off.
The cigar lighter gets ex-
tremely hot. Handle with
care and prevent its use by
children: danger of fire and/or
burning.DETERRENT LED (fig. 136)
The led (A) on the instrument cluster
comes into operation when the doors are
locked (ignition key at STOPor removed)
and it remains in the “deterrence” condition,
flashing with a red light until the next time
the doors are unlocked.
IMPORTANTIf a door or the tailgate are
not closed perfectly, the deterrent led flash-
es at a higher frequency for 4 seconds and
then flashes at normal frequency again.FRONT ASHTRAY AND CIGAR
LIGHTER
(fig. 137)
To gain access to the ashtray and the cig-
ar lighter open the lid (A).
To use the cigar lighter, with the key at
MAR, press button (B); after a few sec-
onds the button will return automatically
to its initial position and the cigar lighter is
ready for use.
Remove the tray to empty and clean the
ashtray (C).
The position of the cigar lighter in relation
to the ashtray and viceversa, may vary de-
pending on the trim level.
fig. 136
A0A0005b
fig. 137
A0A0634b
Page 144 of 307

GETTING TO KNOW YOUR CAR
142
REAR ASHTRAYS (fig. 138)
For the rear passengers there are two con-
cealed ashtrays.
To use or remove pull in the direction of
the arrow.CARD HOLDER RECESS
AND GLASS HOLDER
(fig. 139)
(for versions/markets where
applicable)
The interior fittings are completed by the
removable card holder recess (A) and glass
holder (B) located on the centre of the dash-
board. To use them, press as shown.
fig. 138
A0A0115b
fig. 139
A0A0116b
ODDMENT POCKETS
ON FRONT DOORS
(fig. 140)
Each front door has an oddment pocket
(A).
fig. 140
A0A0117b
Page 145 of 307

GETTING TO KNOW YOUR CAR
143
CELL PHONE
PROVISION
The car may be fitted with a provision for
installing a cell phone.
The mobile phone provision consists of:
– radio + cell phone dual-purpose anten-
na;
– connection and supply cables with spe-
cific connector for connecting hands-free kit.
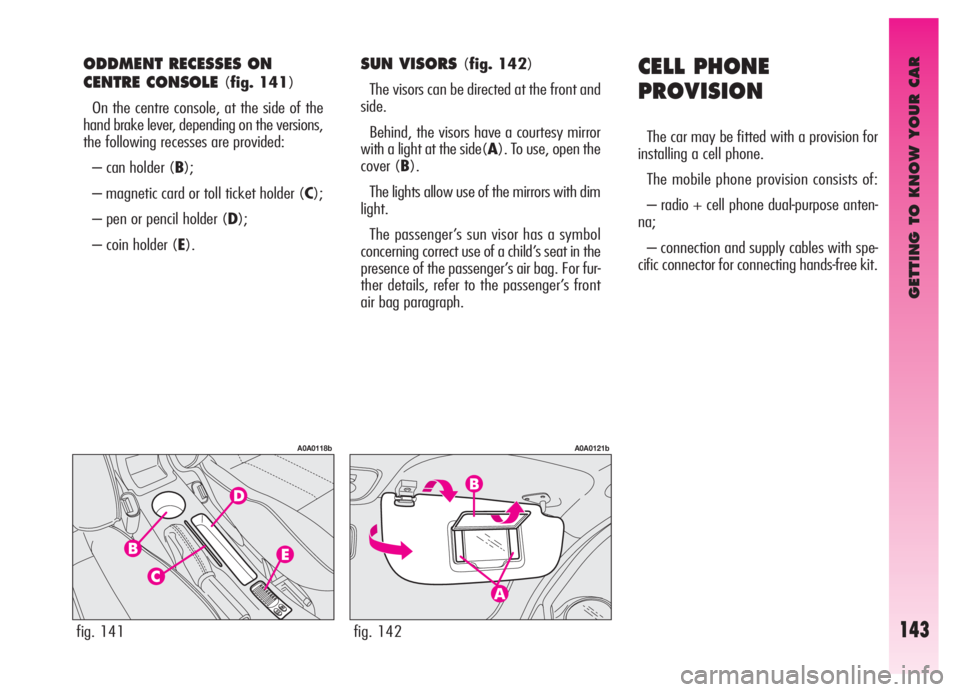
ODDMENT RECESSES ON
CENTRE CONSOLE
(fig. 141)
On the centre console, at the side of the
hand brake lever, depending on the versions,
the following recesses are provided:
– can holder (B);
– magnetic card or toll ticket holder (C);
– pen or pencil holder (D);
– coin holder (E).
SUN VISORS (fig. 142)
The visors can be directed at the front and
side.
Behind, the visors have a courtesy mirror
with a light at the side(A). To use, open the
cover (B).
The lights allow use of the mirrors with dim
light.
The passenger’s sun visor has a symbol
concerning correct use of a child’s seat in the
presence of the passenger’s air bag. For fur-
ther details, refer to the passenger’s front
air bag paragraph.
fig. 141
A0A0118b
fig. 142
A0A0121b
Page 146 of 307

GETTING TO KNOW YOUR CAR
144
For the installation of a
cell phone and connection
to the provision in the car,
contact only Alfa Romeo Autho-
rised Services; this will guarantee
first-rate results with no possibil-
ity of any inconvenience that may
compromise the safety of the ve-
hicle.
The voice kit should be
purchased by the customer
as it must be compatible
with the customer’s phone.RADIO TRANSMITTERS
AND CELLULAR
TELEPHONES
Radio transceiver equipment (e.g.: e-tacs
mobile phones, HAM radio systems and the
like) shall not be used inside the car unless
a separate aerial is mounted outside the car.
The use of these devices inside the pas-
senger compartment (without external aer-
ial) may cause electrical systems equipping
the car to malfunction. This could compro-
mise car safety in addition to constituting
a potential hazard for the passengers.
In addition, transmission and reception of
these devices may be affected by the shield-
ing effect of the car body.
As concerns the use of mobile phones
(GSM, GPRS, UMTS) provided with offi-
cial EC approval, strictly comply with the in-
structions given by the mobile phone man-
ufacturer.
ACCESSORIES
PURCHASED
BY THE OWNER
If after buying the car, you decide to install
electrical accessories that require a perma-
nent electric supply (alarm, voice feature,
radionavigator with satellite antitheft, etc.)
or accessories that in any case burden the
electric supply, contact Alfa Romeo Autho-
rised Services, whose qualified personnel,
besides suggesting the most suitable devices
belonging to Lineaccessori Alfa Romeo, will
also evaluate the overall electric absorption,
checking whether the vehicle electric system
is able to withstand the load required, or
whether it needs to be integrated with a
more powerful battery.
Page 147 of 307

GETTING TO KNOW YOUR CAR
145
OPENING FROM INSIDE
(fig. 143)
Tailgate is released electrically and this can
be performed only when the ignition key
is in position MARwith car at a standstill
or in STOPorPARKposition for 3 min-
utes without unlocking/locking one of the
doors.
To unlock the tailgate, press button (A)
on the centre console panel.
Tailgate raising is facilitated by the gas
shock springs.
OPENING WITH REMOTE
CONTROL
(fig. 144)
The tailgate can be opened by remote con-
trol from outside pressing the button (A),
also when the electronic alarm is engaged.
Opening of the tailgate is accompanied by
a double flash of the direction indicators;
closing is accompanied by a single flash.
If an electronic alarm is fitted, with the
opening of the tailgate, the alarm system
switches off volumetric protection and the
tailgate control sensor, the system “beeps”
twice (with the exception of certain mar-
kets).
Closing the tailgate again, the control func-
tions are restored, the system “beeps” twice
(with the exception of certain markets).
fig. 143
A0A0129b
LUGGAGE
COMPARTMENT
The tailgate can be opened:
from the outside of the car- by a
remote control impulse;
from the inside of the door- by de-
pressing the button (A-fig. 143).
IMPORTANTIf the boot is not proper-
ly shut, the
´warning light will come on
(on certain versions accompanied by the
message on the reconfigurable multifunction
display).
The gas springs are cali-
brated to ensure correct
tailgate raising with the
weights foreseen by the manufac-
turer. The arbitrary addition of
items (such spoilers, etc.) may
compromise the correct operation
and safety of the actual tailgate.
fig. 144
A0A0636b
Page 148 of 307

GETTING TO KNOW YOUR CAR
146
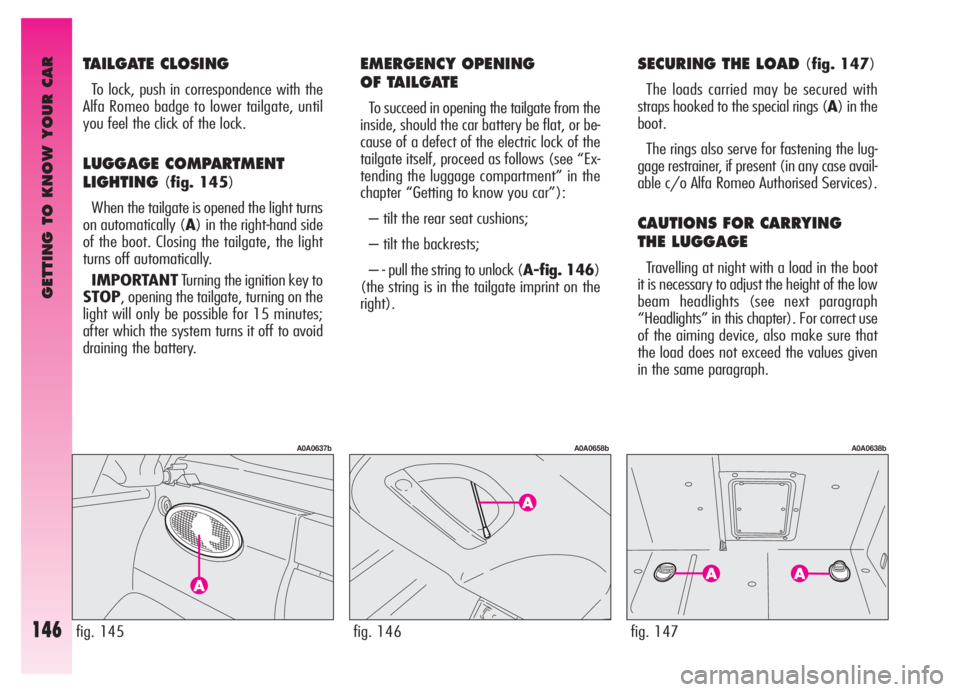
EMERGENCY OPENING
OF TAILGATE
To succeed in opening the tailgate from the
inside, should the car battery be flat, or be-
cause of a defect of the electric lock of the
tailgate itself, proceed as follows (see “Ex-
tending the luggage compartment” in the
chapter “Getting to know you car”):
– tilt the rear seat cushions;
– tilt the backrests;
– - pull the string to unlock (A-fig. 146)
(the string is in the tailgate imprint on the
right).
TAILGATE CLOSING
To lock, push in correspondence with the
Alfa Romeo badge to lower tailgate, until
you feel the click of the lock.
LUGGAGE COMPARTMENT
LIGHTING
(fig. 145)
When the tailgate is opened the light turns
on automatically (A) in the right-hand side
of the boot. Closing the tailgate, the light
turns off automatically.
IMPORTANTTurning the ignition key to
STOP, opening the tailgate, turning on the
light will only be possible for 15 minutes;
after which the system turns it off to avoid
draining the battery.
fig. 145
A0A0637b
fig. 146
A0A0658b
SECURING THE LOAD (fig. 147)
The loads carried may be secured with
straps hooked to the special rings (A) in the
boot.
The rings also serve for fastening the lug-
gage restrainer, if present (in any case avail-
able c/o Alfa Romeo Authorised Services).
CAUTIONS FOR CARRYING
THE LUGGAGE
Travelling at night with a load in the boot
it is necessary to adjust the height of the low
beam headlights (see next paragraph
“Headlights” in this chapter). For correct use
of the aiming device, also make sure that
the load does not exceed the values given
in the same paragraph.
fig. 147
A0A0638b
Page 149 of 307

GETTING TO KNOW YOUR CAR
147fig. 149
A0A0707b
Do this only with the car
stationary.
DANGER-SERIOUS IN-
JURY. When carrying out
checks or maintenance op-
erations in the engine compart-
ment, take special care not to bump
the head on the raised bonnet.
If checks are needed in
the engine compartment,
when it is still hot, do not
approach the fan: it might start
working also with the ignition key
removed. Wait for the engine to
cool down.
BONNET
The bonnet opening lever is under the left
end of the dashboard.
To open:
– pull the lever (A-fig. 148) until the
bonnet clicks open.
– press the safety lever (A-fig. 149)
upwards.
– raise the bonnet.
IMPORTANTBonnet raising is aided by
two gas springs. Do not tamper with these
springs and accompany the bonnet while
raising it.
fig. 148
A0A0135b
Do not load the boot
above the permitted max-
imum (see “Technical spec-
ifications”). Also make sure that
the objects contained in the boot
are well secured to prevent them
from being thrown forward, caus-
ing harm to the passengers.
A heavy load that has not
been secured may cause
serious harm to passen-
gers.
If you want to carry re-
serve fuel in a can, follow
legal regulations, only us-
ing a certified can, suitably fastened
to the load securing eyelets. Even
in this way the risk of fire is in-
creased in the case of an accident.
Page 150 of 307

GETTING TO KNOW YOUR CAR
148
Scarves, ties and other
loose clothing might be
pulled by moving parts.
For safety reasons the
bonnet shall always be
perfectly closed when trav-
elling. Always check for proper
bonnet locking. If the bonnet is left
inadvertently open, stop the car
immediately and close the bonnet.
To close:
– lower the bonnet until approx. 20 cm
from the engine compartment and then let
it drop, ensuring it is fully closed and not just
held in position by the safety catch.
If the bonnet does not close properly do
not push it down but open it again and re-
peat the above procedure.
HEADLIGHTS
The adjustment of the headlights is vital to
your safety and comfort and to that of oth-
er road users.
The adjustment of the headlights is also
governed by precise regulations.
Contact Alfa Romeo Authorised Services to
have the headlights correctly adjusted.
IMPORTANTThe headlight inner sur-
face may get slightly misted: this does not
mean it is faulty; it is a natural phenome-
non due to low temperature and the air hu-
midity level. Misting will disappear as soon
as the headlights are turned on. The pres-
ence of water drops inside the headlight in-
dicates water infiltration: contact Alfa Romeo
Authorised Services.
COMPENSATION FOR TILT
(fig. 150)
When the vehicle is loaded, the beam from
the headlights is raised due to the back-
wards tilt of the vehicle.
In this case the headlights must be ad-
justed correctly.
To do this, use the rocker button (A), on
the plate at the side of the steering column:
– press the arrow on the button (
A), to
increase by one position (e.g.:0
➟1➟2➟
3);
– press the arrow on the button (
S), this will low-
er by one position (e.g.:3
➟2➟1➟0);
The display (B) in the tachometer shows
the positions while adjustment is being ma
fig. 150
A0A0093b