boot Alfa Romeo GT 2005 Owner handbook (in English)
[x] Cancel search | Manufacturer: ALFA ROMEO, Model Year: 2005, Model line: GT, Model: Alfa Romeo GT 2005Pages: 307, PDF Size: 6.05 MB
Page 199 of 307

GETTING TO KNOW YOUR CAR
197
BOSE HI-FI
SOUND SYSTEM
(upon request for
versions/markets where
applicable)
The BOSE HI-FI system has been accurately
designed for
Alfa GT, to offer out-
standing sound quality and reproduce the
musical realism of a live concert, for all the
seats in the passenger compartment.
The system feature include outstandingly
faithful reproduction of crystalline treble
tones and full, rich basses which among oth-
er things, make the Loudness function su-
perfluous. In addition, the complete range
of the sounds is reproduced in the whole pas-
senger compartment enveloping the occu-
pants with the natural spatial sensation that
is felt when listening to live music.
The components adopted are patented and
are the result of the most sophisticated tech-
nology, but at the same time they are easy
and intuitive to use, so that even less expert
people can use the system.
fig. 163
A0A0642b
fig. 161
A0A0336b
fig. 162
A0A0337b
TECHNICAL INFORMATION
(fig. 161-162-163)
System comprises:
– four high efficiency woofers (A) with di-
ameter
165 mm, two at the front and two at the
back, each having a coaxial tweeter inside;– a bass box with a volume of 12 dm
3
(B) housed on the left-hand side of the
boot;
– a high power HI-FI amplifier (150W)
with 6 channels, analogue equalising in am-
plitude signal phase and with 130 mm di-
ameter sub-woofer.
Page 201 of 307

GETTING TO KNOW YOUR CAR
199
ENVIRONMENTAL
PROTECTION
The devices used to reduce petrol engine
emissions are:
– trivalent catalytic converter (catalytic si-
lencer);
– Lambda sensors;
– anti-evaporation system.
If one or more spark plugs are discon-
nected, do not run the engine, even for a
test.
The devices used to reduce diesel fuel en-
gine emissions are:
– oxidising catalyst;
– exhaust gas re-circulation system
(E. G. R.). Do not go near the fuel
filler with naked flames or
lit cigarettes: danger of
fire. Avoid going too near the fuel
filler with your face, to avoid in-
haling harmful vapours.
In the case of need, only
replace the fuel cap with
another genuine one, or the
efficiency of the fuel vapour re-
covery system could be adversely
affected.
Should it be not possible to open the fuel
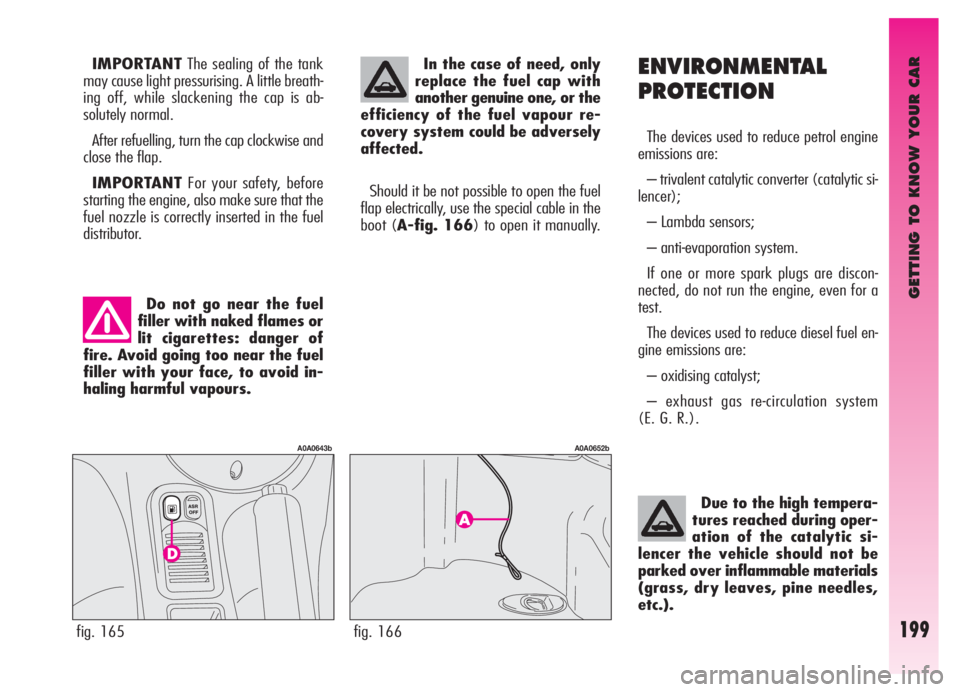
flap electrically, use the special cable in the
boot (A-fig. 166) to open it manually.
Due to the high tempera-
tures reached during oper-
ation of the catalytic si-
lencer the vehicle should not be
parked over inflammable materials
(grass, dry leaves, pine needles,
etc.).
fig. 165
A0A0643b
fig. 166
A0A0652b
IMPORTANTThe sealing of the tank
may cause light pressurising. A little breath-
ing off, while slackening the cap is ab-
solutely normal.
After refuelling, turn the cap clockwise and
close the flap.
IMPORTANTFor your safety, before
starting the engine, also make sure that the
fuel nozzle is correctly inserted in the fuel
distributor.
Page 205 of 307

Never leave children
unattended in the vehicle.
Always remove the igni-
tion key when leaving the vehicle
and take it with you.To avoid useless con-
sumption of power and
possible draining of the
battery, never leave the ignition
key in the MAR position when
the engine is not running.
CORRECT USE OF THE CAR
203
PARKING
When the vehicle is parked, proceed as
follows:
– Switch off the engine.
– Engage the handbrake.
– Engage first gear if the vehicle is faced
uphill or reverse if the vehicle is facing
downhill.
– Turn the front wheels so that the vehi-
cle will immediately come to a halt if the
handbrake slips.
REDUCING RUNNING
COSTS AND
ENVIRONMENT
POLLUTION
By following a few simple guidelines, it
is possible to save vehicle running costs
and reduce harmful emissions.
GENERAL CONSIDERATIONS
Vehicle maintenance
To take care of the car maintenance
have the checks and adjustments carried
out in accordance with the “Scheduled
Maintenance Programme”.
Tyres
Check the pressure of the tyres routinely
at an interval of no more than 4 weeks: if
the pressure is too low consumption levels
increase as resistance to rolling is higher.
Useless loads
Never travel with an overload in the
boot. The weight of the vehicle (especial-
ly in urban traffic), and its geometry heav-
ily affect consumption levels and stability.Electric services
Use electric devices only for the amount
of time needed. Rearscreen heating, addi-
tional headlights, windscreen wipers and
heater fan need a considerable amount of
energy, therefore increasing the require-
ment of current increases fuel consump-
tion (up to +25% in the urban cycle).
Climate control system
The climate control system is a further
load bearing heavily on the engine induc-
ing higher consumption levels(up to
+20% on average). Outside temperature
permitting, preferably use the air vents.
Aerodynamic items
The use of non-certified aerodynamic
items may adversely affect air drag and
consumption levels.
Page 218 of 307

IN AN EMERGENCY
216
– Using the wrench provided, tighten
the fastening bolts.
– Lower the car and remove the jack.
– Using the wrench provided, fully tight-
en the bolts in the sequence shown previ-
ously for the compact spare wheel fig. 8.
– Place the cap near the wheel so that
the inflation valve can come through the
slot provided on the cap.
– Press the circumference of the cap,
starting from the parts nearest to the infla-
tion valve until it is inserted completely.
IMPORTANTIncorrect fitting may
cause the wheel cap to come off when the
car is travelling.For versions with alloy rims:
– Tighten the pin (A-fig. 9) in one of
the fastening bolt holes on the wheel hub.
– Insert the wheel on the pin and, using
the wrench provided, tighten the four bolts
available. This is facilitated by the exten-
sion provided (B).
– Remove the pin (A-fig. 9) and tight-
en the last fastening bolt.
– Lower the car and remove the jack.
– Using the wrench provided, tighten
the bolts in the sequence shown previous-
ly for the compact spare wheel fig. 8.After refitting a wheel:
– stow the spare wheel in the space pro-
vided in the boot
– insert the jack in its container forcing
it lightly to prevent it from vibrating when
travelling
– place the tools used in the housings in
the container
– stow the container complete with tools
on the spare wheel and secure everything
with the clamping device (A-fig. 3)
– correctly re-position the stiff cover.
fig. 7
A0A0155b
fig. 8
A0A0156b
fig. 9
A0A0693b
Page 219 of 307

IN AN EMERGENCY
217
QUICK TYRE REPAIR
KIT FIX&GO automatic
The car is provided with the quick tyre re-
pair kit “FIX&GO automatic”, instead of the
traditional tool kit and space-saver spare
wheel.
The kit fig. 10, is placed in the boot. In
this container are also housed the screw-
driver and the tow hitch. The quick tyre repair kit includes:
– a bottle A-fig. 10containing the seal-
er, fitted with:
– filling pipe B
– sticker Cbearing the notice “max. 80
km/h”, to be placed in a position visible
to the driver (on the instrument panel) af-
ter fixing the tyre;
– compressor Dwith pressure gauge and
fittings;– instruction brochure fig. 11, to be used
for prompt and proper use of the quick re-
pair kit and to be then handed to the per-
sonnel charged with handling the tyre treat-
ed with the tyre repair kit;
– a pair of protection gloves located in the
side space of the compressor;
– adapters for inflating different elements.
fig. 10
A0A1095b
fig. 11
A0A1096b
Page 227 of 307

IN AN EMERGENCY
225
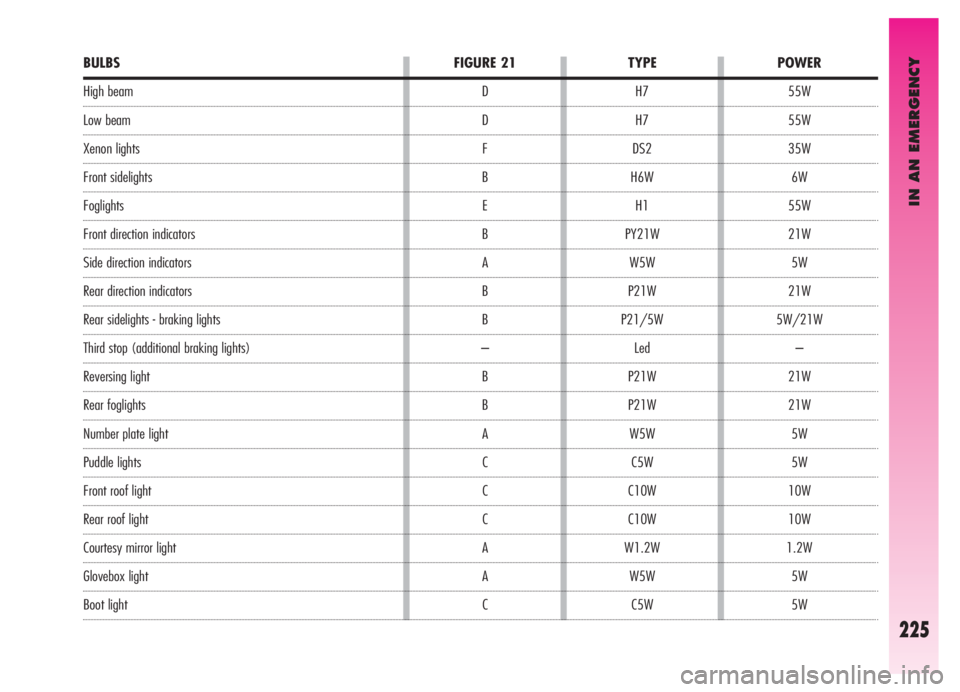
BULBS
High beam
Low beam
Xenon lights
Front sidelights
Foglights
Front direction indicators
Side direction indicators
Rear direction indicators
Rear sidelights - braking lights
Third stop (additional braking lights)
Reversing light
Rear foglights
Number plate light
Puddle lights
Front roof light
Rear roof light
Courtesy mirror light
Glovebox light
Boot lightFIGURE 21
D
D
F
B
E
B
A
B
B
–
B
B
A
C
C
C
A
A
CPOWER
55W
55W
35W
6W
55W
21W
5W
21W
5W/21W
–
21W
21W
5W
5W
10W
10W
1.2W
5W
5W TYPE
H7
H7
DS2
H6W
H1
PY21W
W5W
P21W
P21/5W
Led
P21W
P21W
W5W
C5W
C10W
C10W
W1.2W
W5W
C5W
Page 232 of 307

IN AN EMERGENCY
230
REVERSING LIGHT
AND REAR FOG GUARDS
(fig. 31-32)
The reversing light and rear fog guard are
in the tail light unit fastened to the tailgate;
they are to be found respectively one on the
right and the other on the left of the vehicle
facing forwards.
To change the bulb, proceed as follows:
– from the bumper lower side (fig. 31),
operate on the bulb holder (A-fig 32) turn-
ing it counter-clockwise and remove it. Take
care not to get burnt if the muffler is still hot;
fig. 31
A0A0627b
fig. 33
A0A0629b
– Remove the bulb pushing gently and
turning counter-clockwise;
– Replace the bulb, then refit the bulb
holder.
Anyway, you are advised to have this
operation carried out by Alfa Romeo
Authorised Services.REAR DIRECTION INDICATORS
AND REAR SIDELIGHTS-
BRAKING LIGHTS
(fig. 33-34)
The rear direction indicators and the side-
lights-braking lights are in the tail light
unit fastened to the body.
To change the bulb, proceed as follows:
– From inside the boot, open the com-
partment (A-fig. 33) and then the door
(B) through the tab (C);
– Turn the bulb for sidelight and braking
light counter-clockwise (D-fig. 34),
or the bulb for the direction indicator (E-
fig. 34) and remove it;
fig. 32
A0A0628b
Page 237 of 307

IN AN EMERGENCY
235
BOOT LIGHT (fig. 47-48)
To change the bulb, proceed as follows:
– Open the tailgate;
– Remove the light unit (A-fig. 47)
levering in the point shown by the arrow; – Refit the light unit inserting it in its cor-
rect position firstly on one end and then
on the other until it clicks into place.– Replace the bulb (B-fig. 48) releas-
ing it from the side contacts, making sure
that the new bulb is correctly clamped
between the contacts;
– Refit the light unit inserting it in its cor-
rect position firstly on one end and then
on the other until it clicks into place (C).
fig. 46
A0A0182b
fig. 47
A0A0648b
fig. 48
A0A0649b
Page 246 of 307

IN AN EMERGENCY
244
IF THE VEHICLE IS TO BE TOWED
The tow ring supplied with the vehicle is
housed in the tool box under the boot
mat.
To install the tow ring, proceed as fol-
lows:
– Take the tow ring from the tool box.
– Remove the cover (A) snap-fitted on
the front (fig. 55) or rear (fig. 56)
bumper. To do this, using the flat-bladed
screwdriver provided, protect the tip with
a soft cloth to avoid damaging the car.– Firmly screw the ring in its housing.
fig. 55 - front
A0A0650b
fig. 56 - rear
A0A0670b
Before tightening the
ring carefully clean the
threaded housing. Before
beginning to tow the car, make
sure that the ring is firmly tight-
ened in its threaded housing.
Before starting to tow,
turn the ignition key to
MAR and back to STOP,
again without removing it.
Removing the key automatically
engages the steering lock result-
ing in the impossibility to steer
the wheels. When towing
remember that without the help
of the engine brake and power
steering greater effort is required
on the pedal and steering wheel.
Do not use flexible cables for
towing and avoid jerks. During
towing operations make sure
that fastening the joint to the car
does not damage the components
in contact with it. When towing
the car, it is compulsory to follow
specific traffic regulations con-
cerning both the towing device
and behaviour on the road.
Page 250 of 307

VEHICLE MAINTENANCE
248
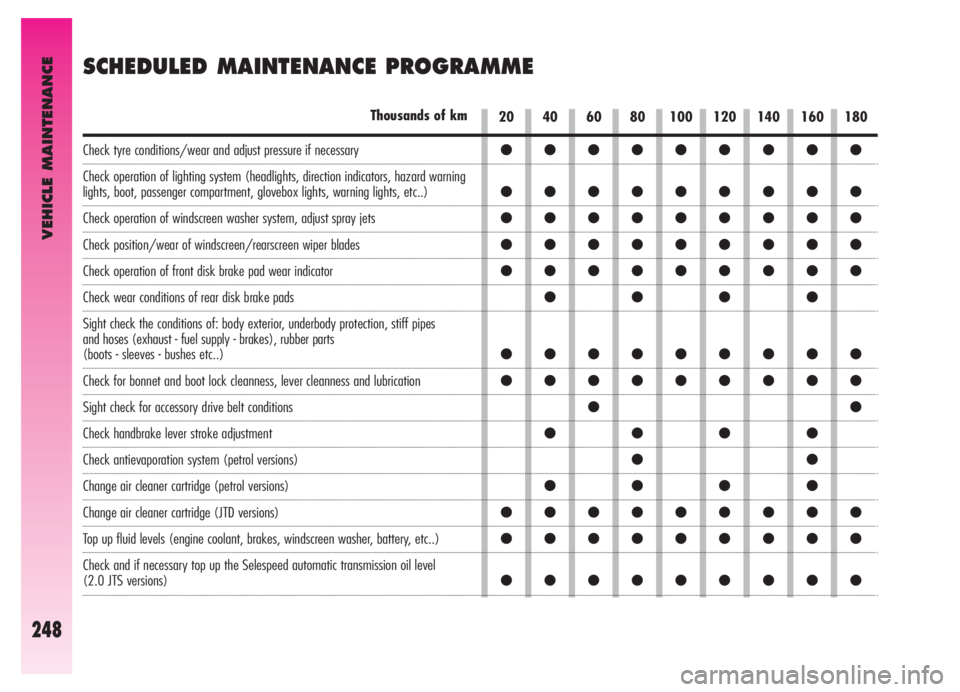
SCHEDULED MAINTENANCE PROGRAMME
20 40 60 80 100 120 140 160 180Thousands of km
Check tyre conditions/wear and adjust pressure if necessary
Check operation of lighting system (headlights, direction indicators, hazard warning
lights, boot, passenger compartment, glovebox lights, warning lights, etc..)
Check operation of windscreen washer system, adjust spray jets
Check position/wear of windscreen/rearscreen wiper blades
Check operation of front disk brake pad wear indicator
Check wear conditions of rear disk brake pads
Sight check the conditions of: body exterior, underbody protection, stiff pipes
and hoses (exhaust - fuel supply - brakes), rubber parts
(boots - sleeves - bushes etc..)
Check for bonnet and boot lock cleanness, lever cleanness and lubrication
Sight check for accessory drive belt conditions
Check handbrake lever stroke adjustment
Check antievaporation system (petrol versions)
Change air cleaner cartridge (petrol versions)
Change air cleaner cartridge (JTD versions)
Top up fluid levels (engine coolant, brakes, windscreen washer, battery, etc..)
Check and if necessary top up the Selespeed automatic transmission oil level
(2.0 JTS versions)
●●●●●●●●●
●●●●●●●●●
●●●●●●●●●
●●●●●●●●●
●●●●●●●●●
●●●●
●●●●●●●●●
●●●●●●●●●
●●
●●●●
●●
●●●●
●●●●●●●●●
●●●●●●●●●
●●●●●●●●●