headlights Alfa Romeo GT 2005 Owner handbook (in English)
[x] Cancel search | Manufacturer: ALFA ROMEO, Model Year: 2005, Model line: GT, Model: Alfa Romeo GT 2005Pages: 307, PDF Size: 6.05 MB
Page 228 of 307
IN AN EMERGENCY
226
IF AN EXTERIOR
LIGHT GOES OUT
XENON LIGHTS
Due to high voltage, the
bulb of (Xenon) gas-dis-
charge headlights must on-
ly be replaced by experts: danger
of death! Contact Alfa Romeo Au-
thorized Services.
HALOGEN HEADLIGHTSThe bulbs are arranged inside the light
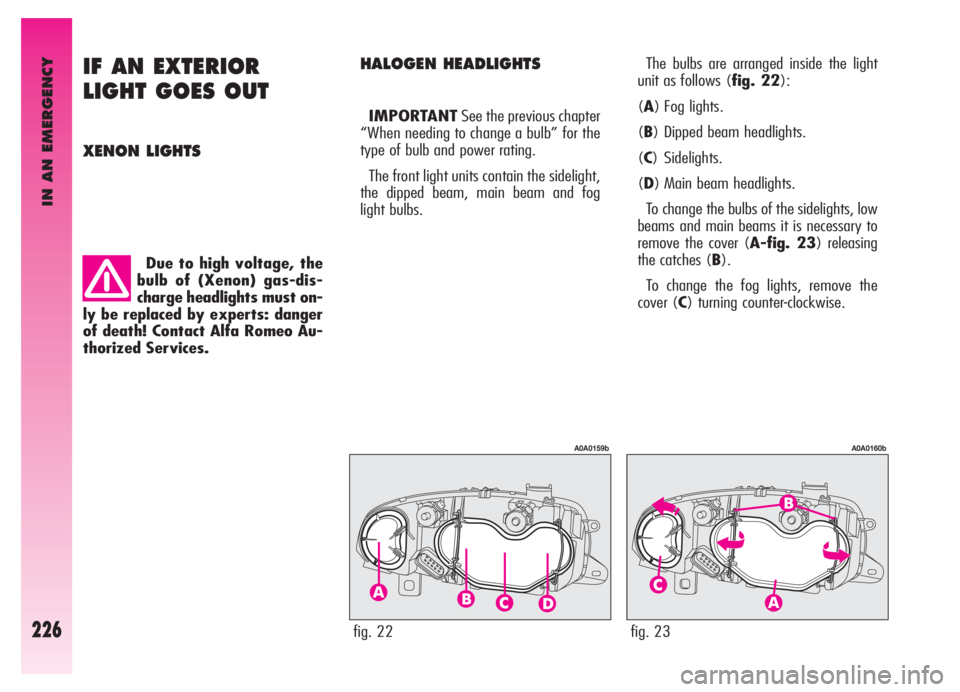
unit as follows (fig. 22):
(A) Fog lights.
(B) Dipped beam headlights.
(C) Sidelights.
(D) Main beam headlights.
To change the bulbs of the sidelights, low
beams and main beams it is necessary to
remove the cover (A-fig. 23) releasing
the catches (B).
To change the fog lights, remove the
cover (C) turning counter-clockwise. IMPORTANTSee the previous chapter
“When needing to change a bulb” for the
type of bulb and power rating.
The front light units contain the sidelight,
the dipped beam, main beam and fog
light bulbs.
fig. 22
A0A0159b
fig. 23
A0A0160b
Page 230 of 307

IN AN EMERGENCY
228
Dipped beam headlights
(fig. 25)
To change the bulb, proceed as follows:
– Remove the protective cover releasing
the catches.
– Disconnect the electric connector (A).
– Release the bulb catch (B).
– Remove the bulb and replace it.
– Fit a new bulb, making the tabs of the
metallic part coincide with the grooves on
the reflector, then hook the bulb holder
catch (B).
– Re-connect the electric connector (A).
– Refit the protective cover correctly.
fig. 25
A0A0162b
Main beam headlights
(fig. 27)
To change the bulb, proceed as follows:
– Remove the protective cover releasing
the catches.
– Disconnect the electric connector (A).
– Release the bulb catch (B).
– Remove the bulb and replace it.
– Fit a new bulb, making the tabs of the
metallic part coincide with the grooves on
the reflector, then hook the bulb holder
catch (B).
– Re-connect the electric connector (A).
– Refit the protective cover correctly.
fig. 27
A0A0164b
Front side lights(fig. 26)
To change the bulb, proceed as follows:
– Remove the protective cover releasing
the catches.
– Using the extension (A), integral with
the bulb holder (B), withdraw the bulb
holder itself which is snap-fitted.
– Remove the bulb (C), pushing gently
and turning counter-clockwise.
– Change the bulb and re-insert the bulb
holder making sure that it clicks into
place; also check that the bulb is in the
correct position looking at the lamp from
outside.
– Refit the protective cover correctly.
fig. 26
A0A0342b
Page 248 of 307

IN AN EMERGENCY
246
other crashes is high. Leave the car imme-
diately and go beyond the guard-rail.
– If doors are blocked, do not try to get
out of the car breaking the windscreen
which is stratified. The windows and rear
screen are easier to break.
– Remove the ignition key of the vehi-
cles involved.
– If you note a smell of fuel or other
chemical products, do not smoke and
have a cigarette stubbed out.
– To put out fires, even small ones, use
the extinguisher, blankets, sand, or earth.
Never use water.
– If use of the lighting system is not nec-
essary, disconnect the battery negative
terminal (–).IN THE EVENT
OF AN ACCIDENT
– It is important to keep calm.
– If you are not directly involved, stop at
least a few dozen metres away from the
accident.
– On motorways, stop without blocking
the emergency lane.
– Turn the engine off and the hazard
warning lights on.
– At night, illuminate the place of the
accident with the headlights.
– Take care, do not risk being run over.
– Signal the accident placing the trian-
gle at regulation distance in a clearly visi-
ble place.
– Call the emergency organisation, giv-
ing the most accurate information possi-
ble. On motorways use the special phones
provided.
– In motorways pileups, especially with
poor visibility, the risk of being involved in
IF PEOPLE ARE INJURED
– An injured person must never be aban-
doned. Helping is compulsory also for per-
sons not directly involved in the accident.
– Do not crowd around injured people.
– Reassure the injured person that help
is on the way, and stay near to overcome
any panic.
– Release or cut the seat belt restraining
injured persons.
– Do not give injured persons anything
to drink.
– An injured person should never be
moved except in the following circum-
stances.
– Remove an injured person from the
car only in danger of fire, sinking or
falling. When removing an injured person:
do not pull the limbs or bend the head and
keep the body as horizontal as possible.
FIRST AID KIT
In addition to the first-aid kit, it is also
wise to keep an extinguisher and a blan-
ket in the car.
Page 250 of 307
VEHICLE MAINTENANCE
248
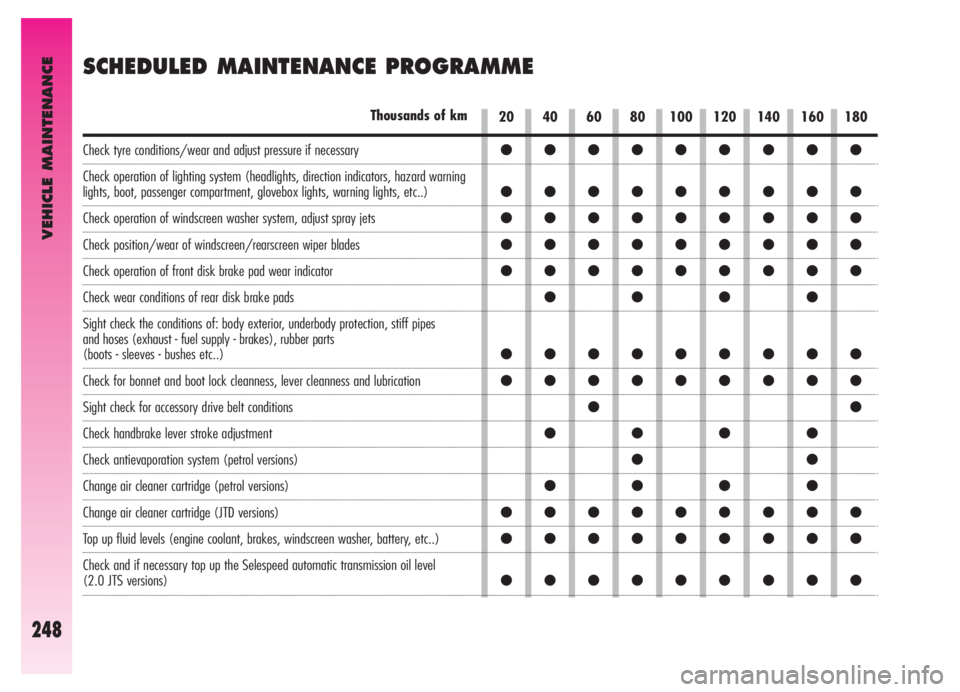
SCHEDULED MAINTENANCE PROGRAMME
20 40 60 80 100 120 140 160 180Thousands of km
Check tyre conditions/wear and adjust pressure if necessary
Check operation of lighting system (headlights, direction indicators, hazard warning
lights, boot, passenger compartment, glovebox lights, warning lights, etc..)
Check operation of windscreen washer system, adjust spray jets
Check position/wear of windscreen/rearscreen wiper blades
Check operation of front disk brake pad wear indicator
Check wear conditions of rear disk brake pads
Sight check the conditions of: body exterior, underbody protection, stiff pipes
and hoses (exhaust - fuel supply - brakes), rubber parts
(boots - sleeves - bushes etc..)
Check for bonnet and boot lock cleanness, lever cleanness and lubrication
Sight check for accessory drive belt conditions
Check handbrake lever stroke adjustment
Check antievaporation system (petrol versions)
Change air cleaner cartridge (petrol versions)
Change air cleaner cartridge (JTD versions)
Top up fluid levels (engine coolant, brakes, windscreen washer, battery, etc..)
Check and if necessary top up the Selespeed automatic transmission oil level
(2.0 JTS versions)
●●●●●●●●●
●●●●●●●●●
●●●●●●●●●
●●●●●●●●●
●●●●●●●●●
●●●●
●●●●●●●●●
●●●●●●●●●
●●
●●●●
●●
●●●●
●●●●●●●●●
●●●●●●●●●
●●●●●●●●●
Page 252 of 307
VEHICLE MAINTENANCE
250
ADDITIONAL
OPERATIONS
Every 1000 kmor before long jour-
neys, check and if necessary top up:
– engine coolant fluid level
– brake/hydraulic clutch control fluid
level
– power steering fluid level
– windscreen and headlamp washer
fluid level
– tyre pressure and conditions.
Every 3000 kmcheck and if necessary
top up the engine oil level.
The use of FL Seleniaproducts is rec-
ommended which have been designed
and made expressly for Alfa Romeo cars
(see “Refuelling” in the “Technical
Specifications” chapter).
ANNUAL INSPECTION
PROGRAMME
For cars with an annual mileage
of below 20,000 km (for exam-
ple about 10,000 km) the follow-
ing yearly inspection programme
is advised:
– Check tyre conditions/wear and if
necessary adjust the pressure (including
spare wheel)
– Check operation of lighting system
(headlights, direction indicators, hazard
warning lights, boot, passenger compart-
ment, glovebox lights, warning lights,
etc.)
– Check operation of windscreen wiper
system, spray jet adjustment
– Check position/wear of windscreen
– Check front disk brake pad conditions
and wear– Sight check for conditions of: engine,
gearbox, transmission, pipes (exhaust -
fuel supply - brakes), rubber parts (boots
- sleeves - bushes etc..), brake and fuel
supply system hoses
– Check for bonnet and boot lock clean-
ness, lever cleanness and lubrication
– Check battery charge
– Sight check for conditions of various
drive belts
– Check and if necessary top up fluid
levels (engine coolant, brakes, wind-
screen washer, battery etc. )
– Change engine oil and engine oil filter
– Change pollen filter.
Page 270 of 307
VEHICLE MAINTENANCE
268
Detergents cause water
pollution. Therefore the
vehicle should be washed
in areas equipped for collecting
and purifying the liquid used in
the washing process.Where possible, do not park under trees;
the resinous substances many species
release give the paint a dull appearance
and increase the possibility of triggering
the rust processes.
IMPORTANTBird droppings must be
washed off immediately and thoroughly
as the acid they contain is particularly
aggressive.
To correctly wash the car:
1) Remove the aerial from the roof to pre-
vent damage to it if the car is washed in
an automatic system.
2) Spray the vehicle with a low pressure
jet of water.
3) Pass a sponge moistened with a light
detergent solution, rinsing the sponge fre-
quently.
4) Rinse well with water and dry with a
jet of air or chamois leather.
When drying, take particular care with
the less visible parts like door surrounds,
bonnet and around the headlights where
water may stagnate. The vehicle should
not be taken to a closed area immediate-
ly, but left in the open so that residual
water can evaporate.
Do not wash the vehicle after it has been
left in the sun or with the bonnet hot: this
may alter the shine of the paintwork.
Exterior plastic parts must be cleaned in
the same way as the rest of the vehicle. ADVICE FOR PRESERVING
THE BODYWORK
Paint
The paintwork does not only serve an
aestethic purpose but also protects the
underlying sheet metal.
In the case of deep scrapes or scores,
you are advised to have the necessary
touching up carried out immediately to
avoid the formation fo rust.
Only original products should be used for
touching up paint (see “Body paint identi-
fication plate” in the “Technical
Specifications” chapter).
Normal paint maintenance consists in
washing at intervals depending on the
conditions and environment of use. For
example, in highly polluted areas, or if the
roads are sprayed with salt, it is wise to
wash the car more frequently.
Page 271 of 307
VEHICLE MAINTENANCE
269
Engine compartment
At the end of the winter the engine com-
partment should be carefully washed,
without directing the jet against electronic
control units. Contact a specialised work-
shop to have this done.
Detergents cause water
pollution. Therefore the en-
gine compartment should
be washed in areas equipped for
collecting and purifying the liquid
used in the washing process.
IMPORTANTThe vehicle should be
washed with the engine cold and the igni-
tion key at STOP. After washing make sure
that the various protections (e.g. rubber
caps and various covers) have not been
damaged or removed. Windows
Use specific products to clean the win-
dows. Use clean cloths to avoid scratching
or altering the transparency of the glass.
IMPORTANTThe inside of the
rearscreen should be wiped gently with a
cloth in the direction of the filaments to
avoid damaging the heating device.
Front headlights
IMPORTANTDo not use aromatic sub-
stances (e.g. petroleum) or ketones (e.g.
acetone) to clean the front headlight plas-
tic transparents.
Never use inflammable
products like fuel oil ether
or rectified petrol for
cleaning inside the car. The elec-
trostatic charges generated when
rubbing to clean may cause fire.
INTERIOR FITTINGS
Periodically check that water is not
trapped under the mats (due to water drip-
ping off shoes, umbrellas, etc.) which
could cause oxidisation on the sheet metal.
CLEANING SEATS AND FABRIC
AND VELVET PARTS
– Use a soft brush or a vacuum cleaner
to remove dust. Velvet is cleaned better if
the brush is moistened.
– Rub the seat with a sponge moistened
with a solution of water and neutral deter-
gent.
Page 295 of 307

INDEX
293
- refuelling ............................... 198
Fuel consumption ........................ 286
Fuel flap .................................... 198
Fuses ........................................ 236
Gearbox lever ............................ 127
Getting to know your car.... 6
Glass holder ......................... 141-142
Glove compartment ..................... 138
Glove compartment light
- changing bulbs ....................... 234
Handbrake ................................ 126
Hazard warning lights .................. 124
Headlamp beam adjustment ......... 148
Headlight washers ................ 49-267
Headlights
- adjustment abroad .................. 148
- beam adjustment .................... 148
- changing bulbs ................. 221-224
- compensation for tilt ......... 148-149
Headrests (front/rear) .......... 18-21Horn ......................................... 52
Hoses ........................................ 265
Ignition device ............................ 14
Ignition switch and steering lock 14-15
In an emergency..................... 210
In the event of an accident ........... 246
Inertial fuel cut off switch ............. 125
Instrument cluster ................. 53-54
Instrument lighting adjustment ...... 59
Intelligent washing (windscreen) ... 47
Interior fittings ............................ 269
Interior lighting
- boot lighting .......................... 146
- dashboard lighting (rheostat) ... 59
- front lighting .................... 138-139
- rear lighting ........................... 140
Jack ......................................... 215
Levers (steering wheel) ............... 44
Lights ........................................ 44Load limiters (seat belts) ............. 29
Low beam headlights
- changing bulbs ................. 225-228
- switching on .................... 44-45
Luggage restrainer net ................. 22
Main beam headlights
- changing bulbs ................. 226-228
- switching on .......................... 45
Maintenance
- additional operations ............... 250
- annual inspection programme ... 250
- checking levels ....................... 253
- precautions and warnings ......... 251
- scheduled maintenance ........... 247
- scheduled maintenance
programme ............................ 248
Manual heater ............................ 102
Mechanical gearbox ..................... 127
Number plate lights
- changing bulbs ........................ 231