tow Alfa Romeo GT 2005 Owner handbook (in English)
[x] Cancel search | Manufacturer: ALFA ROMEO, Model Year: 2005, Model line: GT, Model: Alfa Romeo GT 2005Pages: 307, PDF Size: 6.05 MB
Page 214 of 307

IN AN EMERGENCY
212
STARTING BY INERTIA
If the car is equipped with “Kit for tyre
repair Fix&Go“, see the instructions con-
tained in the following chapter.
GENERAL INSTRUCTIONS
As an alternative to FIX & GO, the com-
pact spare wheel or a wheel with the nor-
mal size can be supplied upon request;
wheel changing and correct use of the
jack and compact spare wheel call for
some precautions as listed below.
IN THE EVENT OF A PUNCTURE
Never push, tow or
coast start the vehicle.
This could cause fuel to
flow into the catalyst damaging
it irreversibly.
Remember that the
engine brake and power
steering are not opera-
tional until the engine is started,
therefore, much greater effort
than usual is needed on the brake
pedal and steering wheel.
Signal the presence of
the stationary vehicle
according to current regu-
lations: hazard warning lights,
reflecting triangle etc..
Any passengers should leave
the car and wait for the wheel to
be changed out of harm of the
traffic.
If parked on a slope or rough
surface, chock the wheels with
wedges or other suitable devices
to prevent the car from rolling.
Never start the engine
with the car jacked.
When driving with a
trailer, disconnect the trailer
before raising the car.
The compact spare wheel is spe-
cific to your car, do not use it on
other models, or use the spare
wheel of other models on your
vehicle.
Should the type of wheels used
be changed (alloy rims instead of
steel), it is also necessary to
change the whole set of fastening
bolts with others of suitable size.
The compact spare wheel is nar-
rower than normal wheels, it
should be used only for the dis-
tance necessary to reach a service
point to have the punctured tyre
repaired and, during its use, the
car speed must not exceed 80
km/h.
Page 218 of 307

IN AN EMERGENCY
216
– Using the wrench provided, tighten
the fastening bolts.
– Lower the car and remove the jack.
– Using the wrench provided, fully tight-
en the bolts in the sequence shown previ-
ously for the compact spare wheel fig. 8.
– Place the cap near the wheel so that
the inflation valve can come through the
slot provided on the cap.
– Press the circumference of the cap,
starting from the parts nearest to the infla-
tion valve until it is inserted completely.
IMPORTANTIncorrect fitting may
cause the wheel cap to come off when the
car is travelling.For versions with alloy rims:
– Tighten the pin (A-fig. 9) in one of
the fastening bolt holes on the wheel hub.
– Insert the wheel on the pin and, using
the wrench provided, tighten the four bolts
available. This is facilitated by the exten-
sion provided (B).
– Remove the pin (A-fig. 9) and tight-
en the last fastening bolt.
– Lower the car and remove the jack.
– Using the wrench provided, tighten
the bolts in the sequence shown previous-
ly for the compact spare wheel fig. 8.After refitting a wheel:
– stow the spare wheel in the space pro-
vided in the boot
– insert the jack in its container forcing
it lightly to prevent it from vibrating when
travelling
– place the tools used in the housings in
the container
– stow the container complete with tools
on the spare wheel and secure everything
with the clamping device (A-fig. 3)
– correctly re-position the stiff cover.
fig. 7
A0A0155b
fig. 8
A0A0156b
fig. 9
A0A0693b
Page 219 of 307

IN AN EMERGENCY
217
QUICK TYRE REPAIR
KIT FIX&GO automatic
The car is provided with the quick tyre re-
pair kit “FIX&GO automatic”, instead of the
traditional tool kit and space-saver spare
wheel.
The kit fig. 10, is placed in the boot. In
this container are also housed the screw-
driver and the tow hitch. The quick tyre repair kit includes:
– a bottle A-fig. 10containing the seal-
er, fitted with:
– filling pipe B
– sticker Cbearing the notice “max. 80
km/h”, to be placed in a position visible
to the driver (on the instrument panel) af-
ter fixing the tyre;
– compressor Dwith pressure gauge and
fittings;– instruction brochure fig. 11, to be used
for prompt and proper use of the quick re-
pair kit and to be then handed to the per-
sonnel charged with handling the tyre treat-
ed with the tyre repair kit;
– a pair of protection gloves located in the
side space of the compressor;
– adapters for inflating different elements.
fig. 10
A0A1095b
fig. 11
A0A1096b
Page 231 of 307

IN AN EMERGENCY
229
– Replace the bulb;
– Refit the bulb holder turning counter-
clockwise and check that it is secured cor-
rectly;
– Refit the transparent.SIDE DIRECTION INDICATORS
(fig. 30)
– Push the transparent cover towards
the rear of the car to compress the catch
(A). Release the front part and remove
this unit.
– Turn the bulb holder (B) counter-clock-
wise and remove it from the cover.
– Remove the snap-fitted bulb and
replace it.
– Insert the bulb holder (B) in the trans-
parent cover, then position the unit mak-
ing sure the catch clicks into place (A).
fig. 29
A0A0626b
fig. 30
A0A0166b
FRONT DIRECTION
INDICATORS
(fig. 28-29)
To change the bulb, proceed as follows:
– Using the screwdriver provided,
remove the transparent unit operating on
the two metal clips as shown in the figure;
– Turn the bulb holder clockwise (A)
and remove it;
– Remove the bulb (B) pushing gently
and turning counter-clockwise;
fig. 28
A0A0625b
Page 246 of 307

IN AN EMERGENCY
244
IF THE VEHICLE IS TO BE TOWED
The tow ring supplied with the vehicle is
housed in the tool box under the boot
mat.
To install the tow ring, proceed as fol-
lows:
– Take the tow ring from the tool box.
– Remove the cover (A) snap-fitted on
the front (fig. 55) or rear (fig. 56)
bumper. To do this, using the flat-bladed
screwdriver provided, protect the tip with
a soft cloth to avoid damaging the car.– Firmly screw the ring in its housing.
fig. 55 - front
A0A0650b
fig. 56 - rear
A0A0670b
Before tightening the
ring carefully clean the
threaded housing. Before
beginning to tow the car, make
sure that the ring is firmly tight-
ened in its threaded housing.
Before starting to tow,
turn the ignition key to
MAR and back to STOP,
again without removing it.
Removing the key automatically
engages the steering lock result-
ing in the impossibility to steer
the wheels. When towing
remember that without the help
of the engine brake and power
steering greater effort is required
on the pedal and steering wheel.
Do not use flexible cables for
towing and avoid jerks. During
towing operations make sure
that fastening the joint to the car
does not damage the components
in contact with it. When towing
the car, it is compulsory to follow
specific traffic regulations con-
cerning both the towing device
and behaviour on the road.
Page 247 of 307

IN AN EMERGENCY
245
Take care when position-
ing the arms of the lift or
workshop lift to avoid
damaging the side strips.
USING AN ARM LIFT OR
WORKSHOP LIFT
The vehicle should be lifted only at the
side, setting the end of the arms or the
workshop lift in the illustrated areas, at
approx. 40 cm from the wheelhouse pro-
file (fig. 57).These areas are highlighted by the sym-
bol
▼on the lower part of the side mem-
ber.
The car may fall if the
jack is not positioned cor-
rectly. Never use the jack
for higher capacities than the one
stated on the label.
IMPORTANTFor versions with
Selespeed transmission, make sure that
the gears are in neutral (N) (checking
that the vehicle moves if pushed) and
then proceed as for towing a normal car
with mechanical transmission, following
the instructions given previously.
Should it be impossible to set the gears
to neutral, do not tow the car and contact
Alfa Romeo Authorised Services.Do not start the engine
when towing the car.
IF THE VEHICLE IS TO BE LIFTED
fig. 57
A0A0672b
Page 253 of 307

VEHICLE MAINTENANCE
251
IMPORTANT
Engine oil
Should prevailing use of the car be under
one of the following specially heavy con-
ditions:
– trailer or caravan towing
– dusty roads
– short distances (less than 7-8 km)
repeated and with external temperatures
below zero
– frequently idling engines or long dis-
tance low speed driving or in case of a
long term inactivity
replace engine oil more frequently than
required on Service Schedule.IMPORTANT
Diesel filter
The different grades of purity in diesel
fuel normally available might make it nec-
essary to replace the filter more frequent-
ly than indicated in the Service Schedule.
If the engine misfires it shows the filter
needs changing.IMPORTANT
Air cleaner
Using the car on dusty roads change the
air cleaner more frequently than specified
in the Schedule Maintenance Programme.
For any doubts concerning the intervals
between the engine oil and air cleaner
replacement in relation to how the vehicle
is used, contact Alfa Romeo Authorised
Services.
Page 283 of 307

TECHNICAL SPECIFICATIONS
281
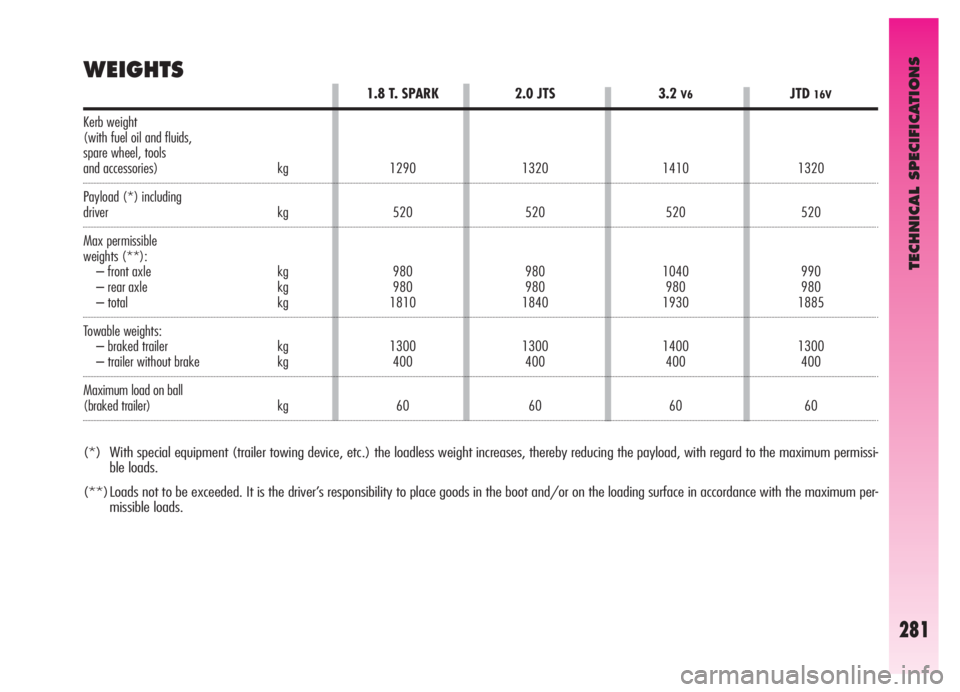
WEIGHTS
(*) With special equipment (trailer towing device, etc.) the loadless weight increases, thereby reducing the payload, with regard to the maximum permissi-
ble loads.
(**)Loads not to be exceeded. It is the driver’s responsibility to place goods in the boot and/or on the loading surface in accordance with the maximum per-
missible loads.
JTD16V
1320
520
990
980
1885
1300
400
60
3.2V6
1410
520
1040
980
1930
1400
400
60
2.0 JTS
1320
520
980
980
1840
1300
400
60
1.8 T. SPARK
1290
520
980
980
1810
1300
400
60
Kerb weight
(with fuel oil and fluids,
spare wheel, tools
and accessories) kg
Payload (*) including
driver kg
Max permissible
weights (**):
– front axle kg
– rear axle kg
– total kg
Towable weights:
– braked trailer kg
– trailer without brake kg
Maximum load on ball
(braked trailer) kg
Page 297 of 307

INDEX
295
Steering lock .............................. 15
Steering system
- adjustment lever ..................... 22
- technical specifications ............. 275
Steering wheel
- adjustment lever ..................... 22
- horn control ........................... 52
Sun visors .................................. 143
Suspensions (specifications) ......... 275
Tailgate
- opening from inside .......... 124-145
- opening with remote control 8-145
Technical specifications......... 271
Tools ......................................... 214
Towing the car ............................ 244
Towing trailers ............................ 205
Transmission ............................... 274
Tyres
- correct reading ....................... 276
- FIX&GO automatic .................. 217
- in the event of a puncture ........ 212
- inflating pressure .............. 279-304
- snow chains ........................... 208- types of tyres and rims ............ 278
- wear ..................................... 264
- winter ................................... 208
VDC system .............................. 152
Vehicle maintenance............. 247
Volumetric protection ................... 13
Warning lights .......................... 85
Washing the car
- engine compartment ............... 269
- exterior ................................. 268
- interior .................................. 270
Weights ..................................... 280
Wheels
- FIX&GO automatic .................. 217
- geometry .............................. 276
- replacement ........................... 214
- snow chains ........................... 208
- tyre inflating pressure ........ 279-304
- tyres and rims ........................ 278
- warnings ......................... 212-213
Windscreen washer
- operation ............................... 47- spray jets .............................. 267
Windscreen wiper
- blade replacement .................. 266
- operation ............................... 47
- rain sensor ............................. 48
- spray jets .............................. 266