Alfa Romeo GT 2006 Owner handbook (in English)
Manufacturer: ALFA ROMEO, Model Year: 2006, Model line: GT, Model: Alfa Romeo GT 2006Pages: 307, PDF Size: 6.05 MB
Page 11 of 307
The codes of any keys not
presented during the mem-
orising procedure are
erased. The reason for this is to en-
sure that any lost or stolen keys
cannot be used to start the engine.
GETTING TO KNOW YOUR CAR
9
OPERATION
Each time the ignition key is turned to the
STOPposition the Alfa Romeo CODE sys-
tem deactivates the functions of the engine
electronic control unit.
Each time the car is started turning the
ignition key to MAR, the Alfa Romeo
CODE control unit sends a recognition
code to the engine control unit to deacti-
vate the inhibitor. The code is crypted and
variable between over four billion possible
combinations, and it is sent only if the sys-
tem control unit has recognised the code
transmitted from the key which contains
an electronic transmitter, through an aeri-
al wound around the ignition switch.IMPORTANTTurning on of the Alfa
Romeo CODE warning light (
Y) when
travelling with the ignition key at MAR:
1) If the warning light turns on, this
means that the system is running a self-
test (for example for a voltage drop). At
the first stop, it will be possible to test the
system: switch off the engine turning the
ignition key to STOP; then turn the igni-
tion key to MAR: the warning light turns
on and should go off in about one second.
If the warning light stays on, repeat the
procedure described previously leaving the
key at STOPfor over 30 seconds. Should
the inconvenience persists, contact Alfa
Romeo Authorised Services. If the code has not been recognised cor-
rectly, the Alfa Romeo CODE warning light
(
Y) on the cluster turns on.
In this case, the key should be moved to
theSTOPposition and then back to
MAR; if the lock continues, possibly try
again with the other key provided with the
car. If it is still not possible to start the car,
follow the instructions given in the “In an
emergency” chapter and then contact Alfa
Romeo Authorised Services.
IMPORTANTEvery key has its own
code, which must be memorised by the
system control unit. To memorise new
keys, up to a maximum of eight, apply
solely to Alfa Romeo Authorised Services
taking with you all the keys in your pos-
session, the CODE card, a personal identi-
ty document and the car’s ownership doc-
uments.
Page 12 of 307
GETTING TO KNOW YOUR CAR
10
2) For versions without the reconfig-
urable multifunction display, the flashing
of the warning light means that the car is
not protected by the engine inhibitor
device. This condition for cars with recon-
figurable multifunction display is shown by
the turning on of the warning light togeth-
er with the display of the message: “C
ODE
SYSTEM NOT PROGRAMMED
”. Contact Alfa
Romeo Authorised Services immediately
to have all the keys memorised.
If after about 2 seconds
with the ignition key at
MAR, for versions without
reconfigurable multifunction dis-
play, the Alfa Romeo CODE warn-
ing light (
Y) turns on again flash-
ing, or for versions with reconfig-
urable multifunction display, the
warning light turns on again to-
gether with the message “Code
system not programmed”, this
means that the code of the keys
has not been stored, therefore the
car is not protected by the Alfa
Romeo CODE system against at-
tempted theft. In this case contact
Alfa Romeo Authorised Services to
have the key codes stored.
KEY BATTERY REPLACEMENT
If when pressing button (BorC-fig. 6)
on the remote control, nothing happens,
the battery should be replaced by a new
one of the same type to be found c/o nor-
mal retailers.
Used batteries are harm-
ful to the environment.
They should be disposed of
as specified by law in the special
containers provided. Avoid expo-
sure to naked flames and high tem-
peratures. Keep out of reach of
children.
fig. 5
A0A0603b
Battery replacement:
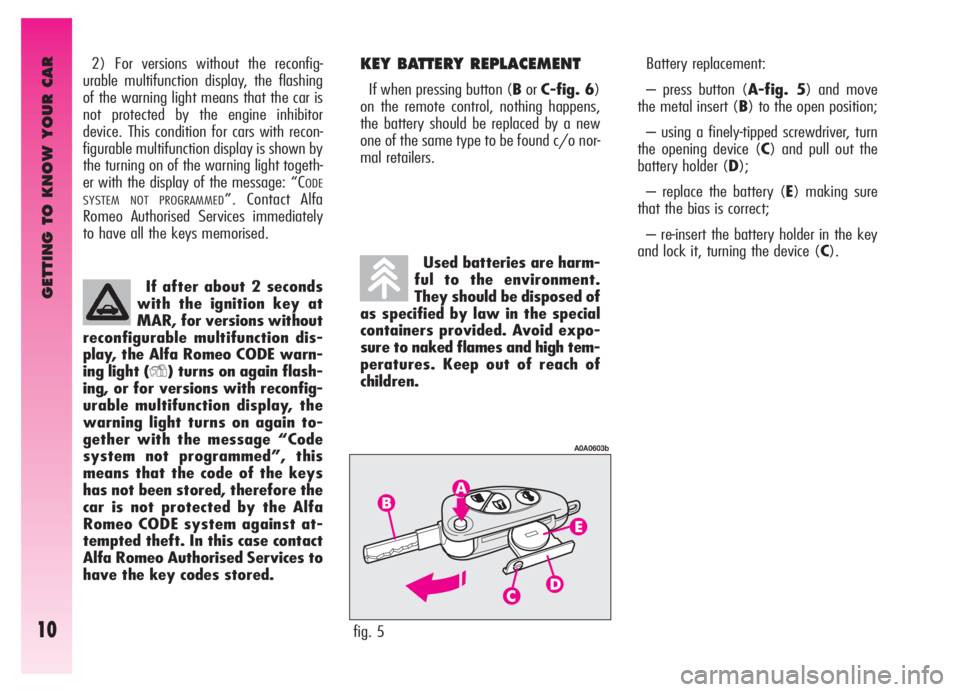
– press button (A-fig. 5) and move
the metal insert (B) to the open position;
– using a finely-tipped screwdriver, turn
the opening device (C) and pull out the
battery holder (D);
– replace the battery (E) making sure
that the bias is correct;
– re-insert the battery holder in the key
and lock it, turning the device (C).
Page 13 of 307
GETTING TO KNOW YOUR CAR
11
ELECTRONIC ALARM
DESCRIPTION
The system comprises: a transmitter,
receiver, control unit with siren and volu-
metric sensors. The electronic alarm is
controlled by the receiver incorporated in
the instrument cluster and it is turned on
and off by the remote control in the key
which sends the crypted and variable
code. The electronic alarm controls: the
unlawful opening of doors, bonnet and
boot (perimetral protection), operation of
the ignition key, battery cable cutting, the
presence of moving bodies in the passen-
ger compartment (volumetric protection),
any abnormal raising/sloping of the car
(for versions/markets where applicable)
and central door locking. It also makes it
possible to cut off the volumetric protec-
tion.
IMPORTANTThe engine inhibitor
function is guaranteed by the Alfa Romeo
CODE system which is activated automati-
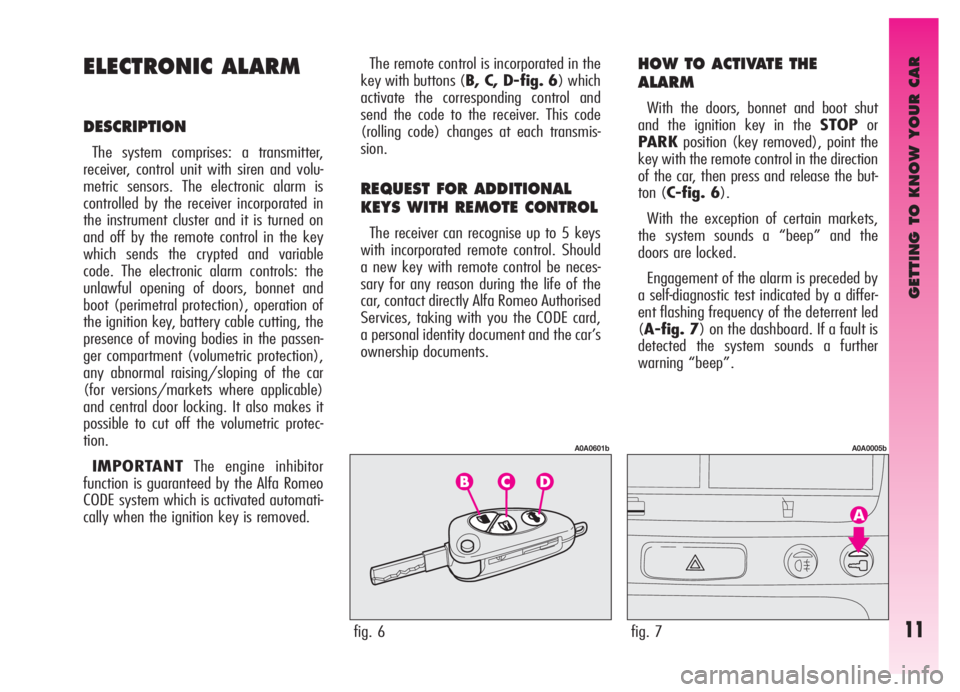
cally when the ignition key is removed.The remote control is incorporated in the
key with buttons (B, C, D-fig. 6) which
activate the corresponding control and
send the code to the receiver. This code
(rolling code) changes at each transmis-
sion.
REQUEST FOR ADDITIONAL
KEYS WITH REMOTE CONTROL
The receiver can recognise up to 5 keys
with incorporated remote control. Should
a new key with remote control be neces-
sary for any reason during the life of the
car, contact directly Alfa Romeo Authorised
Services, taking with you the CODE card,
a personal identity document and the car’s
ownership documents.
HOW TO ACTIVATE THE
ALARM
With the doors, bonnet and boot shut
and the ignition key in the STOPor
PARKposition (key removed), point the
key with the remote control in the direction
of the car, then press and release the but-
ton (C-fig. 6).
With the exception of certain markets,
the system sounds a “beep” and the
doors are locked.
Engagement of the alarm is preceded by
a self-diagnostic test indicated by a differ-
ent flashing frequency of the deterrent led
(A-fig. 7) on the dashboard. If a fault is
detected the system sounds a further
warning “beep”.
fig. 6
A0A0601b
fig. 7
A0A0005b
Page 14 of 307
GETTING TO KNOW YOUR CAR
12
– if the led continues flashing, but at dif-
ferent intervals than normal, this means
that different attempts to break in have
occurred. Through the number of flashes it
is possible to identify the type of attempt:
1 flash:one or more doors
2 flashes:tailgate
3 flashes:bonnet
4 flashes:ultrasounds
5 flashes:abnormal vehicle lift-
ing/sloping (for ver-
sions/markets where
applicable)
6 flashes:tampering with car start-
ing cables
7 flashes:tampering with battery
cables or cutting emer-
gency key cables
8 flashes:connection line to sen-
sors and siren
9 flashes:at least three causes of
alarm. Surveillance
After switching on, the flashing of the
deterrent led (A-fig. 7) on the dash-
board indicates the system surveillance
mode. The led flashes throughout this
period.
IMPORTANTOperation of the elec-
tronic alarm is adapted at the origin to the
rules of the different countries.
Self-diagnostic functions
and door, bonnet, boot control
If, after engaging the alarm, a second
“beep” is sounded, switch off the system
pressing the button (B-fig. 6), check
that the doors, bonnet and tailgate are
properly shut, then switch the system on
again pressing the button (C). Otherwise,
the door, bonnet or tailgate that is not
shut properly will be excluded from the
alarm system control.
If the doors, bonnet and boot are shut
correctly and the control signal is repeat-
ed, the system self-diagnostic has detect-
ed a system operating fault. It is therefore
necessary to contact Alfa Romeo
Authorised Services.HOW TO DEACTIVATE
THE ALARM
To deactivate the alarm press the button
(B-fig. 6) of the key with remote control.
The system will react as follows (with the
exception of certain markets):
– two brief flashes of the direction indi-
cators
– two brief “beeps” of the system
– door unlocking.
IMPORTANTIf when the system is
turned off the deterrent led (A-fig. 7)
on the dashboard stays on (maximum 2
minutes or until the ignition key is set to
MAR) the following should be borne in
mind:
Page 15 of 307

GETTING TO KNOW YOUR CAR
13
WHEN THE ALARM
IS TRIGGERED
When the system is on, the alarm comes
into action in the following cases:
– opening of one of the doors, bonnet or
tailgate;
– disconnection of the battery or sec-
tioning of electric cables;
– intrusion in the passenger compart-
ment, for example breakage of windows
(volumetric protection);
– attempt to start the engine (key in
MARposition);
– abnormal car lifting/sloping (for ver-
sions/markets where applicable).
Depending on the markets, the cutting in
of the alarm causes operation of the siren
and hazard warning ligths (for about 26
seconds). The ways of operating and the
number of cycles may vary depending on
the markets.
A maximum number of cycles is howev-
er envisaged.
Once the alarm cycle has ended, the sys-
tem resumes its normal control function.
VOLUMETRIC PROTECTION
To make sure that the protection system
works correctly the side windows and sun-
roof (if fitted) must be properly shut.
The function can be cut off (if, for exam-
ple, leaving animals in the car) carrying
out the following operations in rapid suc-
cession: starting from the condition with
the ignition key at MAR, move the key
toSTOP, then immediately back to
MARand then to STOPagain, then
remove the ignition key.
The deterrent led (A-fig. 7) on the
dashboard lights up for about 2 seconds to
confirm that the function has been cut off.
To restore volumetric protection, move
the and keep the ignition key at MARfor
over 30 seconds.
If, with the volumetric protection func-
tion deactivated, an electric control con-
trolled by the ignition key at MAR(e.g.
power windows) turn the ignition key to
MAR, operate the control and move the
key to STOPin a maximum time of 30
seconds. This way volumetric protection is
not restored.
HOW TO CUT OFF
THE ALARM SYSTEM
To deactivate the alarm system com-
pletely (for instance during prolonged
inactivity of the vehicle) simply lock the
car turning the key in the lock.
MINISTERIAL CERTIFICATION
In accordance with the law in force in
each country, on the subject of radio fre-
quency, we wish to point out that for the
markets in which the transmitter needs to
be marked, the certification number is
given on the component.
Depending on the versions/markets, the
code may also be given on the transmitter
and/or on the receiver.
Page 16 of 307
GETTING TO KNOW YOUR CAR
14
IGNITION DEVICE
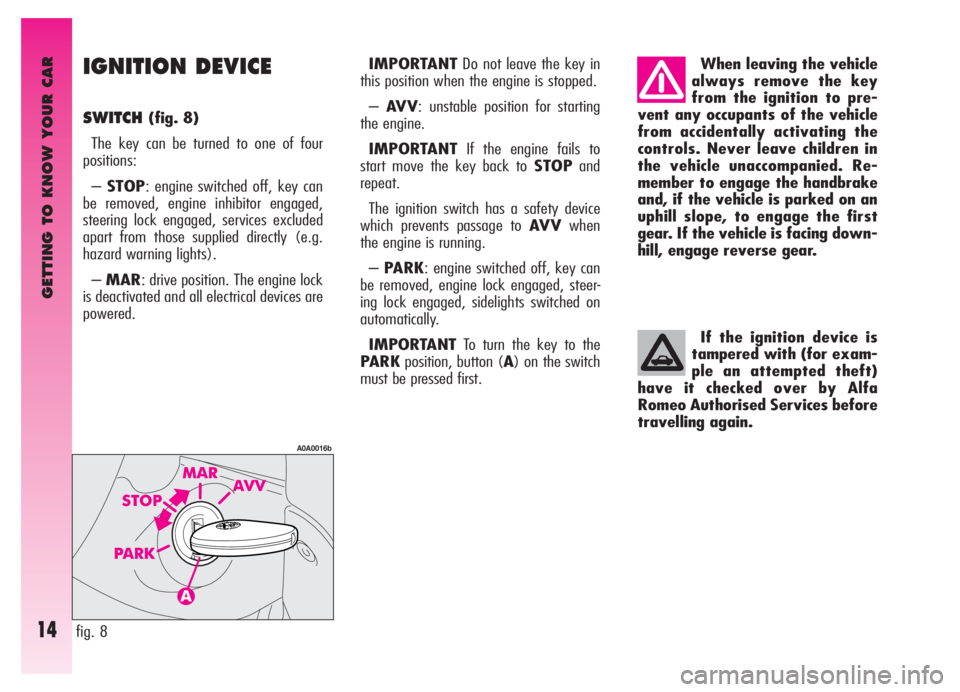
SWITCH(fig. 8)
The key can be turned to one of four
positions:
–STOP: engine switched off, key can
be removed, engine inhibitor engaged,
steering lock engaged, services excluded
apart from those supplied directly (e.g.
hazard warning lights).
–MAR: drive position. The engine lock
is deactivated and all electrical devices are
powered.
fig. 8
A0A0016b
When leaving the vehicle
always remove the key
from the ignition to pre-
vent any occupants of the vehicle
from accidentally activating the
controls. Never leave children in
the vehicle unaccompanied. Re-
member to engage the handbrake
and, if the vehicle is parked on an
uphill slope, to engage the first
gear. If the vehicle is facing down-
hill, engage reverse gear.
If the ignition device is
tampered with (for exam-
ple an attempted theft)
have it checked over by Alfa
Romeo Authorised Services before
travelling again.
IMPORTANTDo not leave the key in
this position when the engine is stopped.
–AV V: unstable position for starting
the engine.
IMPORTANTIf the engine fails to
start move the key back to STOPand
repeat.
The ignition switch has a safety device
which prevents passage to AV Vwhen
the engine is running.
–PARK: engine switched off, key can
be removed, engine lock engaged, steer-
ing lock engaged, sidelights switched on
automatically.
IMPORTANTTo turn the key to the
PARKposition, button (A) on the switch
must be pressed first.
Page 17 of 307
It is absolutely forbidden
to carry out whatever af-
ter-market operation in-
volving steering system or steer-
ing column modifications (e.g.: in-
stallation of anti-theft Device) that
could badly affect performance and
safety, cause the lapse of warran-
ty and also result in non-compli-
ance of the car with homologation
requirements.
GETTING TO KNOW YOUR CAR
15
STEERING LOCK
Engaging:
– move the key to STOPorPARK,
then remove the key and turn the steering
wheel slightly to facilitate the locking
action.
Disengaging:
– turn the key to MARgently rocking
the steering wheel from side to side.
Never remove the ignition
key with the car on the
move. The steering wheel
would lock automatically the first
time the steering wheel is turned.
This also occurs if the car is towed.
DOORS
Before opening a door, al-
ways make sure that it can
be done safely.
OPENING/CLOSING
FROM OUTSIDE
Front doors
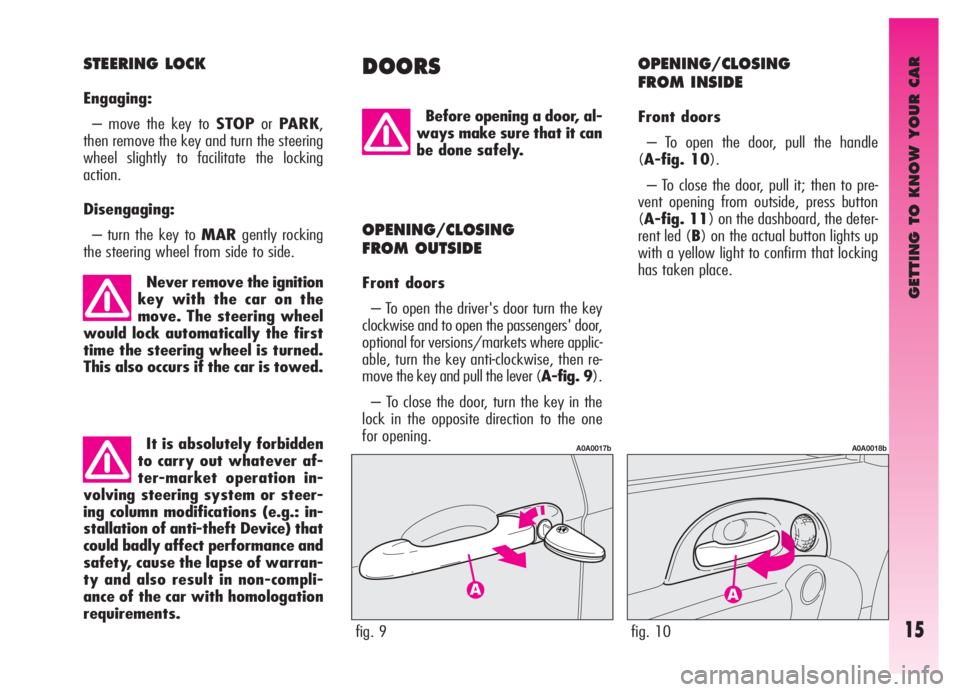
– To open the driver's door turn the key
clockwise and to open the passengers' door,
optional for versions/markets where applic-
able, turn the key anti-clockwise, then re-
move the key and pull the lever (A-fig. 9).
– To close the door, turn the key in the
lock in the opposite direction to the one
for opening.
fig. 9
A0A0017b
fig. 10
A0A0018b
OPENING/CLOSING
FROM INSIDE
Front doors
– To open the door, pull the handle
(A-fig. 10).
– To close the door, pull it; then to pre-
vent opening from outside, press button
(A-fig. 11) on the dashboard, the deter-
rent led (B) on the actual button lights up
with a yellow light to confirm that locking
has taken place.
Page 18 of 307
GETTING TO KNOW YOUR CAR
16
FRONT SEATSCENTRAL LOCKING
This allows central locking of the door
locks.
To engage central locking, the doors
must be perfectly shut, otherwise locking
is denied.
IMPORTANTWith central locking
engaged, pulling the inside lever for open-
ing one of the front doors causes the
unlocking of all the doors.
In the event of a power cut off (blown
fuse, battery disconnected, etc.) it is still
possible to work the lock by hand.
fig. 11
A0A0019b
Any adjustments are to
be carried out only with
the vehicle stationary.
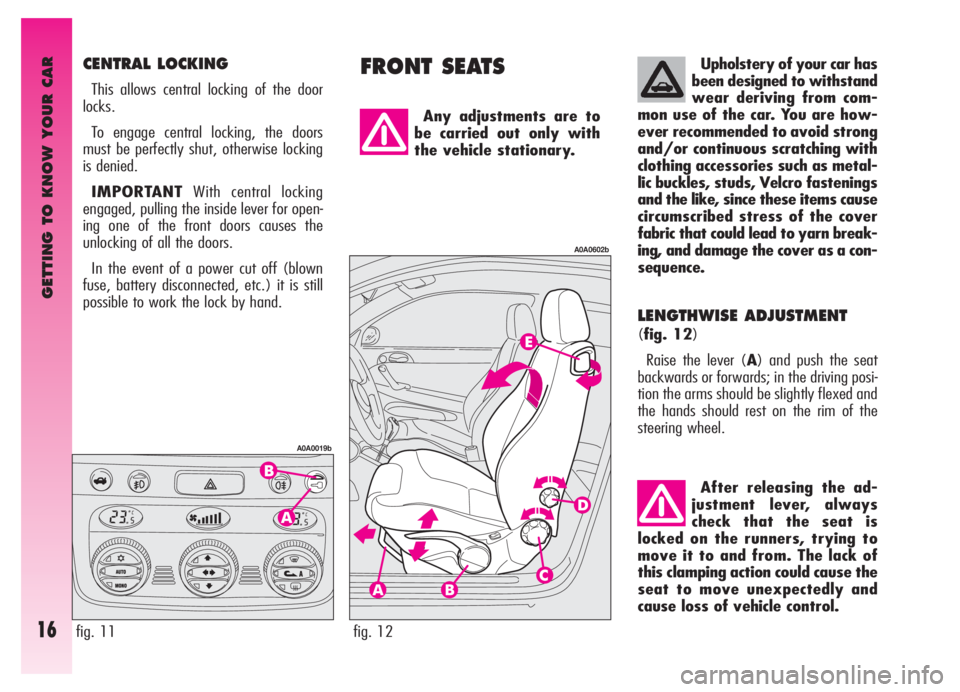
LENGTHWISE ADJUSTMENT
(fig. 12)
Raise the lever (A) and push the seat
backwards or forwards; in the driving posi-
tion the arms should be slightly flexed and
the hands should rest on the rim of the
steering wheel.
fig. 12
A0A0602b
After releasing the ad-
justment lever, always
check that the seat is
locked on the runners, trying to
move it to and from. The lack of
this clamping action could cause the
seat to move unexpectedly and
cause loss of vehicle control.
Upholstery of your car has
been designed to withstand
wear deriving from com-
mon use of the car. You are how-
ever recommended to avoid strong
and/or continuous scratching with
clothing accessories such as metal-
lic buckles, studs, Velcro fastenings
and the like, since these items cause
circumscribed stress of the cover
fabric that could lead to yarn break-
ing, and damage the cover as a con-
sequence.
Page 19 of 307
GETTING TO KNOW YOUR CAR
17
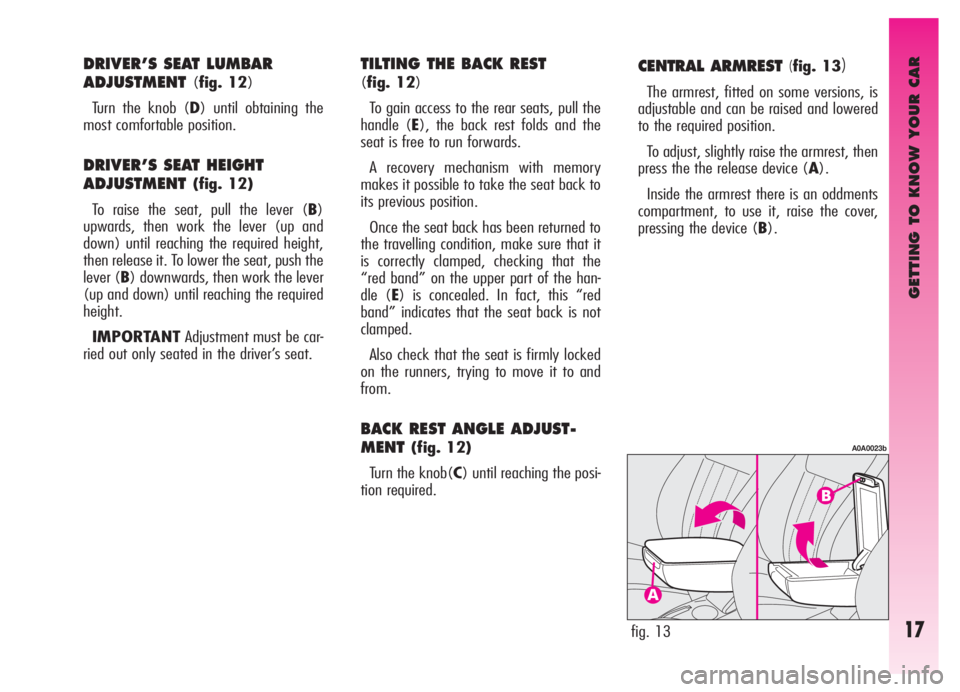
CENTRAL ARMREST (fig. 13)
The armrest, fitted on some versions, is
adjustable and can be raised and lowered
to the required position.
To adjust, slightly raise the armrest, then
press the the release device (A).
Inside the armrest there is an oddments
compartment, to use it, raise the cover,
pressing the device (B).
TILTING THE BACK REST
(fig. 12)
To gain access to the rear seats, pull the
handle (E), the back rest folds and the
seat is free to run forwards.
A recovery mechanism with memory
makes it possible to take the seat back to
its previous position.
Once the seat back has been returned to
the travelling condition, make sure that it
is correctly clamped, checking that the
“red band” on the upper part of the han-
dle (E) is concealed. In fact, this “red
band” indicates that the seat back is not
clamped.
Also check that the seat is firmly locked
on the runners, trying to move it to and
from.
BACK REST ANGLE ADJUST-
MENT
(fig. 12)
Turn the knob(C) until reaching the posi-
tion required.
fig. 13
A0A0023b
DRIVER’S SEAT LUMBAR
ADJUSTMENT
(fig. 12)
Turn the knob (D) until obtaining the
most comfortable position.
DRIVER’S SEAT HEIGHT
ADJUSTMENT
(fig. 12)
To raise the seat, pull the lever (B)
upwards, then work the lever (up and
down) until reaching the required height,
then release it. To lower the seat, push the
lever (B) downwards, then work the lever
(up and down) until reaching the required
height.
IMPORTANTAdjustment must be car-
ried out only seated in the driver’s seat.
Page 20 of 307
GETTING TO KNOW YOUR CAR
18
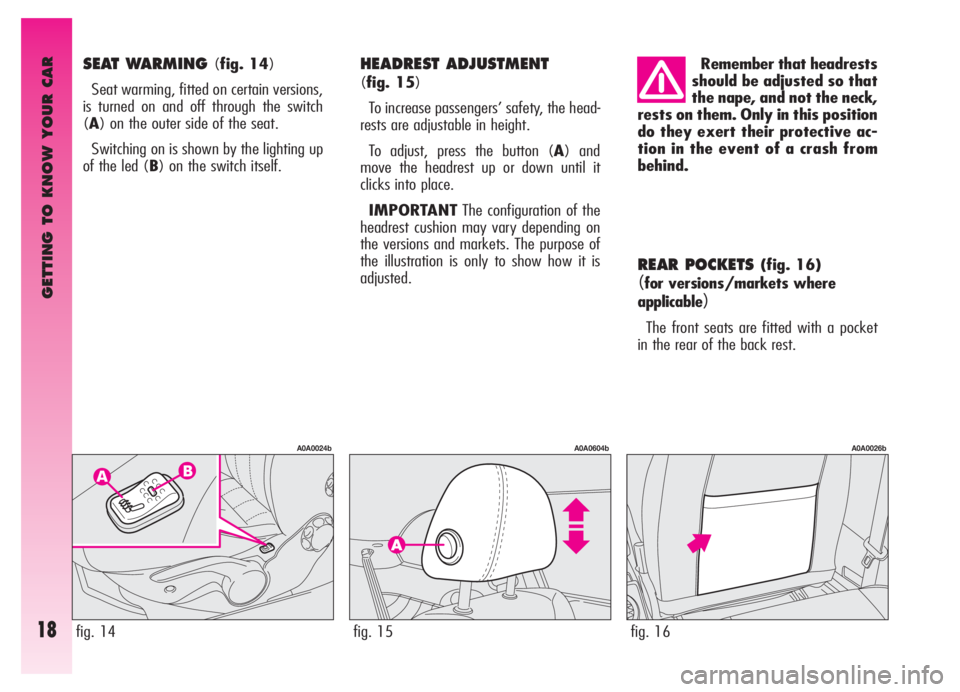
REAR POCKETS (fig. 16)
(for versions/markets where
applicable
)
The front seats are fitted with a pocket
in the rear of the back rest.
HEADREST ADJUSTMENT
(fig. 15)
To increase passengers’ safety, the head-
rests are adjustable in height.
To adjust, press the button (A) and
move the headrest up or down until it
clicks into place.
IMPORTANTThe configuration of the
headrest cushion may vary depending on
the versions and markets. The purpose of
the illustration is only to show how it is
adjusted.
fig. 15
A0A0604b
Remember that headrests
should be adjusted so that
the nape, and not the neck,
rests on them. Only in this position
do they exert their protective ac-
tion in the event of a crash from
behind.
fig. 16
A0A0026b
SEAT WARMING (fig. 14)
Seat warming, fitted on certain versions,
is turned on and off through the switch
(A) on the outer side of the seat.
Switching on is shown by the lighting up
of the led (B) on the switch itself.
fig. 14
A0A0024b