Alfa Romeo GT 2007 Owner handbook (in English)
Manufacturer: ALFA ROMEO, Model Year: 2007, Model line: GT, Model: Alfa Romeo GT 2007Pages: 271, PDF Size: 5.57 MB
Page 61 of 271
GETTING TO KNOW YOUR CAR
59
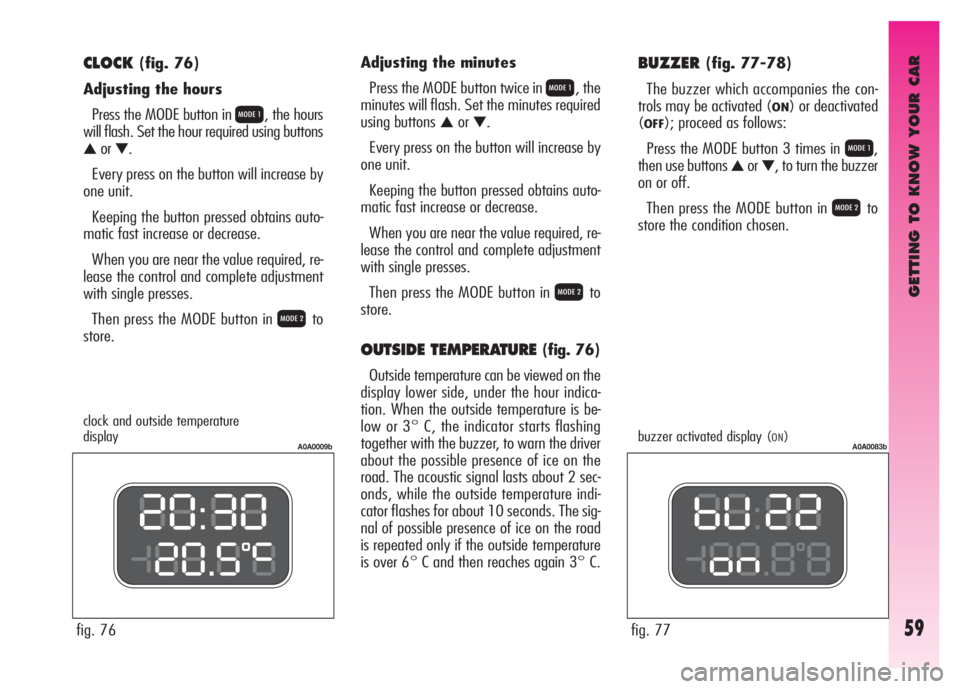
CLOCK(fig. 76)
Adjusting the hours
Press the MODE button in
Q, the hours
will flash. Set the hour required using buttons
▲or▼.
Every press on the button will increase by
one unit.
Keeping the button pressed obtains auto-
matic fast increase or decrease.
When you are near the value required, re-
lease the control and complete adjustment
with single presses.
Then press the MODE button in
Rto
store.
fig. 76Adjusting the minutes
Press the MODE button twice in
Q, the
minutes will flash. Set the minutes required
using buttons
▲or▼.
Every press on the button will increase by
one unit.
Keeping the button pressed obtains auto-
matic fast increase or decrease.
When you are near the value required, re-
lease the control and complete adjustment
with single presses.
Then press the MODE button in
Rto
store.
OUTSIDE TEMPERATURE (fig. 76)
Outside temperature can be viewed on the
display lower side, under the hour indica-
tion. When the outside temperature is be-
low or 3° C, the indicator starts flashing
together with the buzzer, to warn the driver
about the possible presence of ice on the
road. The acoustic signal lasts about 2 sec-
onds, while the outside temperature indi-
cator flashes for about 10 seconds. The sig-
nal of possible presence of ice on the road
is repeated only if the outside temperature
is over 6° C and then reaches again 3° C.
A0A0009b
fig. 77
A0A0083b
BUZZER(fig. 77-78)
The buzzer which accompanies the con-
trols may be activated (
ON) or deactivated
(
OFF); proceed as follows:
Press the MODE button 3 times in
Q,
then use buttons
▲or▼, to turn the buzzer
on or off.
Then press the MODE button in
Rto
store the condition chosen.
clock and outside temperature
display buzzer activated display (ON)
Page 62 of 271
GETTING TO KNOW YOUR CAR
60
fig. 79
A0A0012b
fig. 80
A0A0013b
fig. 81
A0A0007b
ing is turned off with the exception of the
speedometer.
Keeping button
▲pressed (on the plate
at the side of the steering column) for more
than 4 seconds the complete instrument
cluster lighting is turned on again.
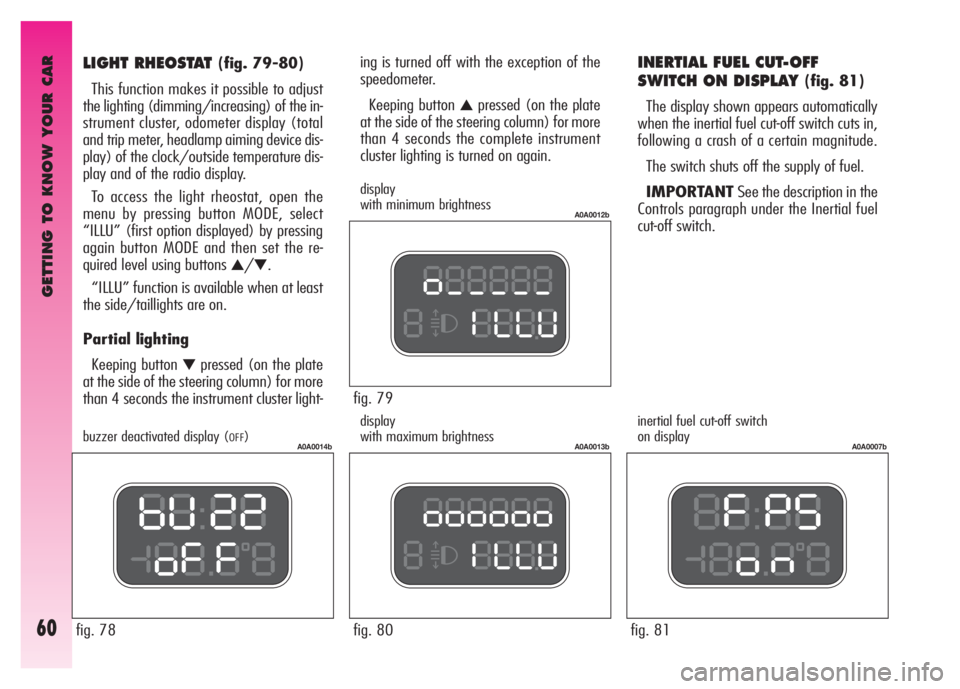
INERTIAL FUEL CUT-OFF
SWITCH ON DISPLAY
(fig. 81)
The display shown appears automatically
when the inertial fuel cut-off switch cuts in,
following a crash of a certain magnitude.
The switch shuts off the supply of fuel.
IMPORTANTSee the description in the
Controls paragraph under the Inertial fuel
cut-off switch.
display
with minimum brightness
display
with maximum brightnessinertial fuel cut-off switch
on display
fig. 78
A0A0014bbuzzer deactivated display (OFF)
LIGHT RHEOSTAT (fig. 79-80)
This function makes it possible to adjust
the lighting (dimming/increasing) of the in-
strument cluster, odometer display (total
and trip meter, headlamp aiming device dis-
play) of the clock/outside temperature dis-
play and of the radio display.
To access the light rheostat, open the
menu by pressing button MODE, select
“ILLU” (first option displayed) by pressing
again button MODE and then set the re-
quired level using buttons
▲/▼.
“ILLU” function is available when at least
the side/taillights are on.
Partial lighting
Keeping button
▼pressed (on the plate
at the side of the steering column) for more
than 4 seconds the instrument cluster light-
Page 63 of 271
GETTING TO KNOW YOUR CAR
61fig. 82
A0A9129g
fig. 83
A0A0022m
INFORMATION ABOUT
CAR CONDITION
❒Trip computer;
❒Lighting adjustment (rheostat);
❒Display of failure messages with corre-
sponding symbol;
❒Display of warning messages with cor-
responding symbol (e.g.: possible ice
on road);
❒Gear selected (2.0 T.SPARK Selespeed
versions only);
❒Engine oil level (JTDMversions only).
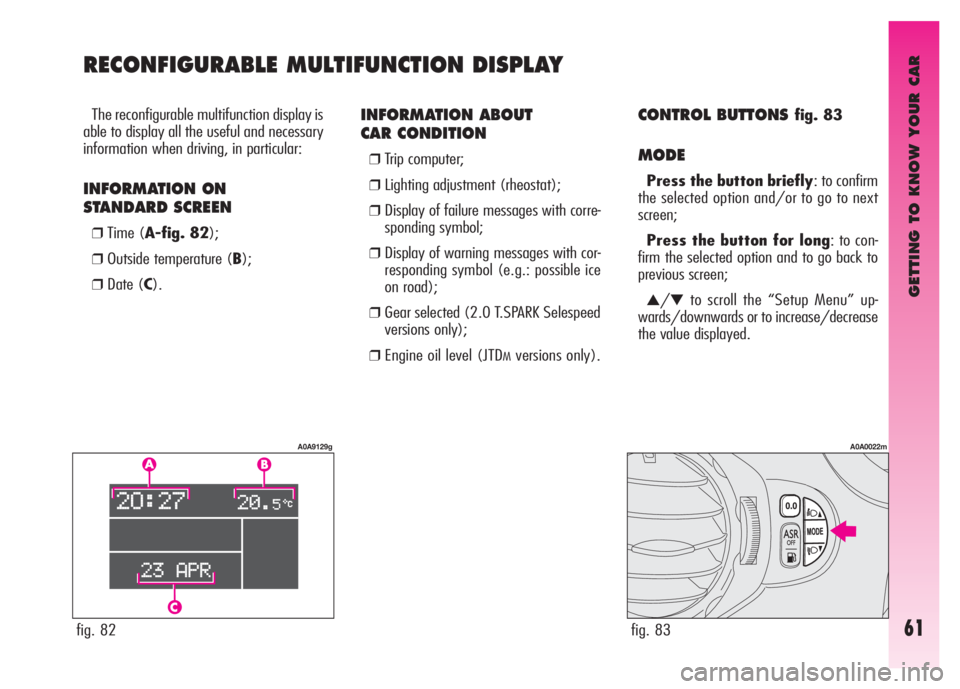
CONTROL BUTTONS fig. 83
MODE
Press the button briefly: to confirm
the selected option and/or to go to next
screen;
Press the button for long: to con-
firm the selected option and to go back to
previous screen;
▲/▼to scroll the “Setup Menu” up-
wards/downwards or to increase/decrease
the value displayed. The reconfigurable multifunction display is
able to display all the useful and necessary
information when driving, in particular:
INFORMATION ON
STANDARD SCREEN
❒Time (A-fig. 82);
❒Outside temperature (B);
❒Date (C).
RECONFIGURABLE MULTIFUNCTION DISPLAY
Page 64 of 271
GETTING TO KNOW YOUR CAR
62
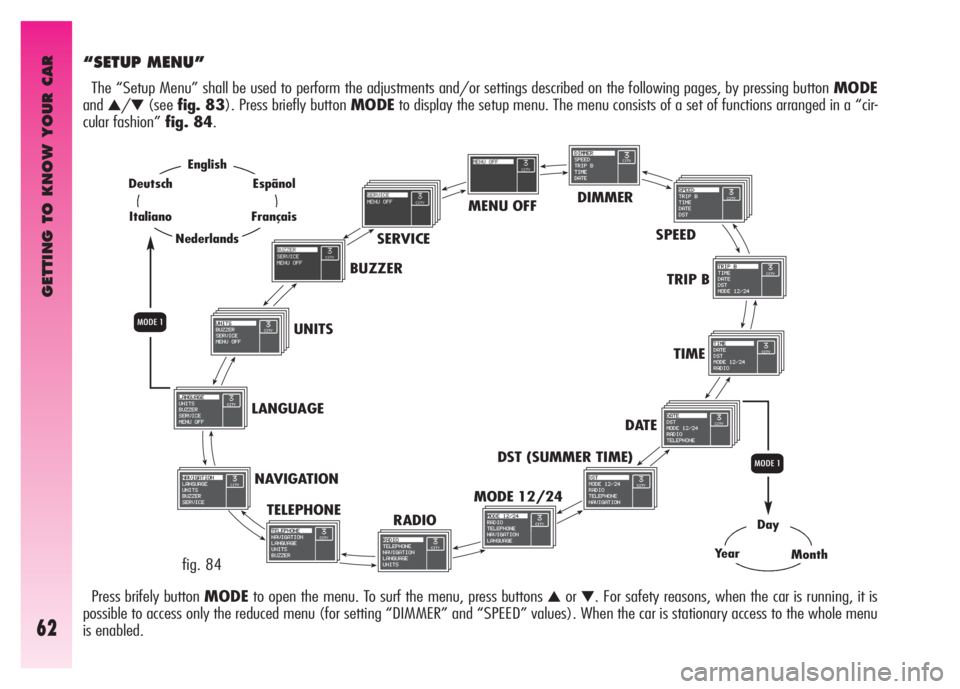
“SETUP MENU”
The “Setup Menu” shall be used to perform the adjustments and/or settings described on the following pages, by pressing button MODE
and
▲/▼(seefig. 83). Press briefly button MODEto display the setup menu. The menu consists of a set of functions arranged in a “cir-
cular fashion” fig. 84.
MENU OFFDIMMER
SPEED
TRIP B
TIME
DATE
DST (SUMMER TIME)
MODE 12/24
RADIO TELEPHONE NAVIGATION LANGUAGEUNITSBUZZERSERVICE
Day
YearMonth
Q
English
Nederlands
Espãnol
Français
Deutsch
Italiano
Q
Press brifely button MODEto open the menu. To surf the menu, press buttons ▲or▼. For safety reasons, when the car is running, it is
possible to access only the reduced menu (for setting “DIMMER” and “SPEED” values). When the car is stationary access to the whole menu
is enabled.fig. 84
Page 65 of 271

GETTING TO KNOW YOUR CAR
63
Engine oil level check
(JTD versions)
Turning the ignition key to MARthe dis-
play shows the engine oil level for a few sec-
onds. During this phase, to clear the display
and move to next screen, press briefly but-
tonMODE.
IMPORTANTTo make sure that the en-
gine oil level displayed is correct, carry out
the check with the car on level ground.
Fig. 85refers to the correct engine oil
level display. As the oil level gradually falls,
the full bars go off leaving room for the emp-
ty ones.
fig. 85
A0A9101g
fig. 86
A0A9102g
fig. 87
A0A9103g
Fig. 86refers to the display with an oil
level below the preset minimum. In this con-
dition the bars are all empty.
IMPORTANTIn this case the correct en-
gine oil level should be restored as soon as
possible, see “Checking levels” in section
“Car maintenance”. Fig. 87refers to the display with an oil
level above the preset maximum. In this con-
dition the bars are all full.
IMPORTANTIn this case, contact Alfa
Romeo Authorised Services who will restore
the correct engine oil level.
Page 66 of 271
GETTING TO KNOW YOUR CAR
64
SPEED
With this function it is possible to set the
car speed limit (km/h or mph), when this
limit is exceeded the driver is immediately
alerted (see section “Warning lights and mes-
sages”).
To set the speed limit, proceed as follows:
❒press briefly button MODE: the display
will show the word ON;
❒press briefly button MODEthen, use
buttons
▲/▼to set the required speed
(during setting the value flashes).
❒press briefly button MODEto go back
to the menu screen or press the button
for long to go back to the standard
screen.
IMPORTANTThe possible setting is be-
tween 30 and 250 km/h or between 20
and 150 mph depending on the unit set pre-
viously (see paragraph “UNITS” described
later). Every press of the button
▲/▼in-
creases or decreases by one unit. Keeping
button
▲/▼pressed, obtain automatic fast
increase/decrease. When you are near the
required setting release the button and com-
plete adjustment with single presses. To clear setting:
❒press briefly button MODE: the display
will show the word OFF;
❒press button (▼): the display will show
the word OFF;
❒press briefly button MODEto go back
to the menu screen or press the button
for long to go back to the standard
screen.
DIMMER
With this function it is possible to adjust
the lighting (dimming/brightening) of the
instrument cluster, mileage recorder (total,
trip meter), headlight aiming display, radio
display, radio navigator display (where pro-
vided) and two-zone climate control (where
provided).
Proceed as follows:
❒press briefly button MODE: the display
will show a graduated scale;
❒press buttons ▲/▼to adjust as re-
quired.
Partial lighting
Keeping button (
▼) pressed for more than 4
seconds, the rev counter lighting is turned off.
Keeping button (
▲) pressed for more than
4 seconds, the complete instrument cluster
lighting is turned on again.
IMPORTANTWhen external lights are
switched on dimming of the brightness can
be perceived. In the event of any faults,
lighting adjustment (rheostat) is not possi-
ble and the display is shown at its maximum
brightness.
Page 67 of 271
GETTING TO KNOW YOUR CAR
65
TIME
This function enables to set the clock
(hours - minutes).
Proceed as follows:
❒press briefly button MODE: the display
will show the hour;
❒press buttons ▲/▼for setting;
❒press briefly button MODEto set min-
utes (pressing the button for long will
return to standard screen);
❒press buttons ▲/▼for setting;
❒press briefly button MODEto go back
to the menu screen or press the button
for long to go back to the standard
screen.
IMPORTANTEvery press of the button
▲/▼increases or decreases by one unit.
Keeping button
▲/▼pressed, obtain au-
tomatic fast increase/decrease. When you
are near the required setting release the but-
ton and complete adjustment with single
presses.
DATE
This function enables to update the date
(day - month - year).
To correct the date proceed as follows:
❒press briefly button MODE: the display
will show the date;
❒press buttons ▲/▼for setting the day;
❒press briefly button MODEfor setting
the month (or press the button for long
to go back to standard screen);
❒press buttons ▲/▼for setting;
❒press briefly button MODEfor setting
the year (or press the button for long
to go back to standard screen);
❒press buttons ▲/▼for setting;
❒press briefly button MODEto go back
to the menu screen or press the button
for long to go back to the standard
screen.
TRIP B
With this option it is possible to turn
(ON/OFF) the TRIP B function (partial
trip) which displays the figures relating to
AVERAGE CONSUMPTION B, AVERAGE
SPEED B, TRAVEL TIME B, and TRAVEL DIS-
TANCE B during a “partial mission” con-
tained in the “general mission” (for further
information see “Trip Computer”).
For activation/deactivation, proceed as fol-
lows:
❒press briefly button MODE: the display
will show the word ON;
❒use buttons ▲/▼to select on or off;
❒press briefly button MODEto go back
to the menu screen or press the button
for long to go back to the standard
screen.
Page 68 of 271
GETTING TO KNOW YOUR CAR
66
MODE 12/24
This option enables to set the clock in the
12h or 24h mode.
To adjust, proceed as follows:
❒press briefly button MODE: the display
will show 12h;
❒press buttons ▲/▼for setting (12h
or24h);
❒press briefly button MODEto go back
to the menu screen or press the button
for long to go back to the standard
screen.
RADIO
This option enables to activate/deactivate
(ON/OFF) the repetition of the informa-
tion displayed by the radio front panel on
the instrument panel display.
For activation/deactivation, proceed as fol-
lows:
❒press briefly button MODE: the display
will show the word ON;
❒use buttons ▲/▼to select on or off;
❒press briefly button MODEto go back
to the menu screen or press the button
for long to go back to the standard screen.
Selecting and activating “RADIO DIS-
PLAY ON”, when turning the radio on, the
display repeats the information displayed by
the radio front panel.
TELEPHONE
This option enables to activate/deactivate
(ON/OFF) displaying of the name (if in
the list) and phone number of the caller on
the instrument panel display.
For activation/deactivation, proceed as fol-
lows:
❒press briefly button MODE: the display
will show the word ON;
❒use buttons ▲/▼to select on or off;
❒press briefly button MODEto go back
to the menu screen or press the button
for long to go back to the standard
screen.
Selecting and activating “TELEPHONE
DISPLAY ON”, when a phone call arrives,
the display shows the name (if in the list)
and the phone number of the caller.
DST (SUMMER TIME)
This option enables to turn ON/OFFthe
summer time function (which corresponds
to + 1 hour in relation to the daylight time).
For activation/deactivation, proceed as fol-
lows:
❒press briefly button MODE: the display
will show the word ON;
❒use buttons ▲/▼to select on or off;
❒press briefly button MODEto go back
to the menu screen or press the button
for long to go back to the standard
screen.
Selecting and activating the “DST ON”
function, the display switches from daylight
time to summer time and vice versa, with
no need to intervene manually on the
“TIME” function described previously.
Page 69 of 271

GETTING TO KNOW YOUR CAR
67
LANGUAGE
This option enables to select the language
required for the texts shown on the display.
To set the required language proceed as
follows:
❒press briefly button MODE: the display
will show the previously set “lan-
guage”;
❒press buttons ▲/▼for setting;
❒press briefly button MODEto go back
to the menu screen or press the button
for long to go back to the standard
screen.
UNITS
This option enables to set the units for dis-
tance covered (km or mi), fuel consumption
(l/100 km, km/l or mpg) and tempera-
ture (°C or °F).
To set the required unit proceed as follows:
❒press briefly button MODE: the display
will show “km” or “mi” (according to
previous setting);
❒press buttons ▲/▼for setting;
❒press briefly button MODEto select
the temperature unit (or press the but-
ton for long to go back to the standard
screen): the display will show °Cor °F
(according to previous setting);
❒press buttons ▲/▼for setting;
NAVIGATION
This option enables, during use of the ra-
dionavigator, to activate/deactivate
(ON/OFF) the repetition of the pictograms
displayed by the radionavigator on the in-
strument panel display.
For activation/deactivation, proceed as fol-
lows:
❒press briefly button MODE: the display
will show the word ON;
❒use buttons ▲/▼to select on or off;
❒press briefly button MODEto go back
to the menu screen or press the button
for long to go back to the standard
screen.
Selecting and activating “NAVIGATION
DISPLAY ON”, the instrument panel dis-
play shows the information displayed by the
radionavigator display.
Page 70 of 271
GETTING TO KNOW YOUR CAR
68
BUZZER
This option enables to adjust the volume
of the roger-beep accompanying the acti-
vation of the car buttons and any fail-
ure/warning indication shown on the dis-
play.
To adjust the volume proceed as follows:
❒press briefly button MODE: the display
will show the previously set volume
“level”;
❒press buttons ▲/▼for setting;
❒press briefly button MODEto go back
to the menu screen or press the button
for long to go back to the standard
screen.
IMPORTANTIn the buzzer OFFcon-
dition, any buzzer failure warnings are main-
tained.
SERVICE
Through this function it is possible to dis-
play information connected to proper car ser-
vicing.
To consult this function, proceed as follows:
❒press briefly button MODE: service in
“km” or “mi” according to previous
setting, will be displayed (see para-
graph “UNITS”);
❒press buttons ▲/▼to display the re-
quired service info;
❒press briefly button MODEto go back
to the menu screen or press the button
for long to go back to the standard
screen.
IMPORTANTThe Service Schedule in-
cludes car maintenance every 20,000 km;
this is shown automatically, with the igni-
tion key to MAR, starting from 2,000 km
(or mi) from this deadline and it will be dis-
played again every 200 km. The display can
only be reset by Alfa Romeo Authorized Ser-
vices.
MENU OFF
Selecting this option will bring back to stan-
dard screen.
❒press briefly button MODEto select
the consumption unit (or press the but-
ton for long to go back to the standard
screen);
❒If the distance unit set is “km”, the dis-
play will show “l/100km” or
“km/l”: press buttons
▲/▼for set-
ting. If the distance unit set is “mi”, the
display will show “mpg”;
❒press briefly button MODEto go back
to the menu screen or press the button
for long to go back to the standard
screen.
IMPORTANTThe temperature unit (°C
or °F) set on the display is also shown on
the displays of the two-zone climate control
(where provided) and radionavigator (where
provided).