Alfa Romeo GT 2010 Owner handbook (in English)
Manufacturer: ALFA ROMEO, Model Year: 2010, Model line: GT, Model: Alfa Romeo GT 2010Pages: 271, PDF Size: 5.34 MB
Page 21 of 271

GETTING TO KNOW YOUR CAR
19
REAR SEATS
If a particularly heavy
load is placed in the boot,
when travelling at night, it
is wise to check the height of the
high beams (see “Headlamps”
paragraph).
fig. 18
A0A0605b
Removing the rear parcel shelf
Proceed as follows:
– free the ends of the two rods (A-fig. 18)
supporting the parcel shelf (B) pulling the
eyelets (C) off the pins (D);
– release the pins (A-fig. 19) at the out-
side of the shelf from their housings (B) ob-
tained in the side supports, then remove the
shelf pulling it outwards.
fig. 19
A0A0255b
EXTENDING THE
LUGGAGE COMPARTMENT
The split of rear seat makes it possible to
extend the luggage compartment totally or
partially, acting separately on one of the two
parts, thereby offering different possibilities
of load depending on the number of rear
passengers. Fabric upholstery of your
car is purpose-made to
withstand common wear
resulting from normal use of the
car. It is however absolutely nec-
essary to prevent hard and/or pro-
longed scratching/scraping caused
by clothing accessories like metal-
lic buckles, studs, “Velcro” fixings,
etc. that stressing locally the fabric
could break yarns and damage the
upholstery as a consequence.
Page 22 of 271

GETTING TO KNOW YOUR CAR
20
– raise the headrest to the highest posi-
tion, press both buttons (A-fig. 21) at the
side of the two supports, then remove the
headrest pulling them upwards;
– move the seat belts to the side extend-
ing them correctly without twisting;
– raise the levers (A-fig. 22) retaining
the back rests and tilt them forwards to ob-
tain a single loading surface (fig. 23).
fig. 21
A0A0607b
fig. 23
A0A0608 b
Total extension
Proceed as follows:
– check that seat buckles of the side belts
are fitted in the respective pockets on the
back rest (A-fig. 20) and the tab (B)
of the centre abdominal belt is inserted in
the support (C).
– pull the handles in the centre of the cush-
ions, then tilt them forwards;
fig. 20
A0A0623bfig. 22
A0A0608 b
IMPORTANTFor versions/markets
where applicable, the retainer levers are re-
placed by buttons (one for each side). To re-
lease the back rests and tilt them, use the
buttons themselves.
Page 23 of 271

GETTING TO KNOW YOUR CAR
21
Remember that headrests
should be adjusted so that
the nape, and not the neck,
rests on them. Only in this position
do they exert their protective ac-
tion in the event of a crash from
behind. Partial extension
For partial extension, proceed as follows:
– tilt the cushion required pulling the han-
dle at the centre of the cushion, then tilt-
ing the actual cushion;
– move the seat belt to one side extend-
ing it correctly without twisting;
– raise the lever retaining the back rest
and tilt it forwards.
To bring the seat back to its
normal position
Proceed as follows:
– move the seat belts to one side ex-
tending them correctly without twisting;
– raise the seat backs, pushing them back-
wards until hearing both clamping devices
click into place;
– set the cushions to the horizontal posi-
tion keeping the centre seat belt raised.
HEADREST ADJUSTMENT
(fig. 24)
The car may be fitted with two headrests
for the side seats and, depending on the trim
level, it may also have a third headrest in
the centre.
To use the headrest, raise it from the (2)
“non use position” and reach the (1) “all
removed” position. To restore the “non use
position”, press button (A-fig. 21) and
push the headrest downwards.
All rear headrests can be removed.
fig. 24
A0A0610b
The particular headrest shape interferes in-
tentionally with the rear passenger’s correct
position on the back rest; this forces the pas-
senger to raise the headrest to use it cor-
rectly.
IMPORTANT When using rear seats,
the headrests shall be kept in the “all re-
moved” position.
Page 24 of 271

GETTING TO KNOW YOUR CAR
22
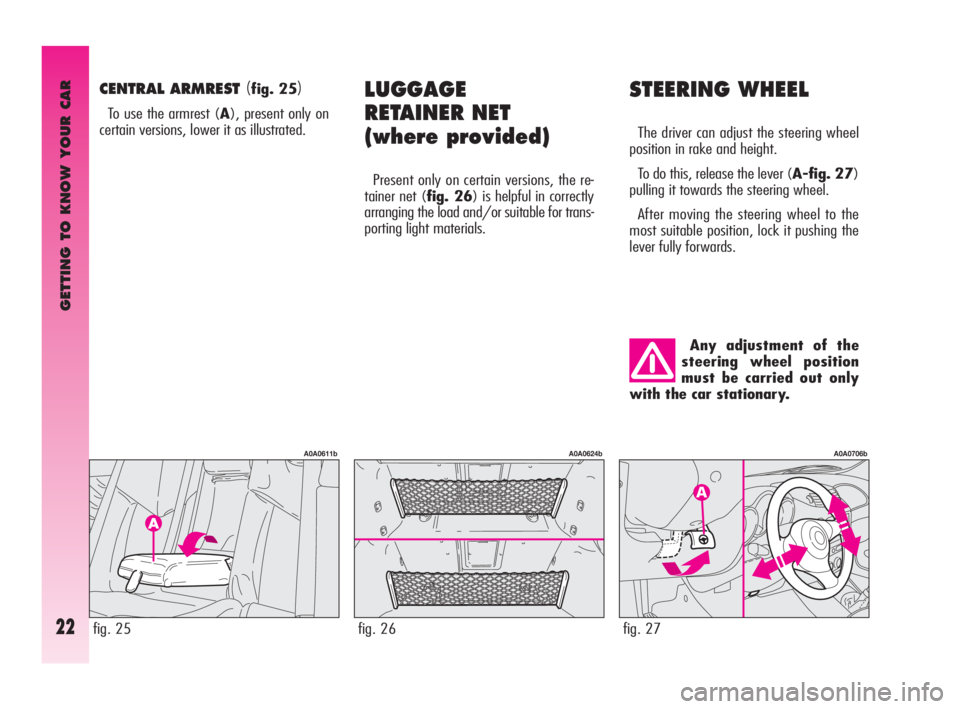
STEERING WHEEL
The driver can adjust the steering wheel
position in rake and height.
To do this, release the lever (A-fig. 27)
pulling it towards the steering wheel.
After moving the steering wheel to the
most suitable position, lock it pushing the
lever fully forwards.
LUGGAGE
RETAINER NET
(where provided)
Present only on certain versions, the re-
tainer net (fig. 26) is helpful in correctly
arranging the load and/or suitable for trans-
porting light materials.
fig. 27
A0A0706b
Any adjustment of the
steering wheel position
must be carried out only
with the car stationary.
CENTRAL ARMREST (fig. 25)
To use the armrest (A), present only on
certain versions, lower it as illustrated.
fig. 26
A0A0624b
fig. 25
A0A0611b
Page 25 of 271

GETTING TO KNOW YOUR CAR
23
REAR-VIEW MIRROR
ADJUSTMENT
INNER
The mirror, fitted with a safety device that
causes it to be released in the event of a
violent crash, can be moved using the lever
(A-fig. 28) to two different positions, nor-
mal or antiglare.
fig. 28
A0A0039b
Folding(fig. 30)
– In the event of need (for example when
the mirror causes difficulty in narrow spaces)
it is possible to fold the mirror moving it from
position (A) to position (B).
fig. 30
A0A0041b
When driving the mirrors
should always be in posi-
tion (A).
As the driver’s wing mir-
ror is curved, it may slight-
ly alter the perception of
distance.
OUTER
Electric adjustment (fig. 29)
– use the switch (A) to select the mirror
required (right or left);
– pressing the button (B) in one of the
four directions, move the mirror selected pre-
viously;
– position the switch (A) in the interme-
diate locking position.
IMPORTANTAdjustment is possible on-
ly with the ignition key at MAR.
fig. 29
A0A0040b
Page 26 of 271

GETTING TO KNOW YOUR CAR
24fig. 33
A0A0043b
POWER WINDOWS
IMPORTANTWith the ignition key at
STOPor removed, the power windows re-
main activated for about 3 minutes and are
deactivated immediately the moment a door
is opened.Driver’ side
(fig. 33)
The driver’s door panel contains the but-
tons that control the following windows,
with the ignition key at MAR:
A- left front window
B- right front window.
Press the button to lower the window. Pull
to raise it. Defrosting/demisting(fig. 31-32)
The electric mirrors are fitted with heat-
ing coils which come into operation with
rearscreen heating pressing the button (A)
thereby defrosting and/or demisting the mir-
rors.
IMPORTANTThe function is timed and
automatically switched off after a few min-
utes.
fig. 32
A0A0612b
fig. 31
A0A0042b
Page 27 of 271

GETTING TO KNOW YOUR CAR
25fig. 34
A0A0044b
Passenger’s side (fig. 34)
The button (A) controls the passenger’s
side window.
Button and window operation is the same
as that described for driver’s side.
Improper use of the pow-
er windows can be danger-
ous. Before and during its
operation, always make sure that
passengers are not exposed to the
risk of harm either directly by the
moving windows or by personal
objects drawn or knocked by them.Always remove the igni-
tion key when getting out
of the car to prevent the
power windows being operated ac-
cidentally and constituting a danger
to the passengers in the car.
Do not keep the button
pressed when the window
is completely raised or
lowered.
IMPORTANTThe driver’s power window
is fitted with the “continuous automatic op-
eration” device for both lowering and raising
the window. A brief press on the upper or
lower part of the button will cause it to move
and continue automatically: the window
stops in the required position by pressing ei-
ther the upper or lower part of the button
again. The passenger window is fitted with
“automatic continuous operation” device just
for window opening.
Page 28 of 271

GETTING TO KNOW YOUR CAR
26
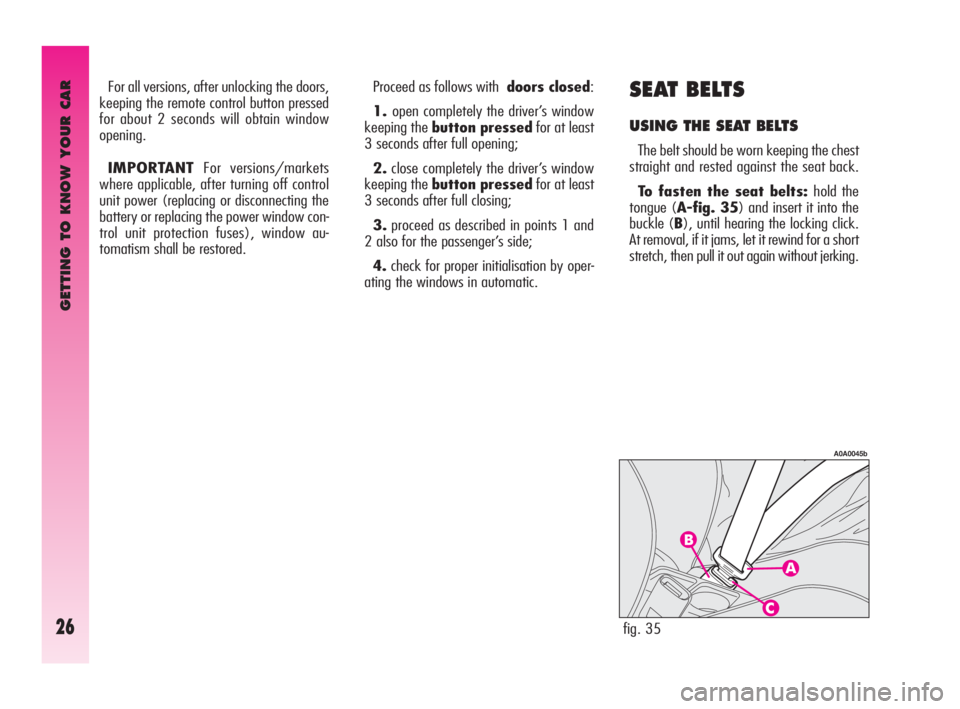
SEAT BELTS
USING THE SEAT BELTS
The belt should be worn keeping the chest
straight and rested against the seat back.
To fasten the seat belts: hold the
tongue (A-fig. 35) and insert it into the
buckle (B), until hearing the locking click.
At removal, if it jams, let it rewind for a short
stretch, then pull it out again without jerking.
fig. 35
A0A0045b
Proceed as follows with doors closed:
1.open completely the driver’s window
keeping the button pressedfor at least
3 seconds after full opening;
2.close completely the driver’s window
keeping the button pressedfor at least
3 seconds after full closing;
3.proceed as described in points 1 and
2 also for the passenger’s side;
4.check for proper initialisation by oper-
ating the windows in automatic. For all versions, after unlocking the doors,
keeping the remote control button pressed
for about 2 seconds will obtain window
opening.
IMPORTANTFor versions/markets
where applicable, after turning off control
unit power (replacing or disconnecting the
battery or replacing the power window con-
trol unit protection fuses), window au-
tomatism shall be restored.
Page 29 of 271

GETTING TO KNOW YOUR CAR
27
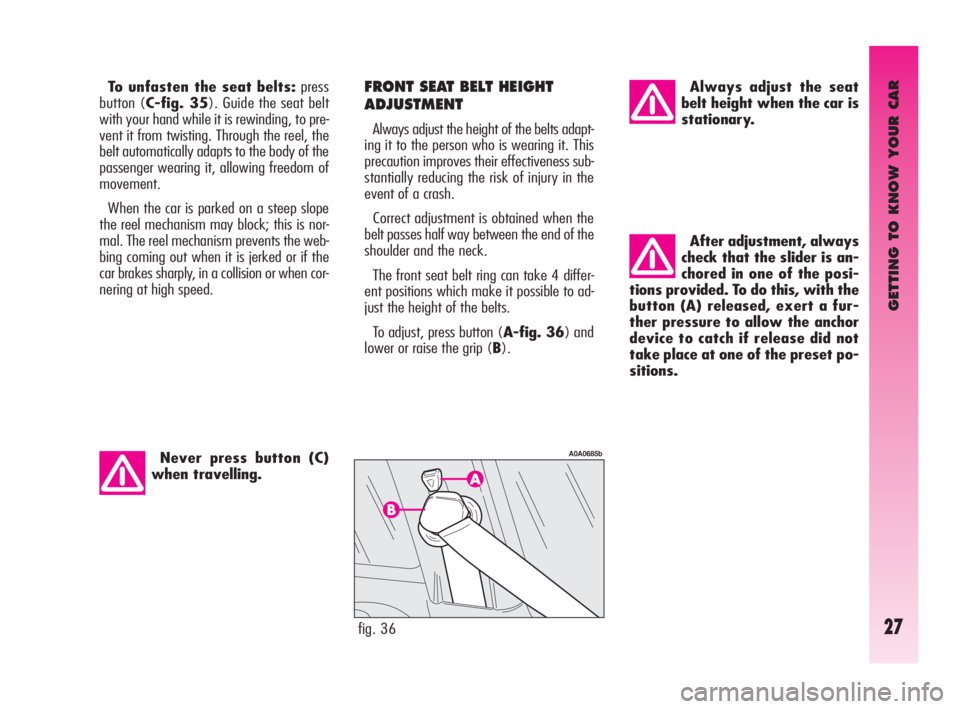
After adjustment, always
check that the slider is an-
chored in one of the posi-
tions provided. To do this, with the
button (A) released, exert a fur-
ther pressure to allow the anchor
device to catch if release did not
take place at one of the preset po-
sitions.
Never press button (C)
when travelling. To unfasten the seat belts:press
button (C-fig. 35). Guide the seat belt
with your hand while it is rewinding, to pre-
vent it from twisting. Through the reel, the
belt automatically adapts to the body of the
passenger wearing it, allowing freedom of
movement.
When the car is parked on a steep slope
the reel mechanism may block; this is nor-
mal. The reel mechanism prevents the web-
bing coming out when it is jerked or if the
car brakes sharply, in a collision or when cor-
nering at high speed.
Always adjust the seat
belt height when the car is
stationary. FRONT SEAT BELT HEIGHT
ADJUSTMENT
Always adjust the height of the belts adapt-
ing it to the person who is wearing it. This
precaution improves their effectiveness sub-
stantially reducing the risk of injury in the
event of a crash.
Correct adjustment is obtained when the
belt passes half way between the end of the
shoulder and the neck.
The front seat belt ring can take 4 differ-
ent positions which make it possible to ad-
just the height of the belts.
To adjust, press button (A-fig. 36) and
lower or raise the grip (B).
fig. 36
A0A0685b
Page 30 of 271

GETTING TO KNOW YOUR CAR
28
Rear seat belts shall be worn as shown in
fig. 38.Fig. 39shows improper belt fas-
tening. To tilt the back rest see paragraph
“Boot extension”.
IMPORTANTThe centre rear seatbelt is
installed on request only for versions/mar-
kets on which it is required.
IMPORTANTRemember that, in the
event of an accident, any passengers occu-
pying the rear seats who are not wearing
a seat belt not only subject themselves to
great personal risk, but constitute a danger
to the occupants of the front seats.PRE-TENSIONING DEVICES
To increase the efficiency of the front seat
belts, the car is fitted with pre-tensioning de-
vices. These devices “feel” that the car is
being subject to a violent impact by way of
a sensor and rewind the seat belts a few
centimetres. In this way they ensure that
the seat belt adheres to the wearer before
the restraining action begins.
The seat belt locks to indicate that the de-
vice has intervened; the seat belt cannot be
drawn back up even when guiding it man-
ually.
IMPORTANTThe pretensioner will give
maximum protection when the seat belt ad-
heres snugly to wearer’s chest and hips.
fig. 39
A0A0387b
fig. 38
A0A0386b
fig. 37
A0A0686b
REAR BELTS
To fasten the belt: gently pull the belt from
its reel and guide the tape to prevent it from
twisting, then insert the tongue (A-fig. 37)
into the buckle housing (B).
To unfasten the seat belts, press button (E).