display Alfa Romeo GT 2010 Owner handbook (in English)
[x] Cancel search | Manufacturer: ALFA ROMEO, Model Year: 2010, Model line: GT, Model: Alfa Romeo GT 2010Pages: 271, PDF Size: 5.34 MB
Page 94 of 271
GETTING TO KNOW YOUR CAR
92
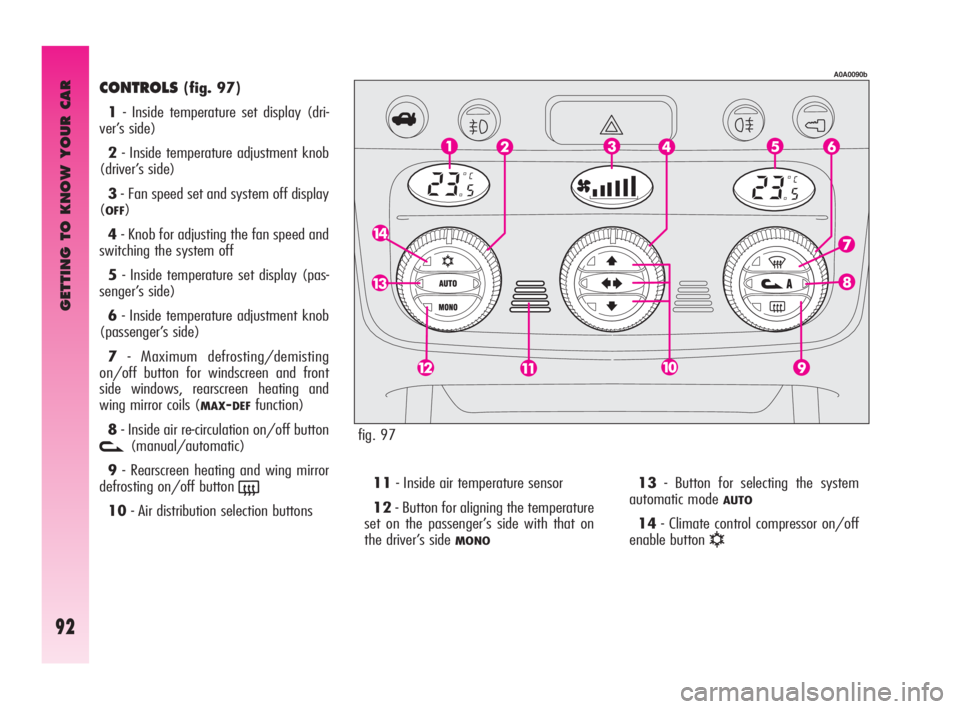
CONTROLS(fig. 97)
1- Inside temperature set display (dri-
ver’s side)
2- Inside temperature adjustment knob
(driver’s side)
3- Fan speed set and system off display
(
OFF)
4- Knob for adjusting the fan speed and
switching the system off
5- Inside temperature set display (pas-
senger’s side)
6- Inside temperature adjustment knob
(passenger’s side)
7- Maximum defrosting/demisting
on/off button for windscreen and front
side windows, rearscreen heating and
wing mirror coils (
MAX-DEFfunction)
8- Inside air re-circulation on/off button
v(manual/automatic)
9- Rearscreen heating and wing mirror
defrosting on/off button
(
10- Air distribution selection buttons 11- Inside air temperature sensor
12- Button for aligning the temperature
set on the passenger’s side with that on
the driver’s side
MONO
13- Button for selecting the system
automatic mode
AUTO
14- Climate control compressor on/off
enable button
√
fig. 97
A0A0090b
Page 95 of 271
GETTING TO KNOW YOUR CAR
93
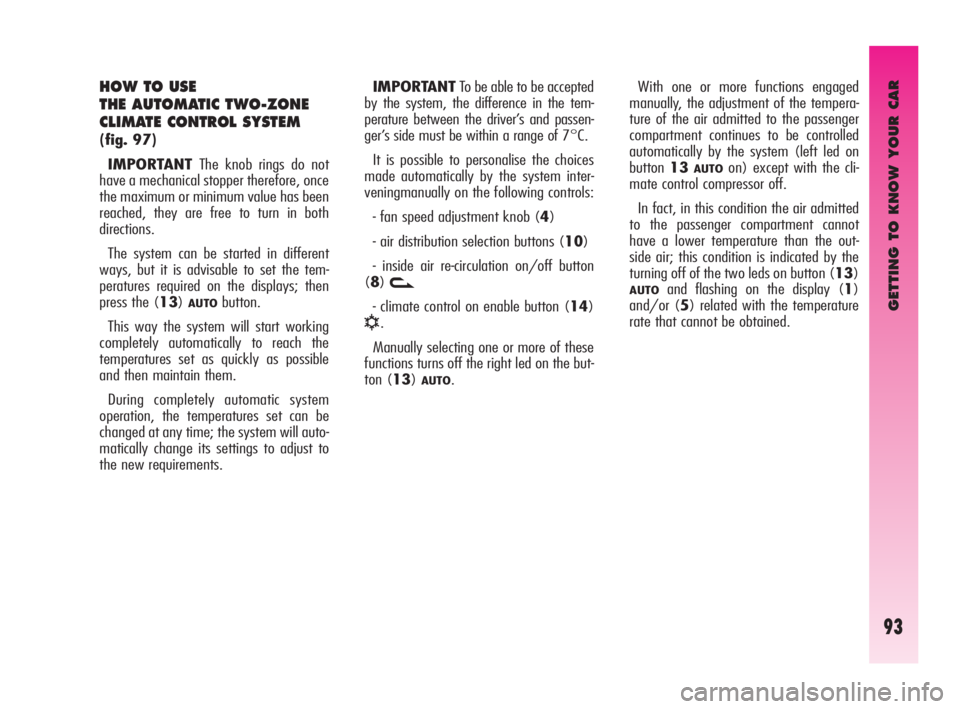
HOW TO USE
THE AUTOMATIC TWO-ZONE
CLIMATE CONTROL SYSTEM
(fig. 97)
IMPORTANTThe knob rings do not
have a mechanical stopper therefore, once
the maximum or minimum value has been
reached, they are free to turn in both
directions.
The system can be started in different
ways, but it is advisable to set the tem-
peratures required on the displays; then
press the (13)
AUTObutton.
This way the system will start working
completely automatically to reach the
temperatures set as quickly as possible
and then maintain them.
During completely automatic system
operation, the temperatures set can be
changed at any time; the system will auto-
matically change its settings to adjust to
the new requirements. IMPORTANTTo be able to be accepted
by the system, the difference in the tem-
perature between the driver’s and passen-
ger’s side must be within a range of 7°C.
It is possible to personalise the choices
made automatically by the system inter-
veningmanually on the following controls:
- fan speed adjustment knob (4)
- air distribution selection buttons (10)
- inside air re-circulation on/off button
(8)
v
- climate control on enable button (14)
√.
Manually selecting one or more of these
functions turns off the right led on the but-
ton (13)
AUTO.With one or more functions engaged
manually, the adjustment of the tempera-
ture of the air admitted to the passenger
compartment continues to be controlled
automatically by the system (left led on
button13
AUTOon) except with the cli-
mate control compressor off.
In fact, in this condition the air admitted
to the passenger compartment cannot
have a lower temperature than the out-
side air; this condition is indicated by the
turning off of the two leds on button (13)
AUTOand flashing on the display (1)
and/or (5) related with the temperature
rate that cannot be obtained.
Page 96 of 271

GETTING TO KNOW YOUR CAR
94
AIR TEMPERATURE
ADJUSTMENT KNOBS
(fig. 98)
Turning the rings of knobs (2or6),
clockwise or counter-clockwise, respective-
ly highers or lowers the temperature of
the air required respectively in the left
zone (knob 2) or right zone (knob 6) of
the passenger compartment. The temper-
atures set are shown on the displays (1)
and (5) above the knobs.
Separate operation of the temperatures
set is restored automatically using knob
(6).
Turning the knob rings clockwise or
counter-clockwise until they reach the
extreme selections HIorLO, the maxi-
mum heating or cooling functions are
respectively engaged:
A0A0204b
fig. 98
Page 97 of 271

GETTING TO KNOW YOUR CAR
95
HI function
(highest heating power - fig. 99)
This is turned on setting on the display a
temperature above 32.5°C, and can be
activated independently from the driver’s
or passenger’s side or both; this setting
brings the system to the “monozone”
mode and is shown on both displays.
This function can be engaged when
requiring to heat the passenger compart-
ment as quickly as possible, exploiting the
maximum potential of the system.
This function uses the maximum temper-
ature of the coolant fluid, while air distrib-
ution and fan speed are controlled accord-
ing to the system settings.
This function is unadvisable with
the engine cold to prevent admit-
ting air that is not warm enough
to the passenger compartment.
All manual settings are possible with this
function on.
To switch the system off, simply turn the
ring of knob (2) or (6) of the tempera-
ture set to a value below 32.5°C; the
opposite display will show 32.5°C.
A0A0218b
fig. 99
Pressing key (13)
AUTOthe display will
show a temperature of 32.5°C and returns
to an operating condition with automatic
temperature adjustment.
Page 98 of 271
GETTING TO KNOW YOUR CAR
96
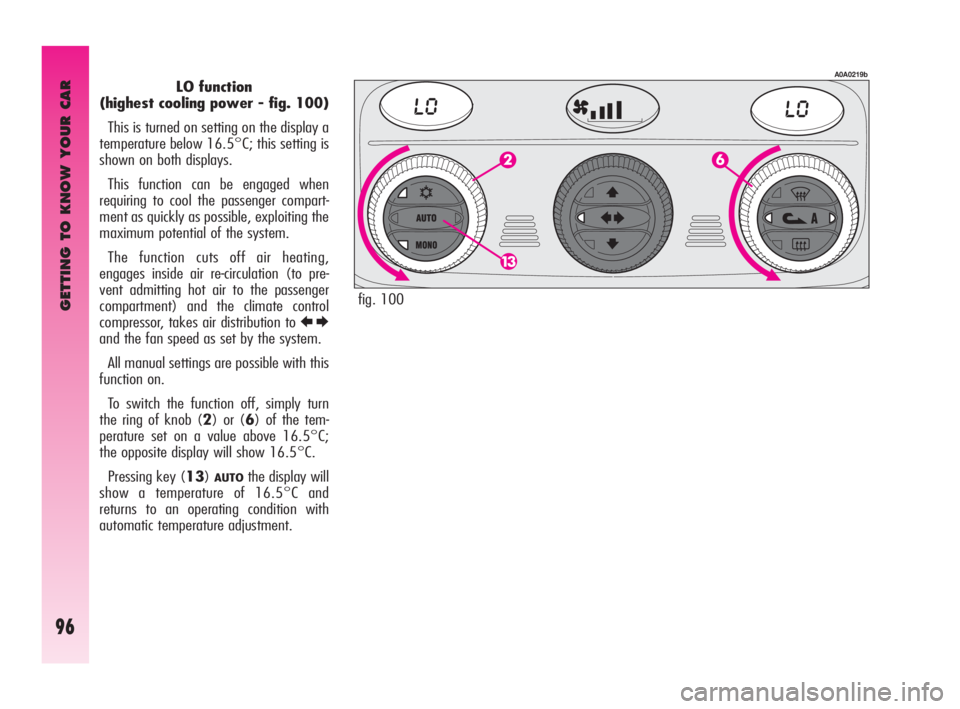
LO function
(highest cooling power - fig. 100)
This is turned on setting on the display a
temperature below 16.5°C; this setting is
shown on both displays.
This function can be engaged when
requiring to cool the passenger compart-
ment as quickly as possible, exploiting the
maximum potential of the system.
The function cuts off air heating,
engages inside air re-circulation (to pre-
vent admitting hot air to the passenger
compartment) and the climate control
compressor, takes air distribution to
RE
and the fan speed as set by the system.
All manual settings are possible with this
function on.
To switch the function off, simply turn
the ring of knob (2) or (6) of the tem-
perature set on a value above 16.5°C;
the opposite display will show 16.5°C.
Pressing key (13)
AUTOthe display will
show a temperature of 16.5°C and
returns to an operating condition with
automatic temperature adjustment.
A0A0219b
fig. 100
Page 100 of 271

GETTING TO KNOW YOUR CAR
98
FAN SPEED
ADJUSTMENT KNOB
(fig. 102-103)
Turning the ring of knob (4), clockwise
or counter-clockwise, increases or decreas-
es the speed of the fan, thus the amount
of air admitted to the passenger compart-
ment; the 16 selectable speeds are shown
on a bar (in steps of 3), up to a maximum
of 6 bars lit:
- maximum fan speed = all bars lit;
- minimum fan speed = one bar lit.
The fan can be cut off (all bars off) only
if the climate control compressor has been
switched off pressing button (14)
√. To
restore automatic fan speed control, after a
manual adjustment, press button (13)
AUTO. Completely turning the ring of knob
(4) counter-clockwise switches the system
off, with the following situation: display
(1) off; display (5) off; centre display (3)
with litdisplay
OFFand left led on inside air
re-circulation button (8)
von.
IMPORTANTPressing the inside air
recirculation button (8)
vit is possible
to obtain the inlet of untreated outside air
to the passenger compartment.
To turn the system on again, simply turn
the ring of knob (4) clockwise, or press
any one button, except the inside air re-cir-
culation (8) and rearscreen (9) buttons;
this operation restores all the operating
conditions stored previously.IMPORTANTOn leaving the
OFFcon-
dition, inside air re-circulation
vreturns
to the condition prior to switching off.
A0A0205b
A0A0206bfig. 102
fig. 103
Page 102 of 271
GETTING TO KNOW YOUR CAR
100
turns on, or press button (13)AUTO; in
which case, however, the other manual
settings set will be cancelled.
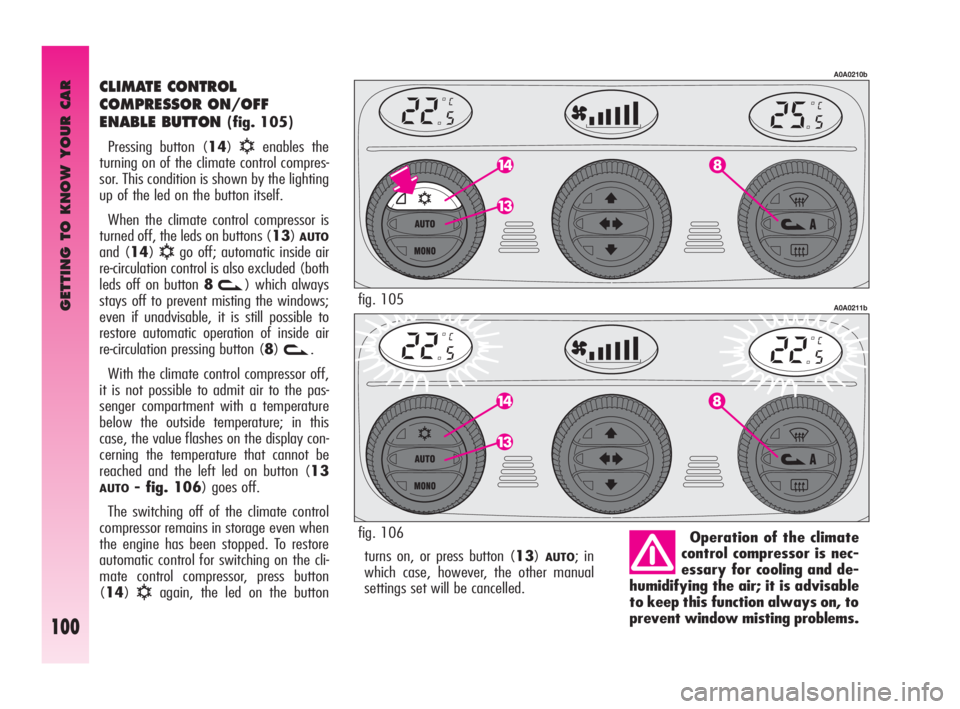
CLIMATE CONTROL
COMPRESSOR ON/OFF
ENABLE BUTTON
(fig. 105)
Pressing button (14)
√enables the
turning on of the climate control compres-
sor. This condition is shown by the lighting
up of the led on the button itself.
When the climate control compressor is
turned off, the leds on buttons (13)
AUTO
and (14)√go off; automatic inside air
re-circulation control is also excluded (both
leds off on button 8
v) which always
stays off to prevent misting the windows;
even if unadvisable, it is still possible to
restore automatic operation of inside air
re-circulation pressing button (8)
v.
With the climate control compressor off,
it is not possible to admit air to the pas-
senger compartment with a temperature
below the outside temperature; in this
case, the value flashes on the display con-
cerning the temperature that cannot be
reached and the left led on button (13
AUTO- fig. 106) goes off.
The switching off of the climate control
compressor remains in storage even when
the engine has been stopped. To restore
automatic control for switching on the cli-
mate control compressor, press button
(14)
√again, the led on the buttonOperation of the climate
control compressor is nec-
essary for cooling and de-
humidifying the air; it is advisable
to keep this function always on, to
prevent window misting problems.
A0A0210b
A0A0211bfig. 105
fig. 106
Page 105 of 271
GETTING TO KNOW YOUR CAR
103
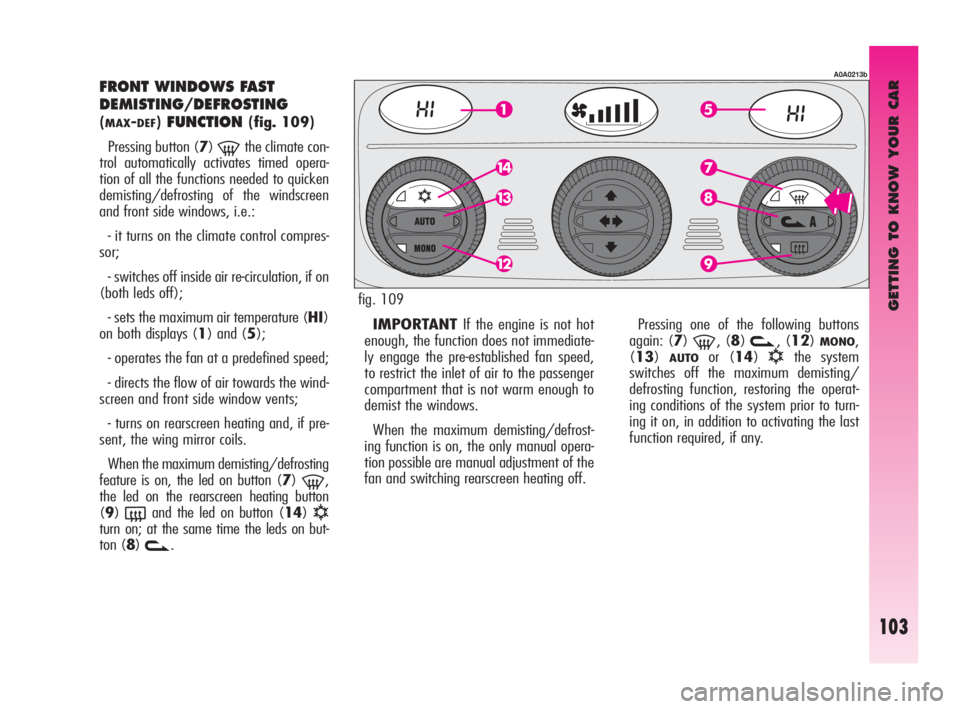
FRONT WINDOWS FAST
DEMISTING/DEFROSTING
(MAX-DEF)FUNCTION(fig. 109)
Pressing button (7)
-the climate con-
trol automatically activates timed opera-
tion of all the functions needed to quicken
demisting/defrosting of the windscreen
and front side windows, i.e.:
- it turns on the climate control compres-
sor;
- switches off inside air re-circulation, if on
(both leds off);
- sets the maximum air temperature (HI)
on both displays (1) and (5);
- operates the fan at a predefined speed;
- directs the flow of air towards the wind-
screen and front side window vents;
- turns on rearscreen heating and, if pre-
sent, the wing mirror coils.
When the maximum demisting/defrosting
feature is on, the led on button (7)
-,
the led on the rearscreen heating button
(9)
(and the led on button (14)√turn on; at the same time the leds on but-
ton (8)
v.IMPORTANTIf the engine is not hot
enough, the function does not immediate-
ly engage the pre-established fan speed,
to restrict the inlet of air to the passenger
compartment that is not warm enough to
demist the windows.
When the maximum demisting/defrost-
ing function is on, the only manual opera-
tion possible are manual adjustment of the
fan and switching rearscreen heating off. Pressing one of the following buttons
again: (7)
-, (8)v, (12)MONO,
(13)
AUTOor (14)√the system
switches off the maximum demisting/
defrosting function, restoring the operat-
ing conditions of the system prior to turn-
ing it on, in addition to activating the last
function required, if any.
A0A0213b
fig. 109
Page 109 of 271

GETTING TO KNOW YOUR CAR
107
If no leaks are found the car can be restart-
ed. Press button (A) to activate the fuel sup-
ply system again.
fig. 113
A0A0092b
If a smell of fuel is noted
following an accident, or
the fuel system is leaking,
to avoid the risk of fire do not re-
set the switch. DOOR LOCKING SYSTEM
(fig. 112)
To lock the doors simultaneously, press but-
ton (E), on the centre console panel, re-
gardless of the position of the ignition key.
The deterrent led turns on as follows:
– with the ignition key at MARglowing
steadily with a yellow light;
– with the ignition key at STOPflash-
ing with a red light (deterrence condition).
INERTIAL FUEL CUT-OFF
SWITCH
(fig. 113)
This is an automatic safety switch, to be
found on the floor next to the driver’s door
pillar, which is triggered in the event of a
crash of a certain magnitude to interrupt the
flow of fuel.
The cutting in of the inertial switch is shown
on the display of the instrument cluster.
Page 110 of 271

GETTING TO KNOW YOUR CAR
108
The wheels should be
locked after a few clicks of
the hand brake. If it does
not occur contact Alfa Romeo Au-
thorised Services to have the hand
brake adjusted.
HAND BRAKE (fig. 115)
The hand brake lever is located between
the two front seats.
To operate the brake when the car is sta-
tionary, pull lever (A) upwards, until the re-
quired braking action is obtained.
When the ignition key is at MAR, the
warning light on the instrument cluster
x
will come on.
fig. 115
A0A0620b
Adjust the beams every
time the load carried
changes.
Correct positions as a function of the load:
– position 0: one or two people occupy-
ing the front seats
– position 1: five people;
– position 2: five people + load in the
boot;
– position 3: driver + 350 Kg load all
stowed in luggage com-
partment
fig. 114
A0A1106b
HEADLIGHT AIMING DEVICE
(fig. 114)
The headlights should be aimed correctly
depending on the car load.
For the required adjustment (only possible
with low beams on), press buttons
▲/▼:
– press button
▲, to increase by one po-
sition (e.g.: 0
➟1➟ 2➟3);
– press button
▼to decrease by one po-
sition (e.g.: 3
➟2➟1➟0);
The display (A), in the tachometer shows
positions during adjustment.
Xenon headlights aiming is automatic, ver-
sions with this optional are therefore not fit-
ted with headlight aiming device.