ECU Alfa Romeo MiTo 2009 Owner handbook (in English)
[x] Cancel search | Manufacturer: ALFA ROMEO, Model Year: 2009, Model line: MiTo, Model: Alfa Romeo MiTo 2009Pages: 250, PDF Size: 4.61 MB
Page 51 of 250
50GETTING TO KNOW YOUR CAR
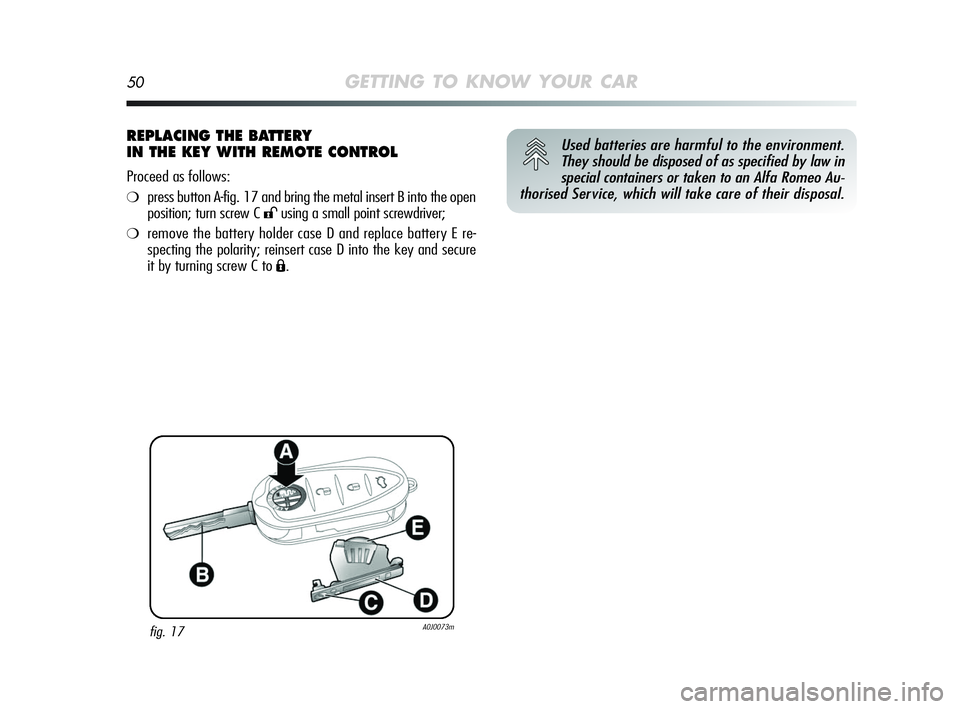
REPLACING THE BATTERY
IN THE KEY WITH REMOTE CONTROL
Proceed as follows:
❍press button A-fig. 17 and bring the metal insert B into the open
position; turn screw C
:using a small point screwdriver;
❍remove the battery holder case D and replace battery E re-
specting the polarity; reinsert case D into the key and secure
it by turning screw C to
Á.
fig. 17A0J0073m
Used batteries are harmful to the environment.
They should be disposed of as specified by law in
special containers or taken to an Alfa Romeo Au-
thorised Service, which will take care of their disposal.
001-126 Alfa MiTo GB 13-11-2008 10:08 Pagina 50
Page 106 of 250
GETTING TO KNOW YOUR CAR105
1
After having travelled several kilometres check that
the attachment retaining bolts are still securely fas-
tened.
Distribute the load uniformly and when driving
take into consideration the increased sensitivity
to transverse air currents.
Always obey local legislation regarding maximum
load size.
Never exceed the maximum permitted load.
The Lineaccessori Alfa Romeo includes a dedicated roof rack/ski
rack for this vehicle.HEADLIGHTS
ADJUSTING THE LIGHT BEAM
The correct orientation of the headlights is important for the dri-
ver’s comfort and safety as well as for all other road users. It is al-
so a specific rule of the highway code.
The headlights must be correctly directed to ensure the best visi-
bility conditions for all drivers. To check and, if necessary, adjust
the alignment contact an Alfa Romeo Authorised Service.
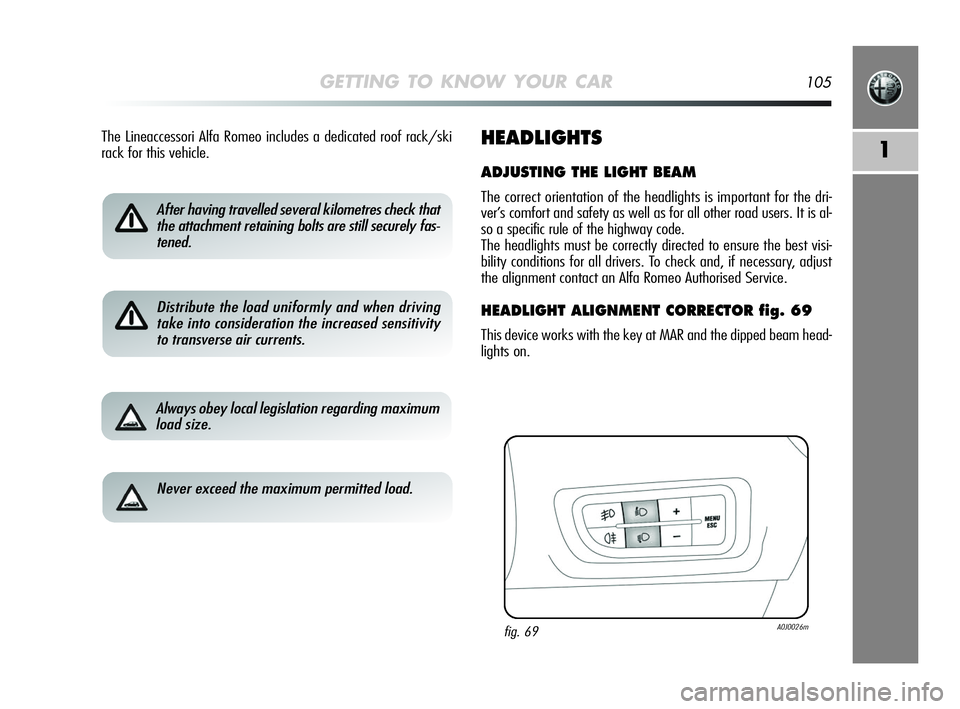
HEADLIGHT ALIGNMENT CORRECTOR fig. 69
This device works with the key at MAR and the dipped beam head-
lights on.
fig. 69A0J0026m
001-126 Alfa MiTo GB 13-11-2008 10:08 Pagina 105
Page 130 of 250
SAFETY129
2
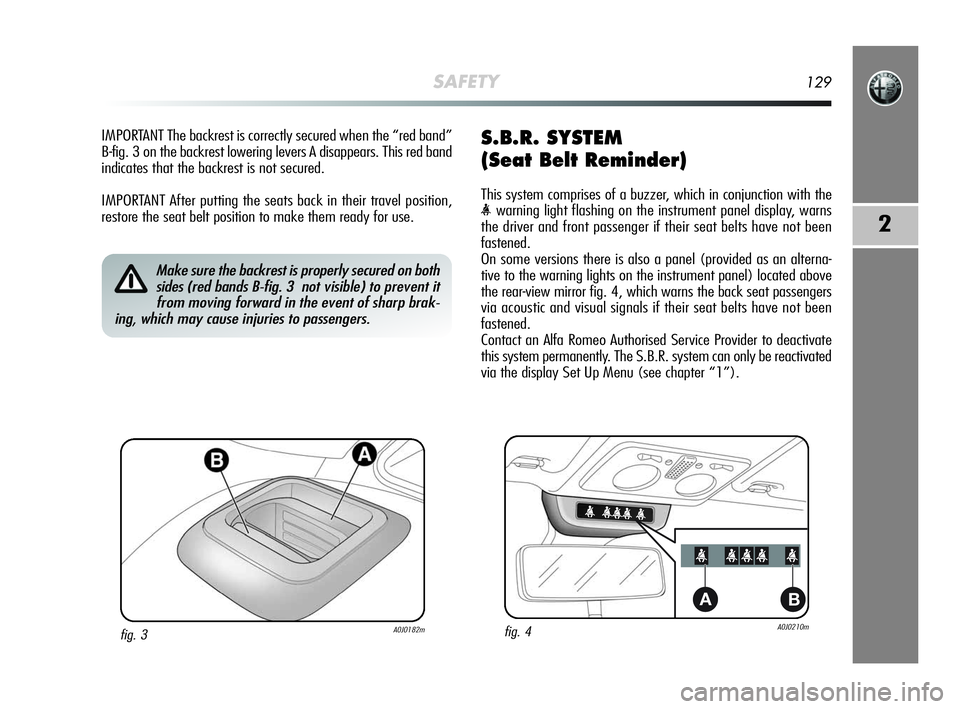
IMPORTANT The backrest is correctly secured when the “red band”
B-fig. 3 on the backrest lowering levers A disappears. This red band
indicates that the backrest is not secured.
IMPORTANT After putting the seats back in their travel position,
restore the seat belt position to make them ready for use.S.B.R. SYSTEM
(Seat Belt Reminder)
This system comprises of a buzzer, which in conjunction with the
fastened.
On some versions there is also a panel (provided as an alterna-
tive to the warning lights on the instrument panel) located above
the rear-view mirror fig. 4, which warns the back seat passengers
via acoustic and visual signals if their seat belts have not been
fastened.
Contact an Alfa Romeo Authorised Service Provider to deactivate
this system permanently. The S.B.R. system can only be reactivated
via the display Set Up Menu (see chapter “1”).
Make sure the backrest is properly secured on both
sides (red bands B-fig. 3 not visible) to prevent it
from moving forward in the event of sharp brak-
ing, which may cause injuries to passengers.
fig. 4A0J0210m
AB
fig. 3A0J0182m
127-148 Alfa MiTo GB 12-11-2008 15:41 Pagina 129
Page 137 of 250
136SAFETY
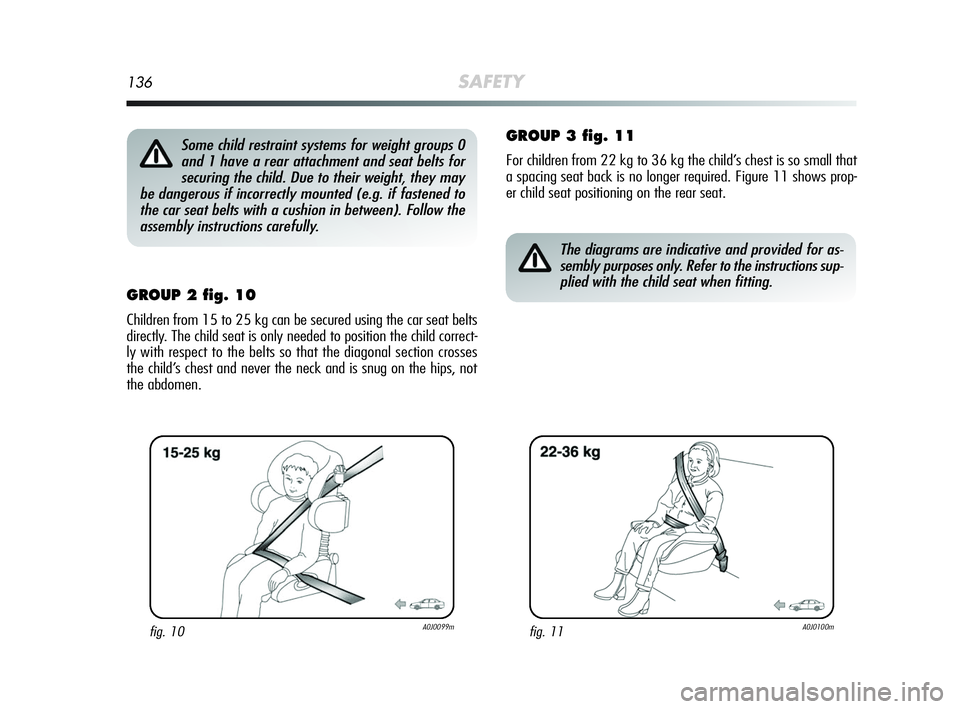
GROUP 2 fig. 10
Children from 15 to 25 kg can be secured using the car seat belts
directly. The child seat is only needed to position the child correct-
ly with respect to the belts so that the diagonal section crosses
the child’s chest and never the neck and is snug on the hips, not
the abdomen.
GROUP 3 fig. 11
For children from 22 kg to 36 kg the child’s chest is so small that
a spacing seat back is no longer required. Figure 11 shows prop-
er child seat positioning on the rear seat.
fig. 10A0J0099mfig. 11A0J0100m
The diagrams are indicative and provided for as-
sembly purposes only. Refer to the instructions sup-
plied with the child seat when fitting.
Some child restraint systems for weight groups 0
and 1 have a rear attachment and seat belts for
securing the child. Due to their weight, they may
be dangerous if incorrectly mounted (e.g. if fastened to
the car seat belts with a cushion in between). Follow the
assembly instructions carefully.
127-148 Alfa MiTo GB 12-11-2008 15:41 Pagina 136
Page 153 of 250
152STARTING UP AND DRIVING
EMERGENCY START
If the Ywarning light in the instrument panel remains on con-
stantly, contact an Alfa Romeo Authorised Service Provider.
STOPPING THE ENGINE
Turn the ignition key to STOP while the engine is idling.
IMPORTANT After a taxing drive, before turning the engine off you
should allow it to idle to allow the temperature in the engine com-
partment to fall.
PARKING
Switch off the engine and pull up the handbrake. Engage a gear
(1stif the car is facing uphill or reverse if it is facing downhill) and
leave the wheels steered to one side.
If the car is parked on a steep slope block the wheels with a wedge
or stone. Always remove the ignition key when leaving the vehi-
cle.
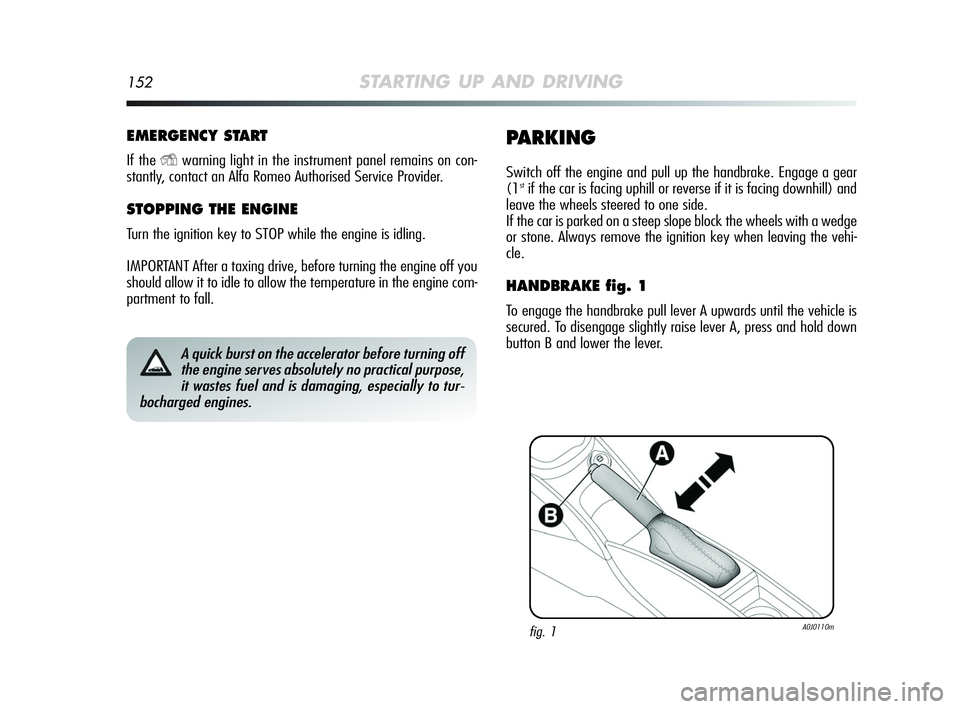
HANDBRAKE fig. 1
To engage the handbrake pull lever A upwards until the vehicle is
secured. To disengage slightly raise lever A, press and hold down
button B and lower the lever.
A quick burst on the accelerator before turning off
the engine serves absolutely no practical purpose,
it wastes fuel and is damaging, especially to tur-
bocharged engines.
fig. 1A0J0110m
149-158 Alfa MiTo GB 12-11-2008 15:41 Pagina 152
Page 154 of 250
STARTING UP AND DRIVING153
3
IMPORTANT Carry out these manoeuvres with the brake pedal pressed.
IMPORTANT For vehicles equipped with a front armrest, lift this
up to ensure that it does not interfere with the action of the hand-
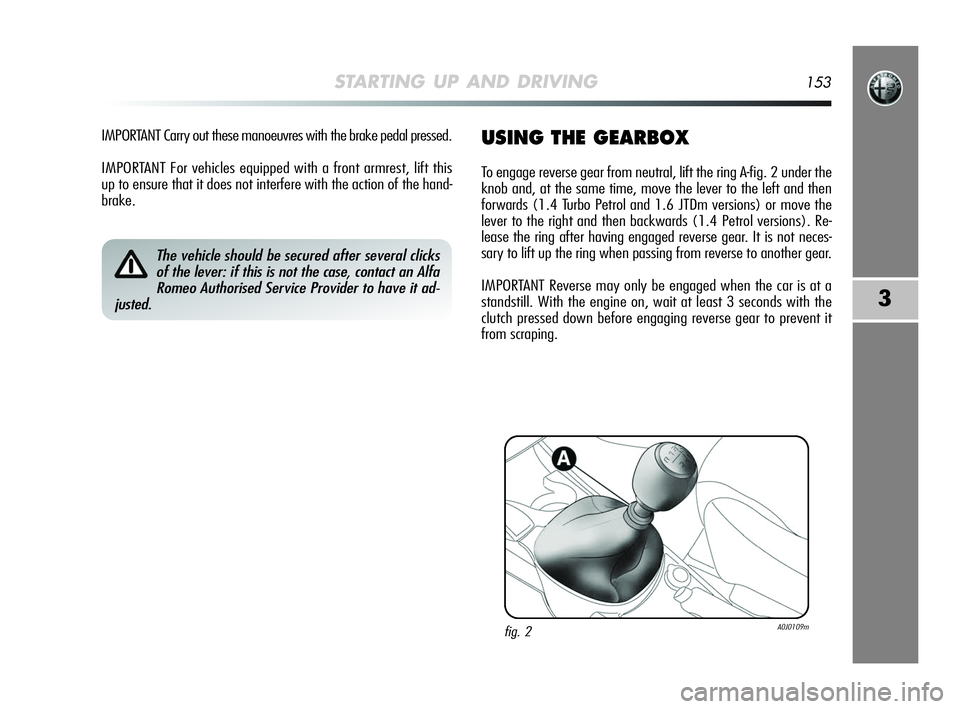
brake.USING THE GEARBOX
To engage reverse gear from neutral, lift the ring A-fig. 2 under the
knob and, at the same time, move the lever to the left and then
forwards (1.4 Turbo Petrol and 1.6 JTDm versions) or move the
lever to the right and then backwards (1.4 Petrol versions). Re-
lease the ring after having engaged reverse gear. It is not neces-
sary to lift up the ring when passing from reverse to another gear.
IMPORTANT Reverse may only be engaged when the car is at a
standstill. With the engine on, wait at least 3 seconds with the
clutch pressed down before engaging reverse gear to prevent it
from scraping.
The vehicle should be secured after several clicks
of the lever: if this is not the case, contact an Alfa
Romeo Authorised Service Provider to have it ad-
justed.
fig. 2A0J0109m
149-158 Alfa MiTo GB 12-11-2008 15:41 Pagina 153
Page 169 of 250
168IN AN EMERGENCY
REFITTING THE WHEEL
Following the procedure described previously, raise the car and re-
move the small spare wheel.
Proceed as follows:
❍make sure the contact surfaces between spare wheel and hub
are clean so that the fastening bolts will not come loose;
❍tighten the retaining bolts using wrench A-fig. 4;
❍lower the car and remove the jack;
❍use wrench A-fig. 4 to fully tighten the bolts, following the se-
quence shown in fig. 9;
❍for versions with steel rims: secure the wheel hub to the rim;
❍for versions with alloy rims with hub cap: align the pin on the
cap with the seat on the rim.
After tyre replacement:stow the small spare wheel in
the space provided in the boot; place the jack and other tools
into their container; place the container, complete with tools on
the small spare wheel; replace the luggage compartment mat.
159-196 Alfa MiTo GB 12-11-2008 15:45 Pagina 168
Page 171 of 250
170IN AN EMERGENCY
The kit cannot be used to repair damage to the tyre
sidewall. Do not use the fast repair kit on tyres
damaged by the vehicle running with a flat tyre.
If the wheel rim is damaged (the channel is so de-
formed as to cause an air leakage) it cannot be re-
paired. Do not remove the foreign body (screw
or nail) from the tyre.
Do not operate the compressor for longer than 20
minutes consecutively. Risk of overheating. The kit
is not suitable for permanent repairs. The tyres
may only be repaired temporarily.
Do not dispose of the cylinder and contained sealant
in the environment. Dispose of them according to the
national and local laws in force.
The cylinder contains ethylene and latex: may
cause an allergic reaction. Harmful if swallowed.
Irritates the eyes. May cause sensitisation by in-
halation or contact. Avoid contact with the eyes, skin and
clothes. In the event of contact, wash immediately with
plenty of water. Do not induce vomiting if swallowed. Rinse
your mouth and drink plenty of water. Call a doctor im-
mediately. Keep away from children. The product must
not be used by asthmatics. Do not breath in the vapours
during insertion and suction. Call a doctor immediately if
allergic reactions are noted. Store the cylinder in the spe-
cific compartment, away from sources of heat. The seal-
ing fluid will expire. Replace the cylinder containing the
sealant after the expiry date.
159-196 Alfa MiTo GB 12-11-2008 15:45 Pagina 170
Page 177 of 250
176IN AN EMERGENCY
REPLACING EXTERIOR BULBS
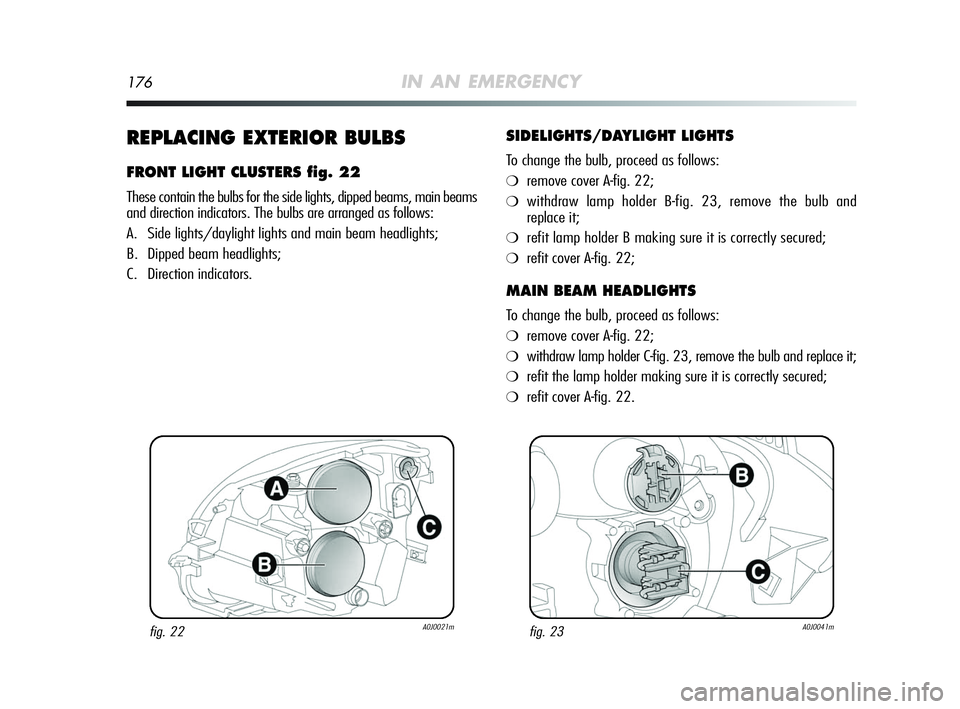
FRONT LIGHT CLUSTERS fig. 22
These contain the bulbs for the side lights, dipped beams, main beams
and direction indicators. The bulbs are arranged as follows:
A. Side lights/daylight lights and main beam headlights;
B. Dipped beam headlights;
C. Direction indicators.
SIDELIGHTS/DAYLIGHT LIGHTS
To change the bulb, proceed as follows:
❍remove cover A-fig. 22;
❍withdraw lamp holder B-fig. 23, remove the bulb and
replace it;
❍refit lamp holder B making sure it is correctly secured;
❍refit cover A-fig. 22;
MAIN BEAM HEADLIGHTS
To change the bulb, proceed as follows:
❍remove cover A-fig. 22;
❍withdraw lamp holder C-fig. 23, remove the bulb and replace it;
❍refit the lamp holder making sure it is correctly secured;
❍refit cover A-fig. 22.
fig. 22A0J0021mfig. 23A0J0041m
159-196 Alfa MiTo GB 12-11-2008 15:45 Pagina 176
Page 178 of 250
IN AN EMERGENCY177
4
DIPPED BEAM HEADLIGHTS
With incandescent bulb
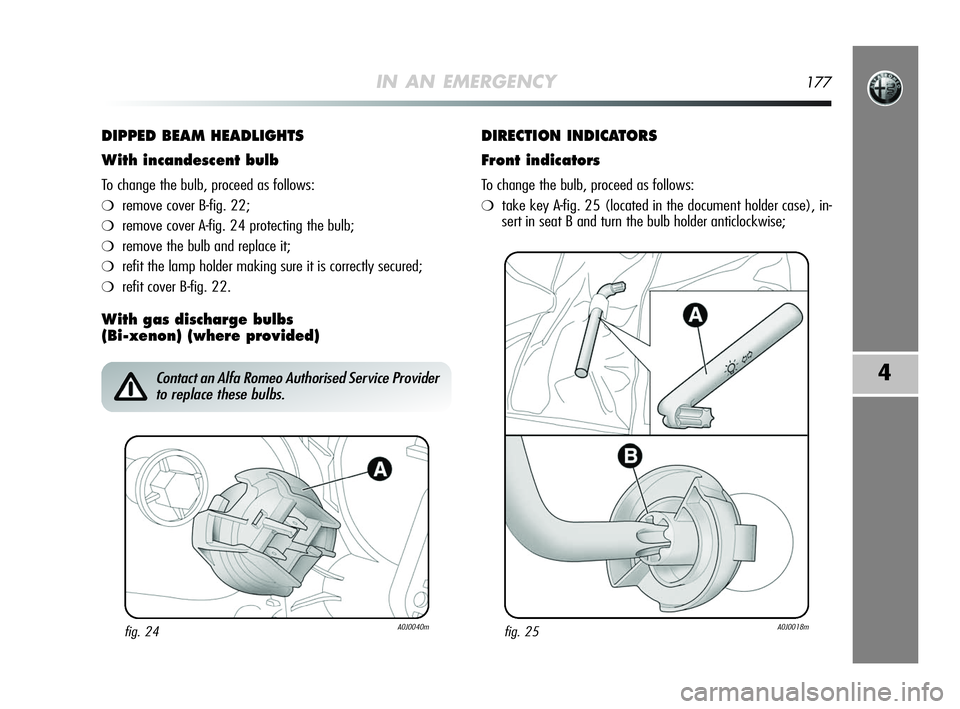
To change the bulb, proceed as follows:
❍remove cover B-fig. 22;
❍remove cover A-fig. 24 protecting the bulb;
❍remove the bulb and replace it;
❍refit the lamp holder making sure it is correctly secured;
❍refit cover B-fig. 22.
With gas discharge bulbs
(Bi-xenon) (where provided)DIRECTION INDICATORS
Front indicators
To change the bulb, proceed as follows:
❍take key A-fig. 25 (located in the document holder case), in-
sert in seat B and turn the bulb holder anticlockwise;
fig. 24A0J0040m
Contact an Alfa Romeo Authorised Service Provider
to replace these bulbs.
fig. 25A0J0018m
159-196 Alfa MiTo GB 12-11-2008 15:45 Pagina 177