engine Alfa Romeo MiTo 2012 Owner handbook (in English)
[x] Cancel search | Manufacturer: ALFA ROMEO, Model Year: 2012, Model line: MiTo, Model: Alfa Romeo MiTo 2012Pages: 262, PDF Size: 6.46 MB
Page 168 of 262
IN AN EMERGENCY167
4
JACK
Important notes:
❍the jack weight is 1.76 kg;
❍the jack requires no adjustment;
❍the jack cannot be repaired; if it breaks it must be replaced with
a new jack;
❍no tool other than the cranking device may be fitted on the
jack.Replace the wheel as follows:
❍stop the car in a position where it does not endanger on-com-
ing traffic and where you can replace the wheel safely. The
ground must be flat and compact;
❍switch off the engine, pull up the handbrake and engage 1st
gear or reverse; put on the high visibility jacket (required by
law) before leaving the vehicle;
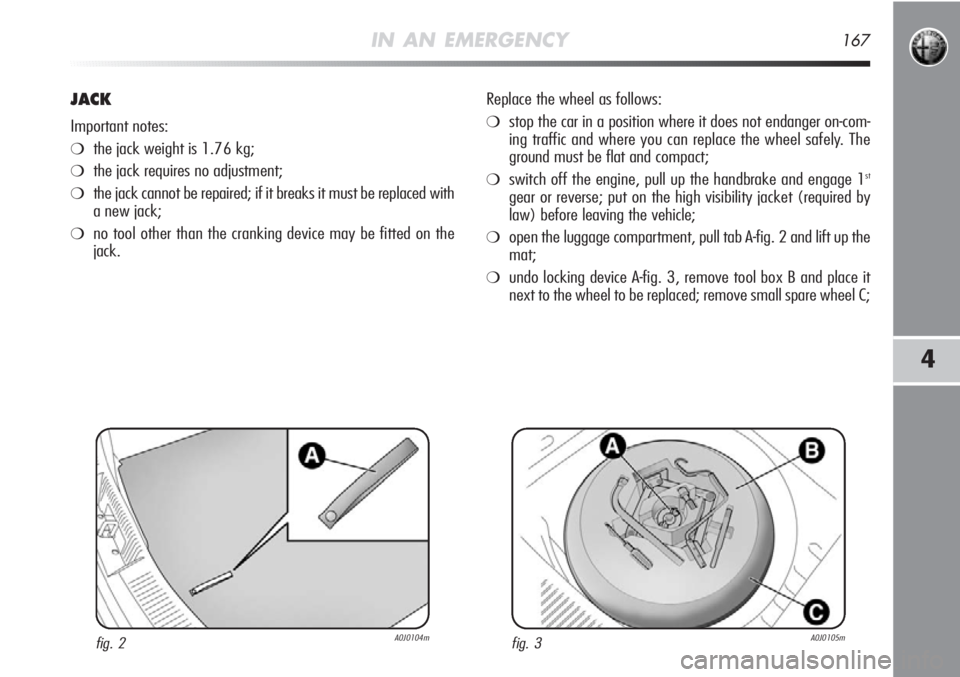
❍open the luggage compartment, pull tab A-fig. 2 and lift up the
mat;
❍undo locking device A-fig. 3, remove tool box B and place it
next to the wheel to be replaced; remove small spare wheel C;
fig. 2A0J0104mfig. 3A0J0105m
Page 177 of 262
176IN AN EMERGENCY
❍if a pressure value of a least 1.8 bars is not reached within 5
minutes, disconnect the compressor from the valve and current
socket, move the vehicle forwards by about 10 metres to dis-
tribute the sealant fluid in the tyre and repeat the inflation
procedure;
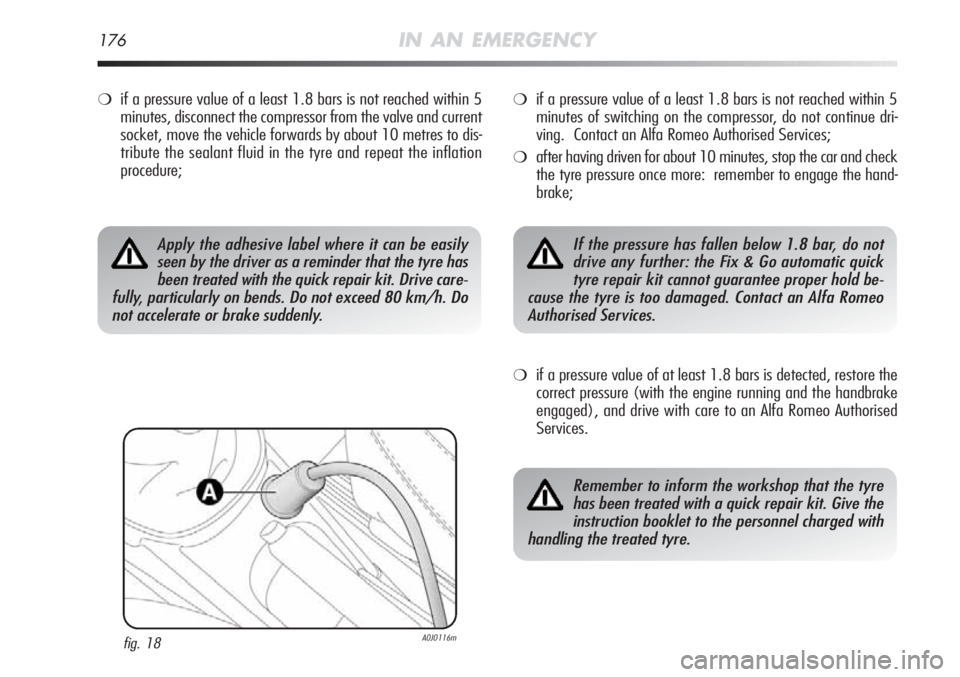
fig. 18A0J0116m
❍if a pressure value of a least 1.8 bars is not reached within 5
minutes of switching on the compressor, do not continue dri-
ving. Contact an Alfa Romeo Authorised Services;
❍after having driven for about 10 minutes, stop the car and check
the tyre pressure once more: remember to engage the hand-
brake;
❍if a pressure value of at least 1.8 bars is detected, restore the
correct pressure (with the engine running and the handbrake
engaged), and drive with care to an Alfa Romeo Authorised
Services.
Apply the adhesive label where it can be easily
seen by the driver as a reminder that the tyre has
been treated with the quick repair kit. Drive care-
fully, particularly on bends. Do not exceed 80 km/h. Do
not accelerate or brake suddenly.If the pressure has fallen below 1.8 bar, do not
drive any further: the Fix & Go automatic quick
tyre repair kit cannot guarantee proper hold be-
cause the tyre is too damaged. Contact an Alfa Romeo
Authorised Services.
Remember to inform the workshop that the tyre
has been treated with a quick repair kit. Give the
instruction booklet to the personnel charged with
handling the treated tyre.
Page 189 of 262
188IN AN EMERGENCY
If the fuse blows again contact an Alfa Romeo
Authorised Services.
Never replace a blown fuse with anything other
than a new fuse.
Under no circumstances should a fuse be replaced
with one of a higher amperage; FIRE RISK.
If a general protection fuse for safety systems
(air bag system, braking system), power unit sys-
tems (engine system, transmission system) or
steering system is triggered, contact Alfa Romeo Autho-
rized Services.
If a general protection fuse blows contact an Alfa
Romeo Authorised Services.
Before replacing a fuse, make sure you have re-
moved the key from the ignition and have turned
off and/or unplugged all energy-consuming
devices.
If a general protection fuse (MEGA-FUSE, MIDI-
FUSE, MAXI-FUSE) is activated, contact an Alfa
Romeo Authorised Services.
Page 190 of 262
IN AN EMERGENCY189
4
fig. 41A0J0204m
If you have to wash the engine compartment, take
care not to aim the jet of water directly at the fuse
box or windscreen wiper motors.FUSE LOCATION
Fuses are grouped together in three junction units located in the
engine compartment, dashboard and luggage compartment
Fuse box in engine compartment
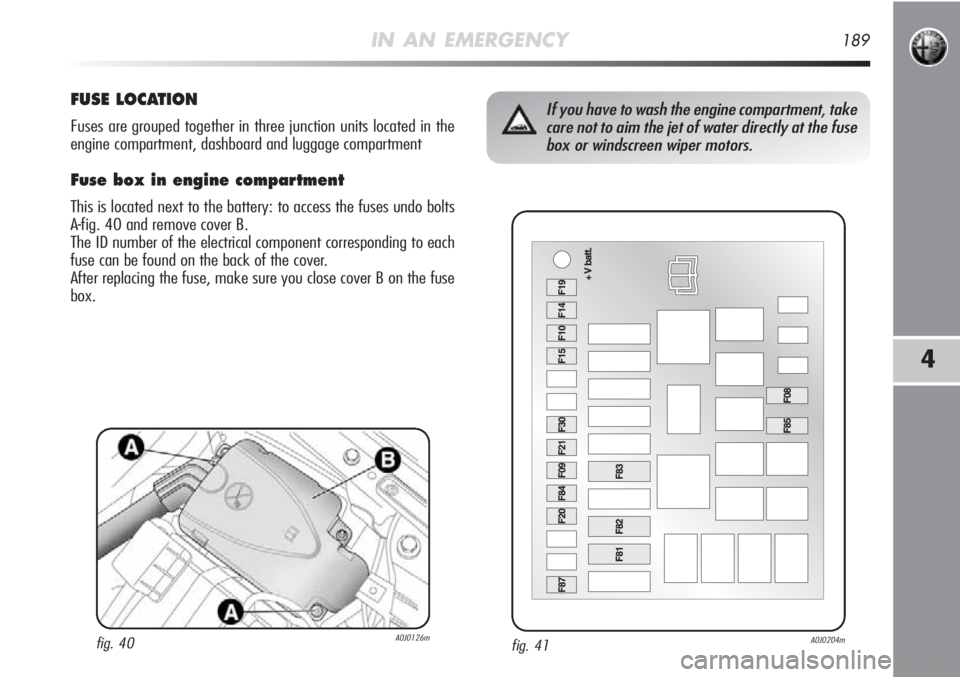
This is located next to the battery: to access the fuses undo bolts
A-fig. 40 and remove cover B.
The ID number of the electrical component corresponding to each
fuse can be found on the back of the cover.
After replacing the fuse, make sure you close cover B on the fuse
box.
fig. 40A0J0126m
Page 194 of 262
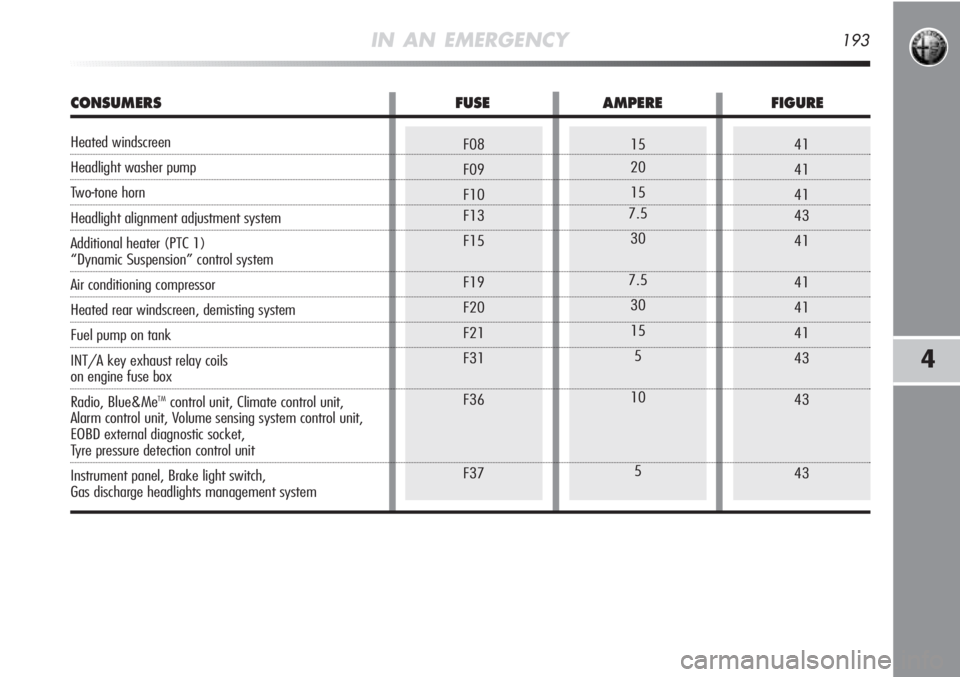
41
41
41
43
41
41
41
41
43
43
4315
20
15
7.5
30
7.5
30
15
5
10
5F08
F09
F10
F13
F15
F19
F20
F21
F31
F36
F37
IN AN EMERGENCY193
4
CONSUMERS FUSE AMPERE FIGURE
Heated windscreen
Headlight washer pump
Two-tone horn
Headlight alignment adjustment system
Additional heater (PTC 1)
“Dynamic Suspension” control system
Air conditioning compressor
Heated rear windscreen, demisting system
Fuel pump on tank
INT/A key exhaust relay coils
on engine fuse box
Radio, Blue&Me
TMcontrol unit, Climate control unit,
Alarm control unit, Volume sensing system control unit,
EOBD external diagnostic socket,
Tyre pressure detection control unit
Instrument panel, Brake light switch,
Gas discharge headlights management system
Page 196 of 262
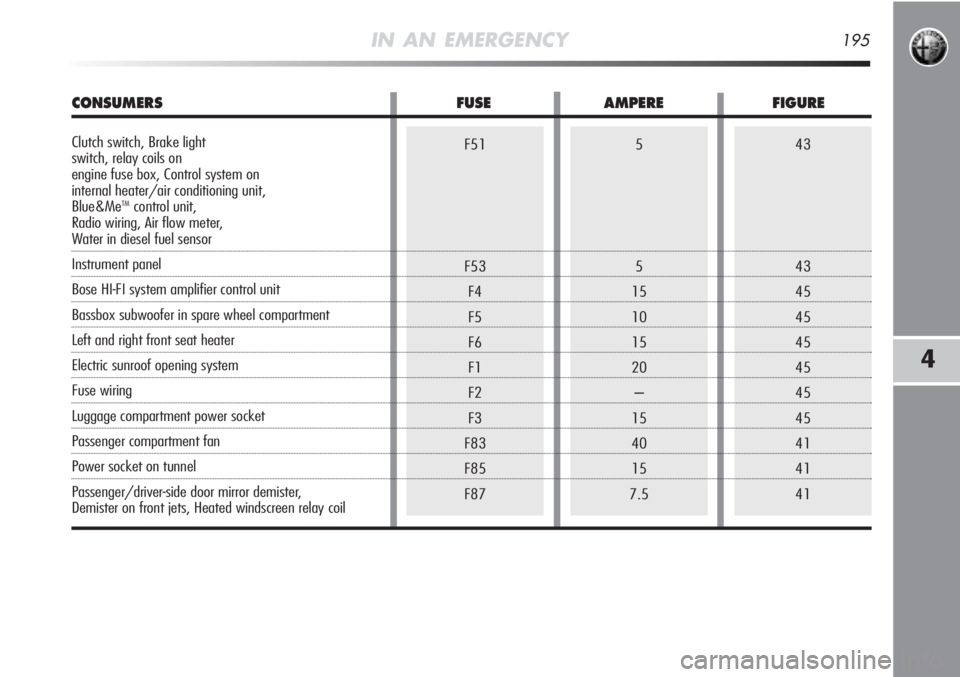
43
43
45
45
45
45
45
45
41
41
415
5
15
10
15
20
–
15
40
15
7.5F51
F53
F4
F5
F6
F1
F2
F3
F83
F85
F87
IN AN EMERGENCY195
4
CONSUMERS FUSE AMPERE FIGURE
Clutch switch, Brake light
switch, relay coils on
engine fuse box, Control system on
internal heater/air conditioning unit,
Blue&Me
TMcontrol unit,
Radio wiring, Air flow meter,
Water in diesel fuel sensor
Instrument panel
Bose HI-FI system amplifier control unit
Bassbox subwoofer in spare wheel compartment
Left and right front seat heater
Electric sunroof opening system
Fuse wiring
Luggage compartment power socket
Passenger compartment fan
Power socket on tunnel
Passenger/driver-side door mirror demister,
Demister on front jets, Heated windscreen relay coil
Page 201 of 262
200IN AN EMERGENCY
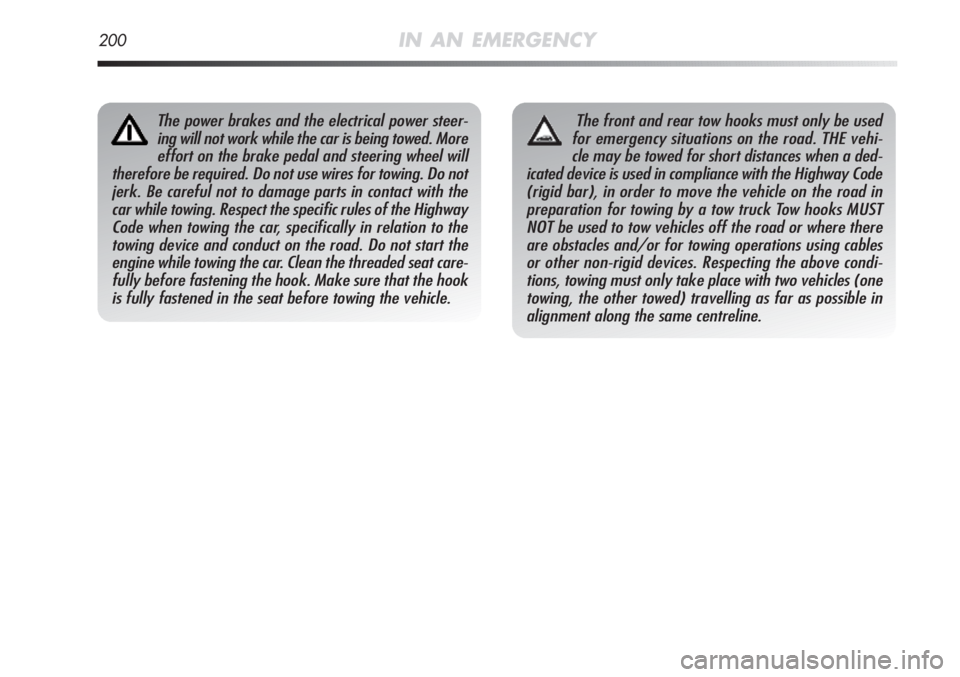
The power brakes and the electrical power steer-
ing will not work while the car is being towed. More
effort on the brake pedal and steering wheel will
therefore be required. Do not use wires for towing. Do not
jerk. Be careful not to damage parts in contact with the
car while towing. Respect the specific rules of the Highway
Code when towing the car, specifically in relation to the
towing device and conduct on the road. Do not start the
engine while towing the car. Clean the threaded seat care-
fully before fastening the hook. Make sure that the hook
is fully fastened in the seat before towing the vehicle.The front and rear tow hooks must only be used
for emergency situations on the road. THE vehi-
cle may be towed for short distances when a ded-
icated device is used in compliance with the Highway Code
(rigid bar), in order to move the vehicle on the road in
preparation for towing by a tow truck Tow hooks MUST
NOT be used to tow vehicles off the road or where there
are obstacles and/or for towing operations using cables
or other non-rigid devices. Respecting the above condi-
tions, towing must only take place with two vehicles (one
towing, the other towed) travelling as far as possible in
alignment along the same centreline.
Page 204 of 262
CARE AND MAINTENANCE203
5
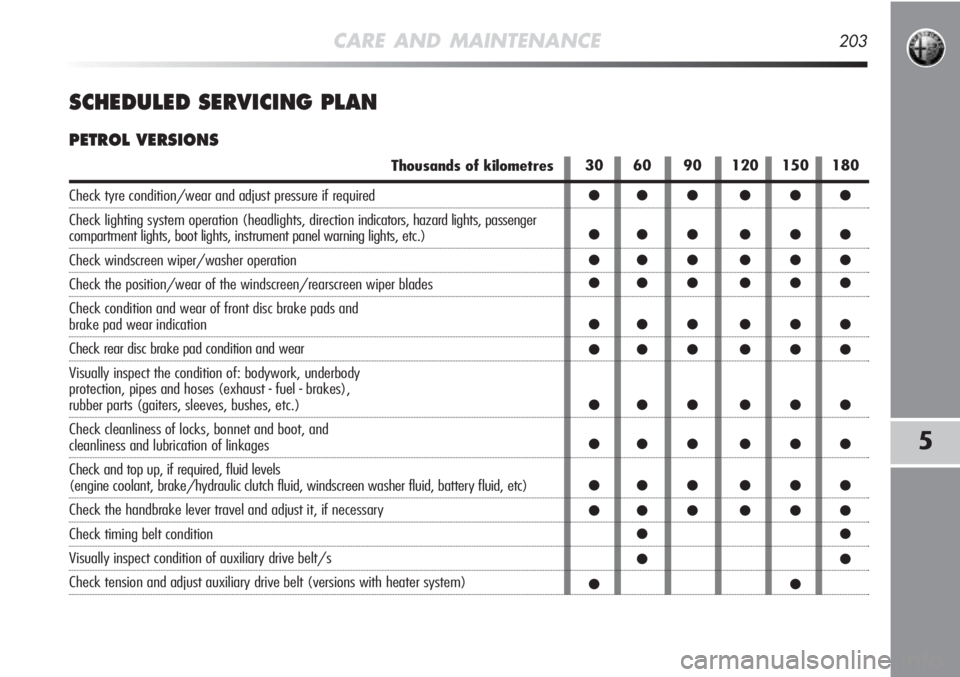
SCHEDULED SERVICING PLAN
PETROL VERSIONS
Thousands of kilometres
Check tyre condition/wear and adjust pressure if required
Check lighting system operation (headlights, direction indicators, hazard lights, passenger
compartment lights, boot lights, instrument panel warning lights, etc.)
Check windscreen wiper/washer operation
Check the position/wear of the windscreen/rearscreen wiper blades
Check condition and wear of front disc brake pads and
brake pad wear indication
Check rear disc brake pad condition and wear
Visually inspect the condition of: bodywork, underbody
protection, pipes and hoses (exhaust - fuel - brakes),
rubber parts (gaiters, sleeves, bushes, etc.)
Check cleanliness of locks, bonnet and boot, and
cleanliness and lubrication of linkages
Check and top up, if required, fluid levels
(engine coolant, brake/hydraulic clutch fluid, windscreen washer fluid, battery fluid, etc)
Check the handbrake lever travel and adjust it, if necessary
Check timing belt condition
Visually inspect condition of auxiliary drive belt/s
Check tension and adjust auxiliary drive belt (versions with heater system)30 60 90 120 150 180
●●● ●●●
●●● ●●●
●●● ●●●
●●● ●●●
●●● ●●●
●●● ●●●
●●● ●●●
●●● ●●●
●●● ●●●
●●● ●●●
●●
●●
●●
Page 205 of 262
204CARE AND MAINTENANCE
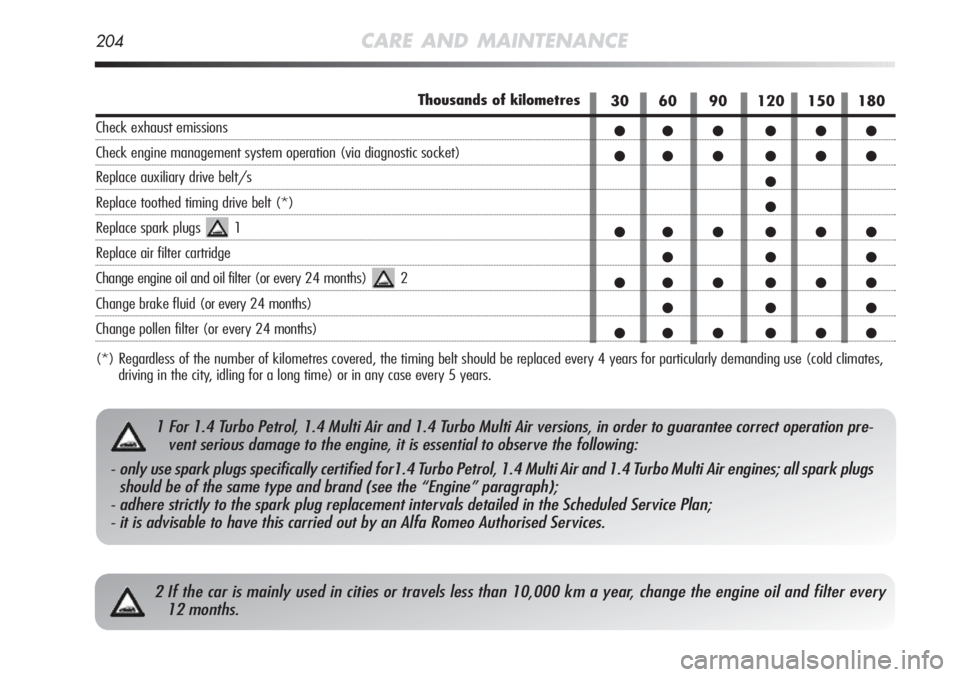
2 If the car is mainly used in cities or travels less than 10,000 km a year, change the engine oil and filter every
12 months.
30 60 90 120 150 180
●●● ●●●
●●● ●●●
●
●
●●● ●●●
●●●
●●● ●●●
●●●
●●● ●●●
1 For 1.4 Turbo Petrol, 1.4 Multi Air and 1.4 Turbo Multi Air versions, in order to guarantee correct operation pre-
vent serious damage to the engine, it is essential to observe the following:
- only use spark plugs specifically certified for1.4 Turbo Petrol, 1.4 Multi Air and 1.4 Turbo Multi Air engines; all spark plugs
should be of the same type and brand (see the “Engine” paragraph);
- adhere strictly to the spark plug replacement intervals detailed in the Scheduled Service Plan;
- it is advisable to have this carried out by an Alfa Romeo Authorised Services.
Thousands of kilometres
Check exhaust emissions
Check engine management system operation (via diagnostic socket)
Replace auxiliary drive belt/s
Replace toothed timing drive belt (*)
Replace spark plugs 1
Replace air filter cartridge
Change engine oil and oil filter (or every 24 months) 2
Change brake fluid (or every 24 months)
Change pollen filter (or every 24 months)
(*) Regardless of the number of kilometres covered, the timing belt should be replaced every 4 years for particularly demanding use (cold climates,
driving in the city, idling for a long time) or in any case every 5 years.
Page 206 of 262
CARE AND MAINTENANCE205
5
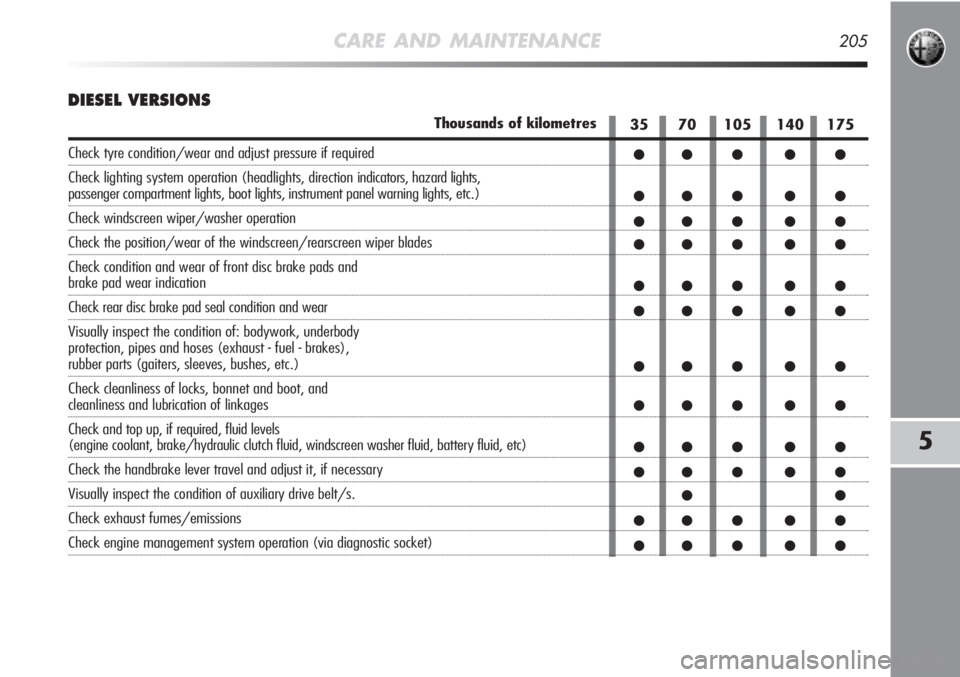
DIESEL VERSIONS
35 70 105 140 175
●● ● ● ●
●● ● ● ●
●● ● ● ●
●● ● ● ●
●● ● ● ●
●● ● ● ●
●● ● ● ●
●● ● ● ●
●● ● ● ●
●● ● ● ●
●●
●● ● ● ●
●● ● ● ●
Thousands of kilometres
Check tyre condition/wear and adjust pressure if required
Check lighting system operation (headlights, direction indicators, hazard lights,
passenger compartment lights, boot lights, instrument panel warning lights, etc.)
Check windscreen wiper/washer operation
Check the position/wear of the windscreen/rearscreen wiper blades
Check condition and wear of front disc brake pads and
brake pad wear indication
Check rear disc brake pad seal condition and wear
Visually inspect the condition of: bodywork, underbody
protection, pipes and hoses (exhaust - fuel - brakes),
rubber parts (gaiters, sleeves, bushes, etc.)
Check cleanliness of locks, bonnet and boot, and
cleanliness and lubrication of linkages
Check and top up, if required, fluid levels
(engine coolant, brake/hydraulic clutch fluid, windscreen washer fluid, battery fluid, etc)
Check the handbrake lever travel and adjust it, if necessary
Visually inspect the condition of auxiliary drive belt/s.
Check exhaust fumes/emissions
Check engine management system operation (via diagnostic socket)