window Alfa Romeo MiTo 2012 Owner handbook (in English)
[x] Cancel search | Manufacturer: ALFA ROMEO, Model Year: 2012, Model line: MiTo, Model: Alfa Romeo MiTo 2012Pages: 262, PDF Size: 6.46 MB
Page 6 of 262
GETTING TO KNOW YOUR CAR5
1
Dashboard............................................................................................... 7
Instrument panel and on-board instruments ................................................... 8
Display .................................................................................................... 26
Menu items.............................................................................................. 32
Trip Computer ........................................................................................... 42
Symbols .................................................................................................. 46
Alfa Romeo Code System ............................................................................ 46
The keys ................................................................................................. 47
Alarm ..................................................................................................... 53
Ignition device .......................................................................................... 55
Seats...................................................................................................... 56
Head restraints.......................................................................................... 59
Steering wheel......................................................................................... 60
Rearview mirrors ...................................................................................... 61
Climatic comfort........................................................................................ 63
Heating/climate control system .................................................................. 64
Two-zone automatic climate control system ................................................... 68
External lights .......................................................................................... 76
Window washing ...................................................................................... 79
Cruise Control ........................................................................................... 81
Courtesy lights ......................................................................................... 83
Controls.................................................................................................. 86
Page 7 of 262
6GETTING TO KNOW YOUR CAR
Interior fittings...................................................................................... 89
Electric sunroof ..................................................................................... 92
Doors .................................................................................................. 95
Electric windows................................................................................... 96
Luggage compartment........................................................................... 99
Bonnet................................................................................................ 103
Roof rack/ski rack ................................................................................ 104
Headlights ........................................................................................... 105
ABS system ......................................................................................... 107
VDC system ......................................................................................... 108
“Alfa DNA” system................................................................................. 111
Start&Stop system ................................................................................ 114
Dynamic Suspension.............................................................................. 119
EOBD system ....................................................................................... 120
Electric power steering ........................................................................... 120
Radio wiring system .............................................................................. 121
Wiring for navigation system................................................................... 122
Installation of electrical/electronic devices................................................. 122
Parking sensors.................................................................................... 123
T.P.M.S. system .................................................................................... 126
At the filling station ............................................................................... 129
Protecting the environment ..................................................................... 130
Page 8 of 262
GETTING TO KNOW YOUR CAR7
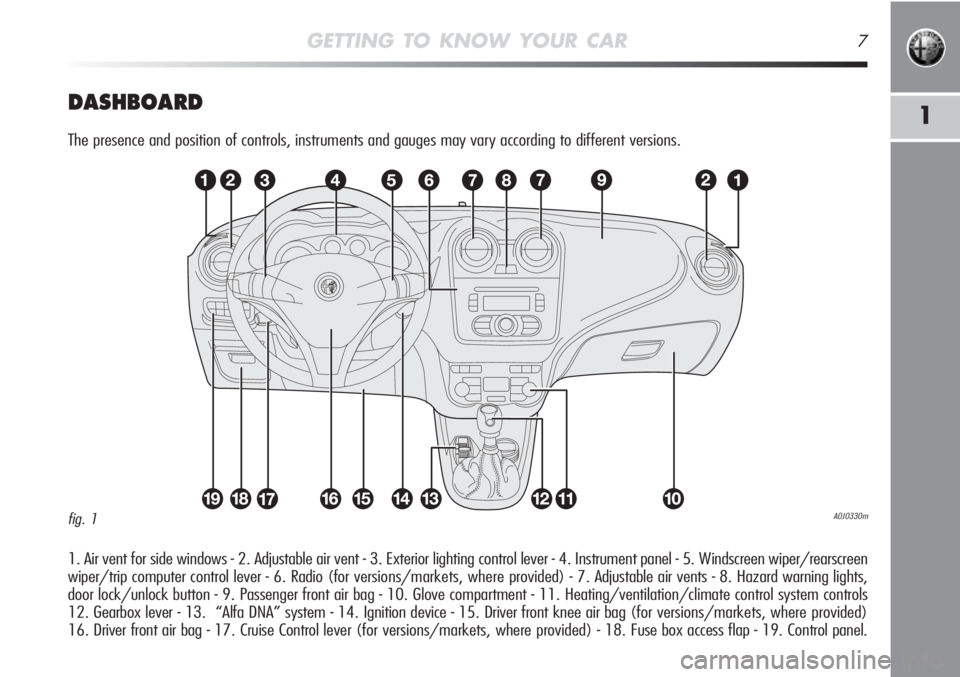
1DASHBOARD
The presence and position of controls, instruments and gauges may vary according to different versions.
1. Air vent for side windows - 2. Adjustable air vent - 3. Exterior lighting control lever - 4. Instrument panel - 5. Windscreen wiper/rearscreen
wiper/trip computer control lever - 6. Radio (for versions/markets, where provided) - 7. Adjustable air vents - 8. Hazard warning lights,
door lock/unlock button - 9. Passenger front air bag - 10. Glove compartment - 11. Heating/ventilation/climate control system controls
12. Gearbox lever - 13. “Alfa DNA” system - 14. Ignition device - 15. Driver front knee air bag (for versions/markets, where provided)
16. Driver front air bag - 17. Cruise Control lever (for versions/markets, where provided) - 18. Fuse box access flap - 19. Control panel.
A0J0330mfig. 1
Page 53 of 262
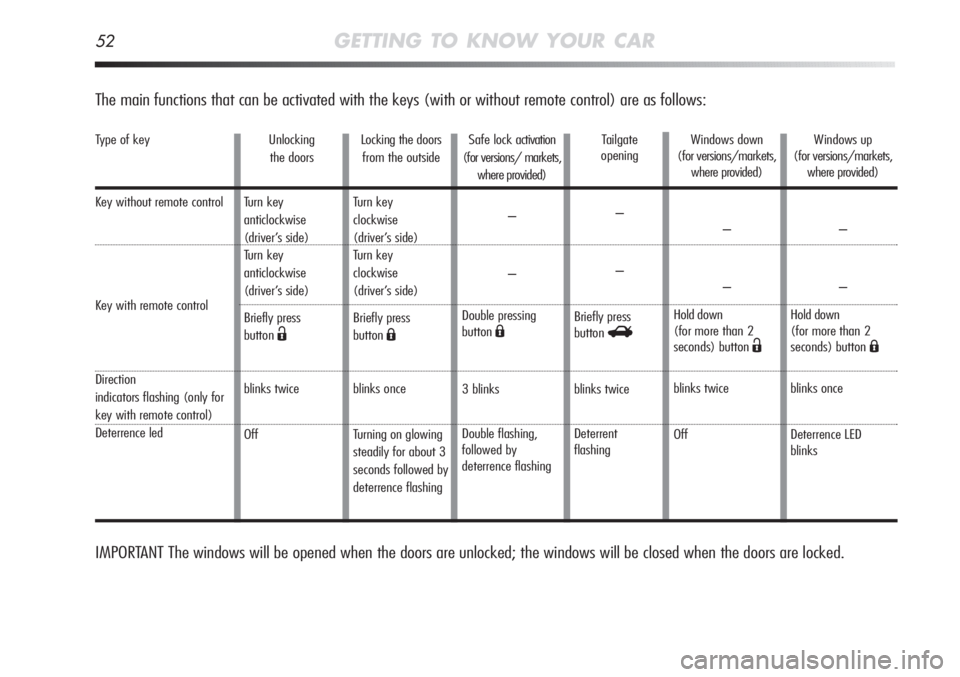
Type of key
Key without remote control
Key with remote control
Direction
indicators flashing (only for
key with remote control)
Deterrence led
52GETTING TO KNOW YOUR CAR
The main functions that can be activated with the keys (with or without remote control) are as follows:
Unlocking
the doors
Turn key
anticlockwise
(driver’s side)
Turn key
anticlockwise
(driver’s side)
Briefly press
button
Ë
blinks twice
OffLocking the doors
from the outside
Turn key
clockwise
(driver’s side)
Turn key
clockwise
(driver’s side)
Briefly press
button
Á
blinks once
Turning on glowing
steadily for about 3
seconds followed by
deterrence flashingSafe lock activation
(for versions/ markets,
where provided)
–
–
Double pressing
button
Á
3 blinks
Double flashing,
followed by
deterrence flashingTailgate
opening
–
–
Briefly press
button
R
blinks twice
Deterrent
flashing
IMPORTANT The windows will be opened when the doors are unlocked; the windows will be closed when the doors are locked.
Windows down
(for versions/markets,
where provided)
–
–
Hold down
(for more than 2
seconds) button
Ë
blinks twice
OffWindows up
(for versions/markets,
where provided)
–
–
Hold down
(for more than 2
seconds) button
Á
blinks once
Deterrence LED
blinks
Page 55 of 262
54GETTING TO KNOW YOUR CAR
SWITCHING OFF THE ALARM
Press the Ëbutton. The following operations are performed (ex-
cluding some versions for specific markets):
❍the direction indicators flash twice;
❍two brief acoustic signals are emitted;
❍the doors are unlocked.
IMPORTANT If the central door locking system is engaged using the
metal insert of the key, the alarm is not disabled.
VOLUME SENSING/ANTI-TILT PROTECTION
To guarantee the correct operation of the protection, close the side
windows and any sunroof completely (for versions/markets, where
provided).
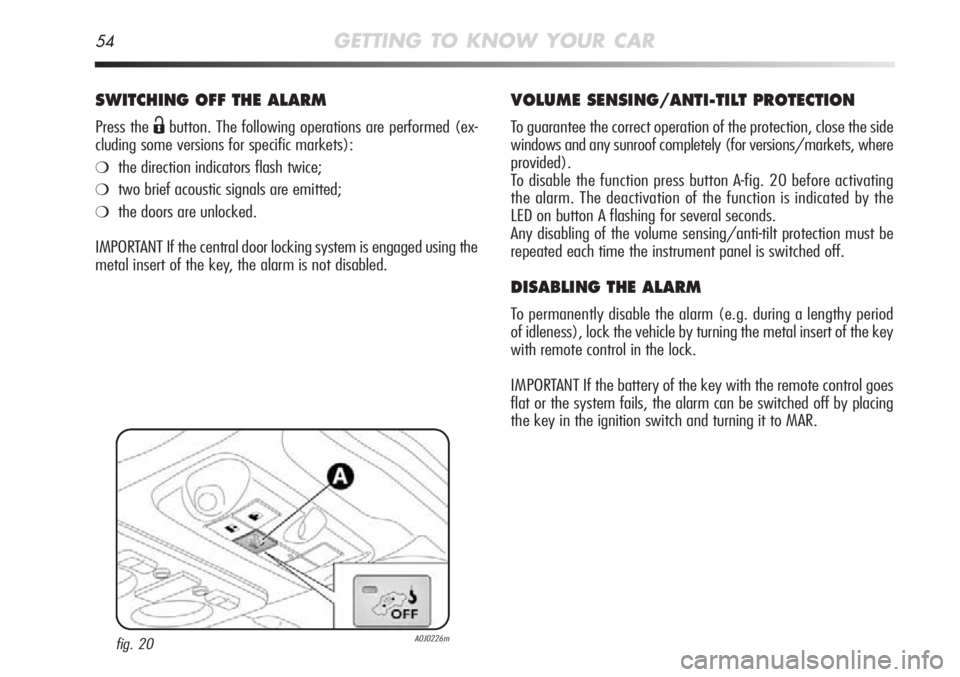
To disable the function press button A-fig. 20 before activating
the alarm. The deactivation of the function is indicated by the
LED on button A flashing for several seconds.
Any disabling of the volume sensing/anti-tilt protection must be
repeated each time the instrument panel is switched off.
DISABLING THE ALARM
To permanently disable the alarm (e.g. during a lengthy period
of idleness), lock the vehicle by turning the metal insert of the key
with remote control in the lock.
IMPORTANT If the battery of the key with the remote control goes
flat or the system fails, the alarm can be switched off by placing
the key in the ignition switch and turning it to MAR.
fig. 20A0J0226m
Page 67 of 262
66GETTING TO KNOW YOUR CAR
FRONT WINDOW FAST
DEMISTING/DEFROSTING
(WINDSCREEN AND SIDE WINDOWS)
The climate control system is very useful to make window demist-
ing faster. Adjust the controls as described previously and switch
on the climate control system by pressing button E.
Proceed as follows:
❍turn knob A to the red section;
❍turn knob B to 4 -(maximum fan speed);
❍turn knob C to -;
❍press button D to disable the air recirculation system (the LED
on the button should be off);
After demisting/defrosting, operate the controls to restore the re-
quired comfort.
Window demisting
The climate control system is very useful in preventing the win-
dows from misting up in the event of high levels of humidity.
In the event of considerable outside moisture and/or rain and/or
considerable differences in temperature inside and outside the pas-
senger compartment, perform the following preventive demisting
procedure:
❍turn knob A to the red section;
❍press button D to disable the air recirculation system (the LED
on the button should be off);
❍turn knob C to -with the possibility of moving it to position
®if demisting does not take place
❍turn knob B to the 2ndspeed.
Page 68 of 262
GETTING TO KNOW YOUR CAR67
1
DEMISTING/DEFROSTING
OF HEATED REAR WINDSCREEN
Press button F (() to activate/deactivate the function. The func-
tion is automatically deactivated after 20 minutes.
For versions/markets, where fitted, pressing the
(button also
activates the defrosting and defogging of the external rearview mir-
rors, the heated windscreen (where fitted) and the heated spray
nozzles (where fitted).
IMPORTANT Do not affix stickers to the inside of the rear window
over the heating filaments to avoid damage that might cause it
to stop working properly.
AIR RECIRCULATION
Press button D (T) so that the LED on the button lights up. It
is advisable to switch air recirculation on while standing in traffic
or in tunnels to prevent the introduction of polluted air.
Do not use the function for a long time, particularly if there are many
passengers on board, to prevent the windows from misting up.
IMPORTANT The air recirculation system makes it possible to reach
the required “heating” or “cooling” conditions faster. Do not use
the air recirculation function on rainy/cold days as it would con-
siderably increase the possibility of the windows misting inside.
LOOKING AFTER THE SYSTEM
Run the climate control system for at least 10 minutes every month
during the winter. Have the system checked by an Alfa Romeo
Authorised Service before the summer.
Page 69 of 262
68GETTING TO KNOW YOUR CAR
TWO-ZONE AUTOMATIC CLIMATE CONTROL SYSTEM (for versions/markets, where provided)
EFGABC
L
D
NHIM
A0J0037mfig. 32
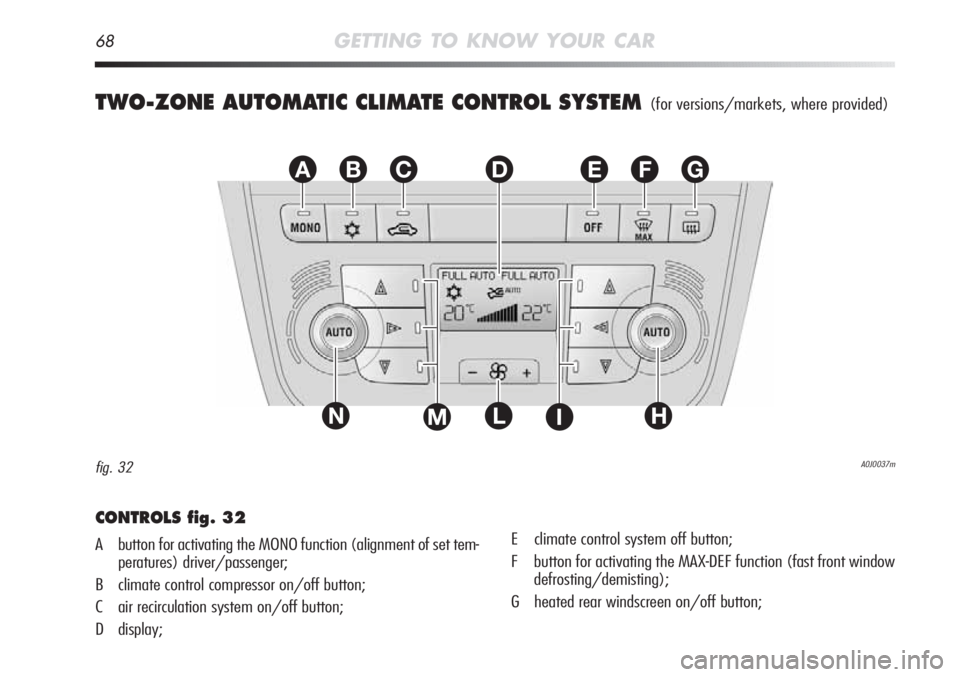
CONTROLS fig. 32
A button for activating the MONO function (alignment of set tem-
peratures) driver/passenger;
B climate control compressor on/off button;
C air recirculation system on/off button;
D display;E climate control system off button;
F button for activating the MAX-DEF function (fast front window
defrosting/demisting);
G heated rear windscreen on/off button;
Page 72 of 262
GETTING TO KNOW YOUR CAR71
1
In FULL AUTO mode the climate control system automatically man-
ages the air distribution; the LEDs on the I and M buttons should
be off.
When set manually, the set distribution is shown by the LEDs on
the selected buttons.
In combined function mode the relevant function is enabled si-
multaneously with those already set by pressing the correspond-
ing button. If a button is pressed for a function that is active, the
operation is cancelled and the corresponding LED goes off. To re-
store automatic air distribution control after making a manual set-
ting, press the AUTO button.
When the driver selects air distribution to the windscreen, the air
distribution on the passenger’s side is also aligned to the wind-
screen. The passenger can select a different distribution mode by
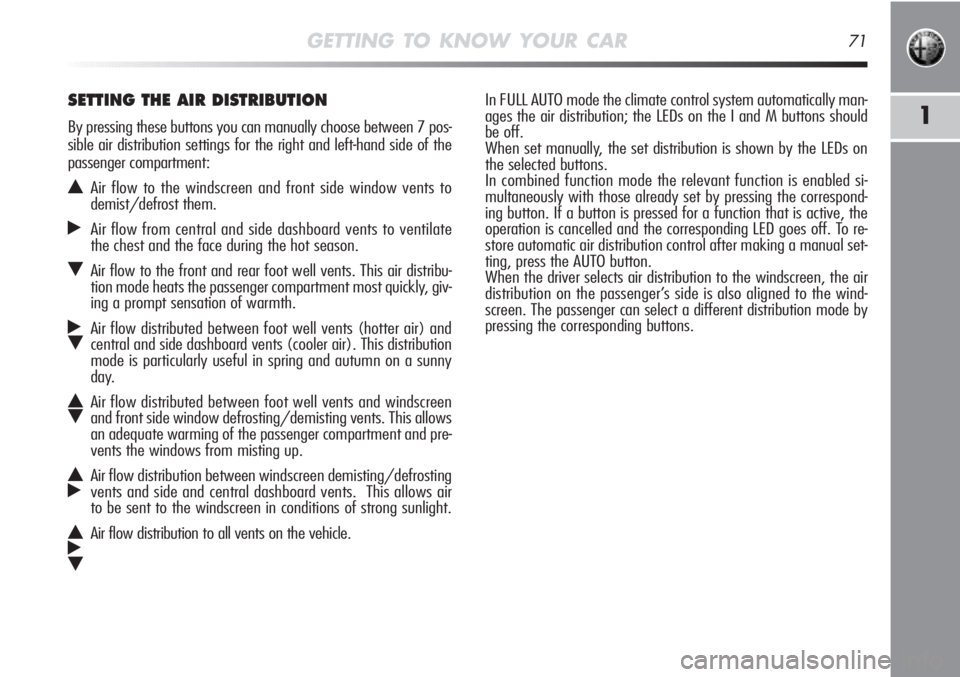
pressing the corresponding buttons.SETTING THE AIR DISTRIBUTION
By pressing these buttons you can manually choose between 7 pos-
sible air distribution settings for the right and left-hand side of the
passenger compartment:
NAir flow to the windscreen and front side window vents to
demist/defrost them.
˙Air flow from central and side dashboard vents to ventilate
the chest and the face during the hot season.
OAir flow to the front and rear foot well vents. This air distribu-
tion mode heats the passenger compartment most quickly, giv-
ing a prompt sensation of warmth.
˙
OAir flow distributed between foot well vents (hotter air) and
central and side dashboard vents (cooler air). This distribution
mode is particularly useful in spring and autumn on a sunny
day.
N
OAir flow distributed between foot well vents and windscreen
and front side window defrosting/demisting vents. This allows
an adequate warming of the passenger compartment and pre-
vents the windows from misting up.
N
˙Air flow distribution between windscreen demisting/defrosting
vents and side and central dashboard vents. This allows air
to be sent to the windscreen in conditions of strong sunlight.
NAir flow distribution to all vents on the vehicle.˙
O
Page 74 of 262
GETTING TO KNOW YOUR CAR73
1
CLIMATE CONTROL SYSTEM COMPRESSOR
Press button B to activate/deactivate the compressor. The deacti-
vation of the climate control compressor remains in the system
memory even when the engine has been stopped.
When the compressor is switched off the system deactivates air re-
circulation to prevent the windows from misting up. In this case,
although the system is capable of maintaining the required tem-
perature, the word FULL will disappear from the display. If, how-
ever, the system is unable to maintain the required temperature,
the temperature indication flashes and the word AUTO disappears.
IMPORTANT With the climate control compressor off, it is not pos-
sible to admit air into the passenger compartment with a temper-
ature below the outside temperature; moreover, under certain en-
vironmental conditions the windows could mist up very quickly since
the air cannot be dehumidified.
To restore automatic control for switching on the climate control
compressor, press button B again or press the AUTO button.
AIR RECIRCULATION
Air recirculation works according to the following operating logics:
❍automatic engagement: press one of the AUTO buttons. En-
gagement is indicated by the word AUTO appearing on the
display;
❍forced engagement (air recirculation always on): this is indi-
cated by the LED on button C lighting up and by the symbol
íappearing on the display;
❍forced disengagement (air recirculation always off, air drawn
from the outside): this is indicated by the LED on button C go-
ing out and by the symbol
êappearing on the display; Forced
engagement/disengagement can be selected by pressing but-
ton C.
IMPORTANT The air recirculation system makes it possible to reach
the required heating/cooling conditions faster.
It is, however, inadvisable to use it on rainy/cold days as it would
considerably increase the possibility of the windows misting up in-
side (especially if the climate control system is off).
When the outside temperature is low, recirculation is forced off (air
drawn from the outside) to prevent the windows misting up. In au-
tomatic operation, inside air recirculation is controlled automatically
by the system according to outside environmental conditions.
When manual recirculation is set, the word FULL disappears from
the display and AUTO disappears from the icon.
It is advisable not to use the air recirculation func-
tion when the outside temperature is low to pre-
vent the windows from rapidly misting up.