fuse Alfa Romeo MiTo 2014 Owner's Manual
[x] Cancel search | Manufacturer: ALFA ROMEO, Model Year: 2014, Model line: MiTo, Model: Alfa Romeo MiTo 2014Pages: 280, PDF Size: 8.79 MB
Page 7 of 280
GETTING TO KNOW YOUR CAR
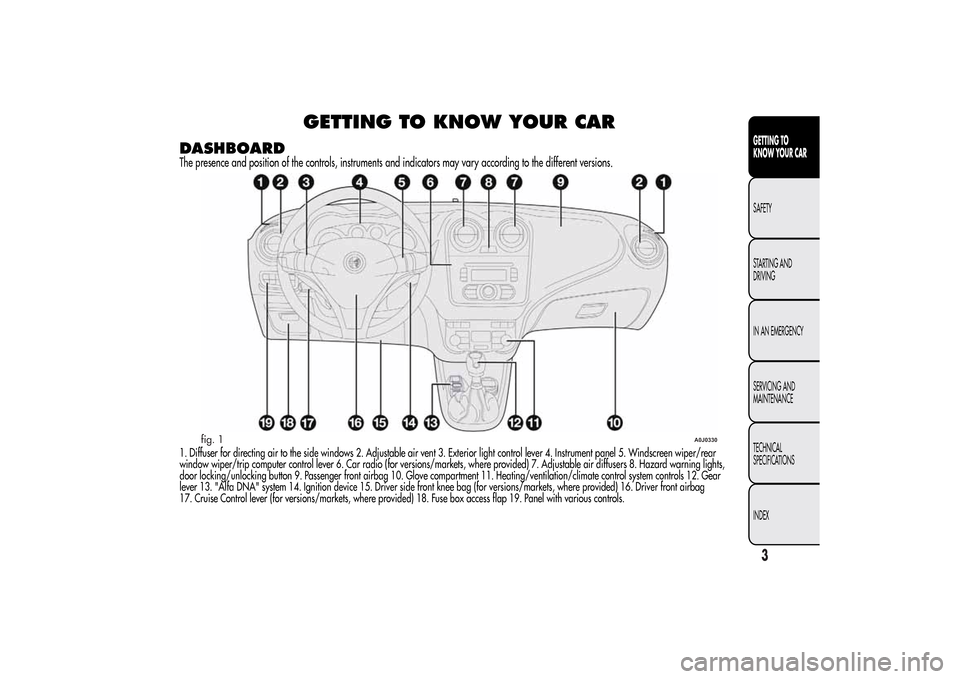
DASHBOARDThe presence and position of the controls, instruments and indicators may vary according to the different versions.1. Diffuser for directing air to the side windows 2. Adjustable air vent 3. Exterior light control lever 4. Instrument panel 5. Windscreen wiper/rear
window wiper/trip computer control lever 6. Car radio (for versions/markets, where provided) 7. Adjustable air diffusers 8. Hazard warning lights,
door locking/unlocking button 9. Passenger front airbag 10. Glove compartment 11. Heating/ventilation/climate control system controls 12. Gear
lever 13. "Alfa DNA" system 14. Ignition device 15. Driver side front knee bag (for versions/markets, where provided) 16. Driver front airbag
17. Cruise Control lever (for versions/markets, where provided) 18. Fuse box access flap 19. Panel with various controls.
fig. 1
A0J0330
3GETTING TO
KNOW YOUR CARSAFETY
STARTING AND
DRIVING
IN AN EMERGENCY
SERVICING AND
MAINTENANCE
TECHNICAL
SPECIFICATIONS
INDEX
Page 22 of 280
Exterior lights failure
On some versions, the display will show a message + symbol if a fault
is detected in one of the following lights:
❒daytime running lights (DRL)
❒side lights
❒direction indicators
❒rear fog light
❒number plate lights.
The failure relating to these lights could be: one or more blown bulbs,
a blown protection fuse or a break in the electrical connection.
Brake light failure
On some versions the display will show a message + symbol if a fault
is detected in the brake lights.
The fault may be caused by a blown bulb, a blown protection fuse or
an interruption of the electric connection.
Dusk sensor failure(for versions/markets, where provided)
On some versions the display will show a message + symbol if there is
a fault in the dusk sensor.
Rain sensor failure(for versions/markets, where provided)
On some versions the display will show a message + symbol if there is
a fault in the rain sensor.
Parking sensor failure(for versions/markets, where provided)
On some versions the display will show a message + symbol if there is
a fault in the parking sensors.
Dynamic Suspension failure
(active shock absorber system)(for versions/markets, where provided)
On some versions, a message + symbol are displayed in the event of
active shock absorber system failure.
In this case, contact Alfa Romeo Authorised Services as soon as
possible.
Display of selected driving mode
(“Alfa DNA” system)(for versions/markets, where provided)
On versions equipped with a "Reconfigurable multifunction display", a
message + symbol associated with the selected driving mode
“DYNAMIC”, “NATURAL” or “ALL WEATHER” is shown. A warning
message is shown on the display if one of these driving modes is not
available.
On versions equipped with "Multifunction display", a letter ("d" or "a")
associated with the selected driving mode is shown together with a
dedicated message.
18GETTING TO
KNOW YOUR CAR
SAFETY
STARTING AND
DRIVING
IN AN EMERGENCY
SERVICING AND
MAINTENANCE
TECHNICAL
SPECIFICATIONS
INDEX
Page 55 of 280
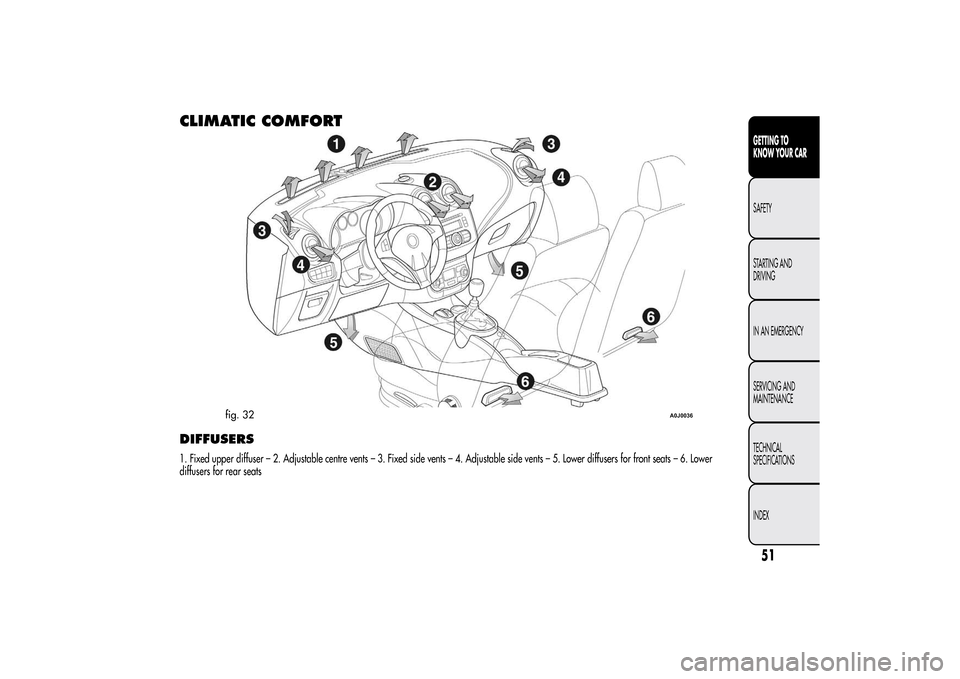
CLIMATIC COMFORTDIFFUSERS1. Fixed upper diffuser – 2. Adjustable centre vents – 3. Fixed side vents – 4. Adjustable side vents – 5. Lower diffusers for front seats – 6. Lower
diffusers for rear seats
fig. 32
A0J0036
51GETTING TO
KNOW YOUR CARSAFETY
STARTING AND
DRIVING
IN AN EMERGENCY
SERVICING AND
MAINTENANCE
TECHNICAL
SPECIFICATIONS
INDEX
Page 61 of 280
❒
to speed up demisting/defrosting of front windows, rear
window and door mirrors;
❒to demist/defrost heated rear window and door mirrors.
During automatic operation, you can change the set temperatures, air
distribution and fan speed at any time by using the relevant buttons
or knobs: the system will automatically change the settings to adjust to
the new requirements.
In this way the climate control system will continue to automatically
manage all functions except for those that have been manually
adjusted. The fan speed is the same in all the zones of the passenger
compartment.
ADJUSTING THE AIR TEMPERATURETurn knob N or H to the right or left to adjust the air temperature: knob
N for the front left area, knob H for the front right area of the
passenger compartment. The set temperatures are shown on the
display.
Press the MONO button to align the air temperature of the two areas:
to set the same temperature, turn knob N.
To return to separate management of air temperature and distribution
between the two areas, turn knob N or H or press the MONO button
again (when the LED on the button is on).
Turn the knobs fully right or left to engage HI (maximum heating) or LO
(maximum cooling) respectively. To deactivate these functions, turn
the temperature knob to the desired temperature.
SETTING THE AIR DISTRIBUTIONBy pressing the buttons (
/
/
), it is possible to set one of the 7
possible air distributions manually:
Air flow to the windscreen and front side window diffusers to
demist/defrost them.Air flow at central and side dashboard vents to ventilate the chest
and the face during the hot season.Air flow to the front and rear footwell diffusers. This air
distribution setting heats the passenger compartment most
quickly, giving a prompt sensation of warmth.
Air flow distributed between footwell vents (hotter air) and
central and side dashboard vents (cooler air). This
distribution setting is useful in spring and autumn on sunny
days.Air flow distributed between footwell diffusers and
windscreen and front side window defrosting/demisting
diffusers. This distribution setting allows the passenger
compartment to warm up efficiently and prevents the
windows from misting up.Air flow distribution between windscreen demisting/
defrosting diffusers and side and central dashboard vents.
This allows air to be sent to the windscreen in conditions
of strong sunlight.
Air flow distribution to all vents on the car.
In FULL AUTO mode, the climate control system automatically manages
air distribution (the LEDs on buttons I and M are off). When set
manually, the air distribution is shown by the LEDs on the selected
buttons.
57GETTING TO
KNOW YOUR CARSAFETY
STARTING AND
DRIVING
IN AN EMERGENCY
SERVICING AND
MAINTENANCE
TECHNICAL
SPECIFICATIONS
INDEX
Page 64 of 280
RAPID WINDOW DEMISTING/
DEFROSTING (MAX-DEF function)Press button F to activate windscreen and side window demisting/
defrosting. The climate control system carries out the following
operations:
❒switches on the air conditioning compressor when climatic
conditions are suitable;
❒deactivates air recirculation;
❒sets maximum air temperature (HI) in both zones;
❒sets fan speed according to the engine coolant temperature;
❒directs air flow to windscreen and front side windows diffusers;
❒activates the heated rear window.
IMPORTANT The MAX-DEF function remains on for about 3 minutes
from when the engine coolant reaches the appropriate temperature.
When the function is active the words FULL AUTO disappear from the
display. With the function active the only possible manual adjustments
are adjusting the fan speed and turning the heated rear window off.
Pressing buttons B, C, F or AUTO switches off the MAX-DEF function
and restores the settings that were present before the function was
activated.HEATED REAR WINDOW
DEMISTING/DEFROSTINGPress the
button to activate heated rear windscreen demisting/
defrosting. This function switches off automatically after about 20
minutes or when the engine is turned off. It is not switched on
automatically the next time the engine is started.For versions/markets where provided, press the
button to activate
demisting/defrosting of door mirrors, heated windscreen (for
versions/markets, where provided) and heated nozzles (for versions/
markets, where provided).
IMPORTANT Do not affix stickers to the inside of the heated rear
window over the heating filaments, to avoid damage that might cause
them to stop working properly.
TURNING THE CLIMATE CONTROL
SYSTEM OFFPress the OFF button.
With climate control off:
❒air recirculation is on, thus isolating the passenger compartment
from the outside;
❒the compressor is off;
❒the fan is off;
❒the heated rear window can be switched on or off;
IMPORTANT The climate control system control unit stores the
temperatures set before the system was switched off and restores them
when any button of the system is pressed (except for button G). If the
function of the pressed button was not active before switching off, that
function will also be activated. If it was active, it will be restored.
To restart the climate control system in fully automatic mode press the
AUTO button.
60GETTING TO
KNOW YOUR CAR
SAFETY
STARTING AND
DRIVING
IN AN EMERGENCY
SERVICING AND
MAINTENANCE
TECHNICAL
SPECIFICATIONS
INDEX
Page 83 of 280
INITIALISATION PROCEDUREAfter the battery has been disconnected or a fuse has blown, the
operation of the sun roof must be initialised again.
Proceed as follows:
❒press button B fig. 54 until the roof is completely closed. Release the
button;
❒press B button and keep it pressed for at least 10 seconds and/or
until the glass panel clicks forwards. Release the button at this point;
❒within 5 seconds of the previous operation, press button B and hold
it down: the front glass panel will complete a full opening and
closing cycle. Only release the button at the end of this cycle.
MAINTENANCE/EMERGENCYIn the event of emergency or maintenance, the roof can be moved
manually when there is no power supply (opening/closing of the front
glass panel) by carrying out the following operations:
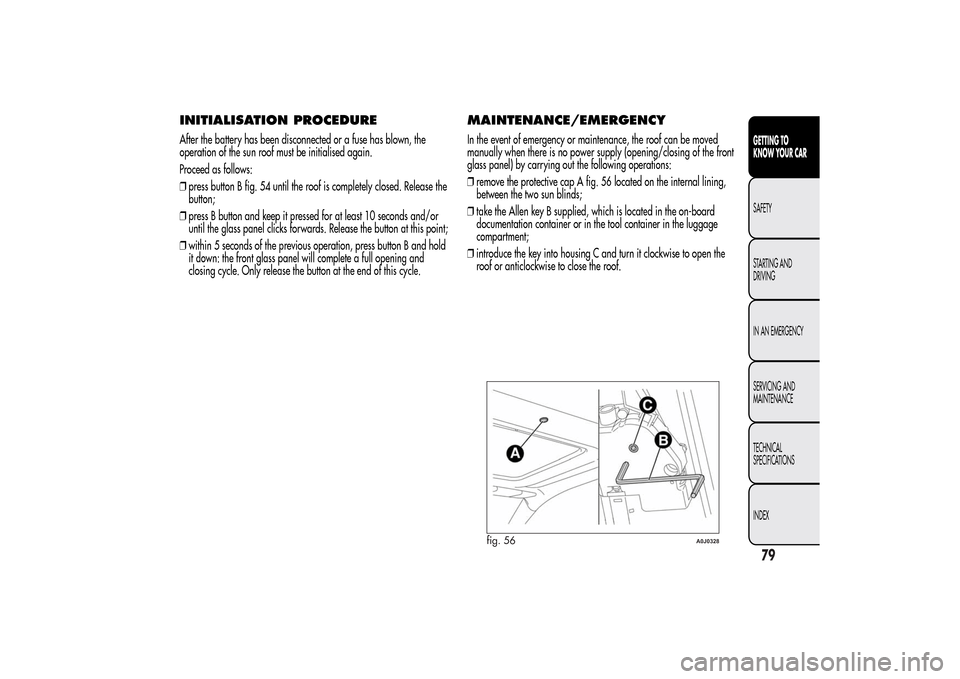
❒remove the protective cap A fig. 56 located on the internal lining,
between the two sun blinds;
❒take the Allen key B supplied, which is located in the on-board
documentation container or in the tool container in the luggage
compartment;
❒introduce the key into housing C and turn it clockwise to open the
roof or anticlockwise to close the roof.
fig. 56
A0J0328
79GETTING TO
KNOW YOUR CARSAFETY
STARTING AND
DRIVING
IN AN EMERGENCY
SERVICING AND
MAINTENANCE
TECHNICAL
SPECIFICATIONS
INDEX
Page 84 of 280
DOORSDOOR CENTRAL LOCKING/
UNLOCKINGLocking from the outside
With the doors closed, press the
button on the key or turn the metal
insert (located inside the key) in the driver side door lock.
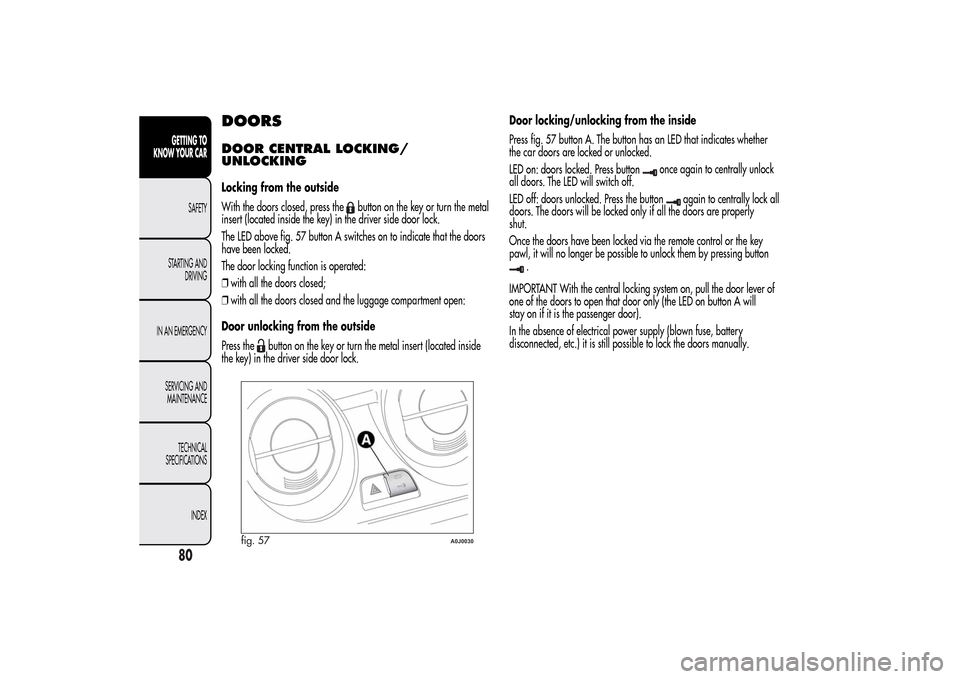
The LED above fig. 57 button A switches on to indicate that the doors
have been locked.
The door locking function is operated:
❒with all the doors closed;
❒with all the doors closed and the luggage compartment open:
Door unlocking from the outside
Press the
button on the key or turn the metal insert (located inside
the key) in the driver side door lock.Door locking/unlocking from the inside
Press fig. 57 button A. The button has an LED that indicates whether
the car doors are locked or unlocked.
LED on: doors locked. Press button
once again to centrally unlock
all doors. The LED will switch off.
LED off: doors unlocked. Press the button
again to centrally lock all
doors. The doors will be locked only if all the doors are properly
shut.
Once the doors have been locked via the remote control or the key
pawl, it will no longer be possible to unlock them by pressing button
.
IMPORTANT With the central locking system on, pull the door lever of
one of the doors to open that door only (the LED on button A will
stay on if it is the passenger door).
In the absence of electrical power supply (blown fuse, battery
disconnected, etc.) it is still possible to lock the doors manually.
fig. 57
A0J0030
80GETTING TO
KNOW YOUR CAR
SAFETY
STARTING AND
DRIVING
IN AN EMERGENCY
SERVICING AND
MAINTENANCE
TECHNICAL
SPECIFICATIONS
INDEX
Page 85 of 280
PASSENGER SIDE EMERGENCY FRONT
DOOR LOCKING DEVICEThe front passenger side door has a device to lock it when there is no
current.
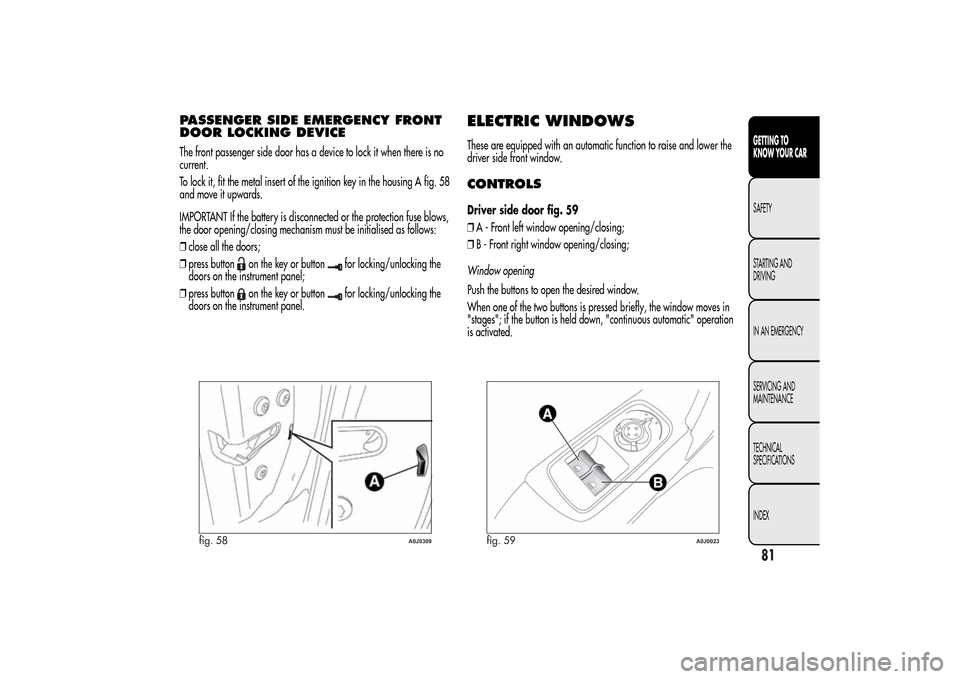
To lock it, fit the metal insert of the ignition key in the housing A fig. 58
and move it upwards.
IMPORTANT If the battery is disconnected or the protection fuse blows,
the door opening/closing mechanism must be initialised as follows:
❒close all the doors;
❒press button
on the key or button
for locking/unlocking the
doors on the instrument panel;
❒press button
on the key or button
for locking/unlocking the
doors on the instrument panel.
ELECTRIC WINDOWSThese are equipped with an automatic function to raise and lower the
driver side front window.CONTROLSDriver side door fig. 59
❒A - Front left window opening/closing;
❒B - Front right window opening/closing;
Window opening
Push the buttons to open the desired window.
When one of the two buttons is pressed briefly, the window moves in
"stages"; if the button is held down, "continuous automatic" operation
is activated.
fig. 58
A0J0309
fig. 59
A0J0023
81GETTING TO
KNOW YOUR CARSAFETY
STARTING AND
DRIVING
IN AN EMERGENCY
SERVICING AND
MAINTENANCE
TECHNICAL
SPECIFICATIONS
INDEX
Page 87 of 280
Incorrect use of the electric windows may be
dangerous. Before and during operation, always check
that no passenger is at risk of being injured directly
by the moving window or by objects getting caught in or
dragged by the window. When leaving the car, always remove
the key from the ignition to prevent accidental operation of the
electric windows from being a hazard for those still on board.
Electric window system initialisation
The system must be re-initialised after disconnecting the battery or if
the relevant protection fuse is blown.
Initialisation procedure:
❒fully close the window to initialise with manual operation;
❒after the window has reached the upper end of travel, hold down
the closing control for at least 1 second.
For versions/markets where provided, after a break in power supply
for the control units (battery replaced or disconnected or protective
fuses for the electric window control units replaced), the automatic
operation of the windows must be restored.
The restoration procedure must be performed as described below with
the doors closed:
❒completely open the driver's door window, holding the operating
button down for at least three seconds after the (lower) end of travel
position;
❒completely raise the driver side window and hold the button down
for at least 3 seconds once the (upper) end of travel position has
been reached;❒proceed in the same way as described in points 1 and 2 for the
passenger side door;
❒make sure that the initialisation is correct by checking that the
windows work automatically.
IMPORTANT With the central locking on, pulling the internal opening
lever for one of the doors switches the locking off for all the doors.
In the absence of electrical power supply (blown fuse, battery
disconnected, etc.) it is still possible to lock the doors manually. In this
case, the automatic lowering function of the windows is not available.
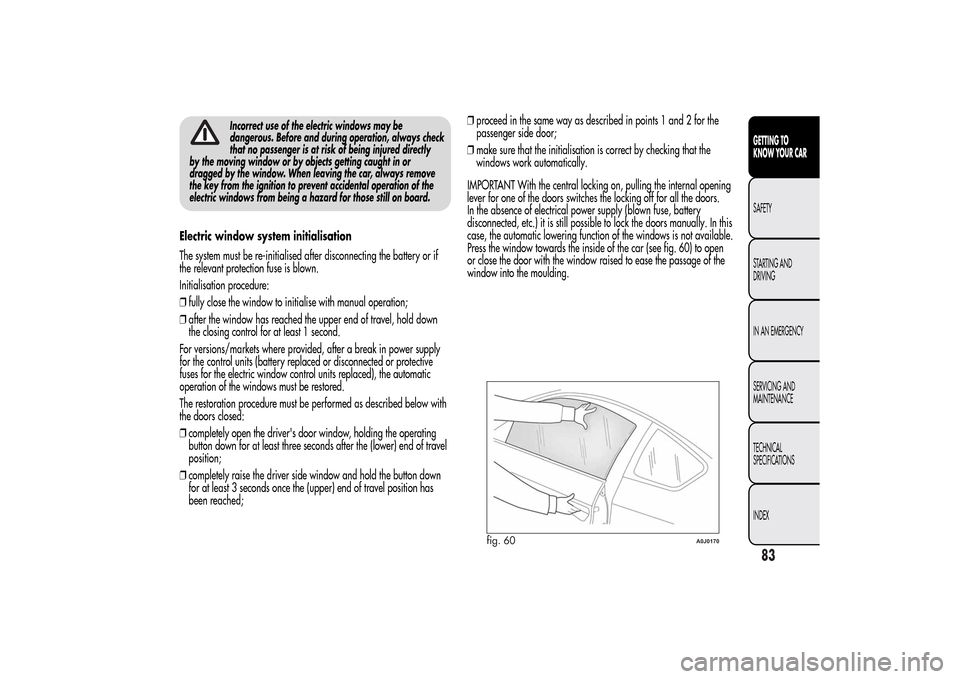
Press the window towards the inside of the car (see fig. 60) to open
or close the door with the window raised to ease the passage of the
window into the moulding.
fig. 60
A0J0170
83GETTING TO
KNOW YOUR CARSAFETY
STARTING AND
DRIVING
IN AN EMERGENCY
SERVICING AND
MAINTENANCE
TECHNICAL
SPECIFICATIONS
INDEX
Page 89 of 280
LUGGAGE COMPARTMENT
INITIALISATIONIMPORTANT If the battery is disconnected or the protection fuse blows,
the luggage compartment opening/closing mechanism must be
initialised as follows:
❒close all the doors and the luggage compartment;
❒Press the
button on the remote control;
❒Press thebutton on the remote control.
EXTENDING THE LUGGAGE
COMPARTMENTThe luggage compartment can be partially (1/3 or 2/3) or totally
extended by splitting the rear seat. See the descriptions in “Removing
the parcel shelf” and “Folding back the seats” paragraphs for how
to expand the luggage compartment.Removing the parcel shelf
Proceed as follows:
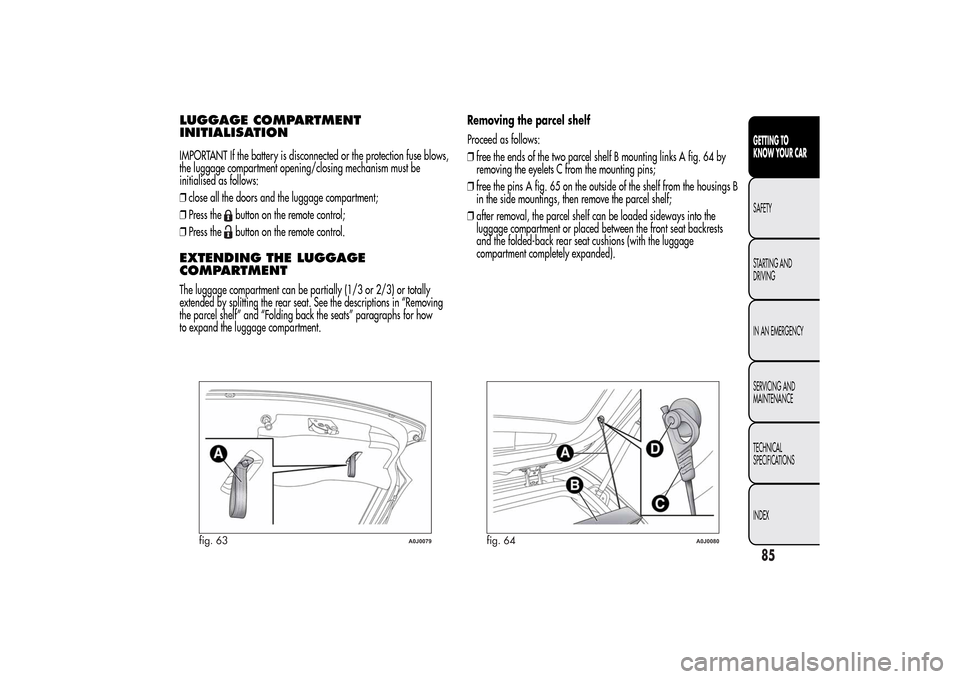
❒free the ends of the two parcel shelf B mounting links A fig. 64 by
removing the eyelets C from the mounting pins;
❒free the pins A fig. 65 on the outside of the shelf from the housings B
in the side mountings, then remove the parcel shelf;
❒after removal, the parcel shelf can be loaded sideways into the
luggage compartment or placed between the front seat backrests
and the folded-back rear seat cushions (with the luggage
compartment completely expanded).
fig. 63
A0J0079
fig. 64
A0J0080
85GETTING TO
KNOW YOUR CARSAFETY
STARTING AND
DRIVING
IN AN EMERGENCY
SERVICING AND
MAINTENANCE
TECHNICAL
SPECIFICATIONS
INDEX