tow Alfa Romeo MiTo 2020 Owner handbook (in English)
[x] Cancel search | Manufacturer: ALFA ROMEO, Model Year: 2020, Model line: MiTo, Model: Alfa Romeo MiTo 2020Pages: 212, PDF Size: 5.18 MB
Page 14 of 212
and turn the steering wheel until it locks.
Deactivation
Move the steering wheel slightly and turn
the ignition key to MAR.
WARNING
2)If the ignition device has been tampered
with (e.g. an attempted theft), have it
checked over by the Alfa Romeo Dealership
before driving again.
3)Always remove the key when you leave
your car to prevent someone from
accidentally operating the controls.
Remember to engage the handbrake.
Engage first gear if the vehicle is parked
uphill or reverse if the vehicle is parked
downhill. Never leave children unattended in
the vehicle.
4)It is absolutely forbidden to carry out any
after-market operation involving steering
system or steering column modifications
(e.g. installation of anti-theft device) that
could adversely affect performance and
safety, invalidate the warranty and also
result in the car not meeting type-approval
requirements.
5)Never remove the key while the car is
moving. The steering wheel will
automatically lock as soon as it is turned.
This holds true for cars being towed as well.
ALFA ROMEO CODESYSTEM
The Alfa Romeo Code prevents
unauthorised use of the vehicle, disabling
engine starting.
Operation
Each time the car is started by turning
the ignition key to MAR, the Alfa Romeo
CODE system control unit sends an
acknowledgement code to the
Powertrain Control Module to deactivate
the inhibitor.
The code is sent only if the Alfa Romeo
CODE system control unit has recognised
the code transmitted by the key.
Each time the ignition key is turned to
STOP, the Alfa Romeo CODE system
deactivates the functions of the
Powertrain Control Module.
Irregular operation
If, during starting, the code is not
correctly recognised, the icon
appears on the instrument panel.
In this case, turn the key to STOP and
then to MAR-ON; if it is still locked, try
again with the other keys that come with
the car. If it is still not possible to start
the engine, contact an Alfa Romeo
Dealership.Activation of warning light while
driving
If the iconappears on the display,
this means that the system is running a
self-diagnosis (for example due to a
voltage drop).
If the iconcontinues to be
displayed, contact an Alfa Romeo
Dealership.
IMPORTANT
1)The electronic components inside the key
may be damaged if the key is subjected to
strong shocks. In order to ensure complete
efficiency of the electronic devices inside the
key, it should never be exposed to direct
sunlight.
12
GETTING TO KNOW YOUR CAR
Page 15 of 212
ALARMSYSTEM
(where provided)
ALARM ACTIVATION
Activation of the alarm triggers the
acoustic warning and the direction
indicators.
IMPORTANT The alarm is adapted by the
Manufacturer to meet the requirements
of the various countries where the
vehicle is marketed.
SWITCHING ON THE ALARM
With the doors, bonnet and tailgate
closed and the ignition key either turned
to STOP or removed, point the key with
remote control towards the car and press
and release the button
.
Except on some versions for specific
markets, the system produces a visual
and acoustic warning and enables door
locking.
ALARM SELF-ACTIVATION(where provided)
If the alarm has not been activated using
the remote control, approximately
30 seconds after the key is turned to the
STOP position and the last time one of
the doors or tailgate was opened and
reclosed, the alarm is activated
automatically.This condition is indicated by the
intermittent illumination of the LED on
the alarm deactivation button on the roof
light and by the activation indications
described previously.
To deactivate the alarm, press the button
on the remote control.
Alarm self-activation also occurs when
the doors are closed by turning the metal
insert of the key in the driver door lock. If
the alarm is self-activated, the doors will
not be locked.
TURNING THE ALARM OFF
Press thebutton. The following
operations are performed (excluding
some markets):
two brief flashes of the direction
indicators;
there are two short acoustic signals;
doors are unlocked.
IMPORTANT The alarm does not switch
off when the central opening is activated
using the metal insert in the key.
DOORS
DOOR CENTRAL LOCKING/UNLOCKING
Locking from the outside
With the doors closed, press the
button on the key or fit and then turn
the metal insert (located inside the key)
in the driver side door lock.
The door locking function is operated:
with all the doors closed;
with all the doors closed and boot
open.
Door unlocking from the outside
Press the
button on the key or turn the
metal insert (located inside the key) in
the driver side door lock.
Door locking/unlocking from the inside
Press the 1 fig. 7 button on the
dashboard. The button has an LED that
indicates whether the doors are locked or
unlocked.LED on: doors locked.LED off:
doors unlocked.
13
Page 19 of 212
REAR
Two height-adjustable head restraints
are provided for the back seats (for the
adjustment see the previous paragraph).
On some versions a head restraint is also
provided for the central seat.
Proceed as follows to remove the head
restraints:
raise the head restraints to their
maximum height;
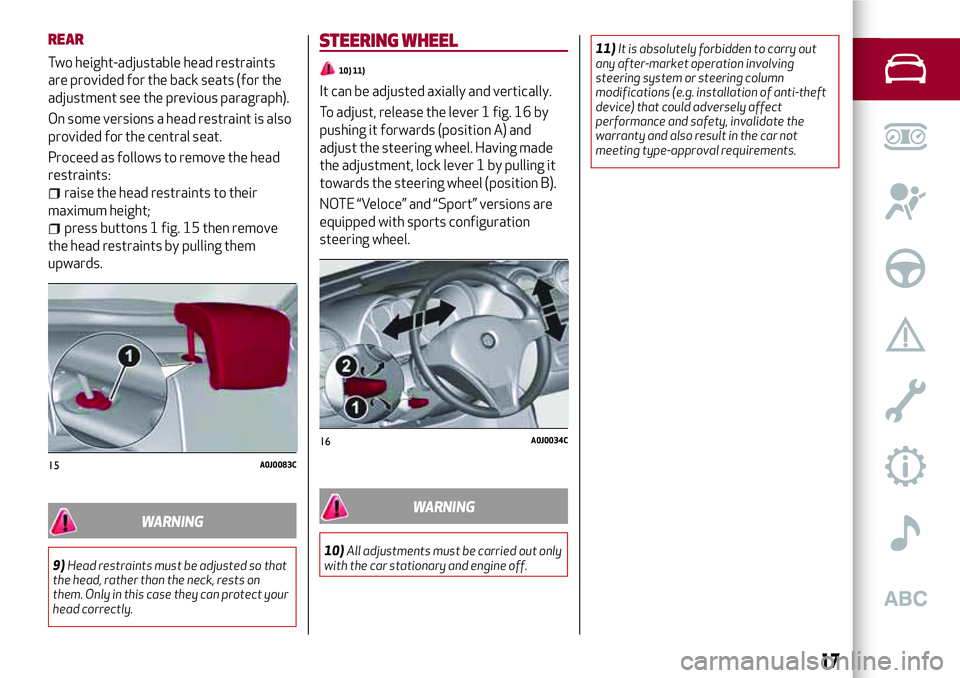
press buttons 1 fig. 15 then remove
the head restraints by pulling them
upwards.
WARNING
9)Head restraints must be adjusted so that
the head, rather than the neck, rests on
them. Only in this case they can protect your
head correctly.
STEERING WHEEL
10) 11)
It can be adjusted axially and vertically.
To adjust, release the lever 1 fig. 16 by
pushing it forwards (position A) and
adjust the steering wheel. Having made
the adjustment, lock lever 1 by pulling it
towards the steering wheel (position B).
NOTE “Veloce” and “Sport” versions are
equipped with sports configuration
steering wheel.
WARNING
10)All adjustments must be carried out only
with the car stationary and engine off.11)It is absolutely forbidden to carry out
any after-market operation involving
steering system or steering column
modifications (e.g. installation of anti-theft
device) that could adversely affect
performance and safety, invalidate the
warranty and also result in the car not
meeting type-approval requirements.
15A0J0083C
16A0J0034C
17
Page 20 of 212
REAR VIEW MIRRORS
INTERIOR MIRROR
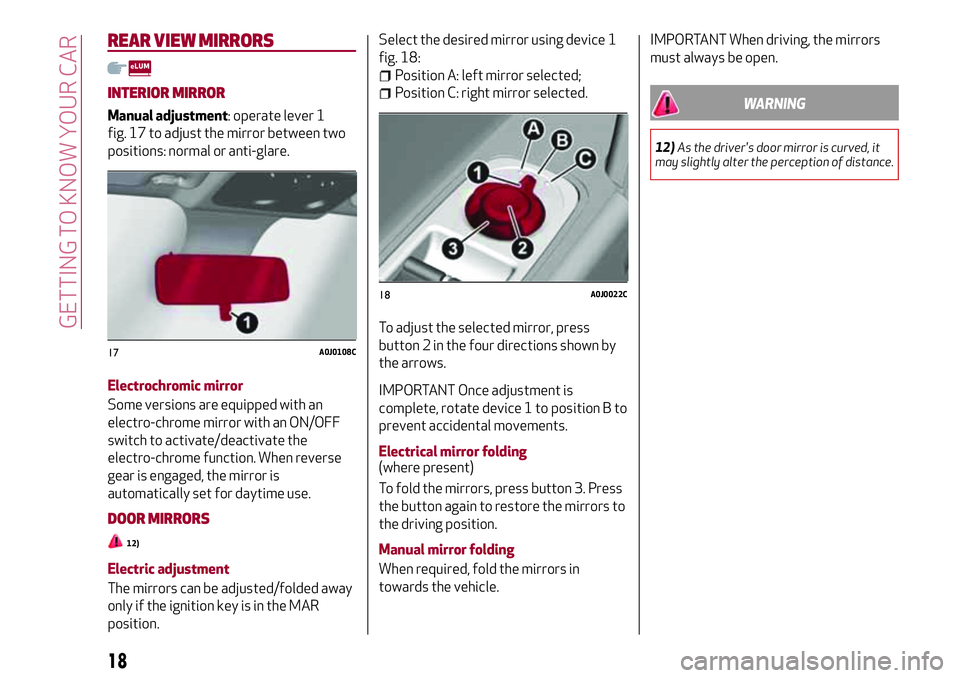
Manual adjustment: operate lever 1
fig. 17 to adjust the mirror between two
positions: normal or anti-glare.
Electrochromic mirror
Some versions are equipped with an
electro-chrome mirror with an ON/OFF
switch to activate/deactivate the
electro-chrome function. When reverse
gear is engaged, the mirror is
automatically set for daytime use.
DOOR MIRRORS
12)
Electric adjustment
The mirrors can be adjusted/folded away
only if the ignition key is in the MAR
position.Select the desired mirror using device 1
fig. 18:
Position A: left mirror selected;
Position C: right mirror selected.
To adjust the selected mirror, press
button 2 in the four directions shown by
the arrows.
IMPORTANT Once adjustment is
complete, rotate device 1 to position B to
prevent accidental movements.
Electrical mirror folding
(where present)
To fold the mirrors, press button 3. Press
the button again to restore the mirrors to
the driving position.
Manual mirror folding
When required, fold the mirrors in
towards the vehicle.
IMPORTANT When driving, the mirrors
must always be open.
WARNING
12)As the driver's door mirror is curved, it
may slightly alter the perception of distance.
17A0J0108C
18A0J0022C
18
GETTING TO KNOW YOUR CAR
Page 21 of 212
EXTERNAL LIGHTS
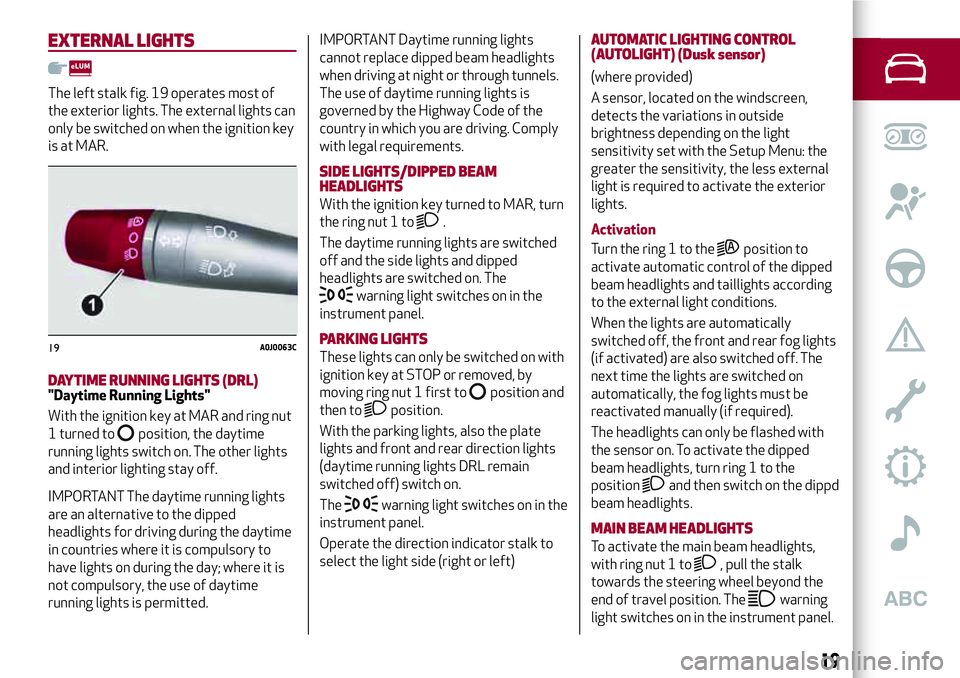
The left stalk fig. 19 operates most of
the exterior lights. The external lights can
only be switched on when the ignition key
is at MAR.
DAYTIME RUNNING LIGHTS (DRL)"Daytime Running Lights"
With the ignition key at MAR and ring nut
1 turned to
position, the daytime
running lights switch on. The other lights
and interior lighting stay off.
IMPORTANT The daytime running lights
are an alternative to the dipped
headlights for driving during the daytime
in countries where it is compulsory to
have lights on during the day; where it is
not compulsory, the use of daytime
running lights is permitted.IMPORTANT Daytime running lights
cannot replace dipped beam headlights
when driving at night or through tunnels.
The use of daytime running lights is
governed by the Highway Code of the
country in which you are driving. Comply
with legal requirements.
SIDE LIGHTS/DIPPED BEAM
HEADLIGHTS
With the ignition key turned to MAR, turn
the ring nut 1 to
.
The daytime running lights are switched
off and the side lights and dipped
headlights are switched on. The
warning light switches on in the
instrument panel.
PARKING LIGHTS
These lights can only be switched on with
ignition key at STOP or removed, by
moving ring nut 1 first to
position and
then to
position.
With the parking lights, also the plate
lights and front and rear direction lights
(daytime running lights DRL remain
switched off) switch on.
The
warning light switches on in the
instrument panel.
Operate the direction indicator stalk to
select the light side (right or left)
AUTOMATIC LIGHTING CONTROL
(AUTOLIGHT) (Dusk sensor)
(where provided)
A sensor, located on the windscreen,
detects the variations in outside
brightness depending on the light
sensitivity set with the Setup Menu: the
greater the sensitivity, the less external
light is required to activate the exterior
lights.
Activation
Turn the ring 1 to the
position to
activate automatic control of the dipped
beam headlights and taillights according
to the external light conditions.
When the lights are automatically
switched off, the front and rear fog lights
(if activated) are also switched off. The
next time the lights are switched on
automatically, the fog lights must be
reactivated manually (if required).
The headlights can only be flashed with
the sensor on. To activate the dipped
beam headlights, turn ring 1 to the
position
and then switch on the dippd
beam headlights.
MAIN BEAM HEADLIGHTS
To activate the main beam headlights,
with ring nut 1 to
, pull the stalk
towards the steering wheel beyond the
end of travel position. The
warning
light switches on in the instrument panel.
19A0J0063C
19
Page 22 of 212
When the stalk is pulled towards the
steering wheel again, beyond the end of
travel position, the main beam headlights
deactivate, the dipped headlights
reactivate and the
warning light
switches off.
It is not possible to switch on the main
beam headlights constantly if automatic
light control is active.
FLASHING
To do this, pull the stalk towards the
steering wheel (unstable position),
regardless of the position of ring nut 1.
The
warning light switches on in the
instrument panel.
HEADLIGHT ALIGNMENT CORRECTOR
This device works with the ignition key in
the MAR position and the dipped
headlights on.
Headlight alignment adjustment
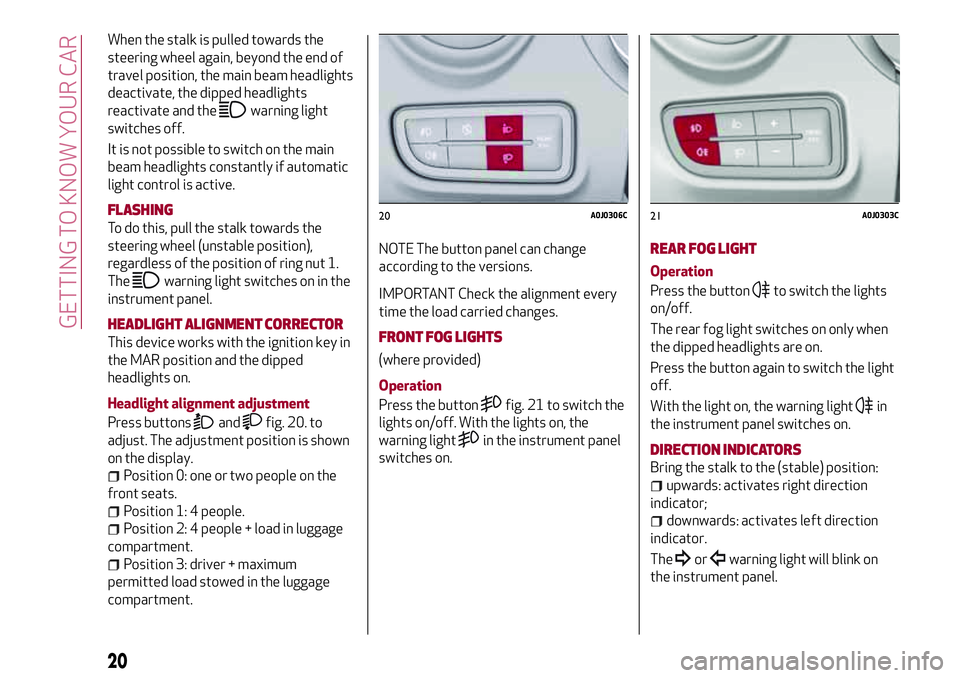
Press buttons
andfig. 20. to
adjust. The adjustment position is shown
on the display.
Position 0: one or two people on the
front seats.
Position 1: 4 people.
Position 2: 4 people + load in luggage
compartment.
Position 3: driver + maximum
permitted load stowed in the luggage
compartment.NOTE The button panel can change
according to the versions.
IMPORTANT Check the alignment every
time the load carried changes.
FRONT FOG LIGHTS
(where provided)
Operation
Press the button
fig. 21 to switch the
lights on/off. With the lights on, the
warning light
in the instrument panel
switches on.
REAR FOG LIGHT
Operation
Press the button
to switch the lights
on/off.
The rear fog light switches on only when
the dipped headlights are on.
Press the button again to switch the light
off.
With the light on, the warning light
in
the instrument panel switches on.
DIRECTION INDICATORS
Bring the stalk to the (stable) position:
upwards: activates right direction
indicator;
downwards: activates left direction
indicator.
The
orwarning light will blink on
the instrument panel.
20A0J0306C21A0J0303C
20
GETTING TO KNOW YOUR CAR
Page 23 of 212
The direction indicators are switched off
automatically when the steering wheel is
straightened.
"Lane change" function
If you wish to signal a lane change, place
the left stalk in the unstable position for
less than half a second. The direction
indicator on the selected side flashes
three times and then switches off
automatically.
"FOLLOW ME HOME" DEVICE
This device allows you to illuminate the
area in front of the car for a certain
amount of time.
Activation
With the key turned to STOP or removed,
pull the left-hand stalk 1 towards the
steering wheel within 2 minutes from
when the engine is turned off.
Each time the stalk is moved, the lights
stay on for an extra 30 seconds up to a
maximum of 210 seconds; then the lights
are switched off automatically.
When the stalk is operated, the warning
light
on the instrument panel
switches on. The display shows a
message and the time set for the
function.
The warning light comes on when the
stalk is operated and stays on until the
function is automatically deactivated.Each movement of the stalk only
increases the amount of time the lights
stay on.
Deactivation
Keep the stalk pulled towards the
steering wheel for more than 2 seconds.
EXTERNAL COURTESY LIGHTS
These light up the car and the space in
front of it when the doors are unlocked.
Activation
When the car is parked and the doors are
unlocked by pressing the
button on the
remote control (or the luggage
compartment is unlocked by pressing
), the dipped beam headlights, rear
side lights and number plate lights are
activated.
The lights stay on for approximately
25 seconds unless the doors and luggage
compartment are locked again with the
remote control or the doors (or luggage
compartment) are opened and reclosed.
In these cases they switch off after
5 seconds.
INTERIOR LIGHTS
FRONT CEILING LIGHT
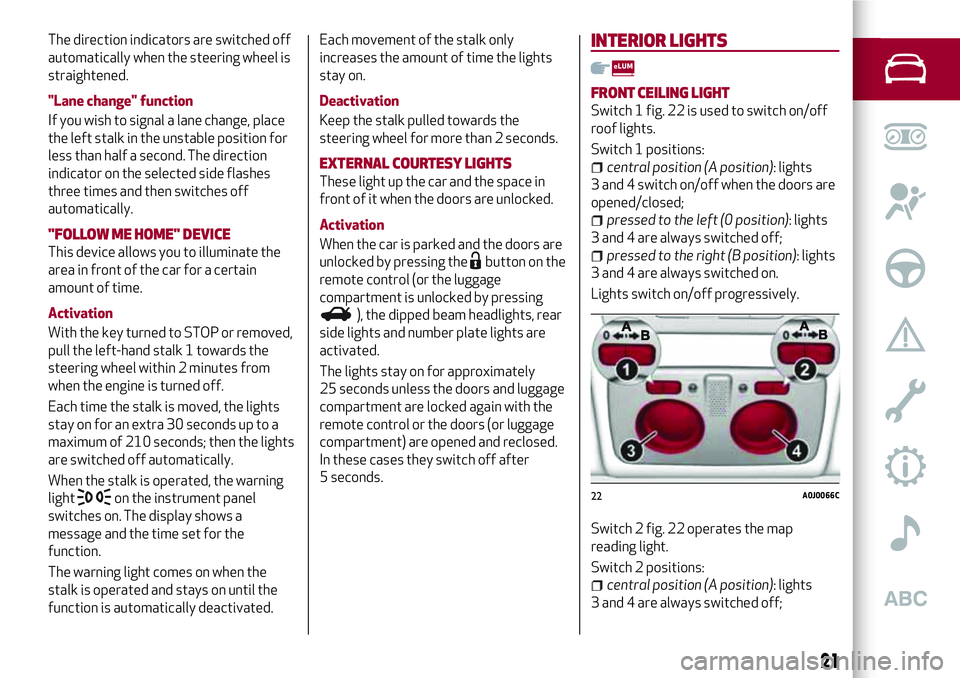
Switch 1 fig. 22 is used to switch on/off
roof lights.
Switch 1 positions:
central position (A position): lights
3 and 4 switch on/off when the doors are
opened/closed;
pressed to the left (0 position): lights
3 and 4 are always switched off;
pressed to the right (B position): lights
3 and 4 are always switched on.
Lights switch on/off progressively.
Switch 2 fig. 22 operates the map
reading light.
Switch 2 positions:
central position (A position): lights
3 and 4 are always switched off;
22A0J0066C
21
Page 24 of 212
pressed to the left (0 position): light
3 switches on;
pressed to the right (B position): light
4 switches on.
IMPORTANT Before getting out of the
car, make sure that both switches are in
the central position: when the doors are
closed the lights will switch off to avoid
draining the battery. In any case, if the
switch is left in the on position, the roof
light switches off automatically about
15 minutes after the engine has been
switched off.
ROOF LIGHT TIMING
Timing while getting into the car
The roof lights come on won unlocking,
opening and closing. The timed period is
interrupted when the ignition is turned to
"MAR-ON".
Timing while getting out of the car
The roof lights come on when the key is
removed from the ignition within
2 minutes of switching off the engine, on
opening and closing a door with the
removed key. The timing stops
automatically when the doors are locked.
WINDSCREEN / REAR WINDOW
WIPERS
This operates only with the ignition key
turned to MAR.
WINDSCREEN WASHER / WIPER
Operation
13) 14)
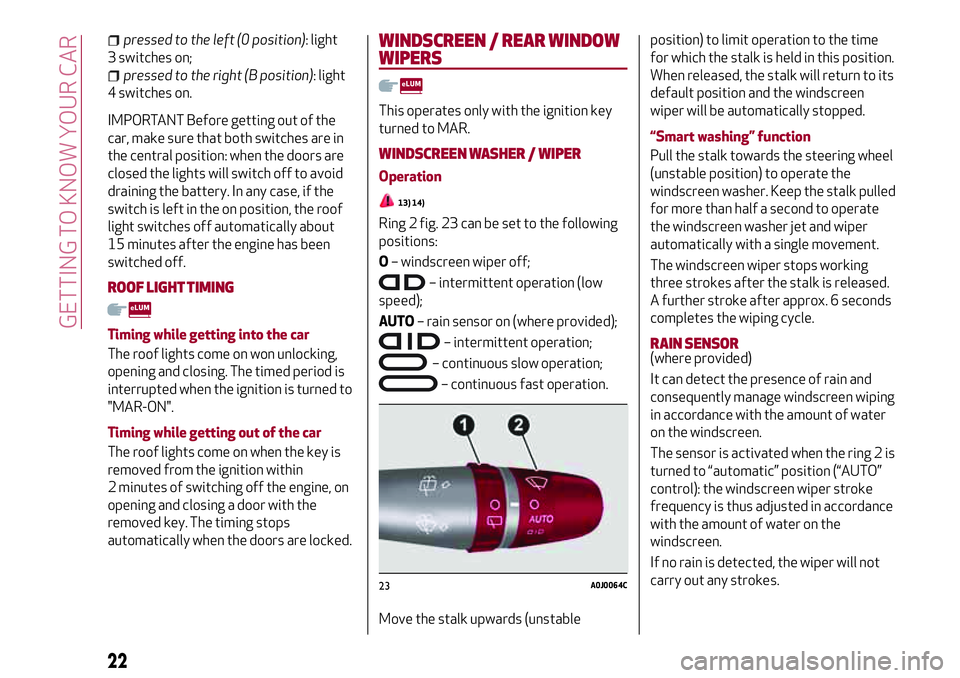
Ring 2 fig. 23 can be set to the following
positions:
O– windscreen wiper off;
– intermittent operation (low
speed);
AUTO– rain sensor on (where provided);
– intermittent operation;
– continuous slow operation;
– continuous fast operation.
Move the stalk upwards (unstableposition) to limit operation to the time
for which the stalk is held in this position.
When released, the stalk will return to its
default position and the windscreen
wiper will be automatically stopped.
“Smart washing” function
Pull the stalk towards the steering wheel
(unstable position) to operate the
windscreen washer. Keep the stalk pulled
for more than half a second to operate
the windscreen washer jet and wiper
automatically with a single movement.
The windscreen wiper stops working
three strokes after the stalk is released.
A further stroke after approx. 6 seconds
completes the wiping cycle.
RAIN SENSOR(where provided)
It can detect the presence of rain and
consequently manage windscreen wiping
in accordance with the amount of water
on the windscreen.
The sensor is activated when the ring 2 is
turned to “automatic” position (“AUTO”
control): the windscreen wiper stroke
frequency is thus adjusted in accordance
with the amount of water on the
windscreen.
If no rain is detected, the wiper will not
carry out any strokes.
23A0J0064C
22
GETTING TO KNOW YOUR CAR
Page 25 of 212
REAR WINDOW WIPER / WASHER
(where provided)
This operates only with the ignition key
turned to MAR.
Turn ring 1 fromOposition to
position to operate the rear window
wiper as follows:
in intermittent mode when the
windscreen wiper is not operating;
in synchronous mode (at half the
speed of the windscreen wiper) when the
windscreen wiper is operating;
in continuous mode with reverse gear
engaged and the control active.
Pushing the stalk towards the dashboard
(rocking position) will activate the rear
window washer jet. Keep the stalk pushed
for more than half a second to activate
the rear window wiper as well. Releasing
the stalk will activate the smart washing
function, as described for the windscreen
wiper.
WARNING
13)Never use the windscreen wipers to
remove layers of snow or ice from the
windscreen. In such conditions, the
windscreen wiper may be subjected to
excessive stress and the motor cut-out
switch, which prevents operation for a few
seconds, may intervene. If operation is not
restored (even after restarting that car with
the key), contact an Alfa Romeo Dealership.14)Do not operate the windscreen wiper
with the blades lifted from the windscreen.
23
Page 27 of 212
1 - air temperature adjustment knob: blue section = cold air / red section = hot air
2 - fan activation/adjustment knob: 0
= fan switched off / 1-2-3= fan speed / 4= maximum fan speed
3 - air distribution knob
air flow towards driver/passenger body
air flow towards driver/passenger and feet area;
air flow towards front and rear footwell;
air flow towards feet area and windscreen;
air flow towards windscreen
4 - air recirculation on/off button (It is advisable not to use the air recirculation function when the outside temperature is low to
prevent the windows from rapidly misting up);
5 - climate control compressor on/off button;
6 - heated rear window on/off button.
25