run flat Alfa Romeo Stelvio 2018 Owner's Manual
[x] Cancel search | Manufacturer: ALFA ROMEO, Model Year: 2018, Model line: Stelvio, Model: Alfa Romeo Stelvio 2018Pages: 276, PDF Size: 5.79 MB
Page 120 of 276
Seat Belt Systems
Buckle up even though you are an
excellent driver, even on short trips.
Someone on the road may be a poor
driver and could cause a collision that
includes you. This can happen far away
from home or on your own street.
Research has shown that seat belts save
lives, and they can reduce the
seriousness of injuries in a collision.
Some of the worst injuries happen when
people are thrown from the vehicle. Seat
belts reduce the possibility of ejection
and the risk of injury caused by striking
the inside of the vehicle. Everyone in a
motor vehicle should be belted at all
times.
Enhanced Seat Belt Use Reminder
System (BeltAlert)
Driver and Passenger BeltAlert (if
equipped)
BeltAlert is a feature intended to
remind the driver and outboard front
seat passenger (if equipped with
outboard front passenger seat BeltAlert)
to buckle their seat belts. The Belt Alert
feature is active whenever the ignition
switch is in the START or ON/RUN
position. Initial Indication
If the driver is unbuckled when the
ignition switch is first in the START or
ON/RUN position, a chime will signal for a
few seconds. If the driver or outboard
front seat passenger (if equipped with
outboard front passenger seat BeltAlert)
is unbuckled when the ignition switch is
first in the START or ON/RUN position
the Seat Belt Reminder Light will turn on
and remain on until both outboard front
seat belts are buckled. The outboard
front passenger seat BeltAlert is not
active when an outboard front passenger
seat is unoccupied.
BeltAlert Warning Sequence
The BeltAlert warning sequence is
activated when the vehicle is moving
above a specified vehicle speed range
and the driver or outboard front seat
passenger is unbuckled (if equipped with
outboard front passenger seat BeltAlert)
(the outboard front passenger seat
BeltAlert is not active when the outboard
front passenger seat is unoccupied). The
BeltAlert warning sequence starts by
blinking the Seat Belt Reminder Light and
sounding an intermittent chime. Once the
BeltAlert warning sequence has
completed, the Seat Belt Reminder Light
will remain on until the seat belts are
buckled. The BeltAlert warning sequence
may repeat based on vehicle speed until
the driver and occupied outboard front
seat passenger seat belts are buckled.The driver should instruct all occupants
to buckle their seat belts.
Change of Status
If the driver or outboard front seat
passenger (if equipped with outboard
front passenger seat BeltAlert)
unbuckles their seat belt while the
vehicle is traveling, the BeltAlert warning
sequence will begin until the seat belts
are buckled again.
The outboard front passenger seat
BeltAlert is not active when the outboard
front passenger seat is unoccupied.
BeltAlert may be triggered when an
animal or other items are placed on the
outboard front passenger seat or when
the seat is folded flat (if equipped). It is
recommended that pets be restrained in
the rear seat (if equipped) in pet
harnesses or pet carriers that are
secured by seat belts, and cargo is
properly stowed.Lap/Shoulder Belts
All seating positions in your vehicle are
equipped with lap/shoulder belts.
The seat belt webbing retractor will lock
only during very sudden stops or
collisions. This feature allows the
shoulder part of the seat belt to move
freely with you under normal conditions.
However, in a collision the seat belt will
lock and reduce your risk of striking the
inside of the vehicle or being thrown out
of the vehicle.
118
SAFETY
Page 125 of 276
Air Bag Warning Light
The ORC monitors the readiness of the
electronic parts of the air bag system
whenever the ignition switch is in the
START or ON/RUN position. If the ignition
switch is in the OFF position or in the ACC
position, the air bag system is not on and
the air bags will not inflate.
The ORC contains a backup power supply
system that may deploy the air bag
system even if the battery loses power or
it becomes disconnected prior to
deployment.
The ORC turns on the Air Bag Warning
Light in the instrument panel for
approximately four to eight seconds for a
self-check when the ignition switch is
first in the ON/RUN position. After the
self-check, the Air Bag Warning Light will
turn off. If the ORC detects a malfunction
in any part of the system, it turns on the
Air Bag Warning Light, either
momentarily or continuously. A single
chime will sound to alert you if the light
comes on again after initial startup.
The ORC also includes diagnostics that
will illuminate the instrument panel Air
Bag Warning Light if a malfunction is
detected that could affect the air bag
system. The diagnostics also record the
nature of the malfunction. While the air
bag system is designed to be
maintenance free, if any of the followingoccurs, have an authorized dealer service
the air bag system immediately.
The Air Bag Warning Light does not
come on during the four to eight seconds
when the ignition switch is first in the
ON/RUN position.
The Air Bag Warning Light remains on
after the four to eight-second interval.
The Air Bag Warning Light comes on
intermittently or remains on while
driving.
Note: If the speedometer, tachometer,
or any engine related gauges are not
working, the Occupant Restraint
Controller (ORC) may also be disabled. In
this condition the air bags may not be
ready to inflate for your protection. Have
an authorized dealer service the air bag
system immediately.
Warning!
Ignoring the Air Bag Warning Light in your
instrument panel could mean you won’t have
the air bag system to protect you in a
collision. If the light does not come on as a
bulb check when the ignition is first turned
on, stays on after you start the vehicle, or if
it comes on as you drive, have an authorized
dealer service the air bag system
immediately.
Redundant Air Bag Warning Light
If a fault with the Air Bag Warning Light is
detected, which could affect the
Supplemental Restraint System (SRS),
the Redundant Air Bag Warning Light will
illuminate on the instrument panel. The
Redundant Air Bag Warning Light will
stay on until the fault is cleared. In
addition, a single chime will sound to alert
you that the Redundant Air Bag Warning
Light has come on and a fault has been
detected. If the Redundant Air Bag
Warning Light comes on intermittently or
remains on while driving have an
authorized dealer service the vehicle
immediately. For additional information
regarding the Redundant Air Bag Warning
Light refer to “Getting To Know Your
Instrument Panel” section of this manual.
Front Air Bags
This vehicle has front air bags and
lap/shoulder belts for both the driver and
front passenger. The front air bags are a
supplement to the seat belt restraint
systems. The driver front air bag is
mounted in the center of the steering
wheel. The passenger front air bag is
mounted in the instrument panel, above
the glove compartment. The words “SRS
AIRBAG” or “AIRBAG” are embossed on
the air bag covers.
123
Page 133 of 276
Maintaining Your Air Bag System
Warning!
Modifications to any part of the air bag
system could cause it to fail when you need
it. You could be injured if the air bag system
is not there to protect you. Do not modify
the components or wiring, including adding
any kind of badges or stickers to the
steering wheel hub trim cover or the upper
right side of the instrument panel. Do not
modify the front bumper, vehicle body
structure, or add aftermarket side steps or
running boards.
It is dangerous to try to repair any part of
the air bag system yourself. Be sure to tell
anyone who works on your vehicle that it
has an air bag system.
Do not attempt to modify any part of your
air bag system. The air bag may inflate
accidentally or may not function properly if
modifications are made. Take your vehicle
to an authorized dealer for any air bag
system service. If your seat, including your
trim cover and cushion, needs to be serviced
in any way (including removal or
loosening/tightening of seat attachment
bolts), take the vehicle to your authorized
dealer. Only manufacturer approved seat
accessories may be used. If it is necessary
to modify the air bag system for persons
with disabilities, contact your authorized
dealer.
Event Data Recorder (EDR)
This vehicle is equipped with an event
data recorder (EDR). The main purpose of
an EDR is to record, in certain crash or
near crash-like situations, such as an air
bag deployment or hitting a road
obstacle, data that will assist in
understanding how a vehicle’s systems
performed. The EDR is designed to
record data related to vehicle dynamics
and safety systems for a short period of
time, typically 30 seconds or less. The
EDR in this vehicle is designed to record
such data as:
How various systems in your vehicle
were operating;
Whether or not the driver and
passenger safety belts were
buckled/fastened;
How far (if at all) the driver was
depressing the accelerator and/or brake
pedal; and,
How fast the vehicle was traveling.
These data can help provide a better
understanding of the circumstances in
which crashes and injuries occur.
Note: EDR data are recorded by your
vehicle only if a non-trivial crash situation
occurs; no data are recorded by the EDR
under normal driving conditions and no
personal data (e.g., name, gender, age,
and crash location) are recorded.
However, other parties, such as law
enforcement, could combine the EDR data with the type of personally
identifying data routinely acquired during
a crash investigation.
To read data recorded by an EDR, special
equipment is required, and access to the
vehicle or the EDR is needed. In addition
to the vehicle manufacturer, other
parties, such as law enforcement, that
have the special equipment, can read the
information if they have access to the
vehicle or the EDR.
Child Restraints
Everyone in your vehicle needs to be
buckled up at all times, including babies
and children. Every state in the United
States, and every Canadian province,
requires that small children ride in proper
restraint systems. This is the law, and you
can be prosecuted for ignoring it.
Children 12 years or younger should ride
properly buckled up in a rear seat, if
available. According to crash statistics,
children are safer when properly
restrained in the rear seats rather than in
the front.
131
Page 145 of 276
Warning!
An improperly attached, damaged, folded, or
stacked floor mat, or damaged floor mat
fasteners may cause your floor mat to
interfere with the accelerator, brake, or
clutch pedals and cause a loss of vehicle
control. To prevent SERIOUS INJURY or
DEATH:
ALWAYS securely attachyour floor
mat using the floor mat fasteners. DO NOT
install your floor mat upside down or turn
your floor mat over. Lightly pull to confirm
mat is secured using the floor mat fasteners
on a regular basis.
ALWAYS REMOVE THE EXISTING FLOOR
MAT FROM THE VEHICLEbefore
installing any other floor mat. NEVER install
or stack an additional floor mat on top of an
existing floor mat.
ONLY install floor mats designed to fit
your vehicle. NEVER install a floor mat that
cannot be properly attached and secured to
your vehicle. If a floor mat needs to be
replaced, only use a FCA approved floor mat
for the specific make, model, and year of
your vehicle.
ONLY use the driver’s side floor mat on
the driver’s side floor area. To check for
interference, with the vehicle properly
parked with the engine off, fully depress the
accelerator, the brake, and the clutch pedal
(if present) to check for interference. If your
floor mat interferes with the operation of
any pedal, or is not secure to the floor,
remove the floor mat from the vehicle and
place the floor mat in your trunk.
ONLY use the passenger’s side floor mat
on the passenger’s side floor area.
ALWAYS make sure objects cannot fall or
slide into the driver’s side floor area when
the vehicle is moving. Objects can become
trapped under accelerator, brake, or clutch
pedals and could cause a loss of vehicle
control.
NEVER place any objects under the floor
mat (e.g., towels, keys, etc.). These objects
could change the position of the floor mat
and may cause interference with the
accelerator, brake, or clutch pedals.
If the vehicle carpet has been removed
and re-installed, always properly attach
carpet to the floor and check the floor mat
fasteners are secure to the vehicle carpet.
Fully depress each pedal to check for
interference with the accelerator, brake, or
clutch pedals then re-install the floor mats.
It is recommended to only use mild soap
and water to clean your floor mats. After
cleaning, always check your floor mat has
been properly installed and is secured to
your vehicle using the floor mat fasteners
by lightly pulling mat.
Periodic Safety Checks You Should
Make Outside The Vehicle
Tires
Examine tires for excessive tread wear
and uneven wear patterns. Check for
stones, nails, glass, or other objects
lodged in the tread or sidewall. Inspect
the tread for cuts and cracks. Inspect
sidewalls for cuts, cracks, and bulges.
Check the wheel nuts for tightness.
Check the tires (including spare) for
proper cold inflation pressure.
Lights
Have someone observe the operation of
brake lights and exterior lights while you
work the controls. Check turn signal and
high beam indicator lights on the
instrument panel.
Door Latches
Check for proper closing, latching, and
locking.
Fluid Leaks
Check area under the vehicle after
overnight parking for fuel, coolant, oil, or
other fluid leaks. Also, if gasoline fumes
are detected or if fuel, or brake fluid
leaks are suspected. The cause should be
located and corrected immediately.
143
Page 149 of 276
Brake switch inactive (brake pedal not
pressed).
Battery at an acceptable charge level.
PANIC button not pushed.
System not disabled from previous
remote start event.
Vehicle alarm system indicator
flashing.
Ignition in the OFF mode (if equipped
with keyless ignition system).
Fuel level meets minimum
requirement.
Remote Start Comfort Systems — If
Equipped
When Remote Start is activated, the
heated steering wheel and driver heated
seat features will automatically turn on in
cold weather.
These features will stay on through the
duration of remote start until the ignition
is cycled to the ON/RUN mode.
Remote Start Windshield Wiper De–Icer
Activation — If Equipped
When remote start is active and the
outside ambient temperature is less than
39°F (4°C), the Windshield Wiper De-Icer
will be enabled. Exiting remote start will
resume previous operation, except if the
Windshield Wiper De-Icer is active.
The Windshield Wiper De-Icer timer and
operation will continue.
Cold Weather Operation
To prevent possible engine damage while
starting at low temperatures, this vehicle
will inhibit engine cranking when the
ambient temperature is less than –22° F
(–30° C) and the oil temperature sensor
reading indicates an engine block heater
has not been used. An externally-
powered electric engine block heater is
available as optional equipment or from
your authorized dealer.
The message “plug in engine heater” will
be displayed in the instrument cluster
when the ambient temperature is below
5° F (–15° C) at the time the engine is
shut off as a reminder to avoid possible
crank delays at the next cold start.
Caution!
Use of the recommended oil and adhering to
the prescribed oil change intervals is
important to prevent engine damage and
ensure satisfactory starting in cold
conditions.
Extended Park Starting
If the vehicle has not been started or
driven for at least 90 days, it is advisable
to follow the indications below. To start the engine, proceed as follows:
1. Briefly push the ignition button
2. If the engine does not start, wait five
seconds and let the starter cool down and
then repeat the starting procedure
3. If the engine does not start after eight
attempts, let the starter cool down for at
least 10 seconds, and then repeat the
starting procedure
If the problem persists, contact your
authorized dealer.
Note:
After prolonged vehicle inactivity,
very difficult starting, that can be noticed
through rapid fatigue of the starter,
might also be due to a partially flat
battery. In this case, refer to "Jump
Starting" in "In Case Of Emergency".
If Engine Fails To Start
Starting the Engine with Key Fob
Battery Run Down or Drained
If the ignition does not respond when the
button is pushed, the key fob battery
might be run down or drained. Therefore,
the system does not detect the presence
of the key fob in the vehicle, and will
display a dedicated message.
In this case, follow the instructions
outlined in "Starting With A Discharged
Key Fob Battery" in the "Getting To Know
Your Vehicle" chapter, and start the
engine normally.
147
Page 156 of 276
To transition the vehicle into REVERSE
(R) mode from DRIVE (D) mode, or into
DRIVE (D) mode from REVERSE (R)
mode, it is necessary to move the gear
selector by pushing the gear selector
button.
When using AutoStick, activate it by
moving the gear selector from DRIVE (D)
to the left and then forward toward the -
symbol or backward toward the + symbol
and the gear is changed.
To shift out of PARK (P), or to pass from
position NEUTRAL (N) to position DRIVE
(D) or REVERSE (R), the vehicle must be
moving at a low speed or stopped, and
the brake pedal must also be pressed.
Note:
DO NOT accelerate while shifting
from position PARK (P) or NEUTRAL (N)
to another position.
After selecting a gear, wait a few
seconds before accelerating. This
precaution is particularly important with
engine cold.
It is not possible to select NEUTRAL
(N) mode from PARK (P) mode.
Transmission Operating Modes
PARK (P)
The transmission is locked in this mode.
The engine can be started in this mode.
Note: Never try to engage PARK (P)
mode when the vehicle is moving. Before
leaving the vehicle, make sure this mode is engaged (letter P shown on the display
and gear selector) and that the park
brake is engaged.
When parking on a flat surface, first
engage the PARK (P) mode and then
engage the electric park brake.
When parking uphill, before activating
the PARK (P) mode, engage the electric
park brake. Otherwise, it could be
difficult to engage the (P) mode.
To check that the PARK (P) mode is actually
engaged, make sure (P) is illuminated on
the display and on the gear selector.
Warning!
Never use the PARK position as a
substitute for the park brake. Always apply
the park brake fully when parked to guard
against vehicle movement and possible
injury or damage.
Your vehicle could move and injure you
and others if it is not in PARK. Check by
trying to move the gear selector out of
PARK with the brake pedal released. Make
sure the transmission is in PARK before
leaving the vehicle.
It is dangerous to shift out of PARK or
NEUTRAL if the engine speed is higher than
idle speed. If your foot is not firmly pressing
the brake pedal, the vehicle could
accelerate quickly forward or in reverse.
You could lose control of the vehicle and hit
someone or something. Only shift into gear
when the engine is idling normally and your
foot is firmly pressing the brake pedal.
Unintended movement of a vehicle could
injure those in or near the vehicle. As with all
vehicles, you should never exit a vehicle
while the engine is running. Before exiting a
vehicle, always apply the park brake, shift
the transmission into PARK, and turn the
ignition STOP/OFF. When the ignition is in
the STOP/OFF mode, the transmission is
locked in PARK, securing the vehicle against
unwanted movement.
When leaving the vehicle, always make
sure the ignition is in the STOP/OFF mode,
remove the key fob from the vehicle, and
lock the vehicle.
Never leave children alone in a vehicle, or
with access to an unlocked vehicle. Allowing
children to be in a vehicle unattended is
dangerous for a number of reasons. A child
or others could be seriously or fatally
injured. Children should be warned not to
touch the park brake, brake pedal or the
transmission gear selector.
Do not leave the key fob in or near the
vehicle (or in a location accessible to
children), and do not leave the ignition in the
ON mode. A child could operate power
windows, other controls, or move the
vehicle.
154
STARTING AND OPERATING
Page 184 of 276
Warning!
Never have any smoking materials lit in or
near the vehicle when the fuel door is open
or the tank is being filled.
Never add fuel when the engine is running.
This is in violation of most state and federal
fire regulations and may cause the MIL to
turn on.
A fire may result if gasoline is pumped
into a portable container that is inside of a
vehicle. You could be burned. Always place
gas containers on the ground while filling.
Note: If the filler compartment is
washed with a pressure washer, keep it at
a distance of at least 8 inches (20 cm).
VEHICLE LOADING
Certification Label
As required by National Highway Traffic
Safety Administration regulations, your
vehicle has a certification label affixed to
the driver's side door or pillar.
This label contains the month and year of
manufacture, Gross Vehicle Weight
Rating (GVWR), Gross Axle Weight Rating
(GAWR) front and rear, and Vehicle
Identification Number (VIN). A
Month-Day-Hour (MDH) number is
included on this label and indicates the
Month, Day and Hour of manufacture. The
bar code that appears on the bottom of
the label is your VIN.
Gross Vehicle Weight Rating
(GVWR)
The GVWR is the total permissible
weight of your vehicle including driver,
passengers, vehicle, options and cargo.
The label also specifies maximum
capacities of front and rear axle systems
(GAWR). Total load must be limited so
GVWR and front and rear GAWR are not
exceeded.
Payload
The payload of a vehicle is defined as the
allowable load weight a truck can carry,
including the weight of the driver, all
passengers, options and cargo.
Gross Axle Weight Rating (GAWR)
The GAWR is the maximum permissible
load on the front and rear axles. The load
must be distributed in the cargo area so
that the GAWR of each axle is not
exceeded.
Each axle GAWR is determined by the
components in the system with the
lowest load carrying capacity (axle,
springs, tires or wheels). Heavier axles or
suspension components sometimes
specified by purchasers for increased
durability does not necessarily increase
the vehicle's GVWR.
Tire Size
The tire size on the Vehicle Certification
Label represents the actual tire size on
your vehicle. Replacement tires must be
equal to the load capacity of this tire size.
Rim Size
This is the rim size that is appropriate for
the tire size listed.
Inflation Pressure
This is the cold tire inflation pressure for
your vehicle for all loading conditions up
to full GAWR.
182
STARTING AND OPERATING
Page 202 of 276
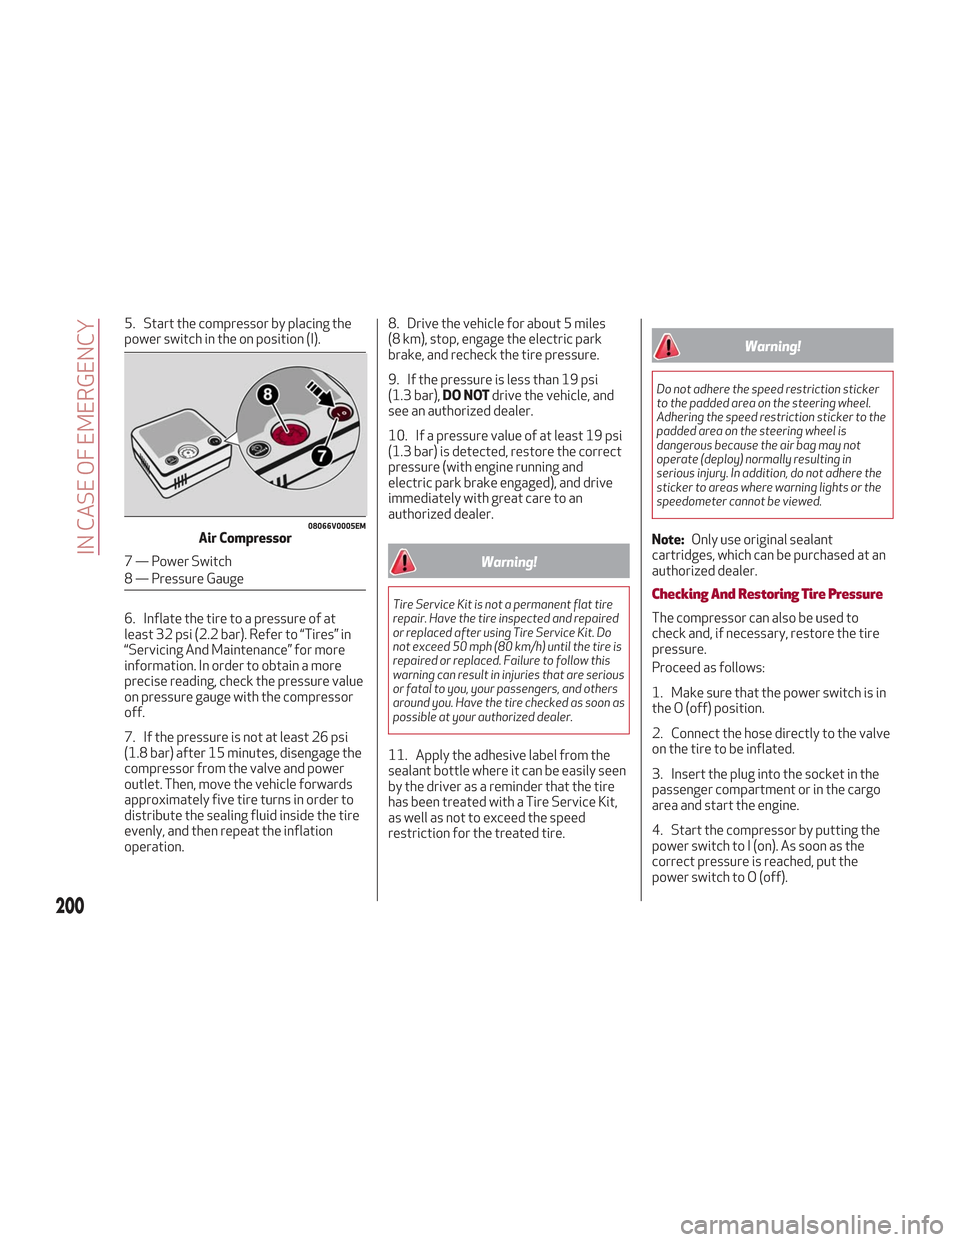
5. Start the compressor by placing the
power switch in the on position (I).
6. Inflate the tire to a pressure of at
least 32 psi (2.2 bar). Refer to “Tires” in
“Servicing And Maintenance” for more
information. In order to obtain a more
precise reading, check the pressure value
on pressure gauge with the compressor
off.
7. If the pressure is not at least 26 psi
(1.8 bar) after 15 minutes, disengage the
compressor from the valve and power
outlet. Then, move the vehicle forwards
approximately five tire turns in order to
distribute the sealing fluid inside the tire
evenly, and then repeat the inflation
operation.8. Drive the vehicle for about 5 miles
(8 km), stop, engage the electric park
brake, and recheck the tire pressure.
9. If the pressure is less than 19 psi
(1.3 bar),
DO NOTdrive the vehicle, and
see an authorized dealer.
10. If a pressure value of at least 19 psi
(1.3 bar) is detected, restore the correct
pressure (with engine running and
electric park brake engaged), and drive
immediately with great care to an
authorized dealer.
Warning!
Tire Service Kit is not a permanent flat tire
repair. Have the tire inspected and repaired
or replaced after using Tire Service Kit. Do
not exceed 50 mph (80 km/h) until the tire is
repaired or replaced. Failure to follow this
warning can result in injuries that are serious
or fatal to you, your passengers, and others
around you. Have the tire checked as soon as
possible at your authorized dealer.
11. Apply the adhesive label from the
sealant bottle where it can be easily seen
by the driver as a reminder that the tire
has been treated with a Tire Service Kit,
as well as not to exceed the speed
restriction for the treated tire.
Warning!
Do not adhere the speed restriction sticker
to the padded area on the steering wheel.
Adhering the speed restriction sticker to the
padded area on the steering wheel is
dangerous because the air bag may not
operate (deploy) normally resulting in
serious injury. In addition, do not adhere the
sticker to areas where warning lights or the
speedometer cannot be viewed.
Note: Only use original sealant
cartridges, which can be purchased at an
authorized dealer.
Checking And Restoring Tire Pressure
The compressor can also be used to
check and, if necessary, restore the tire
pressure.
Proceed as follows:
1. Make sure that the power switch is in
the O (off) position.
2. Connect the hose directly to the valve
on the tire to be inflated.
3. Insert the plug into the socket in the
passenger compartment or in the cargo
area and start the engine.
4. Start the compressor by putting the
power switch to I (on). As soon as the
correct pressure is reached, put the
power switch to O (off).
08066V0005EMAir Compressor
7 — Power Switch
8 — Pressure Gauge
200
IN CASE OF EMERGENCY
Page 206 of 276
Warning!
You or others can be badly burned by hot
engine coolant (antifreeze) or steam from
your radiator. If you see or hear steam
coming from under the hood, do not open the
hood until the radiator has had time to cool.
Never try to open a cooling system pressure
cap when the radiator or coolant bottle is
hot.
Caution!
Driving with a hot cooling system could
damage your vehicle. If temperature gauge
reads “H”, pull over and stop the vehicle. Idle
the vehicle with the air conditioner turned
off until the pointer drops back into the
normal range. If the pointer remains on the
“H”, turn the engine off immediately, and call
for service.
Note:
If the cooling fan does not operate
while the engine is running, the engine
temperature will increase. Stop the
engine and contact an authorized dealer.
If the engine continues to overheat or
frequently overheats, have the cooling
system inspected. The engine could be
seriously damaged unless repairs are
made. Contact an authorized dealer.
TOWING A DISABLED VEHICLE
This section describes procedures for
towing a disabled vehicle using a
commercial towing service.
Caution!
The vehicle should be transported with all
four wheels OFF the ground on the flatbed
of a roadside assistance vehicle. Avoid
towing with only the front (or rear) wheels
lifted. When towing with only the front (or
rear) wheels lifted, in addition to damaging
the body, it could damage the transmission.
Do not use sling-type equipment when
towing. Vehicle damage may occur.
When securing the vehicle to a flatbed
truck, do not attach to front or rear
suspension components. Damage to your
vehicle may result from improper towing.
Ensure that the Electric Park Brake is
released, and remain released, while being
towed.
Damage from improper towing is not
covered under the New Vehicle Limited
Warranty.
Note: If your vehicle is equipped with a
Anti-Lift Protection system, you will need
to disable the system prior to towing by
pushing the button located on the
overhead console. Refer to “Anti-Lift
Protection — If Equipped” in “Getting To
Know Your Vehicle” for further
information.
The operators of the assistance vehicle
must be informed with regard to the
vehicle's minimum height from ground in
order to avoid contact between the ends
of the bumpers with the equipment of the
breakdown truck.
The following image illustrates the front
and rear attachment corners of the
vehicle, to be taken into consideration
when loading the vehicle on the
commercial towing vehicle.
204
IN CASE OF EMERGENCY
Page 218 of 276
Engine Oil
The engine oil level can be seen on the
instrument cluster display every time the
engine is started, or on the Information
and Entertainment system display by
activating on the main menu (MENU
button) the following functions in
sequence:
1. “Apps”
2. “My Car”
3. “Oil Level”
Check on the display using the 6 notches
that the oil level is between the MIN and
MAX level: 1 notch MIN level, 6 notches
MAX level.
If the oil level is close to or below the MIN
mark, add oil gradually through the filler,
(refer to “Top-Up And Oil Level Indication
Update On Display” in this section)
considering that each notch shown on the
display corresponds to approximately
8.8floz(250ml).
Caution!
Make sure not to add too much oil when
topping off the engine. Engine oil in excess
may damage the engine. Have the vehicle
checked. Never exceed the MAX level when
topping off engine oil.
Caution!
The oil level is not refreshed immediately on
the display after topping off. Consequently,
wait for the oil level to be refreshed on the
display and follow the procedure below.
Note:Always reinstall the oil cap and
tighten to proper torque whenever it is
removed to add oil to engine. Never run
the engine with cap removed this could
cause oil to leak from engine.
Top-Up And Oil Level Indication Update
On Display
If a engine oil top-off is needed, in order
to ensure the correct indication of the oil
level on the display, leave the vehicle on
flat ground with the engine running for
approximately five minutes (temperature
higher than 176°F (80°C)) and shut the
engine off. Then, start the engine again,
and idle it for about five minutes.
Note: If you have added the specified
amount of oil and the indicator is not
reading “Full”, please contact an
authorized dealer.
Warning!
If the engine oil is being topped up, wait for
the engine to cool down before loosening the
filler cap, particularly for vehicles with
aluminium cap (if equipped). WARNING: risk
of burns!
Caution!
The oil level must never exceed the MAX
mark.
If the MAX mark is exceeded MAX (last
notch on the right turns red) after the fill-up,
go to an authorized dealer as soon as
possible to have the oil in excess removed.
Do not add oil with specifications
different from those of the oil already in the
engine.
Used engine oil and oil filters contain
substances which are harmful to the
environment. To change the oil and filters,
we advise you to contact an authorized
dealer.
Engine Coolant Fluid
If the level is too low, unscrew the cap of
the reservoir and add the fluid described
in the "Technical Specifications" chapter.
216
SERVICING AND MAINTENANCE