seats Alfa Romeo Stelvio 2019 Owner's Manual
[x] Cancel search | Manufacturer: ALFA ROMEO, Model Year: 2019, Model line: Stelvio, Model: Alfa Romeo Stelvio 2019Pages: 244, PDF Size: 4.95 MB
Page 11 of 244
In-depth knowledge of your new vehicle starts here.
The handbook that you are reading simply and directly explains
how it is made and how it works.
That’s why we advise you to read it seated comfortably on board,
so that you can see immediately what is described for you.
KNOWING YOUR CAR
INSTRUMENT PANEL............................10
DASHBOARD FOR RIGHT-HAND DRIVE VERSION . . ........11
THEKEYS...................................12
IGNITION DEVICE..............................13
ENGINE IMMOBILIZER...........................14
ALARM.....................................15
DOORS.....................................15
SEATS.....................................19
HEAD RESTRAINTS.............................23
STEERING WHEEL..............................23
REAR VIEW MIRRORS...........................24
EXTERNAL LIGHTS .............................26
INTERIOR LIGHTS..............................31
WINDSCREEN WIPER . ...........................31
CLIMATE CONTROL SYSTEM.......................33
WINDOW WINDERS.............................35
ELECTRIC SUNROOF............................36
BONNET....................................38
LUGGAGE COMPARTMENT TAILGATE..................39
Page 21 of 244
SEATS
FRONT SEATS WITH MANUAL
ADJUSTMENT
9)
4)
Longitudinal adjustment
10)
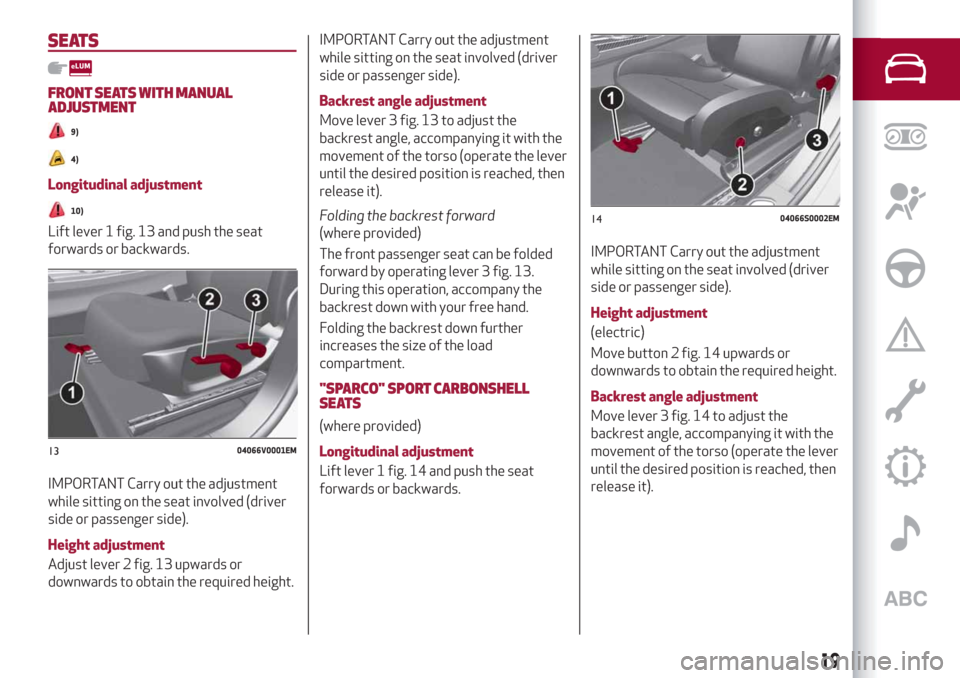
Lift lever 1 fig. 13 and push the seat
forwards or backwards.
IMPORTANT Carry out the adjustment
while sitting on the seat involved (driver
side or passenger side).
Height adjustment
Adjust lever 2 fig. 13 upwards or
downwards to obtain the required height.
IMPORTANT Carry out the adjustment
while sitting on the seat involved (driver
side or passenger side).
Backrest angle adjustment
Move lever 3 fig. 13 to adjust the
backrest angle, accompanying it with the
movement of the torso (operate the lever
until the desired position is reached, then
release it).
Folding the backrest forward
(where provided)
The front passenger seat can be folded
forward by operating lever 3 fig. 13.
During this operation, accompany the
backrest down with your free hand.
Folding the backrest down further
increases the size of the load
compartment.
"SPARCO" SPORT CARBONSHELL
SEATS
(where provided)
Longitudinal adjustment
Lift lever 1 fig. 14 and push the seat
forwards or backwards.
IMPORTANT Carry out the adjustment
while sitting on the seat involved (driver
side or passenger side).
Height adjustment
(electric)
Move button 2 fig. 14 upwards or
downwards to obtain the required height.
Backrest angle adjustment
Move lever 3 fig. 14 to adjust the
backrest angle, accompanying it with the
movement of the torso (operate the lever
until the desired position is reached, then
release it).
1304066V0001EM
1404066S0002EM
19
Page 22 of 244
ELECTRICALLY ADJUSTABLE FRONT
SEATS
5)
NOTE The conformation of the seats may
vary according to the versions.
The buttons for electrical seat
adjustment are on the outer side of the
seat, near the floor.
These buttons can be used to adjust the
height, the lengthwise position in relation
to the vehicle and the angle of the
backrest.
Height adjustment
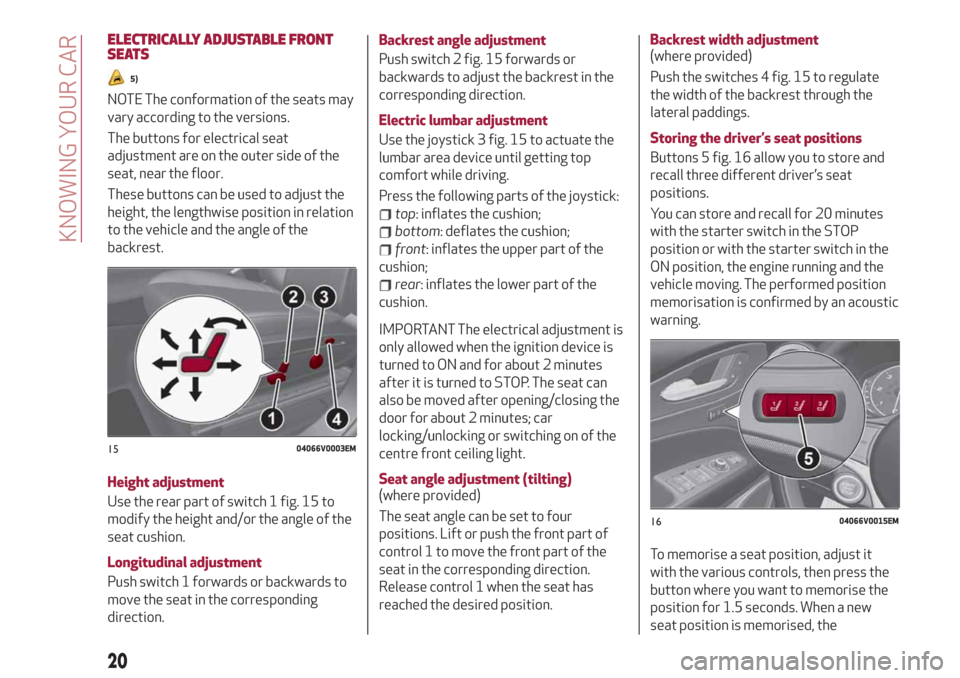
Use the rear part of switch 1 fig. 15 to
modify the height and/or the angle of the
seat cushion.
Longitudinal adjustment
Push switch 1 forwards or backwards to
move the seat in the corresponding
direction.Backrest angle adjustment
Push switch 2 fig. 15 forwards or
backwards to adjust the backrest in the
corresponding direction.
Electric lumbar adjustment
Use the joystick 3 fig. 15 to actuate the
lumbar area device until getting top
comfort while driving.
Press the following parts of the joystick:
top: inflates the cushion;
bottom: deflates the cushion;
front: inflates the upper part of the
cushion;
rear: inflates the lower part of the
cushion.
IMPORTANT The electrical adjustment is
only allowed when the ignition device is
turned to ON and for about 2 minutes
after it is turned to STOP. The seat can
also be moved after opening/closing the
door for about 2 minutes; car
locking/unlocking or switching on of the
centre front ceiling light.
Seat angle adjustment (tilting)
(where provided)
The seat angle can be set to four
positions. Lift or push the front part of
control 1 to move the front part of the
seat in the corresponding direction.
Release control 1 when the seat has
reached the desired position.Backrest width adjustment
(where provided)
Push the switches 4 fig. 15 to regulate
the width of the backrest through the
lateral paddings.
Storing the driver’s seat positions
Buttons 5 fig. 16 allow you to store and
recall three different driver’s seat
positions.
You can store and recall for 20 minutes
with the starter switch in the STOP
position or with the starter switch in the
ON position, the engine running and the
vehicle moving. The performed position
memorisation is confirmed by an acoustic
warning.
To memorise a seat position, adjust it
with the various controls, then press the
button where you want to memorise the
position for 1.5 seconds. When a new
seat position is memorised, the
1504066V0003EM
1604066V0015EM
20
KNOWING YOUR CAR
Page 23 of 244
previously memorised position on the
same button is automatically
overwritten.
Recalling a memorised position is also
possible for about 3 minutes after the
doors are opened and about 1 minute
after the engine is stopped. To recall a
memorised position, press the relevant
button briefly.
EASY ENTRY FUNCTION
The Easy Entry function is designed to
retract the driver side seat automatically
by 2.36 in (60 mm) to make it easier for
the driver to get in and out of the car.
The movement is activated only if the
seat is set to a driving position which is in
front of the B pillar of the car.
The function is associated with
electrically adjustable front seats for
each of the three stored positions.
The Easy Entry function can be
activated/deactivated using the Connect
system.Activating entrance mode
With the door open and the starter device
at STOP, the driver side seat will be in a
position retracted by 2.36 in (60 mm)
with respect to the driving position set by
the user.
When the door is closed and the starter
device is in the ON position, the seat will
automatically return to the set driving
position.
NOTE If the seat is moved manually while
it is still in retracted position, it will
remain in the new set position when the
car is entered again.
Activating exit mode
In order to help the driver get out of the
car, the driver side seat will move back by
2.36 in (60 mm) when the starter device
is in STOP mode and the driver side door
is opened.
NOTE Pressing any button on the seat
memory or control panel will immediately
interrupt the automatic positioning
function (antipanic function). The
operation must be repeated to complete
the function.
REAR SEATS
11)
The rear seats allow for:
three passengers.
SPLIT FOLDING REAR SEAT
Partial extension of the luggage
compartment (1/3 or 2/3)
6)
Extending the right side of the luggage
compartment (1/3 of the rear seat)
allows you to carry two passengers on
the left part of the rear seat, while
extending the left side (2/3 of the rear
seat) allows you to carry one passenger.
Proceed as follows:
completely lower the rear seat head
restraints;
place the seat belt so that it doesn't
impede the movement of the backrest
while tilting it;
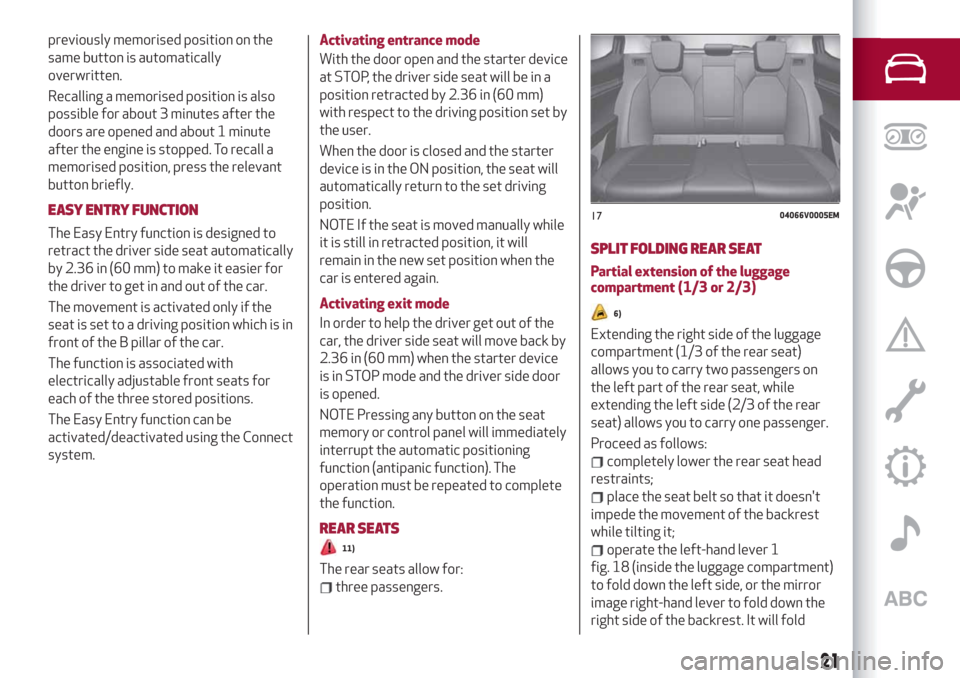
operate the left-hand lever 1
fig. 18 (inside the luggage compartment)
to fold down the left side, or the mirror
image right-hand lever to fold down the
right side of the backrest. It will fold
1704066V0005EM
21
Page 24 of 244
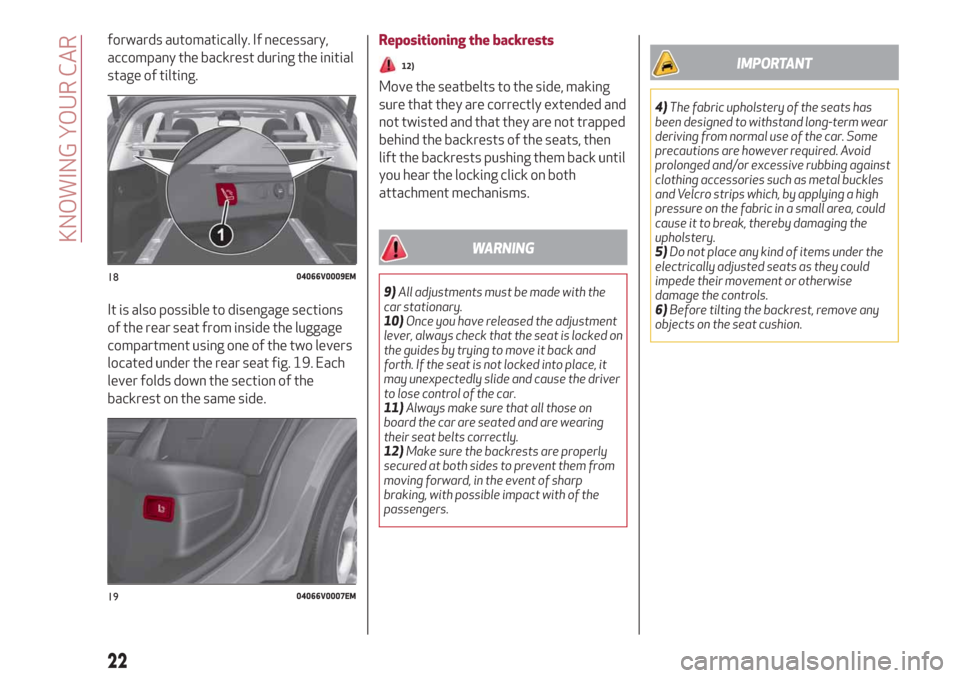
forwards automatically. If necessary,
accompany the backrest during the initial
stage of tilting.
It is also possible to disengage sections
of the rear seat from inside the luggage
compartment using one of the two levers
located under the rear seat fig. 19. Each
lever folds down the section of the
backrest on the same side.Repositioning the backrests
12)
Move the seatbelts to the side, making
sure that they are correctly extended and
not twisted and that they are not trapped
behind the backrests of the seats, then
lift the backrests pushing them back until
you hear the locking click on both
attachment mechanisms.
WARNING
9)All adjustments must be made with the
car stationary.
10)Once you have released the adjustment
lever, always check that the seat is locked on
the guides by trying to move it back and
forth. If the seat is not locked into place, it
may unexpectedly slide and cause the driver
to lose control of the car.
11)Always make sure that all those on
board the car are seated and are wearing
their seat belts correctly.
12)Make sure the backrests are properly
secured at both sides to prevent them from
moving forward, in the event of sharp
braking, with possible impact with of the
passengers.
IMPORTANT
4)The fabric upholstery of the seats has
been designed to withstand long-term wear
deriving from normal use of the car. Some
precautions are however required. Avoid
prolonged and/or excessive rubbing against
clothing accessories such as metal buckles
and Velcro strips which, by applying a high
pressure on the fabric in a small area, could
cause it to break, thereby damaging the
upholstery.
5)Do not place any kind of items under the
electrically adjusted seats as they could
impede their movement or otherwise
damage the controls.
6)Before tilting the backrest, remove any
objects on the seat cushion.
1804066V0009EM
1904066V0007EM
22
KNOWING YOUR CAR
Page 32 of 244
HEADLIGHT ALIGNMENT ADJUSTMENT
Headlight alignment corrector
(where provided)
This device is not available on vehicles
equipped with Xenon headlights
(Bi-Xenon Headlamps 35W version), as
they require an automatic alignment
correction system.
It only operates with the ignition device
at ON.
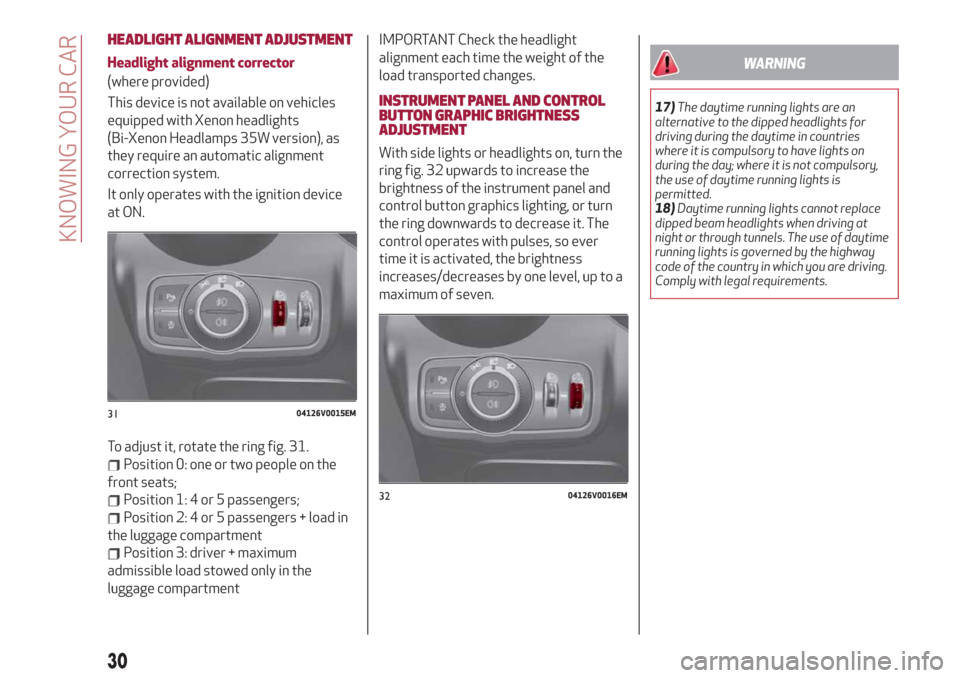
To adjust it, rotate the ring fig. 31.
Position 0: one or two people on the
front seats;
Position 1: 4 or 5 passengers;
Position 2: 4 or 5 passengers + load in
the luggage compartment
Position 3: driver + maximum
admissible load stowed only in the
luggage compartment
IMPORTANT Check the headlight
alignment each time the weight of the
load transported changes.
INSTRUMENT PANEL AND CONTROL
BUTTON GRAPHIC BRIGHTNESS
ADJUSTMENT
With side lights or headlights on, turn the
ring fig. 32 upwards to increase the
brightness of the instrument panel and
control button graphics lighting, or turn
the ring downwards to decrease it. The
control operates with pulses, so ever
time it is activated, the brightness
increases/decreases by one level, up to a
maximum of seven.
WARNING
17)The daytime running lights are an
alternative to the dipped headlights for
driving during the daytime in countries
where it is compulsory to have lights on
during the day; where it is not compulsory,
the use of daytime running lights is
permitted.
18)Daytime running lights cannot replace
dipped beam headlights when driving at
night or through tunnels. The use of daytime
running lights is governed by the highway
code of the country in which you are driving.
Comply with legal requirements.
3104126V0015EM
3204126V0016EM
30
KNOWING YOUR CAR
Page 35 of 244
CLIMATE CONTROLSYSTEM
AUTOMATIC DUAL-ZONE CLIMATE CONTROLSYSTEM
2)
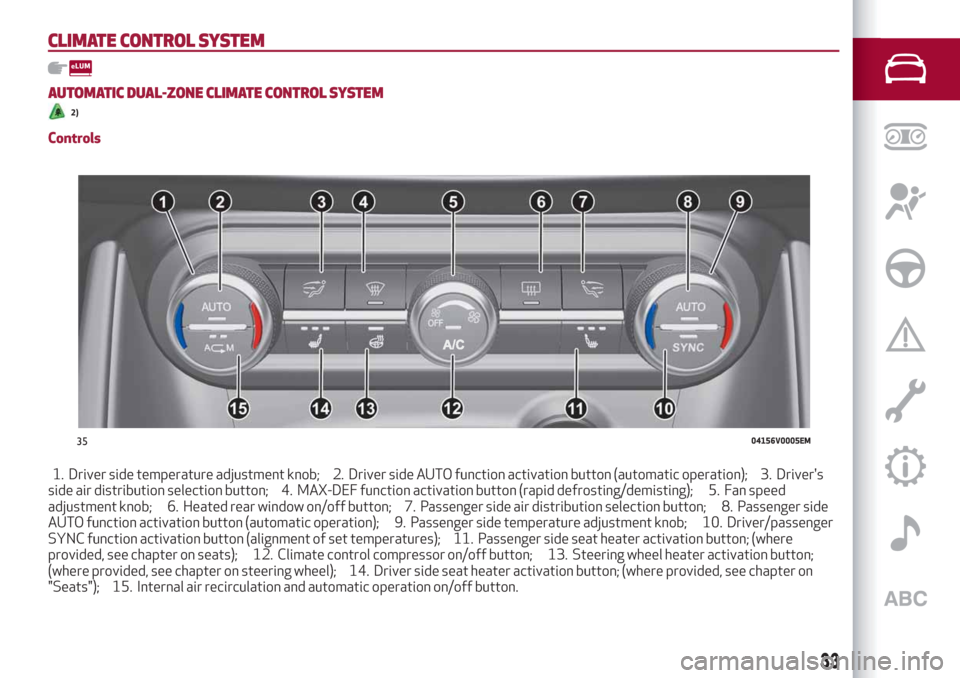
Controls
1. Driver side temperature adjustment knob; 2. Driver side AUTO function activation button (automatic operation); 3. Driver's
side air distribution selection button; 4. MAX-DEF function activation button (rapid defrosting/demisting); 5. Fan speed
adjustment knob; 6. Heated rear window on/off button; 7. Passenger side air distribution selection button; 8. Passenger side
AUTO function activation button (automatic operation); 9. Passenger side temperature adjustment knob; 10. Driver/passenger
SYNC function activation button (alignment of set temperatures); 11. Passenger side seat heater activation button; (where
provided, see chapter on seats); 12. Climate control compressor on/off button; 13. Steering wheel heater activation button;
(where provided, see chapter on steering wheel); 14. Driver side seat heater activation button; (where provided, see chapter on
"Seats"); 15. Internal air recirculation and automatic operation on/off button.
3504156V0005EM
33
Page 90 of 244
SBA (Seat Belt Alert)SYSTEM
The SBR system warns the passengers of
the front and rear (where provided) seats
if their seat belt is not fastened.
The system warnings unfastened seat
belts with visual warnings (warning lights
on in the instrument panel and icons on
the display) and an acoustic warning (see
the following paragraphs).
FRONT SEAT BELT WARNING LIGHT
BEHAVIOUR
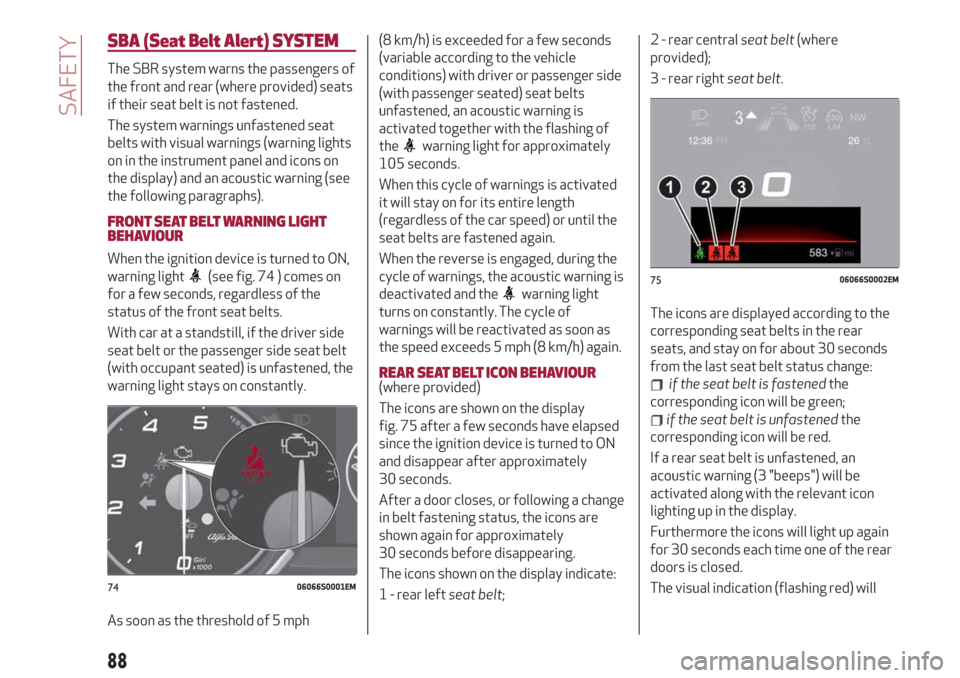
When the ignition device is turned to ON,
warning light
(see fig. 74 ) comes on
for a few seconds, regardless of the
status of the front seat belts.
With car at a standstill, if the driver side
seat belt or the passenger side seat belt
(with occupant seated) is unfastened, the
warning light stays on constantly.
As soon as the threshold of 5 mph(8 km/h) is exceeded for a few seconds
(variable according to the vehicle
conditions) with driver or passenger side
(with passenger seated) seat belts
unfastened, an acoustic warning is
activated together with the flashing of
the
warning light for approximately
105 seconds.
When this cycle of warnings is activated
it will stay on for its entire length
(regardless of the car speed) or until the
seat belts are fastened again.
When the reverse is engaged, during the
cycle of warnings, the acoustic warning is
deactivated and the
warning light
turns on constantly. The cycle of
warnings will be reactivated as soon as
the speed exceeds 5 mph (8 km/h) again.
REAR SEAT BELT ICON BEHAVIOUR(where provided)
The icons are shown on the display
fig. 75 after a few seconds have elapsed
since the ignition device is turned to ON
and disappear after approximately
30 seconds.
After a door closes, or following a change
in belt fastening status, the icons are
shown again for approximately
30 seconds before disappearing.
The icons shown on the display indicate:
1 - rear leftseat belt;2 - rear centralseat belt(where
provided);
3 - rear rightseat belt.
The icons are displayed according to the
corresponding seat belts in the rear
seats, and stay on for about 30 seconds
from the last seat belt status change:if the seat belt is fastenedthe
corresponding icon will be green;
if the seat belt is unfastenedthe
corresponding icon will be red.
If a rear seat belt is unfastened, an
acoustic warning (3 "beeps") will be
activated along with the relevant icon
lighting up in the display.
Furthermore the icons will light up again
for 30 seconds each time one of the rear
doors is closed.
The visual indication (flashing red) will
7406066S0001EM
7506066S0002EM
88
SAFETY
Page 91 of 244
start and stop independently for each
warning light if several seat belts are
unfastened.
The icon will turn green after the
corresponding seat belt has been
fastened.
The rear seat icons will go out, regardless
of the state of the belt (red icon or green
icon), approximately 30 seconds after
the last signal.
IMPORTANT NOTES
As far as the rear seats are concerned,
the SBR system will only indicate
whether the seat belts are unfastened
(red icon) or fastened (green icon), not
the presence of any passengers.
The warning lights/icons all stay off if all
seat belts (front and rear) are fastened
when the ignition device is set to ON.
For the rear seats, the icons will activate
a few seconds after the ignition device
has been turned to ON, regardless of the
status of the seat belts (even if the seat
belts are all fastened).
All the warning lights/icons will come on
when at least one belt changes from
fastened to unfastened status or vice
versa.PRE-TENSIONERS
The car is equipped with front and rear
lateral seat belt pretensioners, which
draw back the seat belts by several
centimetres in the event of a strong
frontal impact. This guarantees the
perfect adherence of the seat belts to
the occupant's bodies before the
retention action begins.
It is evident that the pretensioners have
been activated when the belt withdraws
toward the retractor.
This car is also equipped with a second
pretensioner on the front seat belts
(fitted in the kick plate area). Its
activation is signalled by the shortening
of the metal cable.
A slight discharge of smoke may be
produced during the activation of the
pretensioner which is not harmful and
does not involve any fire hazard.
The pretensioner does not require any
maintenance or lubrication: any changes
to its original conditions will invalidate its
efficiency.
If, due to unusual natural events (floods,
sea storms, etc.), the device has been
affected by water and/or mud, contact an
Alfa Romeo Dealership to have it
replaced.
IMPORTANT To obtain the highest
degree of protection from the action ofthe pretensioner, wear the seat belt tight
to the torso and pelvis.
LOAD LIMITERS
70)
29)
To increase safety in the event of an
accident, the front and rear lateral seat
belt retractors contain a load limiter
which controls the force acting on the
chest and shoulders during the belt
restraining action in the event of a
head-on collision.
GENERAL INSTRUCTIONS FOR USING
THE SEAT BELTS
71) 72) 73)
Respect and ensure that all the other
occupants of the vehicle comply with the
local laws in force regarding the use of
seat belts. Always fasten the seat belts
before setting off.
Seat belts must also be worn by pregnant
women: the risk of injury in the event of
an accident is reduced for them and the
unborn child if they are wearing a seat
belt.
Pregnant women must position the lower
part of the belt very low down so that it
passes over the pelvis and under the
abdomen fig. 76. While pregnancy
progresses, the driver must adjust both
seat and steering wheel to have full
control over the vehicle (pedals and
89
Page 93 of 244
72)For maximum safety, keep the backrest
upright, lean back into it and make sure the
seat belt fits closely across your chest and
pelvis. Always fasten the seat belts for both
the front and rear seats! Travelling without
wearing seat belts will increase the risk of
serious injury and even death in the event of
an accident.
73)If the belt has been subjected to high
levels of stress, for example after an
accident, it should be changed completely
together with the attachments, attachment
fixing screws and the pretensioner. In fact,
even if the belt has no visible defects, it may
have lost its resilience.
IMPORTANT
29)Operations which lead to impacts,
vibrations or localised heating (over 100°C
for a maximum of six hours) in the area
around the pretensioner may cause damage
or make it deploy. Contact an Alfa Romeo
Dealership should intervention be necessary
on these components.
CHILD PROTECTIONSYSTEMS
CARRYING CHILDREN SAFELY
74) 75) 76) 77)
For optimal protection in the event of an
impact, all occupants must be seated and
wearing adequate restraint systems,
including newborn and other children!
This prescription is compulsory in all EC
countries according to EC Directive
2003/20/EC.
Children below the height of 4.9 ft
(1.50 metres) and up to 12 years must be
protected with suitable restraint
systems and be seated on the rear seats.
Statistics on accidents indicate that the
rear seats offer greater safety for
children.
Compared with an adult, a child's head is
larger and heavier in proportion to their
body and the child's muscular and bone
structures are not fully developed.
Therefore, correct restraint systems
other than adult seat belts are necessary,
to reduce as much as possible the risk of
injuries in the event of an accident,
braking or sudden manoeuvre.
Children must be seated safely and
comfortably. As far as the characteristics
of the child seats used allow, you are
advised to keep children in rear facing
child seats for as long as possible (atleast until 3–4 years old), since this is the
most protected position in the event of
an impact.
The choice of the most suitable child
restraint system depends on the weight
and size of the child. There are various
types of child restraint systems, which
can be secured to the car by means of the
seat belts or with the ISOFIX/i-Size
anchorages.
It is recommended to always choose the
restraint system most suitable for the
child; for this reason always refer to the
Owner Handbook provided with the child
restraint system, to be sure that it is of
the right type for the children it is
intended for.
In Europe the characteristics of child
restraint systems are ruled by the
regulation ECE-R44, dividing them into
five weight groups:
Group Weight range
Group 0upto 22 lb (10 kg) in
weight
Group 0+up to 28.7 lb (13 kg)
in weight
Group 120-40lb(9-18kg)
in weight
Group 233-55lb(15-25kg)
in weight
91