key fob ALFA ROMEO STELVIO 2021 User Guide
[x] Cancel search | Manufacturer: ALFA ROMEO, Model Year: 2021, Model line: STELVIO, Model: ALFA ROMEO STELVIO 2021Pages: 280, PDF Size: 10.02 MB
Page 29 of 280
27
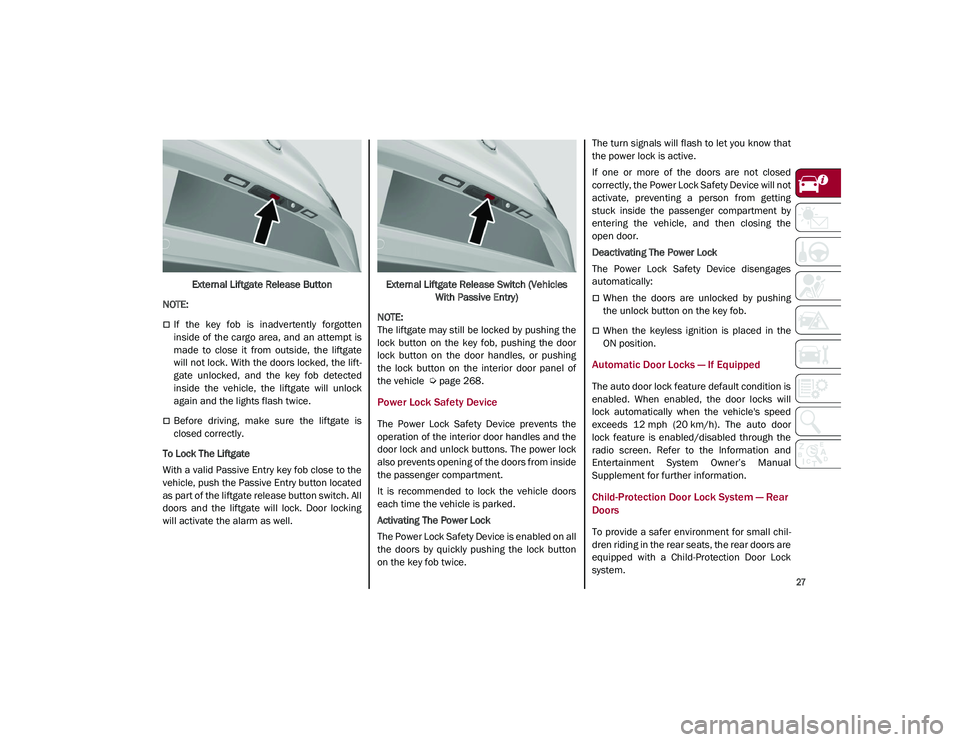
External Liftgate Release Button
NOTE:
If the key fob is inadvertently forgotten
inside of the cargo area, and an attempt is
made to close it from outside, the liftgate
will not lock. With the doors locked, the lift -
gate unlocked, and the key fob detected
inside the vehicle, the liftgate will unlock
again and the lights flash twice.
Before driving, make sure the liftgate is
closed correctly.
To Lock The Liftgate
With a valid Passive Entry key fob close to the
vehicle, push the Passive Entry button located
as part of the liftgate release button switch. All
doors and the liftgate will lock. Door locking
will activate the alarm as well. External Liftgate Release Switch (Vehicles
With Passive Entry)
NOTE:
The liftgate may still be locked by pushing the
lock button on the key fob, pushing the door
lock button on the door handles, or pushing
the lock button on the interior door panel of
the vehicle
Ú
page 268.
Power Lock Safety Device
The Power Lock Safety Device prevents the
operation of the interior door handles and the
door lock and unlock buttons. The power lock
also prevents opening of the doors from inside
the passenger compartment.
It is recommended to lock the vehicle doors
each time the vehicle is parked.
Activating The Power Lock
The Power Lock Safety Device is enabled on all
the doors by quickly pushing the lock button
on the key fob twice. The turn signals will flash to let you know that
the power lock is active.
If one or more of the doors are not closed
correctly, the Power Lock Safety Device will not
activate, preventing a person from getting
stuck inside the passenger compartment by
entering the vehicle, and then closing the
open door.
Deactivating The Power Lock
The Power Lock Safety Device disengages
automatically:
When the doors are unlocked by pushing
the unlock button on the key fob.
When the keyless ignition is placed in the
ON position.
Automatic Door Locks — If Equipped
The auto door lock feature default condition is
enabled. When enabled, the door locks will
lock automatically when the vehicle's speed
exceeds 12 mph (20 km/h). The auto door
lock feature is enabled/disabled through the
radio screen. Refer to the Information and
Entertainment System Owner’s Manual
Supplement for further information.
Child-Protection Door Lock System — Rear
Doors
To provide a safer environment for small chil
-
dren riding in the rear seats, the rear doors are
equipped with a Child-Protection Door Lock
system.
21_GU_OM_EN_USC_t.book Page 27
Page 47 of 280
45
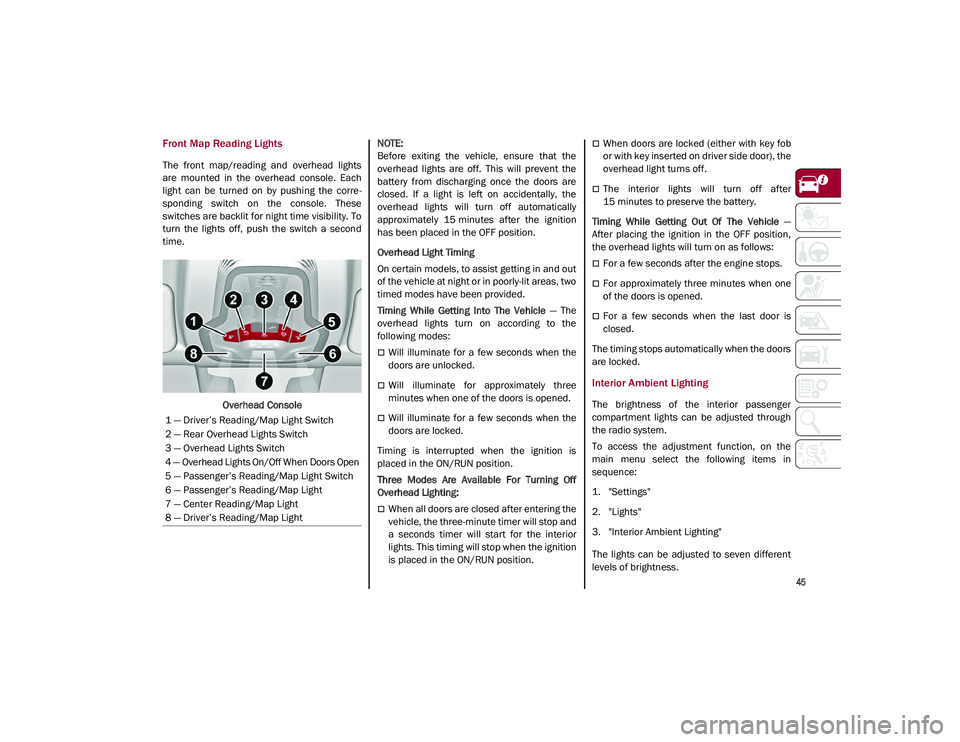
Front Map Reading Lights
The front map/reading and overhead lights
are mounted in the overhead console. Each
light can be turned on by pushing the corre-
sponding switch on the console. These
switches are backlit for night time visibility. To
turn the lights off, push the switch a second
time.
Overhead Console
NOTE:
Before exiting the vehicle, ensure that the
overhead lights are off. This will prevent the
battery from discharging once the doors are
closed. If a light is left on accidentally, the
overhead lights will turn off automatically
approximately 15 minutes after the ignition
has been placed in the OFF position.
Overhead Light Timing
On certain models, to assist getting in and out
of the vehicle at night or in poorly-lit areas, two
timed modes have been provided.
Timing While Getting Into The Vehicle
— The
overhead lights turn on according to the
following modes:
Will illuminate for a few seconds when the
doors are unlocked.
Will illuminate for approximately three
minutes when one of the doors is opened.
Will illuminate for a few seconds when the
doors are locked.
Timing is interrupted when the ignition is
placed in the ON/RUN position.
Three Modes Are Available For Turning Off
Overhead Lighting:
When all doors are closed after entering the
vehicle, the three-minute timer will stop and
a seconds timer will start for the interior
lights. This timing will stop when the ignition
is placed in the ON/RUN position.
When doors are locked (either with key fob
or with key inserted on driver side door), the
overhead light turns off.
The interior lights will turn off after
15 minutes to preserve the battery.
Timing While Getting Out Of The Vehicle —
After placing the ignition in the OFF position,
the overhead lights will turn on as follows:
For a few seconds after the engine stops.
For approximately three minutes when one
of the doors is opened.
For a few seconds when the last door is
closed.
The timing stops automatically when the doors
are locked.
Interior Ambient Lighting
The brightness of the interior passenger
compartment lights can be adjusted through
the radio system.
To access the adjustment function, on the
main menu select the following items in
sequence:
1. "Settings"
2. "Lights"
3. "Interior Ambient Lighting"
The lights can be adjusted to seven different
levels of brightness.
1 — Driver’s Reading/Map Light Switch
2 — Rear Overhead Lights Switch
3 — Overhead Lights Switch
4 — Overhead Lights On/Off When Doors Open
5 — Passenger’s Reading/Map Light Switch
6 — Passenger’s Reading/Map Light
7 — Center Reading/Map Light
8 — Driver’s Reading/Map Light
21_GU_OM_EN_USC_t.book Page 45
Page 60 of 280
GETTING TO KNOW YOUR VEHICLE
58
Your mobile phone must be designed for Qi
wireless charging.
NOTE:
Do not place the key fob or any other type of
metal/magnetized object inside the mobile
phone housing or near the wireless
charging pad.
Be sure to place the mobile device correctly
(display facing upward) on the wireless
charging pad.
The ignition must be in the ON/RUN position
in order for the phone to charge.
To avoid interference with the key fob
search, the wireless charging pad will stop
charging when any door is opened.The following messages will display in the
radio system:
“Your phone is being charged” — The phone
has begun to charge.
“Phone Fully Charged” — The phone has
completed charging its battery.
“Foreign Object Detected” — The phone is
not enabled for wireless charging or an
object that is not permitted has been placed
on the wireless charging pad.
“Unavailable System” — There is a malfunc
-
tion with the wireless charging pad.
The driver can deactivate these messages
through the radio system. Refer to the Infor -
mation and Entertainment System Owner’s
Manual Supplement for further information.
POWER WINDOWS
Power Window Controls
The power window switches work with the igni -
tion in the ACC or ON/RUN position and for
three minutes after the ignition has been
placed in the OFF position. When one of the
front doors is opened, this operation is
disabled.
The window controls on the driver's door
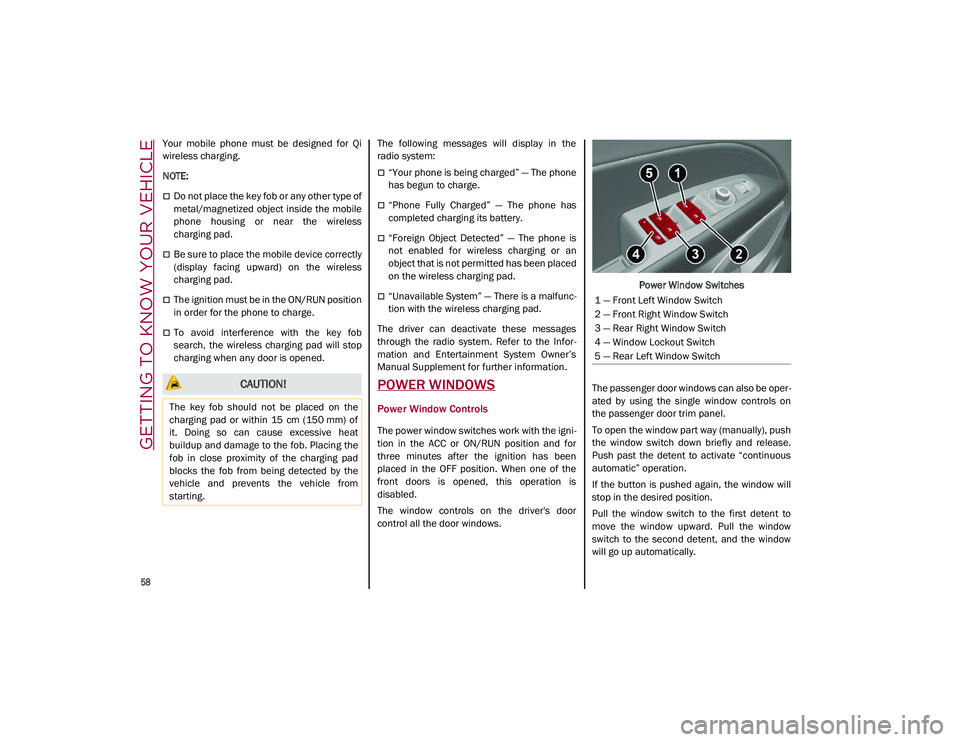
control all the door windows. Power Window Switches
The passenger door windows can also be oper -
ated by using the single window controls on
the passenger door trim panel.
To open the window part way (manually), push
the window switch down briefly and release.
Push past the detent to activate “continuous
automatic” operation.
If the button is pushed again, the window will
stop in the desired position.
Pull the window switch to the first detent to
move the window upward. Pull the window
switch to the second detent, and the window
will go up automatically.
CAUTION!
The key fob should not be placed on the
charging pad or within 15 cm (150 mm) of
it. Doing so can cause excessive heat
buildup and damage to the fob. Placing the
fob in close proximity of the charging pad
blocks the fob from being detected by the
vehicle and prevents the vehicle from
starting.
1 — Front Left Window Switch
2 — Front Right Window Switch
3 — Rear Right Window Switch
4 — Window Lockout Switch
5 — Rear Left Window Switch
21_GU_OM_EN_USC_t.book Page 58
Page 61 of 280
59
To close the window, pull the window switch
up. To stop the window during Auto-Up opera-
tion, push or pull the window switch again.
Auto-Up Feature With Anti-Pinch Protection
The vehicle is equipped with an anti-pinch
safety device for closing the windows.
If the safety system senses any obstacle while
the window is closing, it will stop the window’s
movement and reverse it, depending on its
position.
This device is also useful if the windows are
activated accidentally by children inside the
vehicle.
The anti-pinch safety function is activated both
during the manual and the automatic opera -
tion of the window.
When the anti-pinch system is activated, the
window closing is immediately interrupted.
Then the window closing is automatically reversed and the window lowers by about
8 inches (20 cm) in relation to the first stop
position. The window cannot be operated
during this time.
NOTE:
In the event of an error, or if the anti-pinch
protection is activated three consecutive
times, the automatic closing operation of the
window will be deactivated. In order to restore
the correct operation of the system, the
window must be lowered.
Power Window System Initialization
If power supply is interrupted, the electric
window automatic operation must be reinitial
-
ized.
To perform the initialization procedure, which
must be done on each door with the doors
closed, manually fully close the window to be
initialized.
Wind Buffeting
Wind buffeting can be described as the
perception of pressure on the ears or a heli -
copter-type sound in the ears. Your vehicle
may exhibit wind buffeting with the windows
down, or the sunroof (if equipped) in certain
open or partially open positions. This is a
normal occurrence and can be minimized. If
the buffeting occurs with the rear windows
open, open the front and rear windows together to minimize the buffeting. If the
buffeting occurs with the sunroof open, adjust
the sunroof opening to minimize the buffeting
or open any window.
POWER SUNROOF — IF
EQUIPPED
Power Sunroof
The power sunroof consists of a single glass
panel and is fitted with a power sunshade the
full length of the panel.
Operation of the sunroof is only possible with
the ignition in the ACC or ON/RUN position
Ú
page 20.
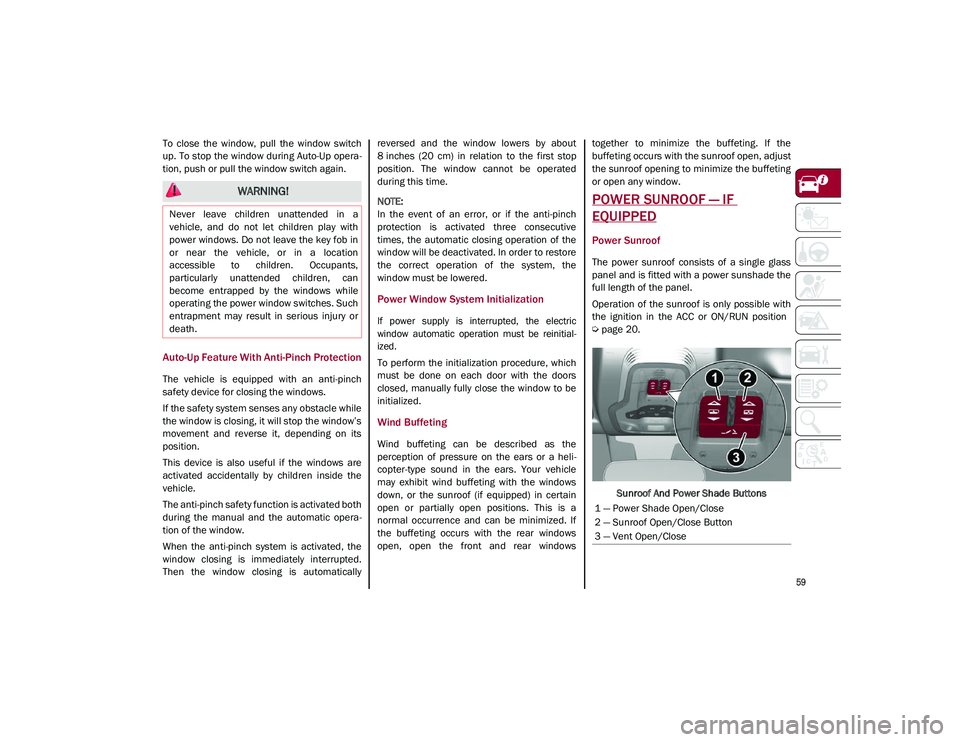
Sunroof And Power Shade Buttons
WARNING!
Never leave children unattended in a
vehicle, and do not let children play with
power windows. Do not leave the key fob in
or near the vehicle, or in a location
accessible to children. Occupants,
particularly unattended children, can
become entrapped by the windows while
operating the power window switches. Such
entrapment may result in serious injury or
death.
1 — Power Shade Open/Close
2 — Sunroof Open/Close Button
3 — Vent Open/Close
21_GU_OM_EN_USC_t.book Page 59
Page 62 of 280
GETTING TO KNOW YOUR VEHICLE
60
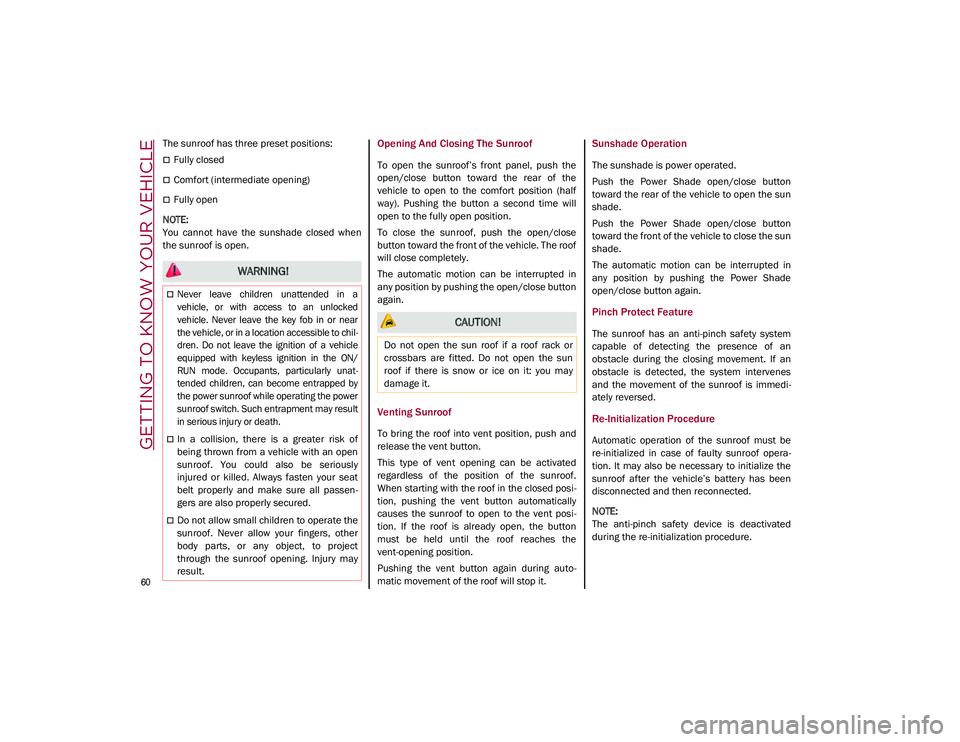
The sunroof has three preset positions:
Fully closed
Comfort (intermediate opening)
Fully open
NOTE:
You cannot have the sunshade closed when
the sunroof is open.
Opening And Closing The Sunroof
To open the sunroof’s front panel, push the
open/close button toward the rear of the
vehicle to open to the comfort position (half
way). Pushing the button a second time will
open to the fully open position.
To close the sunroof, push the open/close
button toward the front of the vehicle. The roof
will close completely.
The automatic motion can be interrupted in
any position by pushing the open/close button
again.
Venting Sunroof
To bring the roof into vent position, push and
release the vent button.
This type of vent opening can be activated
regardless of the position of the sunroof.
When starting with the roof in the closed posi -
tion, pushing the vent button automatically
causes the sunroof to open to the vent posi -
tion. If the roof is already open, the button
must be held until the roof reaches the
vent-opening position.
Pushing the vent button again during auto -
matic movement of the roof will stop it.
Sunshade Operation
The sunshade is power operated.
Push the Power Shade open/close button
toward the rear of the vehicle to open the sun
shade.
Push the Power Shade open/close button
toward the front of the vehicle to close the sun
shade.
The automatic motion can be interrupted in
any position by pushing the Power Shade
open/close button again.
Pinch Protect Feature
The sunroof has an anti-pinch safety system
capable of detecting the presence of an
obstacle during the closing movement. If an
obstacle is detected, the system intervenes
and the movement of the sunroof is immedi -
ately reversed.
Re-Initialization Procedure
Automatic operation of the sunroof must be
re-initialized in case of faulty sunroof opera -
tion. It may also be necessary to initialize the
sunroof after the vehicle’s battery has been
disconnected and then reconnected.
NOTE:
The anti-pinch safety device is deactivated
during the re-initialization procedure.
WARNING!
Never leave children unattended in a
vehicle, or with access to an unlocked
vehicle. Never leave the key fob in or near
the vehicle, or in a location accessible to chil -
dren. Do not leave the ignition of a vehicle
equipped with keyless ignition in the ON/
RUN mode. Occupants, particularly unat -
tended children, can become entrapped by
the power sunroof while operating the power
sunroof switch. Such entrapment may result
in serious injury or death.
In a collision, there is a greater risk of
being thrown from a vehicle with an open
sunroof. You could also be seriously
injured or killed. Always fasten your seat
belt properly and make sure all passen -
gers are also properly secured.
Do not allow small children to operate the
sunroof. Never allow your fingers, other
body parts, or any object, to project
through the sunroof opening. Injury may
result.
CAUTION!
Do not open the sun roof if a roof rack or
crossbars are fitted. Do not open the sun
roof if there is snow or ice on it: you may
damage it.
21_GU_OM_EN_USC_t.book Page 60
Page 64 of 280
GETTING TO KNOW YOUR VEHICLE
62
Closing The Hood
To close, lower the hood to approximately
16 inches (40 cm) from the engine compart-
ment then let it drop. Make sure that the hood
is completely closed and fully latched.
NOTE:
Since the hood is equipped with a double
locking system, one for each side, you must
check that it is closed on each side.
POWER LIFTGATE
Unlocking of the liftgate is electrically oper -
ated and is deactivated when the vehicle is in
motion.
If anything obstructs the power liftgate while it
is closing or opening, the liftgate will automat -
ically reverse to the closed or open position,
provided it meets sufficient resistance.
Opening
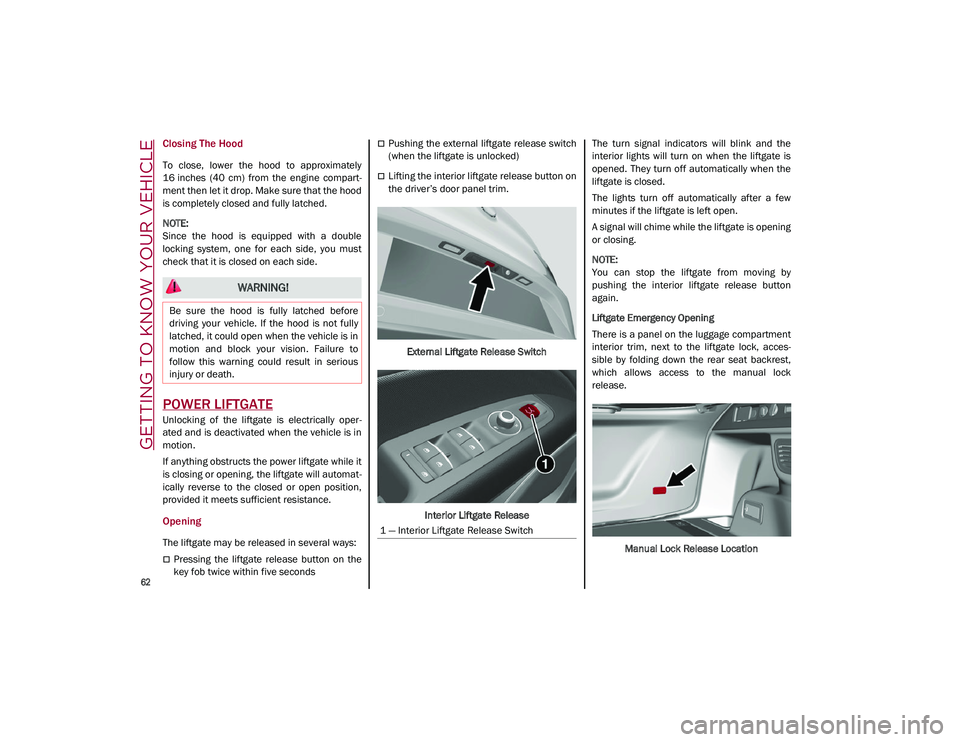
The liftgate may be released in several ways:
Pressing the liftgate release button on the
key fob twice within five seconds
Pushing the external liftgate release switch
(when the liftgate is unlocked)
Lifting the interior liftgate release button on
the driver’s door panel trim.
External Liftgate Release Switch
Interior Liftgate Release The turn signal indicators will blink and the
interior lights will turn on when the liftgate is
opened. They turn off automatically when the
liftgate is closed.
The lights turn off automatically after a few
minutes if the liftgate is left open.
A signal will chime while the liftgate is opening
or closing.
NOTE:
You can stop the liftgate from moving by
pushing the interior liftgate release button
again.
Liftgate Emergency Opening
There is a panel on the luggage compartment
interior trim, next to the liftgate lock, acces
-
sible by folding down the rear seat backrest,
which allows access to the manual lock
release.
Manual Lock Release Location
WARNING!
Be sure the hood is fully latched before
driving your vehicle. If the hood is not fully
latched, it could open when the vehicle is in
motion and block your vision. Failure to
follow this warning could result in serious
injury or death.
1 — Interior Liftgate Release Switch
21_GU_OM_EN_USC_t.book Page 62
Page 65 of 280
63
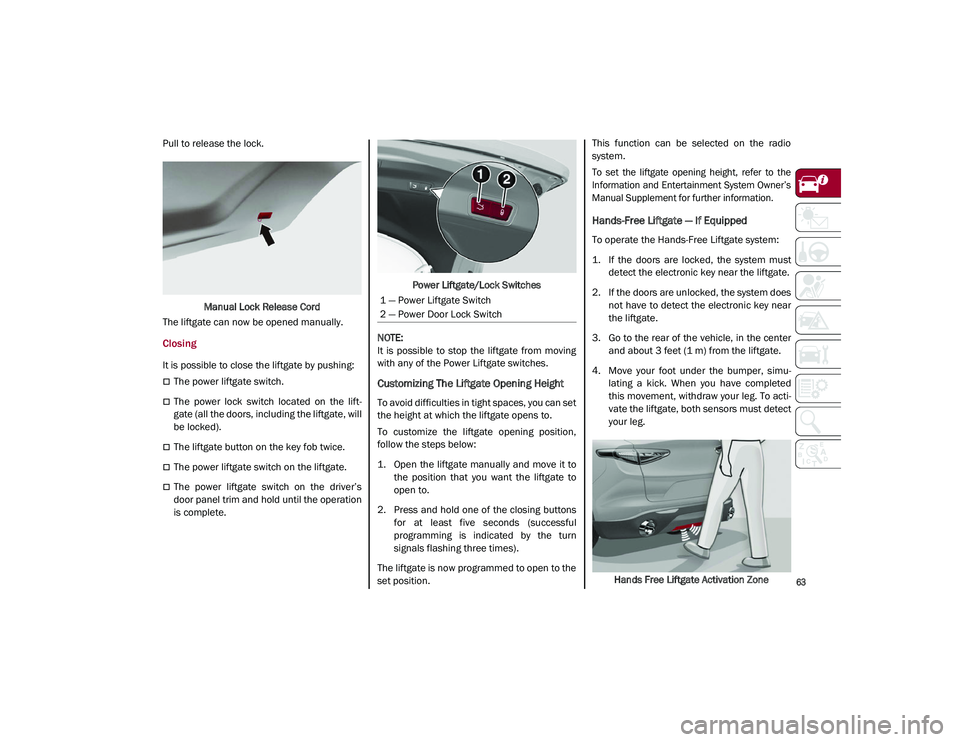
Pull to release the lock.Manual Lock Release Cord
The liftgate can now be opened manually.
Closing
It is possible to close the liftgate by pushing:
The power liftgate switch.
The power lock switch located on the lift -
gate (all the doors, including the liftgate, will
be locked).
The liftgate button on the key fob twice.
The power liftgate switch on the liftgate.
The power liftgate switch on the driver’s
door panel trim and hold until the operation
is complete. Power Liftgate/Lock Switches
NOTE:
It is possible to stop the liftgate from moving
with any of the Power Liftgate switches.
Customizing The Liftgate Opening Height
To avoid difficulties in tight spaces, you can set
the height at which the liftgate opens to.
To customize the liftgate opening position,
follow the steps below:
1. Open the liftgate manually and move it to the position that you want the liftgate to
open to.
2. Press and hold one of the closing buttons for at least five seconds (successful
programming is indicated by the turn
signals flashing three times).
The liftgate is now programmed to open to the
set position. This function can be selected on the radio
system.
To set the liftgate opening height, refer to the
Information and Entertainment System Owner’s
Manual Supplement for further information.
Hands-Free Liftgate — If Equipped
To operate the Hands-Free Liftgate system:
1. If the doors are locked, the system must
detect the electronic key near the liftgate.
2. If the doors are unlocked, the system does not have to detect the electronic key near
the liftgate.
3. Go to the rear of the vehicle, in the center and about 3 feet (1 m) from the liftgate.
4. Move your foot under the bumper, simu -
lating a kick. When you have completed
this movement, withdraw your leg. To acti -
vate the liftgate, both sensors must detect
your leg.
Hands Free Liftgate Activation Zone
1 — Power Liftgate Switch
2 — Power Door Lock Switch
21_GU_OM_EN_USC_t.book Page 63
Page 66 of 280
GETTING TO KNOW YOUR VEHICLE
64
(Continued)
If it is closed, the Hands-Free Liftgate unlocks
and opens completely, and with another
movement of the foot, it stops. A further move-
ment of the foot reverses the direction and
closes the liftgate completely, if you do not
stop it again.
If it is open, with a movement of the foot, the
Hands-Free Liftgate closes completely, and
with another movement of the foot, it stops. If
the liftgate is stopped, another movement of
the foot will reverse the direction and open it
completely.
NOTE:
To conserve the battery charge, avoid
performing this operation repeatedly with the
engine off.
You can activate/deactivate the Hands-Free
Liftgate on the radio system by pushing the
MENU button to select the Main menu, and
selecting the following items:
1. “Settings.”
2. “Doors And Locks.”
3. “Automatic Liftgate Opening.”
Liftgate Initialization
NOTE:
Automatic operation of the liftgate must be
initialized again in case of faulty liftgate opera -
tion. Proceed as follows:
1. Close all the doors and the liftgate.
2. Push the lock button on the key fob.
3. Push the unlock button on the key fob.
Cargo Area Features
Retractable Cargo Area Cover
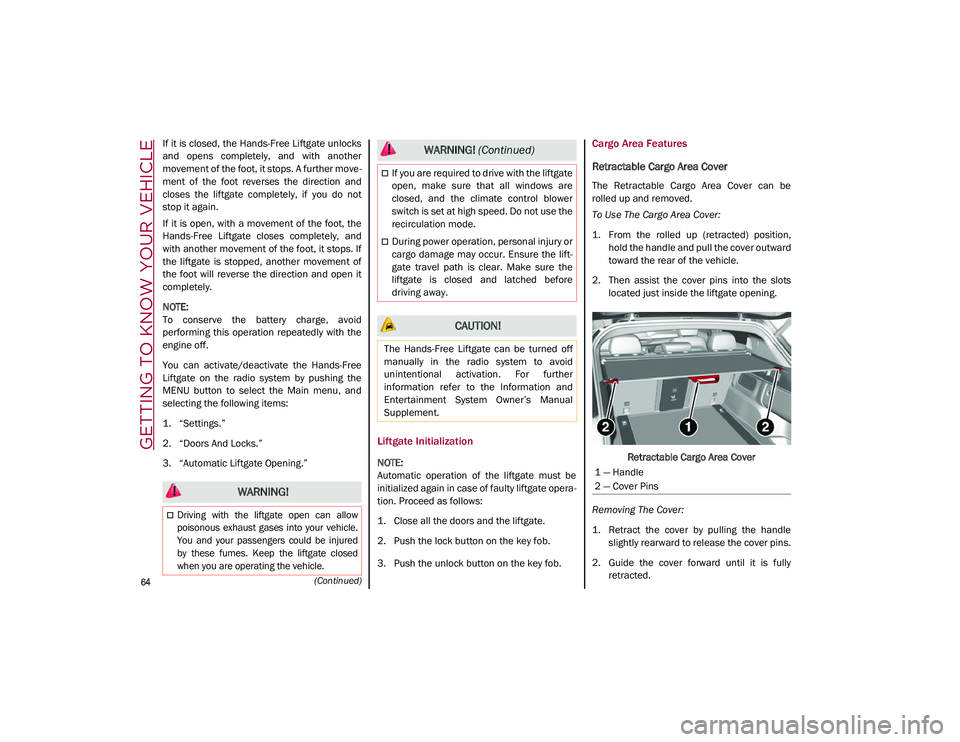
The Retractable Cargo Area Cover can be
rolled up and removed.
To Use The Cargo Area Cover:
1. From the rolled up (retracted) position, hold the handle and pull the cover outward
toward the rear of the vehicle.
2. Then assist the cover pins into the slots located just inside the liftgate opening.
Retractable Cargo Area Cover
Removing The Cover:
1. Retract the cover by pulling the handle slightly rearward to release the cover pins.
2. Guide the cover forward until it is fully retracted.
WARNING!
Driving with the liftgate open can allow
poisonous exhaust gases into your vehicle.
You and your passengers could be injured
by these fumes. Keep the liftgate closed
when you are operating the vehicle.
If you are required to drive with the liftgate
open, make sure that all windows are
closed, and the climate control blower
switch is set at high speed. Do not use the
recirculation mode.
During power operation, personal injury or
cargo damage may occur. Ensure the lift -
gate travel path is clear. Make sure the
liftgate is closed and latched before
driving away.
CAUTION!
The Hands-Free Liftgate can be turned off
manually in the radio system to avoid
unintentional activation. For further
information refer to the Information and
Entertainment System Owner’s Manual
Supplement.
WARNING! (Continued)
1 — Handle
2 — Cover Pins
21_GU_OM_EN_USC_t.book Page 64
Page 88 of 280
86
(Continued)
STARTING AND OPERATING
STARTING THE ENGINE
Before starting the engine, be sure to adjust
the seat, the interior rear view mirror, door
mirrors, and fasten the seat belt correctly.
Never press the accelerator pedal before
starting the engine.
If necessary, messages indicating the starting
procedure will be shown in the display.
Starting Procedure
Proceed as follows:
1. Apply the Electric Park Brake (EPB) andplace the gear selector in PARK (P) or
NEUTRAL (N).
2. Fully press the brake pedal without touching the accelerator.
3. Briefly push the ignition button.
4. If the engine doesn't start within a few seconds, you need to repeat the proce -
dure.
If the problem persists, contact an authorized
dealer.
Remote Starting System
This system uses the key fob to start the
engine conveniently from outside the vehicle
while still maintaining security. The system
has a range of at least 300 feet (91 meters).
The remote starting system also activates the
climate control, the heated seats (if
equipped), and the heated steering wheel (if
equipped), depending on temperatures
outside and inside of the vehicle.
NOTE:
Obstructions between the vehicle and key fob
may reduce this range.
WARNING!
When leaving the vehicle, always remove
the key fob from the vehicle and lock your
vehicle.
Never leave children alone in a vehicle, or
with access to an unlocked vehicle.
Allowing children to be in a vehicle unat -
tended is dangerous for a number of
reasons. A child or others could be seri -
ously or fatally injured. Children should be
warned not to touch the parking brake,
brake pedal or the transmission gear
selector.
Do not leave the key fob in or near the
vehicle, or in a location accessible to chil -
dren. A child could operate power
windows, other controls, or move the
vehicle.
Do not leave children or animals inside
parked vehicles in hot weather. Interior
heat build-up may cause serious injury or
death.
WARNING!
Never pour fuel or other flammable liquid
into the throttle body air inlet opening in
an attempt to start the vehicle. This could
result in flash fire causing serious
personal injury.
Do not attempt to push or tow your vehicle
to get it started. Vehicles equipped with an
automatic transmission cannot be started
this way. Unburned fuel could enter the
catalytic converter and once the engine
has started, ignite and damage the
converter and vehicle.
If the vehicle has a discharged battery,
booster cables may be used to obtain a
start from a booster battery or the battery
in another vehicle. This type of start can
be dangerous if done improperly
Ú
page 201.
CAUTION!
To prevent damage to the starter, do not
continuously crank the engine for more than
25 seconds at a time. Wait 60 seconds
before trying again.
WARNING! (Continued)
21_GU_OM_EN_USC_t.book Page 86
Page 89 of 280
87
How To Use Remote Start
All of the following conditions must be met
before the engine will remote start:
Gear selector in PARK (P).
Doors closed.
Hood closed.
Liftgate closed.
Hazard switch off.
Brake switch inactive (brake pedal not
pressed).
Battery at an acceptable charge level.
PANIC button not pushed.
System not disabled from previous remote
start event.
Vehicle Security System indicator flashing.
Ignition in the OFF mode (if equipped with
keyless ignition system).
Fuel level meets minimum requirement.
Remote Start Comfort Systems — If Equipped
When Remote Start is activated, the heated
steering wheel and driver heated seat features
will automatically turn on in cold weather.
These features will stay on through the dura -
tion of remote start until the ignition is placed
in the ON/RUN mode. Remote Start Windshield Wiper De–Icer Acti
-
vation — If Equipped
When remote start is active and the outside ambient
temperature is less than 39°F (4°C), the Windshield
Wiper De-Icer will be enabled. Exiting remote start will
resume previous operation, except if the Windshield
Wiper De-Icer is active.
The Windshield Wiper De-Icer timer and oper -
ation will continue.
Cold Weather Operation
To prevent possible engine damage while
starting at low temperatures, this vehicle will
inhibit engine cranking when the ambient
temperature is less than –22°F (–30°C) and
the oil temperature sensor reading indicates
an engine block heater has not been used. An
externally-powered electric engine block
heater is available as optional equipment or
from an authorized dealer.
The message “plug in engine heater” will be
displayed in the instrument cluster when the
ambient temperature is below 5°F (–15°C) at the
time the engine is shut off as a reminder to avoid
possible crank delays at the next cold start.
Extended Park Starting
If the vehicle has not been started or driven for
at least 30 days, it is advisable to follow the
indications below.
To start the engine, proceed as follows:
1. Briefly push the ignition button
2. If the engine does not start, wait five seconds and let the starter cool down and
then repeat the starting procedure
3. If the engine does not start after eight attempts, let the starter cool down for at
least 10 seconds, and then repeat the
starting procedure
If the problem persists, contact an authorized
dealer.
NOTE:
After prolonged vehicle inactivity, very difficult
starting, that can be noticed through rapid
fatigue of the starter, might also be due to a
partially drained battery
Ú
page 201.
If Engine Fails To Start
Starting the Engine with Key Fob Battery Run
Down or Drained
If the ignition does not respond when the
button is pushed, the key fob battery might be
run down or drained. Therefore, the system
does not detect the presence of the key fob in
the vehicle, and will display a dedicated
message
Ú
page 20. CAUTION!
Use of the recommended oil and adhering
to the prescribed oil change intervals is
important to prevent engine damage and
ensure satisfactory starting in cold
conditions.
21_GU_OM_EN_USC_t.book Page 87