rear view mirror ALFA ROMEO STELVIO 2021 Owners Manual
[x] Cancel search | Manufacturer: ALFA ROMEO, Model Year: 2021, Model line: STELVIO, Model: ALFA ROMEO STELVIO 2021Pages: 280, PDF Size: 10.02 MB
Page 39 of 280
37
3. Push the adjustment button and therelease button at the side of the two
supports at the same time.
4. Pull upward on the head restraint to fully remove it.
To reinstall the head restraints, proceed as
follows:
1. Hold down both the adjustment button and release button while placing the head
restraint posts into the holes.
2. Then, reposition the head restraint to the appropriate height for the passengers.
3. Replace the seat back to the appropriate position for passengers.MIRRORS
Automatic Dimming Mirror
The rearview mirror can be adjusted up, down,
left, and right. The mirror should be adjusted
to center on the view through the rear window.
This mirror automatically adjusts for headlight
glare from vehicles behind you.
You can turn the feature on or off by pushing
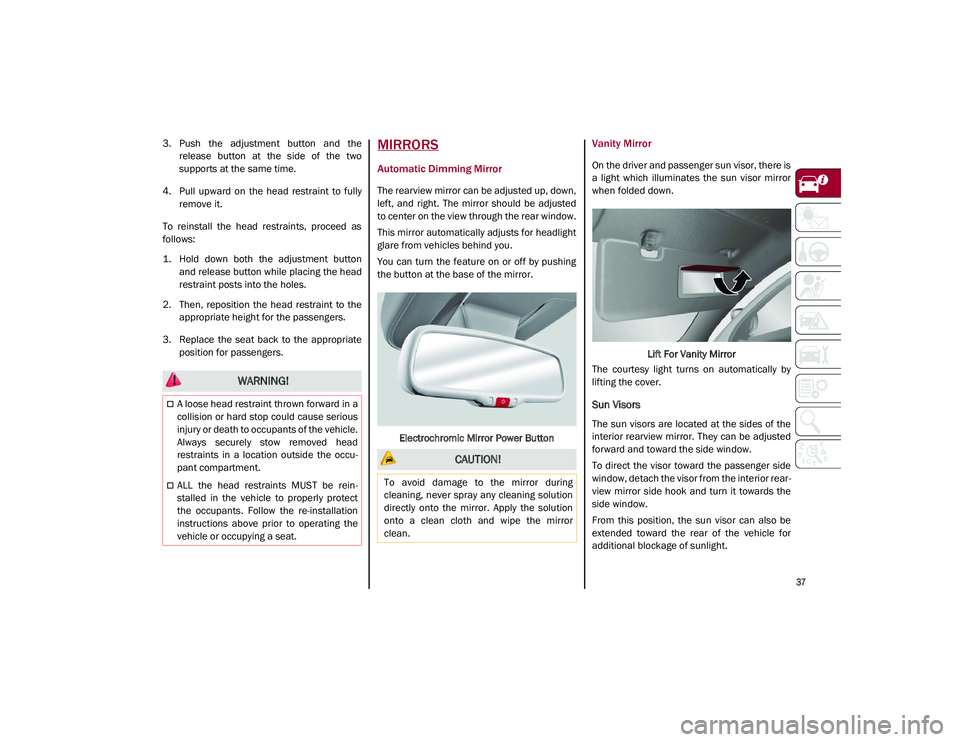
the button at the base of the mirror.
Electrochromic Mirror Power Button
Vanity Mirror
On the driver and passenger sun visor, there is
a light which illuminates the sun visor mirror
when folded down. Lift For Vanity Mirror
The courtesy light turns on automatically by
lifting the cover.
Sun Visors
The sun visors are located at the sides of the
interior rearview mirror. They can be adjusted
forward and toward the side window.
To direct the visor toward the passenger side
window, detach the visor from the interior rear -
view mirror side hook and turn it towards the
side window.
From this position, the sun visor can also be
extended toward the rear of the vehicle for
additional blockage of sunlight.
WARNING!
A loose head restraint thrown forward in a
collision or hard stop could cause serious
injury or death to occupants of the vehicle.
Always securely stow removed head
restraints in a location outside the occu -
pant compartment.
ALL the head restraints MUST be rein -
stalled in the vehicle to properly protect
the occupants. Follow the re-installation
instructions above prior to operating the
vehicle or occupying a seat.
CAUTION!
To avoid damage to the mirror during
cleaning, never spray any cleaning solution
directly onto the mirror. Apply the solution
onto a clean cloth and wipe the mirror
clean.
21_GU_OM_EN_USC_t.book Page 37
Page 49 of 280
47
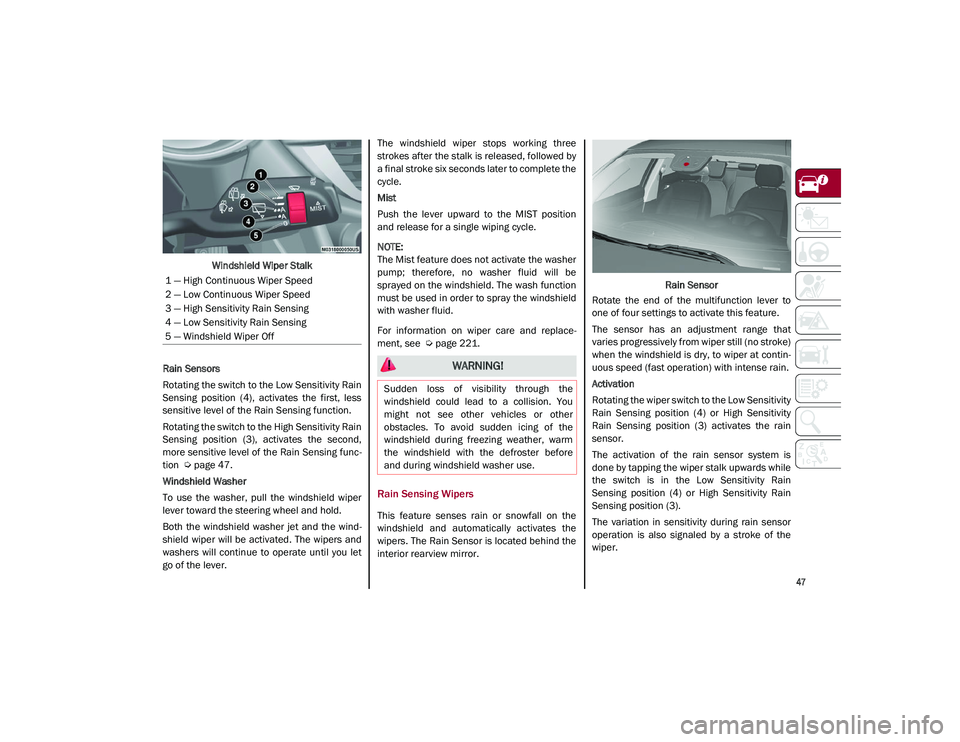
Windshield Wiper Stalk
Rain Sensors
Rotating the switch to the Low Sensitivity Rain
Sensing position (4), activates the first, less
sensitive level of the Rain Sensing function.
Rotating the switch to the High Sensitivity Rain
Sensing position (3), activates the second,
more sensitive level of the Rain Sensing func -
tion
Ú
page 47.
Windshield Washer
To use the washer, pull the windshield wiper
lever toward the steering wheel and hold.
Both the windshield washer jet and the wind -
shield wiper will be activated. The wipers and
washers will continue to operate until you let
go of the lever. The windshield wiper stops working three
strokes after the stalk is released, followed by
a final stroke six seconds later to complete the
cycle.
Mist
Push the lever upward to the MIST position
and release for a single wiping cycle.
NOTE:
The Mist feature does not activate the washer
pump; therefore, no washer fluid will be
sprayed on the windshield. The wash function
must be used in order to spray the windshield
with washer fluid.
For information on wiper care and replace
-
ment, see
Ú
page 221.
Rain Sensing Wipers
This feature senses rain or snowfall on the
windshield and automatically activates the
wipers. The Rain Sensor is located behind the
interior rearview mirror. Rain Sensor
Rotate the end of the multifunction lever to
one of four settings to activate this feature.
The sensor has an adjustment range that
varies progressively from wiper still (no stroke)
when the windshield is dry, to wiper at contin -
uous speed (fast operation) with intense rain.
Activation
Rotating the wiper switch to the Low Sensitivity
Rain Sensing position (4) or High Sensitivity
Rain Sensing position (3) activates the rain
sensor.
The activation of the rain sensor system is
done by tapping the wiper stalk upwards while
the switch is in the Low Sensitivity Rain
Sensing position (4) or High Sensitivity Rain
Sensing position (3).
The variation in sensitivity during rain sensor
operation is also signaled by a stroke of the
wiper.
1 — High Continuous Wiper Speed
2 — Low Continuous Wiper Speed
3 — High Sensitivity Rain Sensing
4 — Low Sensitivity Rain Sensing
5 — Windshield Wiper Off
WARNING!
Sudden loss of visibility through the
windshield could lead to a collision. You
might not see other vehicles or other
obstacles. To avoid sudden icing of the
windshield during freezing weather, warm
the windshield with the defroster before
and during windshield washer use.
21_GU_OM_EN_USC_t.book Page 47
Page 88 of 280
86
(Continued)
STARTING AND OPERATING
STARTING THE ENGINE
Before starting the engine, be sure to adjust
the seat, the interior rear view mirror, door
mirrors, and fasten the seat belt correctly.
Never press the accelerator pedal before
starting the engine.
If necessary, messages indicating the starting
procedure will be shown in the display.
Starting Procedure
Proceed as follows:
1. Apply the Electric Park Brake (EPB) andplace the gear selector in PARK (P) or
NEUTRAL (N).
2. Fully press the brake pedal without touching the accelerator.
3. Briefly push the ignition button.
4. If the engine doesn't start within a few seconds, you need to repeat the proce -
dure.
If the problem persists, contact an authorized
dealer.
Remote Starting System
This system uses the key fob to start the
engine conveniently from outside the vehicle
while still maintaining security. The system
has a range of at least 300 feet (91 meters).
The remote starting system also activates the
climate control, the heated seats (if
equipped), and the heated steering wheel (if
equipped), depending on temperatures
outside and inside of the vehicle.
NOTE:
Obstructions between the vehicle and key fob
may reduce this range.
WARNING!
When leaving the vehicle, always remove
the key fob from the vehicle and lock your
vehicle.
Never leave children alone in a vehicle, or
with access to an unlocked vehicle.
Allowing children to be in a vehicle unat -
tended is dangerous for a number of
reasons. A child or others could be seri -
ously or fatally injured. Children should be
warned not to touch the parking brake,
brake pedal or the transmission gear
selector.
Do not leave the key fob in or near the
vehicle, or in a location accessible to chil -
dren. A child could operate power
windows, other controls, or move the
vehicle.
Do not leave children or animals inside
parked vehicles in hot weather. Interior
heat build-up may cause serious injury or
death.
WARNING!
Never pour fuel or other flammable liquid
into the throttle body air inlet opening in
an attempt to start the vehicle. This could
result in flash fire causing serious
personal injury.
Do not attempt to push or tow your vehicle
to get it started. Vehicles equipped with an
automatic transmission cannot be started
this way. Unburned fuel could enter the
catalytic converter and once the engine
has started, ignite and damage the
converter and vehicle.
If the vehicle has a discharged battery,
booster cables may be used to obtain a
start from a booster battery or the battery
in another vehicle. This type of start can
be dangerous if done improperly
Ú
page 201.
CAUTION!
To prevent damage to the starter, do not
continuously crank the engine for more than
25 seconds at a time. Wait 60 seconds
before trying again.
WARNING! (Continued)
21_GU_OM_EN_USC_t.book Page 86
Page 113 of 280
111
Overtake Aid
When driving with ACC engaged and following
a vehicle at a speed greater than 45 mph
(70 km/h), the system will provide an addi-
tional acceleration up to the ACC set speed to
assist in passing the vehicle. This additional
acceleration is triggered when the driver
utilizes the left turn signal and will only be
active when passing on the left hand side.
The system detects the direction of traffic auto -
matically when the vehicle passes from left
hand traffic to right hand traffic. In this case,
the overtaking assist function is only active
when the reference vehicle is overtaken on the
right. The additional acceleration is deactivated
when the driver uses the right direction indi -
cator and returns to the original lane.
“Stop And Go” Function
The “Stop and Go” operating strategy allows
you to maintain a safe distance from the
vehicle ahead until the vehicle has completely
stopped.
In the event that the ACC system brings your
vehicle to a standstill while following the
vehicle in front, if the vehicle in front starts moving within two seconds of your vehicle
coming to a standstill, your vehicle will resume
motion without the need for any driver action.
If the vehicle in front does not start moving
within two seconds of your vehicle coming to a
standstill, the driver will have to push the RES/
SET switch upward to restart.
Deactivation
The system is deactivated and the set speed is
canceled if:
The on/off button is pushed (when the
system is on or paused).
The ignition is placed in the OFF position
RACE mode is activated (Quadrifoglio
models)
The system is canceled (the set speed and
distance are stored):
When the system is paused
Úpage 108
When the conditions shown in the “Activating
Adaptive Cruise Control (ACC)” section occur
Úpage 108
Limited Operation Warning
If the dedicated message is shown on the
display, a condition limiting the Adaptive
Cruise Control operation may have occurred.
This could be due to an obstruction of the
vehicle’s sensor or camera. It could also be
due to a fault in the system. If an obstruction
is detected, clean the area of the windshield
opposite the interior rearview mirror, where
the camera is located, as well as the area of
the front fascia/bumper where the sensor is
located. Then check that the message has
disappeared.
When the conditions limiting the system func -
tions end, normal operation will resume.
Should the fault persist, contact an authorized
dealer.
Precautions While Driving With ACC
In certain driving situations, ACC may have
detection issues. In these cases, ACC may
brake late or unexpectedly. The driver needs
to stay alert and may need to intervene. The
following are examples of these types of situa -
tions:
Towing A Trailer
Towing a trailer is not advised when using ACC.
Offset Driving
ACC may not detect a vehicle in the same lane
that is offset from your direct line of travel, or
a vehicle merging in from a side lane. There
may not be sufficient distance to the vehicle
The driver is fully responsible for holding a
safe distance from the vehicle ahead
respecting the highway code in force in
the respective country.
WARNING! (Continued)
WARNING!
When the ACC system is resumed, the
driver must ensure that there are no
pedestrians, vehicles or objects in the path
of the vehicle. Failure to follow these
warnings can result in a collision and death
or serious personal injury.
21_GU_OM_EN_USC_t.book Page 111
Page 128 of 280
STARTING AND OPERATING
126
(Continued)
ParkSense System Usage Precautions
NOTE:
Some conditions may influence the perfor-
mance of the ParkSense system:
Reduced sensor sensitivity could be due to
the presence of ice, snow, mud, or thick
paint on the surface of the sensor.
The sensors may detect a false obstacle
(echo interference) due to mechanical inter -
ference, for example when washing the
vehicle or in extreme weather.
The signals sent by the sensors can be
altered by the presence of ultrasonic
systems (e.g. pneumatic brake systems of
trucks or pneumatic drills) near the vehicle.
System performance can be influenced by
the position of the sensors. For example,
due to a change in the ride setting (caused
by wear to the shock absorbers or suspen -
sion), by changing tires, overloading the
vehicle or operations that require the
vehicle to be lowered.
Be sure not to place bumper stickers or
other adhesives over the sensors as this will
affect system performance.
The presence of a trailer hitch without a
trailer. This may interfere with the operation
of the parking sensors. Before using the
ParkSense system, it is recommended to remove or close the trailer hitch assembly
when the vehicle is not being used for
towing.
LANE DEPARTURE WARNING
(LDW) SYSTEM
Lane Departure Warning Operation
The Lane Departure Warning system uses a
forward looking camera located on the wind
-
shield to detect lane markings and measure
vehicle position within the lane boundaries.
When one or both lane limits are detected and
the vehicle passes over one without an acti -
vated turn signal, the system emits a visual as
well as an acoustic signal.
If the vehicle continues to go beyond the line
of the lane without any intervention from the
driver, the surpassed line will light up on the
display (left or right) to urge the driver to bring
the vehicle back into the limits of the lane.
CAUTION!
Projecting loads on the roof of the vehicle
may interfere with the correct operation of
the camera. Before starting, make sure
the load is correctly positioned in order
not to cover the camera operating range.
Do not cover the operating range of the
camera with stickers or other objects.
Do not tamper with nor operate on the
camera. Do not close the openings in the
aesthetic cover located under the interior
rearview mirror. In the event of a failure of
the camera, contact your authorized
dealer.
The camera may have limited or absent
operation due to weather conditions such
as: heavy rain, hail, thick fog, heavy snow,
formation of ice layers on the windshield.
Camera operation may also be compro -
mised by the presence of dust, condensa -
tion, dirt or ice on the windshield, by traffic
conditions (e.g. vehicles that are driving
not aligned with yours, vehicle driving in a
transverse or opposite way on the same
lane, bend with a small radius of curva -
ture), by road surface conditions and by
driving conditions (e.g. off-road driving).
Make sure the windshield is always clean.
Use specific detergents and clean cloths
to avoid scratching the windshield. The
camera operation may also be limited or
absent in some driving, traffic and road
surface conditions.
If the windshield must be replaced due to
scratches, chipping or breakage, contact
exclusively an authorized dealer. Do not
replace the windshield on your own. It is
advisable to replace the windshield if it is
damaged in the area of the camera.
CAUTION! (Continued)
21_GU_OM_EN_USC_t.book Page 126
Page 130 of 280
STARTING AND OPERATING
128
The system operates in the same way, but
mirrored, in the event of exiting the right lane
when only the right lane marking has been
detected.
Left Lane Departure — Both Lanes Detected
When the system is active, both lane lines on
the display illuminate in white to indicate that
both of the lane markings have been detected.
When lane markings are detected, the system
is ready to provide indications in case the
driver unintentionally leaves the lane (turn
signal not activated).
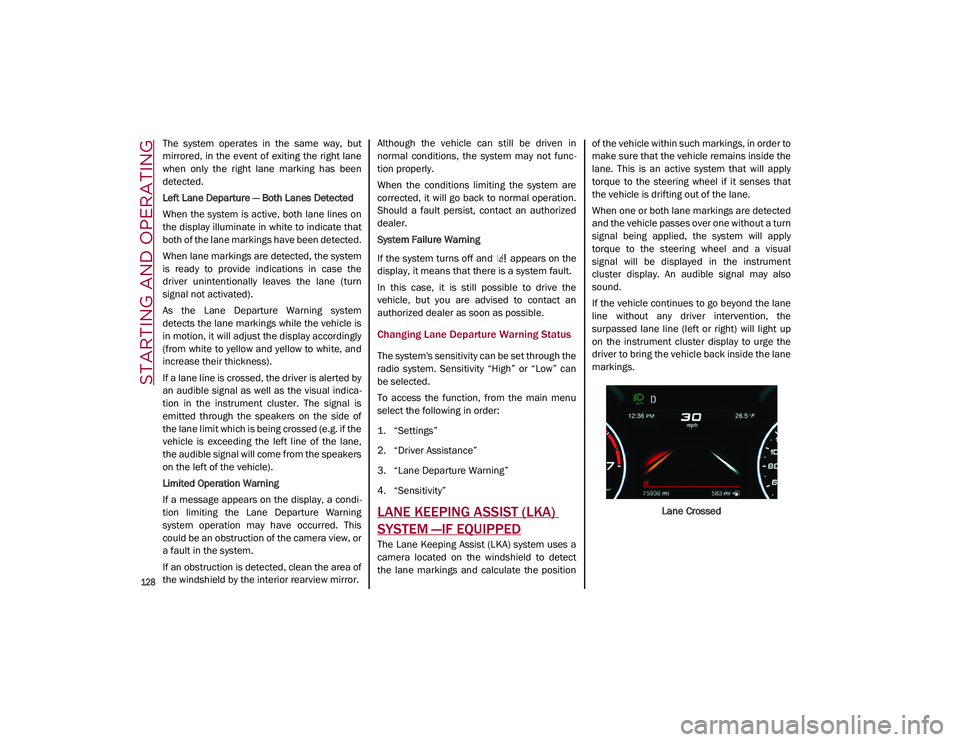
As the Lane Departure Warning system
detects the lane markings while the vehicle is
in motion, it will adjust the display accordingly
(from white to yellow and yellow to white, and
increase their thickness).
If a lane line is crossed, the driver is alerted by
an audible signal as well as the visual indica-
tion in the instrument cluster. The signal is
emitted through the speakers on the side of
the lane limit which is being crossed (e.g. if the
vehicle is exceeding the left line of the lane,
the audible signal will come from the speakers
on the left of the vehicle).
Limited Operation Warning
If a message appears on the display, a condi -
tion limiting the Lane Departure Warning
system operation may have occurred. This
could be an obstruction of the camera view, or
a fault in the system.
If an obstruction is detected, clean the area of
the windshield by the interior rearview mirror. Although the vehicle can still be driven in
normal conditions, the system may not func
-
tion properly.
When the conditions limiting the system are
corrected, it will go back to normal operation.
Should a fault persist, contact an authorized
dealer.
System Failure Warning
If the system turns off and appears on the
display, it means that there is a system fault.
In this case, it is still possible to drive the
vehicle, but you are advised to contact an
authorized dealer as soon as possible.
Changing Lane Departure Warning Status
The system's sensitivity can be set through the
radio system. Sensitivity “High” or “Low” can
be selected.
To access the function, from the main menu
select the following in order:
1. “Settings”
2. “Driver Assistance”
3. “Lane Departure Warning”
4. “Sensitivity”
LANE KEEPING ASSIST (LKA)
SYSTEM —IF EQUIPPED
The Lane Keeping Assist (LKA) system uses a
camera located on the windshield to detect
the lane markings and calculate the position of the vehicle within such markings, in order to
make sure that the vehicle remains inside the
lane. This is an active system that will apply
torque to the steering wheel if it senses that
the vehicle is drifting out of the lane.
When one or both lane markings are detected
and the vehicle passes over one without a turn
signal being applied, the system will apply
torque to the steering wheel and a visual
signal will be displayed in the instrument
cluster display. An audible signal may also
sound.
If the vehicle continues to go beyond the lane
line without any driver intervention, the
surpassed lane line (left or right) will light up
on the instrument cluster display to urge the
driver to bring the vehicle back inside the lane
markings.
Lane Crossed
21_GU_OM_EN_USC_t.book Page 128
Page 133 of 280
131
(Continued)
Changing The System Strength
The system’s strength can be set through the
radio system in the “Driver Assistance” menu.
Select “Lane Keep Assist - Settings” and then
“Strength”. Strength “Low” or “High” can be
selected.
Limited Operation Warning
If a message appears on the display, a condi-
tion limiting the LKA system operation may
have occurred. This could be an obstruction of
the camera view, or a fault in the system.
If an obstruction is detected, clean the area of
the windshield by the interior rearview mirror.
Although the vehicle can still be driven in
normal conditions, the system may not func -
tion properly.
When the conditions limiting the system are
corrected, it will go back to normal operation.
Should a fault persist, contact an authorized
dealer.
System Failure Signaling
If the system turns off and appears on the
display, it means that there is a system fault.
In this case, it is still possible to drive the
vehicle, but you are advised to contact an
authorized dealer as soon as possible. CAUTION!
Projecting loads on the roof of the vehicle
may interfere with the correct operation of
the camera. Before starting, make sure
the load is correctly positioned, in order
not to cover the camera operating range.
If the windshield must be replaced due to
scratches, chips or breakage, contact an
authorized dealer. Do not replace the
windshield on your own; there is risk of
malfunction. It is advisable to replace the
windshield if it is damaged in the area of
the camera.
Do not tamper with or operate on the
camera. Do not close the openings in the
aesthetic cover located under the interior
rearview mirror. In the event of a failure of
the camera, contact an authorized dealer
immediately.
Do not cover the operating range of the
camera with stickers or other objects. Also
pay attention to other objects on the hood
(e.g. a layer of snow) and make sure they
do not interfere with the camera.
The camera may have limited or absent
operation due to weather conditions such
as: heavy rain, hail, thick fog, heavy snow,
formation of ice layers on the windshield.
Camera operation may also be compro -
mised by the presence of dust, condensa -
tion, dirt or ice on the windshield, traffic
conditions (e.g. vehicles that are driving
not aligned with yours, vehicle driving in a
transverse or opposite way on the same
lane, bend with a small radius of curva -
ture), or road surface conditions and
driving conditions (e.g. off-road driving).
Make sure the windshield is always clean.
Use specific detergents and clean cloths
to avoid scratching the windshield. The
camera operation may also be limited or
absent in some driving, traffic and road
surface conditions.
CAUTION! (Continued)
21_GU_OM_EN_USC_t.book Page 131
Page 153 of 280
151
NOTE:
For the system to operate properly, the rear
fascia/bumper area where the radar
sensors are located must stay free from
snow, ice and dirt gathered from the road
surface.
Do not cover the rear fascia/bumper area
where the radar sensors are located with
any object (e.g. adhesives, bike rack, etc.).
If you wish to install a rear tow eye after
purchasing the vehicle, you will need to
deactivate the system via the radio system.
To access the function, select the following
items in sequence on the main menu:a. “Driver Assistance”
b. “Blind Spot Alert” Rear View
The system detects vehicles coming from the
rear part of your vehicle on both sides and
entering the rear detection area with a differ
-
ence in speed of less than 25 mph (40 km/h)
in relation to your vehicle.
Overtaking Vehicles
If another vehicle is overtaken slowly, with a
difference in speed of less than approximately
15 mph (25 km/h) and the vehicle stays in the
blind spot for approximately 1.5 seconds, the
warning light on the door mirror of the corre -
sponding side illuminates.
If the difference in speed between the two
vehicles is greater than approximately 15 mph
(25 km/h), the warning light does not illumi -
nate.
Rear Cross Path Detection (RCP) System
The Rear Cross Path Detection (RCP) system
assists the driver during reverse maneuvers in
the case of reduced visibility.
The RCP system monitors the rear detection
areas on both sides of the vehicle to detect
objects moving toward the sides of the vehicle,
with a minimum speed between approximately
1 mph (1 km/h) and 2 mph (3 km/h) and objects moving at a maximum speed of
21 mph (35 km/h), in areas such as parking
lots. The system activation is signaled to the driver
by an audible warning.
NOTE:
If the sensors are covered by objects or
vehicles, the system may not work as
intended.
For the system to operate correctly, the rear
fascia/bumper area where the radar
sensors are located must stay free from
snow, ice and dirt gathered from the road
surface.
Do not cover the rear fascia/bumper area
where the radar sensors are located with
any object (e.g. adhesives, bike rack, etc.).
WARNING!
The Blind Spot Monitoring system is only an
aid to help detect objects in the blind spot
zones. The BSM system is not designed to
detect pedestrians, bicyclists, or animals.
Even if your vehicle is equipped with the
BSM system, always check your vehicle’s
mirrors, glance over your shoulder, and use
your turn signal before changing lanes.
Failure to do so can result in serious injury
or death.
WARNING!
Rear Cross Path Detection (RCP) is not a
back up aid system. It is intended to be
used to help a driver detect an oncoming
vehicle in a parking lot situation. Drivers
must be careful when backing up, even
when using RCP. Always check carefully
behind your vehicle, look behind you, and
be sure to check for pedestrians, animals,
other vehicles, obstructions, and blind
spots before backing up. Failure to do so
can result in serious injury or death.
21_GU_OM_EN_USC_t.book Page 151
Page 194 of 280
192
IN CASE OF EMERGENCY
Have a flat tire or a burnt-out bulb?
At times, a problem such as these may inter-
fere with your driving experience.
The section on emergencies can help you to
deal with critical situations independently.
In an emergency, we recommend that you call
the phone number found in “Helpful
Addresses And Telephone Numbers” under
“How To Deal With Warranty Problems” in the
Warranty Book.
You may also consider contacting an autho -
rized dealer.
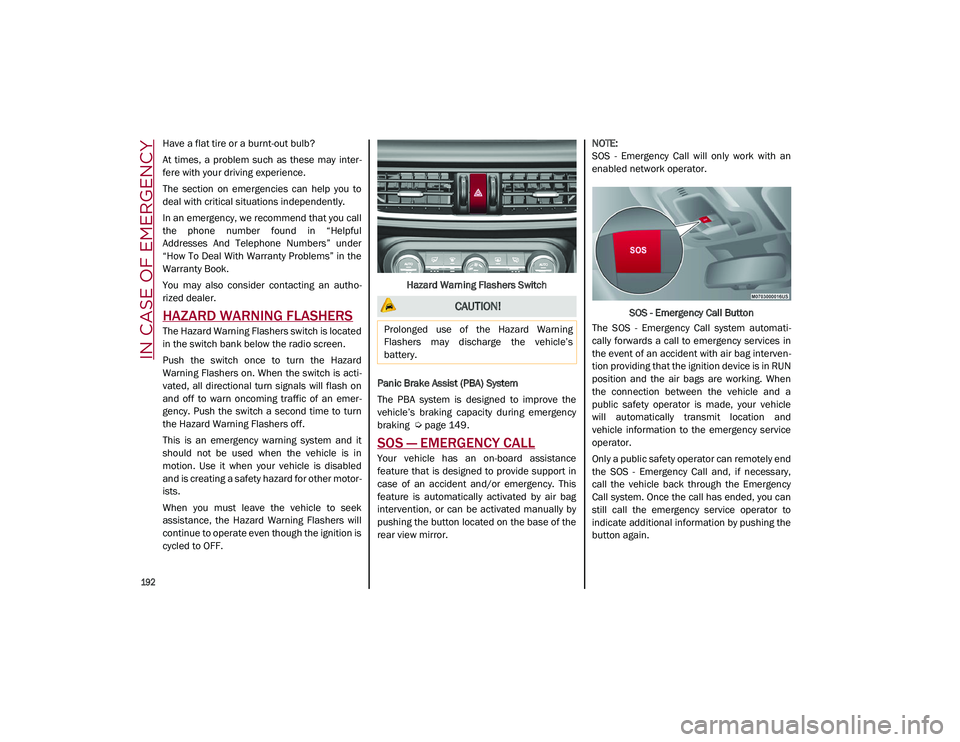
HAZARD WARNING FLASHERS
The Hazard Warning Flashers switch is located
in the switch bank below the radio screen.
Push the switch once to turn the Hazard
Warning Flashers on. When the switch is acti -
vated, all directional turn signals will flash on
and off to warn oncoming traffic of an emer -
gency. Push the switch a second time to turn
the Hazard Warning Flashers off.
This is an emergency warning system and it
should not be used when the vehicle is in
motion. Use it when your vehicle is disabled
and is creating a safety hazard for other motor -
ists.
When you must leave the vehicle to seek
assistance, the Hazard Warning Flashers will
continue to operate even though the ignition is
cycled to OFF. Hazard Warning Flashers Switch
Panic Brake Assist (PBA) System
The PBA system is designed to improve the
vehicle’s braking capacity during emergency
braking
Ú
page 149.
SOS — EMERGENCY CALL
Your vehicle has an on-board assistance
feature that is designed to provide support in
case of an accident and/or emergency. This
feature is automatically activated by air bag
intervention, or can be activated manually by
pushing the button located on the base of the
rear view mirror.
NOTE:
SOS - Emergency Call will only work with an
enabled network operator.
SOS - Emergency Call Button
The SOS - Emergency Call system automati -
cally forwards a call to emergency services in
the event of an accident with air bag interven -
tion providing that the ignition device is in RUN
position and the air bags are working. When
the connection between the vehicle and a
public safety operator is made, your vehicle
will automatically transmit location and
vehicle information to the emergency service
operator.
Only a public safety operator can remotely end
the SOS - Emergency Call and, if necessary,
call the vehicle back through the Emergency
Call system. Once the call has ended, you can
still call the emergency service operator to
indicate additional information by pushing the
button again.
CAUTION!
Prolonged use of the Hazard Warning
Flashers may discharge the vehicle’s
battery.
21_GU_OM_EN_USC_t.book Page 192