dashboard ALFA ROMEO STELVIO 2022 Owners Manual
[x] Cancel search | Manufacturer: ALFA ROMEO, Model Year: 2022, Model line: STELVIO, Model: ALFA ROMEO STELVIO 2022Pages: 256, PDF Size: 10.17 MB
Page 44 of 256

GETTING TO KNOW YOUR VEHICLE
42
If you have any problems, or require assistance,
please call toll-free 1-800-355-3515 or, on the
Internet at
HomeLink.com
for information or
assistance.
EXTERIOR LIGHTS
HEADLIGHT SWITCH
The headlight switch is located on the left side of
the instrument panel, next to the steering wheel.
The headlight switch controls the operation of the
headlights, parking lights, instrument panel
lights, instrument panel light dimming, interior
lights and rear fog lights.
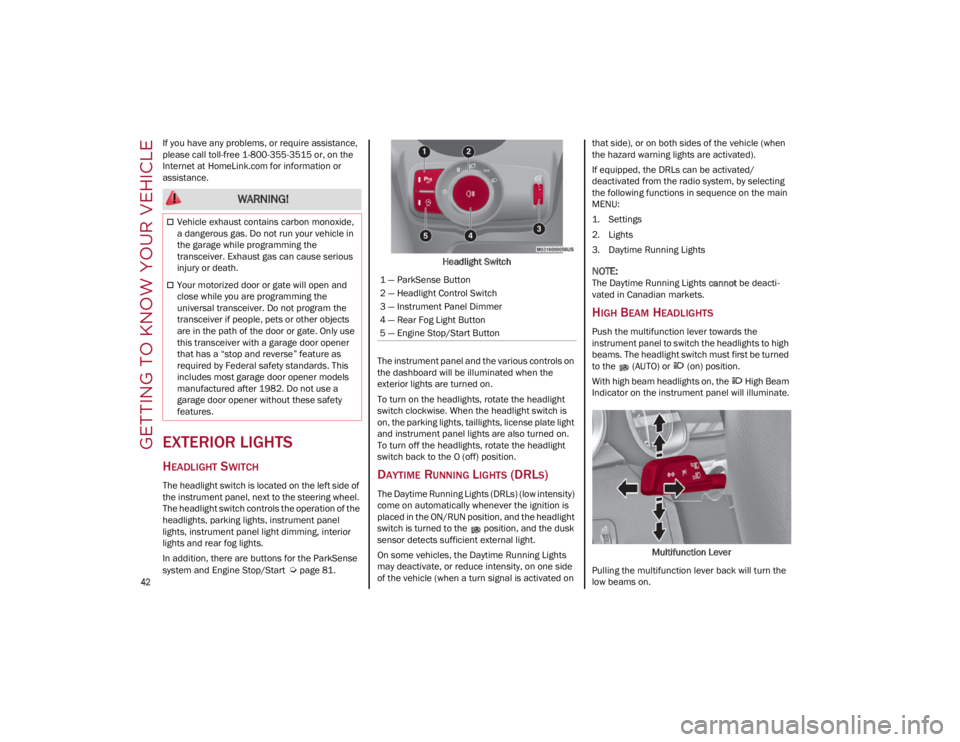
In addition, there are buttons for the ParkSense
system and Engine Stop/Start
Ú
page 81. Headlight Switch
The instrument panel and the various controls on
the dashboard will be illuminated when the
exterior lights are turned on.
To turn on the headlights, rotate the headlight
switch clockwise. When the headlight switch is
on, the parking lights, taillights, license plate light
and instrument panel lights are also turned on.
To turn off the headlights, rotate the headlight
switch back to the O (off) position.
DAYTIME RUNNING LIGHTS (DRLS)
The Daytime Running Lights (DRLs) (low intensity)
come on automatically whenever the ignition is
placed in the ON/RUN position, and the headlight
switch is turned to the position, and the dusk
sensor detects sufficient external light.
On some vehicles, the Daytime Running Lights
may deactivate, or reduce intensity, on one side
of the vehicle (when a turn signal is activated on that side), or on both sides of the vehicle (when
the hazard warning lights are activated).
If equipped, the DRLs can be activated/
deactivated from the radio system, by selecting
the following functions in sequence on the main
MENU:
1. Settings
2. Lights
3. Daytime Running Lights
NOTE:
The Daytime Running Lights
cannot be deacti -
vated in Canadian markets.
HIGH BEAM HEADLIGHTS
Push the multifunction lever towards the
instrument panel to switch the headlights to high
beams. The headlight switch must first be turned
to the (AUTO) or (on) position.
With high beam headlights on, the High Beam
Indicator on the instrument panel will illuminate.
Multifunction Lever
Pulling the multifunction lever back will turn the
low beams on.
WARNING!
Vehicle exhaust contains carbon monoxide,
a dangerous gas. Do not run your vehicle in
the garage while programming the
transceiver. Exhaust gas can cause serious
injury or death.
Your motorized door or gate will open and
close while you are programming the
universal transceiver. Do not program the
transceiver if people, pets or other objects
are in the path of the door or gate. Only use
this transceiver with a garage door opener
that has a “stop and reverse” feature as
required by Federal safety standards. This
includes most garage door opener models
manufactured after 1982. Do not use a
garage door opener without these safety
features.1 — ParkSense Button
2 — Headlight Control Switch
3 — Instrument Panel Dimmer
4 — Rear Fog Light Button
5 — Engine Stop/Start Button
22_GU_OM_EN_USC_t.book Page 42
Page 54 of 256

GETTING TO KNOW YOUR VEHICLE
52
SYNC Button
Push the SYNC button (indicator illuminated) to
sync the passenger side air temperature with the
driver side air temperature.
This function makes temperature regulation
easier when the driver is traveling alone.
Turn the passenger Temperature Adjustment
Knob or push the passenger side Air Distribution
Selection Button to change the passenger side
air temperature and return to separate air
temperature management.
Blower Speed
Turn the Blower Speed Knob to increase or
decrease the blower speed. The speed is
displayed with lighted indicators in the radio
system display.
Maximum fan speed = all indicators
illuminated on the radio system display
Minimum fan speed = one indicator
illuminated on the radio system display
The fan can be turned off by rotating the Blower
Speed Knob counterclockwise to the off position
(all segments on the radio system display are
turned off).
NOTE:
To restore automatic control of the fan speed,
push the AUTO button.
Air Distribution Selection
Push the Air Distribution Selection button on the
faceplate to change the mode of air distribution.
NOTE:
In AUTO mode, the Climate Controls automati -
cally manage the air distribution. When set manu -
ally, the respective symbols on the radio system
indicate the air distribution setting.
Panel Mode
Air comes from the outlets in the
instrument panel to ventilate the chest
and face. Each of these outlets can be
individually adjusted to direct the flow of
air. The air vanes of the center outlets and
outboard outlets can be moved up and down or
side to side to regulate airflow direction. There is
a shut-off wheel located below the air vanes to
shut off or adjust the amount of airflow from
these outlets.
Bi-Level Mode
Air comes from the instrument panel
outlets and floor outlets. A slight amount
of air is directed through the defrost and
side window demister outlets.
NOTE:
Bi-Level mode is designed under comfort condi -
tions to provide cooler air out of the panel outlets
and warmer air from the floor outlets.
Floor Mode
Air comes from the floor outlets. A slight
amount of air is directed through the
defrost and side window demister
outlets. This setting heats the
passenger compartment the quickest. Mix Mode
Air is directed through the floor, defrost,
and side window demister outlets. This
setting works best in cold or snowy
conditions that require extra heat to the
windshield. This setting is good for maintaining
comfort while reducing moisture on the
windshield.
Front Defrost And Panel Mode
Air flow is distributed between the
windshield demisting/defrosting vents
and side/central dashboard vents. This
setting allows air to flow to the
windshield on sunny days.
Front Defrost And Bi-Level Mode
Air flow is distributed to all vents.
Switching The Climate Control System On/Off
To Turn Off The Climate Control System
Rotate the Air Speed Adjustment Knob
completely counterclockwise to turn off the
Climate Control system.
With the air conditioner is off:
Air recirculation is on
The A/C compressor is off
The fan is off
The heated rear window can be activated/
deactivated
NOTE:
The Climate Control system stores the previously
set temperatures and resumes operation when
any button on the system is pushed.
22_GU_OM_EN_USC_t.book Page 52
Page 184 of 256

IN CASE OF EMERGENCY
182
(Continued)
(Continued)
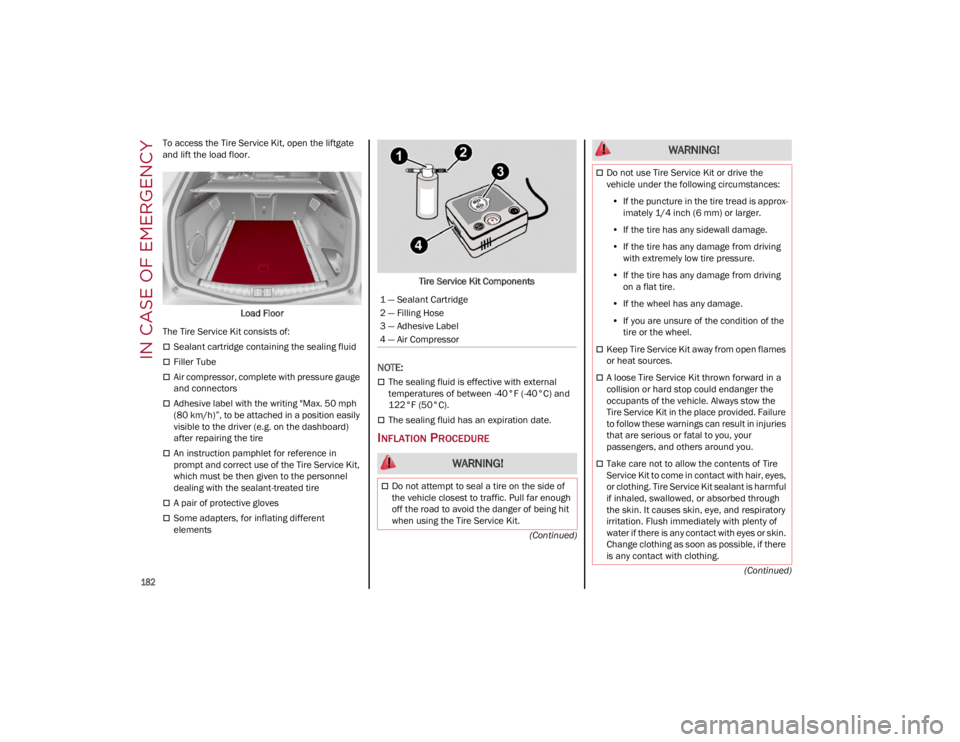
To access the Tire Service Kit, open the liftgate
and lift the load floor.
Load Floor
The Tire Service Kit consists of:
Sealant cartridge containing the sealing fluid
Filler Tube
Air compressor, complete with pressure gauge
and connectors
Adhesive label with the writing "Max. 50 mph
(80 km/h)”, to be attached in a position easily
visible to the driver (e.g. on the dashboard)
after repairing the tire
An instruction pamphlet for reference in
prompt and correct use of the Tire Service Kit,
which must be then given to the personnel
dealing with the sealant-treated tire
A pair of protective gloves
Some adapters, for inflating different
elements Tire Service Kit Components
NOTE:
The sealing fluid is effective with external
temperatures of between -40°F (-40°C) and
122°F (50°C).
The sealing fluid has an expiration date.
INFLATION PROCEDURE
1 — Sealant Cartridge
2 — Filling Hose
3 — Adhesive Label
4 — Air Compressor
WARNING!
Do not attempt to seal a tire on the side of
the vehicle closest to traffic. Pull far enough
off the road to avoid the danger of being hit
when using the Tire Service Kit.
Do not use Tire Service Kit or drive the
vehicle under the following circumstances:
• If the puncture in the tire tread is approx-
imately 1/4 inch (6 mm) or larger.
• If the tire has any sidewall damage.
• If the tire has any damage from driving
with extremely low tire pressure.
• If the tire has any damage from driving
on a flat tire.
• If the wheel has any damage.
• If you are unsure of the condition of the
tire or the wheel.
Keep Tire Service Kit away from open flames
or heat sources.
A loose Tire Service Kit thrown forward in a
collision or hard stop could endanger the
occupants of the vehicle. Always stow the
Tire Service Kit in the place provided. Failure
to follow these warnings can result in injuries
that are serious or fatal to you, your
passengers, and others around you.
Take care not to allow the contents of Tire
Service Kit to come in contact with hair, eyes,
or clothing. Tire Service Kit sealant is harmful
if inhaled, swallowed, or absorbed through
the skin. It causes skin, eye, and respiratory
irritation. Flush immediately with plenty of
water if there is any contact with eyes or skin.
Change clothing as soon as possible, if there
is any contact with clothing.
WARNING!
22_GU_OM_EN_USC_t.book Page 182
Page 235 of 256

233
For the enthusiasts, the technician, or those who
just want to know every detail of their vehicle,
useful information on understanding how your
vehicle works is contained in this chapter and
illustrated with data, tables, and graphics.
VEHICLE IDENTIFICATION
NUMBER (VIN)
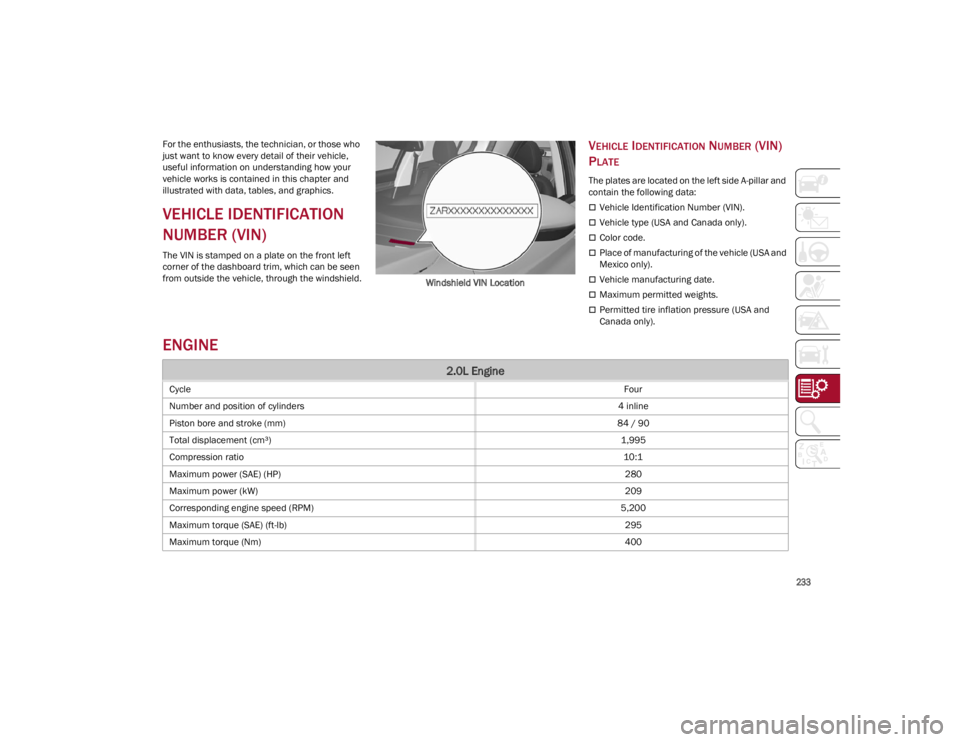
The VIN is stamped on a plate on the front left
corner of the dashboard trim, which can be seen
from outside the vehicle, through the windshield.
Windshield VIN Location
VEHICLE IDENTIFICATION NUMBER (VIN)
P
LATE
The plates are located on the left side A-pillar and
contain the following data:
Vehicle Identification Number (VIN).
Vehicle type (USA and Canada only).
Color code.
Place of manufacturing of the vehicle (USA and
Mexico only).
Vehicle manufacturing date.
Maximum permitted weights.
Permitted tire inflation pressure (USA and
Canada only).
ENGINE
2.0L Engine
Cycle Four
Number and position of cylinders 4 inline
Piston bore and stroke (mm) 84 / 90
Total displacement (cm³) 1,995
Compression ratio 10:1
Maximum power (SAE) (HP) 280
Maximum power (kW) 209
Corresponding engine speed (RPM) 5,200
Maximum torque (SAE) (ft-lb) 295
Maximum torque (Nm) 400
22_GU_OM_EN_USC_t.book Page 233