lights ASTON MARTIN DB AR1 Q 2003 Owners Guide
[x] Cancel search | Manufacturer: ASTON MARTIN, Model Year: 2003, Model line: DB AR1 Q, Model: ASTON MARTIN DB AR1 Q 2003Pages: 279, PDF Size: 3.77 MB
Page 54 of 279

B - Controls
1-B-18
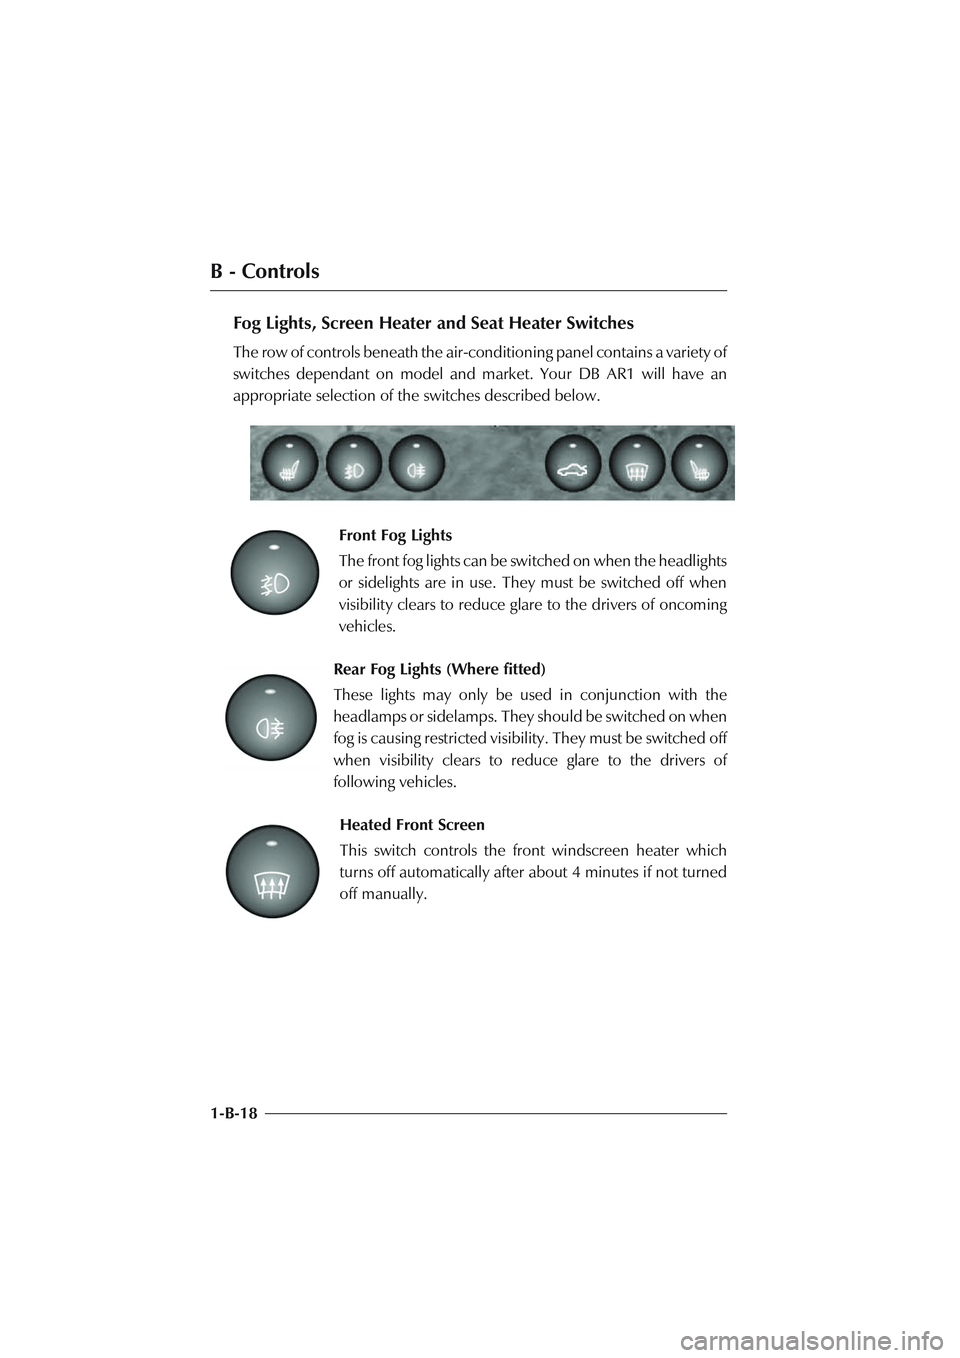
Fog Lights, Screen Heater and Seat Heater Switches
The row of controls beneath the air-conditioning panel contains a variety of
switches dependant on model and market. Your DB AR1 will have an
appropriate selection of the switches described below.
Front Fog Lights
The front fog lights can be switched on when the headlights
or sidelights are in use. They must be switched off when
visibility clears to reduce glare to the drivers of oncoming
vehicles.
Rear Fog Lights (Where fitted)
These lights may only be used in conjunction with the
headlamps or sidelamps. They should be switched on when
fog is causing restricted visibility. They must be switched off
when visibility clears to reduce glare to the drivers of
following vehicles.
Heated Front Screen
This switch controls the front windscreen heater which
turns off automatically after about 4 minutes if not turned
off manually.
Page 55 of 279

B - Controls
1-B-19 Seat Heater Switches
Press to switch on the heater. Press the button a second
time to switch off the heater. The heater is thermostatically
controlled and maintains a constant seat temperature until
either the heater is switched off or the ignition is switched
off.
Boot Release Switch
Press to open the boot at any time when the alarm system
is switched off and the ignition is switched on.
Radio/Cassette/CD Player
The radio/cassette player is located beneath the console switch panel. The
CD changer is fitted in the boot (trunk). Manufacturers operating instructions
for the in-car entertainment system are included with this Owner's Guide.
Hazard Warning Lights
The hazard warning light switch is located beside the
radio cassette player. When pressed, the external indicator
lights and side repeater lights will flash in unison.
Press the switch again to turn off the hazard lights.
Caution: Observe local laws on the use of hazard lights
Page 63 of 279

B - Controls
1-B-27
Interior Lights
The interior light assembly is mounted in the front windscreen header rail
and contains two 'eyeball' lamps and the front interior lamp. The 'eyeball'
lamps are controlled by the outer switches on the lamp assembly and may
be rotated to illuminate the driver or passenger seat areas.
The centre switch on the lamp assembly controls the operation of the front
and rear interior lights as follows:
Front and rear interior lights on
Front and rear interior lights off
Front and rear interior lights come on when a door is opened and
remain on for approximately 12 seconds after a door is closed with
the ignition off.
12 sec
Page 67 of 279

C - Driving
1-C-2
Checks Before Driving
Inspect the car to make sure that everything is according to the information
and specifications in this Owner's Guide.
Check the wheels, wheel nuts and tyres.
Check that all windows, mirrors and lights are clear and unobstructed.
Check that the boot and bonnet are closed.
Once you are in the car, check that the doors are closed.
Check that the seat, mirrors and steering wheel adjustments are correct.
Check that all gauges and indicators are reading correctly.
Check that the seat backs are in an upright position.
Check that all occupants have fastened their seat belts.
Fuel
DB AR1 uses 95/98 RON Unleaded Fuel only (USA - Premium Unleaded).
For optimum performance and extended high speed driving, the use of 98
RON fuel is recommended.
Caution: Do not use unleaded petrol containing metal based additives, such as those
based on Manganese (often sold as MMT) and Iron (often sold as Ferrocene). The use
of fuel containing such additives could lead to catalyst failure which is not covered by
the vehicle warranties.
The DB AR1 total fuel capacity is 82 litres (18 Imp gallons / 21.5 US gallons).
Note: Approximately 7 litres of the total fuel capacity specified above is required
to prime the fuel system and is therefore not usable.
Page 71 of 279

C - Driving
1-C-6
Warning Light Indications at Ignition On
As the ignition is switched on, the DB AR1 electronic control units each
complete a self check to ensure correct operation. During these checks, the
warning lights on the instrument panel will illuminate as follows:
• Bulb Check - All warning lamps illuminate for about three seconds as a
bulb check. (The Sport and Transmission Fail lamps are not illuminated
on manual transmission vehicles).
• The Ignition and Oil Pressure warning lights illuminate until the engine
starts.
• The Check Engine light will illuminate during the engine management
self-check and will extinguish when the starter button is pressed.
• The Seat Belt warning light illuminates and a gong sounds for six seconds
if the driver's seat belt is not fastened. On fastening the seat belt, the gong
immediately ceases. The warning lamp extinguishes at the end of the six
second warning period.
• The ABS and Traction Control warning lights illuminate and extinguish
if the system self checks are satisfactory.
• The Brake warning light will illuminate and extinguish if the brake fluid
level is within specification.
• The SRS Airbag warning light will illuminate and extinguish if the SRS
Airbag control system check is satisfactory.
Only the handbrake (parking brake) warning light should stay on after the
engine has started and is running correctly. The handbrake warning light will
extinguish as the handbrake is fully released.
Note: Other Information lights may remain on (e.g. Main Beam Warning or Low
Screen Wash) dependant on the vehicle state and switch settings at the time.
Page 72 of 279

C - Driving
1-C-7 If either the ABS or Brake Fluid Warning lights remain illuminated, refer to
the description of Brake Warnings during Driving later in this section.
Starting the Engine - Hot or Cold
WARNINGS:
Before driving the vehicle, ensure that you are wearing appropriate footwear to
efficiently operate the floor mounted pedals.
Ensure that floor mounted pedal movement is not restricted by floor mats or
other objects trapped beneath the pedals.
Manual Transmission - The engine can only be started with the clutch
pedal fully depressed.
Touchtronic Transmission - The engine can only be started when the gear
selector lever is in Park or Neutral.
Place the gear selector lever in Neutral (Park on Touchtronic vehicles) and
check that the handbrake is applied. Fully depress the clutch pedal on
manual transmission vehicles.
Insert the ignition key and rotate it to position II. Press the
starter button, wait until the engine fires, then release the
starter button.
Note: Do not press the accelerator during engine starting. The Electronic Engine
Management System automatically compensates for cold or hot start conditions
and makes appropriate adjustments to the fuel/air mixture and engine idle speed
without driver intervention.
Page 87 of 279

C - Driving
1-C-22
Brake Warning Indications During Driving
Your DB AR1 electronic control units continue to monitor correct operation
of the braking sub-systems while the vehicle is being driven. Two brake
warning lights are of particular importance.
The Anti Lock Braking (ABS) Warning Light
The ABS system is monitored for correct operation while the
ignition is switched on. If a fault is detected, the Anti-Lock
warning light will illuminate and the ABS system will be partly
or fully disabled.
The normal braking system will continue to function without anti-lock but
with full vacuum boosted braking to all road wheels being maintained. In
the event of an ABS fault, consult your Aston Martin Dealer immediately.
WARNING: If the ABS warning light illuminates, you should be aware that
wheels could lock during extreme braking or when braking on slippery surfaces.
Take additional care to avoid the danger of wheels locking.
The Brake System Warning Light
The braking system is continuously monitored for fluid level.
If only the brake warning light illuminates, it indicates that the
brake fluid has fallen below the acceptable level. It is essential
that the braking system is checked immediately, preferably
by an Aston Martin Dealer.
WARNING: If the brake warning light illuminates, you should
immediately be prepared for possible increased stopping distances
and possible partial failure of the braking system.
Page 105 of 279

E - Security Systems
1-E-6
Boot (Trunk) Lock Control
To open the boot (trunk), press the right
key fob button. The key fob red lamp will
stay on so long as the right hand button is
pressed. The direction indicators will flash
once (in markets where visible alarm signals
are permitted), the siren will chirp once (in
markets where audible sirens are permitted
and programmed) and the boot will unlock.
It is not necessary to disarm the alarm in
order to use the boot unlock feature.
Caution: Always ensure that the boot (trunk) lid is securely closed after use. The boot
(trunk) interior lights will be on when the lid is left partially open and will cause the
vehicle battery to discharge.
Page 138 of 279

F - Owner Maintenance
1-F-29 3. Raise the vehicle using a 'spectacle frame' type lifting device with a cradle
positioned under each front wheel as shown below.
Rear Suspended Tow
Caution: To prevent body damage ensure an adequate clearance is
maintained between the car body and (1) the ground and (2) the 'spectacle
frame' of the towing vehicle while your car is being towed.
1. Remove the ignition key from the ignition/steering lock.
2. Raise the vehicle using a 'spectacle frame' style lifting device where a
cradle is positioned under each rear wheel as indicated below.
Towing by Another Vehicle
WARNING: When the engine is stationary, there will be no power assistance to
the steering or brakes. Therefore be prepared for relatively heavy steering and
the need for greatly increased brake pedal pressure.
The vehicle may be towed short distances by another provided that a speed
of 48 km/h (30 mph) is not exceeded. Do not tow for more than 24km (15
miles). When being towed, the vehicles gear lever, or gear selector lever
(automatic transmission), must be in Neutral or position N with the ignition
key turned to position II to release the steering lock and to render the horn,
indicators and brake lights operational.
Page 145 of 279

F - Owner Maintenance
1-F-36
Electrical Start from Another Vehicle
If your DB AR1 will not start due to a discharged battery, it may be started
by connecting the battery from another vehicle to the discharged battery.
Before the vehicle is started in this way, ensure that the donor vehicle has
a 12 volt battery and negative (-), black earth terminal to ensure that the
correct battery polarity is maintained.
WARNING: If the voltage or earth of the donor vehicle is different or not known,
do not attempt starting in the way described.
1. Position the vehicles so that the connecting cable will reach between
the batteries. Ensure that the vehicles do not touch each other.
2. To lessen the risk of an electrical short circuit, remove rings, metal
watch bands and any other jewellery. Wear eye protection when
working near the battery. Turn off all electrical motors and ancillaries
in both vehicles. Switch off all lights except those needed to protect the
vehicles or illuminate the work area. Switch off the ignition and apply
the handbrake.
3. Lift out the boot floor panels to gain access to the battery.
4. Connect the red (+) cable between the red (+) positive terminal of the
two batteries.
5. Connect the black (-) cable between the black (-) negative terminals of
the two batteries.
6. Start the donor vehicle engine and run at about 1500 - 2000 rpm.
7. Start the engine. Allow the engine to run for some minutes until the flat
battery is partially charged. Switch off both vehicles.