parking brake ASTON MARTIN DB AR1 Q 2003 Owners Guide
[x] Cancel search | Manufacturer: ASTON MARTIN, Model Year: 2003, Model line: DB AR1 Q, Model: ASTON MARTIN DB AR1 Q 2003Pages: 279, PDF Size: 3.77 MB
Page 12 of 279

xii
DB AR1 Owner's Guide
Monthly
Windscreen Washer - Top-up with the recommended windscreen wash
fluid. Check the operation of the windscreen washers. Use the recommended
concentration of additives to prevent freezing in winter conditions. Check
the windscreen wash fluid level more frequently if the wash system is being
heavily used.
Safety Warning
Engine exhaust, some of its constituents, and certain vehicle components contain
or emit chemicals known to the state of California to cause cancer, and birth
defects or other reproductive harm. In addition, certain fluids contained in
vehicles and certain products of component wear contain or emit chemicals
known to the state of California to cause cancer, and birth defects or other
reproductive harm.
Glossary of Terms
The following glossary contains frequently used alternative names or
spellings for vehicle components mentioned in this Owner's Guide:
Bonnet Hood
Boot Trunk
Brake Disc Rotor
Handbrake Parking Brake
Petrol Gasoline
Tyre Tire
Wing Fender
Windscreen Windshield
Page 42 of 279

B - Controls
1-B-6
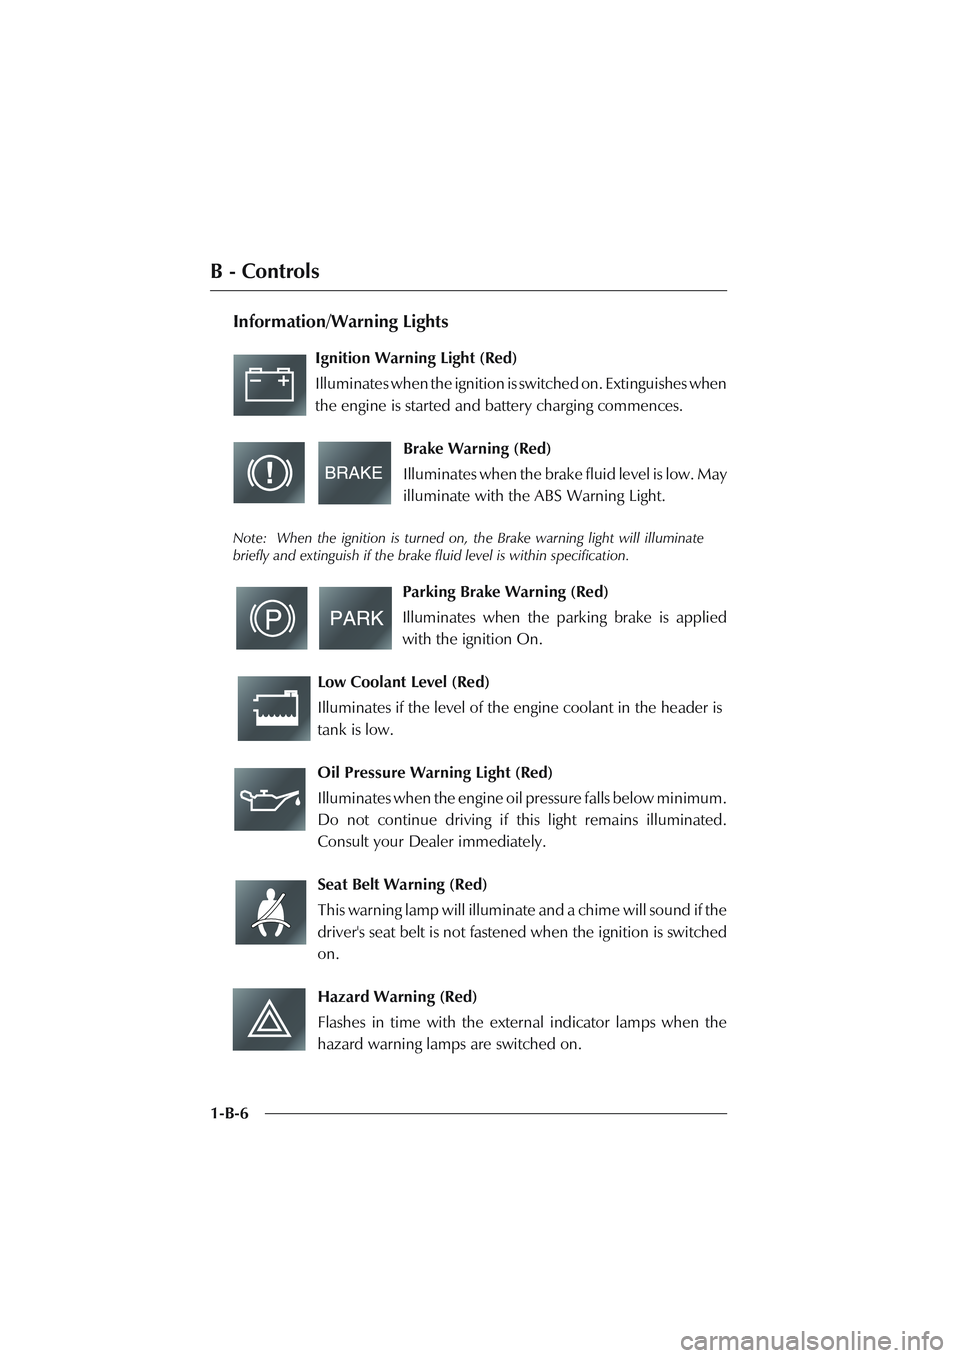
Information/Warning Lights
Ignition Warning Light (Red)
Illuminates when the ignition is switched on. Extinguishes when
the engine is started and battery charging commences.
Brake Warning (Red)
Illuminates when the brake fluid level is low. May
illuminate with the ABS Warning Light.
Note: When the ignition is turned on, the Brake warning light will illuminate
briefly and extinguish if the brake fluid level is within specification.
Parking Brake Warning (Red)
Illuminates when the parking brake is applied
with the ignition On.
Low Coolant Level (Red)
Illuminates if the level of the engine coolant in the header is
tank is low.
Oil Pressure Warning Light (Red)
Illuminates when the engine oil pressure falls below minimum.
Do not continue driving if this light remains illuminated.
Consult your Dealer immediately.
Seat Belt Warning (Red)
This warning lamp will illuminate and a chime will sound if the
driver's seat belt is not fastened when the ignition is switched
on.
Hazard Warning (Red)
Flashes in time with the external indicator lamps when the
hazard warning lamps are switched on.
Page 71 of 279

C - Driving
1-C-6
Warning Light Indications at Ignition On
As the ignition is switched on, the DB AR1 electronic control units each
complete a self check to ensure correct operation. During these checks, the
warning lights on the instrument panel will illuminate as follows:
• Bulb Check - All warning lamps illuminate for about three seconds as a
bulb check. (The Sport and Transmission Fail lamps are not illuminated
on manual transmission vehicles).
• The Ignition and Oil Pressure warning lights illuminate until the engine
starts.
• The Check Engine light will illuminate during the engine management
self-check and will extinguish when the starter button is pressed.
• The Seat Belt warning light illuminates and a gong sounds for six seconds
if the driver's seat belt is not fastened. On fastening the seat belt, the gong
immediately ceases. The warning lamp extinguishes at the end of the six
second warning period.
• The ABS and Traction Control warning lights illuminate and extinguish
if the system self checks are satisfactory.
• The Brake warning light will illuminate and extinguish if the brake fluid
level is within specification.
• The SRS Airbag warning light will illuminate and extinguish if the SRS
Airbag control system check is satisfactory.
Only the handbrake (parking brake) warning light should stay on after the
engine has started and is running correctly. The handbrake warning light will
extinguish as the handbrake is fully released.
Note: Other Information lights may remain on (e.g. Main Beam Warning or Low
Screen Wash) dependant on the vehicle state and switch settings at the time.
Page 88 of 279

C - Driving
1-C-23
The Handbrake (Parking Brake)
The handbrake lever is situated on the outside of the drivers seat. The
handbrake operates on brake drums within the rear wheel brake discs.
To engage the handbrake, pull up firmly on the lever without pressing the
release button. The handbrake ratchet will latch and the handbrake warning
light will illuminate. Note that this lamp is the only indication that the
handbrake is applied. The lever can then be lowered to its fully down
position.
To release the handbrake, pull up on the lever against spring pressure, press
and hold the lock release button whilst lowering the lever to its maximum
down position.
The handbrake warning light extinguishes when the handbrake is fully
released.
Caution: Always check that the warning lamp is correctly extinguished before moving
off. Do not attempt to drive the vehicle if the warning lamp remains on.
Page 131 of 279

F - Owner Maintenance
1-F-22
Jacking and Wheel Changing
WARNINGS:
The front road wheels must be in the straight ahead position before removal. The
front tyre will catch on the wheel arch during removal if not in the "straight
ahead" position.
Check that the temporarily repaired tyre is inflated to the specified pressure.
Never exceed 50 km/h (30 mph) when a temporarily repaired wheel is fitted.
Ensure that no persons are in the vehicle before jacking commences.
Ensure that the handbrake (parking brake) is set and that the car is in 'Park' (Auto)
or 1st Gear (Manual).
Ensure that the vehicle is parked on firm and level ground to ensure a secure base
for the jack.
Do not run the engine while the car is on the jack and never let anyone work
under the car whilst it is on the jack.
Spare Wheel Access (where fitted)
On vehicles with the space saver spare
wheel, the spare wheel is stored in a
well in the boot floor.
Lift out the boot floor and toolkit.
Remove the spare wheel retaining screw
and lift out the spare wheel.
Page 136 of 279

F - Owner Maintenance
1-F-27 The DB AR1 may then be winched onto a transporter or towed to a safe
location using a rope, provided that the following precautions are observed:
Transporting
If the vehicle is to be transported on a trailer or flat bed transporter, the
handbrake must be applied and the wheels chocked. Vehicles fitted with
Touchtronic transmission must have the gear selector lever moved to N or
D but NEVER in P. The parking lock may be damaged if the vehicle is
transported with the gear selector lever in P.
Four tie-down brackets are provided, two on each axle. These are NOT
suitable for solid bar towing.
Front Axle Tie-Down Rear Axle Tie Down
Vehicles with Defective Touchtronic Transmission
The vehicle must be carried on a transporter or towed with the rear wheels
clear of the ground (see suspended towing) or towed with the propeller shaft
disconnected at the final drive input flange. If the propeller shaft is
disconnected, it must be firmly secured away from the final drive flange.
Page 190 of 279

2-A-5
A - Service Schedules
Pre-delivery Inspection (PDI)
Before you receive your DB AR1, it will undergo a comprehensive pre-
delivery inspection at the Dealer's premises to ensure that it meets Aston
Martin's quality standards. The following checks will be made:
Levels and Leaks
Engine oil
Power steering oil
Brake Fluid
Clutch fluid (manual only)
Engine coolant level
Engine coolant specific gravity
Windscreen washer fluid
Fuel system
Gearbox oil/Auto transmission fluid
Rear axle oil - Differential
Battery
Mechanical Functions
Auto transmission
Selection and P & N functions
Manual gear selection
Clutch operation (manual only)
Throttle pedal operation
Parking brake operation
Steering column adjustment and lock
operation
Seat adjuster rails
Bonnet (Hood) release and catch
Door operation and locks
Storage compartments
Rear view mirror
Wheels and Tyres
Road wheel nuts
Tyre pressures
Front wheel tracking
Electrical Checks
Battery condition
Heated windscreen
Windscreen washers
Windscreen wipers
Air-conditioning controls
Gauges and warning lights
Radio/Cassette/CD player
Navigation (where fitted)
All speakers
Electric aerial
Inertia switch
Window mechanisms
Side and headlights (main and dip)
Front fog lights
Rear fog lights (where fitted)
Hazard warning lights
Instrument illumination and dimmer
Air conditioning panel illumination
Auto Trans. PRNDL illumination
Horns
Interior/map lights
Cigar lighter
Seat adjustment - all functions
Door mirror adjustments
Reset clock (if necessary)
Door / boot courtesy lights
Central locking system
Filler flap lock operation
Seat belt operation
Seat belt warning system
Security system / Remote control
Clutch pedal start inhibit
Interrogate DTC codes (not N.
America)
Record battery open-circuit voltage
Page 273 of 279

Index
5-A-2
C
Care and Maintenance of Seat Belts 1-F-57
Catalytic Converters 1-C-4
Child Safety Seats
Child Seats and Passenger Airbags 1-A-20, 1-A-21
Warnings 1-A-19
Clock 1-B-17
Column Switchgear
Left Hand Stalk 1-B-12
Right Hand Stalk 1-B-14
Console Mounted Controls 1-B-16
D
Door Edge Lights 1-F-52
Door Locks 1-A-5
Door Sealing 1-A-5
Driving in Wet Conditions 1-C-9
E
Electric Window Reset Procedure 1-F-52
Electrics
Battery 1-F-30
Engine Bay 1-F-6
Engine Coolant Temperature Gauge 1-B-11
Engine Immobiliser 1-A-4
F
Fluid Level Checks 1-F-4
Brake Fluid Reservoir 1-F-11
Clutch Hydraulic Fluid Reservoir 1-F-9
Engine Oil Level 1-F-7
Power Steering Reservoir 1-F-10
Footbrake 1-C-19
Front Indicator Lights / Front Parking Lights 1-F-47
Front Interior Lights 1-F-51
Fuel 1-C-2
Fuel Cut-Off Switch 1-C-8
Fuel Filler Cap 1-C-3
Fuel Filling 1-C-3
Fuel Gauge 1-B-10
Fuse Boxes 1-F-38
Fuse Lists - Right Hand Drive 1-F-39