spare wheel ASTON MARTIN DB AR1 Q 2003 Owners Guide
[x] Cancel search | Manufacturer: ASTON MARTIN, Model Year: 2003, Model line: DB AR1 Q, Model: ASTON MARTIN DB AR1 Q 2003Pages: 279, PDF Size: 3.77 MB
Page 127 of 279

F - Owner Maintenance
1-F-18
The Vehicle Toolkit
On vehicles fitted with a space-saver spare wheel , the tool kit is stored in
the spare wheel insert.
On vehicles without the spare wheel option the vehicle toolkit is stored in
a well within the boot floor and covered by a boot floor liner panel. The
standard toolkit consists of the following items:
• 2 Tyre Inflation Aerosols and Warning Labels
• 1 Tyre Pressure Gauge
• 1 Towing Eye
• 1 Pair of Pliers
• 1 Screwdriver
• 1 Pair of Gloves
• 1 Locking Wheelnut Socket (UK only)
• 1 Bulb and Fuse Kit
• 1 Allen Key
Lift up the boot floor to access the toolkit.
Page 128 of 279

F - Owner Maintenance
1-F-19
No Spare Wheel Option
Spare Wheel Option
Page 129 of 279

F - Owner Maintenance
1-F-20
Tyre Inflation Aerosols
Your DB AR1 is equipped with two tyre inflation aerosols instead of a spare
wheel. The aerosols are located with the tool kit. In the event of a simple
puncture, the following procedure must be used to perform a safe temporary
reinflation of the tyre. Tyres with major damage cannot be repaired using
inflation aerosols.
WARNING: A replacement tyre must be fitted at the earliest possible opportunity
This is particularly important because of the high performance potential of the
DB AR1.
Warning labels must be placed on the steering wheel and on the repaired wheel
to remind the driver and operator that tyre sealant is in use.
This type of tyreweld is not a permanent repair, but is designed to get you to a
place of repair. The tyre should be replaced as soon as possible.
After affecting a temporary repair, travel at a maximum speed of 50 Km/h (30
mph) until the defective tyre is replaced.
Warning: Inflation aerosols are not suitable for large holes or for repairs to tyre
walls. Do not attempt a repair if the tyre has been displaced from the rim.
Reinflation Procedure
1. Move the vehicle to a safe location and if possible, remove the object
causing the puncture. Reposition the vehicle so that the puncture is at
the bottom of the tyre. Remove the valve cap, deflate the tyre completely
and clean the valve if necessary.
2. Shake both cans of tyre sealant. Warm the cans (e.g. by placing in the
warm air from the heater) if the temperature is below freezing.
Page 131 of 279

F - Owner Maintenance
1-F-22
Jacking and Wheel Changing
WARNINGS:
The front road wheels must be in the straight ahead position before removal. The
front tyre will catch on the wheel arch during removal if not in the "straight
ahead" position.
Check that the temporarily repaired tyre is inflated to the specified pressure.
Never exceed 50 km/h (30 mph) when a temporarily repaired wheel is fitted.
Ensure that no persons are in the vehicle before jacking commences.
Ensure that the handbrake (parking brake) is set and that the car is in 'Park' (Auto)
or 1st Gear (Manual).
Ensure that the vehicle is parked on firm and level ground to ensure a secure base
for the jack.
Do not run the engine while the car is on the jack and never let anyone work
under the car whilst it is on the jack.
Spare Wheel Access (where fitted)
On vehicles with the space saver spare
wheel, the spare wheel is stored in a
well in the boot floor.
Lift out the boot floor and toolkit.
Remove the spare wheel retaining screw
and lift out the spare wheel.
Page 133 of 279

F - Owner Maintenance
1-F-24
5. Using the handwheel (A) on the jack screwshaft, raise the jack until the
jack top plate (B) fits to the jacking point stud under the sill at the affected
wheel. Ensure that the jack baseplate is squarely seated on solid ground.
Note: In the following step, the jack handle extension (D) must be used to prevent
damage to the vehicle paintwork as the jack handle (C) is rotated.
6. Ensure the safety of any persons in the vicinity and the security of the
wheel chock. Raise the vehicle as necessary using the jack ratchet handle
(C) and extension (D) to lift the deflated wheel clear of the ground.
Remove the wheel nuts and remove the deflated wheel.
7. Mount the spare wheel on the hub. Reverse the jack ratchet handle on
the extension and partially tighten the wheel nuts.
8. Lower the vehicle to the ground. Tighten the wheel nuts alternately.
Remove the wheel chock.
9. Repack the tools into their location in the boot. Place the defective wheel
into the bag provided and place on the rear seats.
10. When the spare wheel is correctly fitted and secured, drive conservatively
(80 km/h (50 mph) maximum) and have the wheel nuts torque tightened
to 88-102 Nm (65-75 lbs/ft) at the earliest opportunity.
WARNINGS:
Follow the wheel label warnings. Failure to comply can be dangerous. Drive
cautiously and refit a serviceable standard wheel and tyre as soon as possible.
Never fit more than one temporary spare wheel at a time.
Check that the temporary spare tyre is inflated to the specified pressure.
Never exceed 80 km/h (50 mph) when the spare wheel is fitted.
Page 151 of 279

F - Owner Maintenance
1-F-42
Bulb and Fuse Replacement
A kit of replacement bulbs, fuses etc. is supplied. Any item used from the kit
should be replaced at the earliest opportunity so that the full kit is always
available.
On vehicles fitted with the space-saver spare wheel the kit is stored in the
wheel insert.
On vehicles without the spare wheel the kit is stored in the insert under the
boot floor covering. The kit contents are market dependant and typically
include:
12V, 5W (Festoon) C5W Number Plate Light
12V, 5W (capless) W5W Side Lights/Side Repeater Lights
12V, 55W H1 Headlight Main and Dip Beam
Note: From August 2002 dip beam bulbs 12V, 55W H1 Philips Blue Vision for all
countries except North America.
12V, 55W H3 Headlight/Fog light (not USA)
12V, 3W W3W Side Markers LH/RH, Front
and Rear
Fuse Extractor Key
Note: Spare bayonet fuses are located in the toolkit
Page 177 of 279

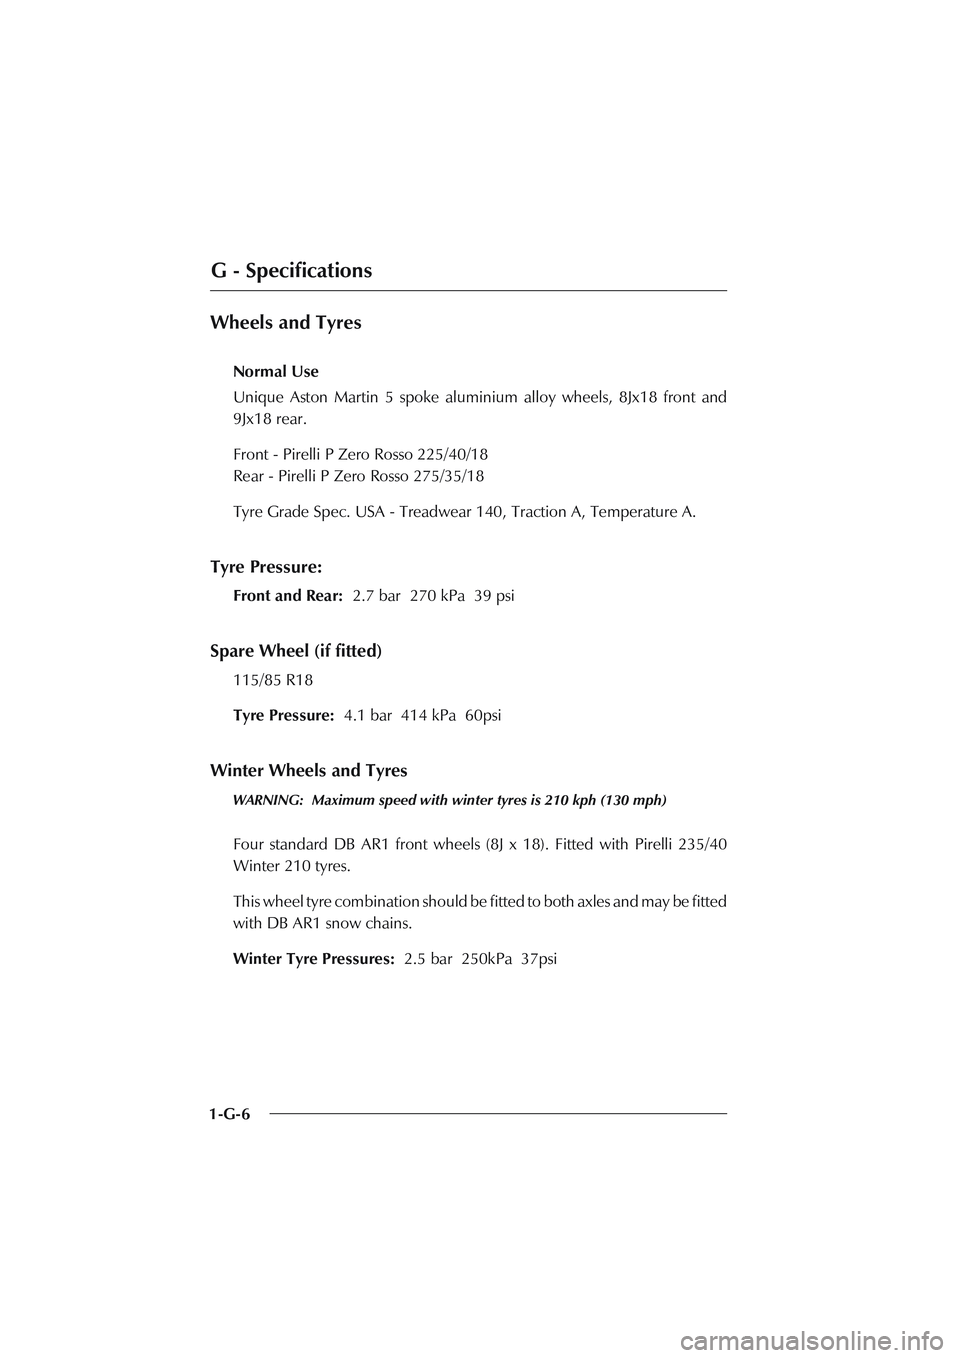
G - Specifications
1-G-6
Wheels and Tyres
Normal Use
Unique Aston Martin 5 spoke aluminium alloy wheels, 8Jx18 front and
9Jx18 rear.
Front - Pirelli P Zero Rosso 225/40/18
Rear - Pirelli P Zero Rosso 275/35/18
Tyre Grade Spec. USA - Treadwear 140, Traction A, Temperature A.
Tyre Pressure:
Front and Rear: 2.7 bar 270 kPa 39 psi
Spare Wheel (if fitted)
115/85 R18
Tyre Pressure: 4.1 bar 414 kPa 60psi
Winter Wheels and Tyres
WARNING: Maximum speed with winter tyres is 210 kph (130 mph)
Four standard DB AR1 front wheels (8J x 18). Fitted with Pirelli 235/40
Winter 210 tyres.
This wheel tyre combination should be fitted to both axles and may be fitted
with DB AR1 snow chains.
Winter Tyre Pressures: 2.5 bar 250kPa 37psi
Page 194 of 279

2-A-9
A - Service Schedules
x - x Check and if necessary adjust headlight
alignment
x x x Check operation of all lights
x x x Check operation of ABS warning lamp
x x x Check operation of all warning indicators
x x x Check audible warnings including
security system
x x x Check operation of the horns
x x x Check operation of the windscreen wipers
x x x Check operation of the windscreen washers
x x x Clean the radio aerial mast
x x x Check exterior rear view mirrors for security and
function
x x x Interrogate DTC P codes (not N. America)
x x x Check man. transmission cooling pump (PDU)
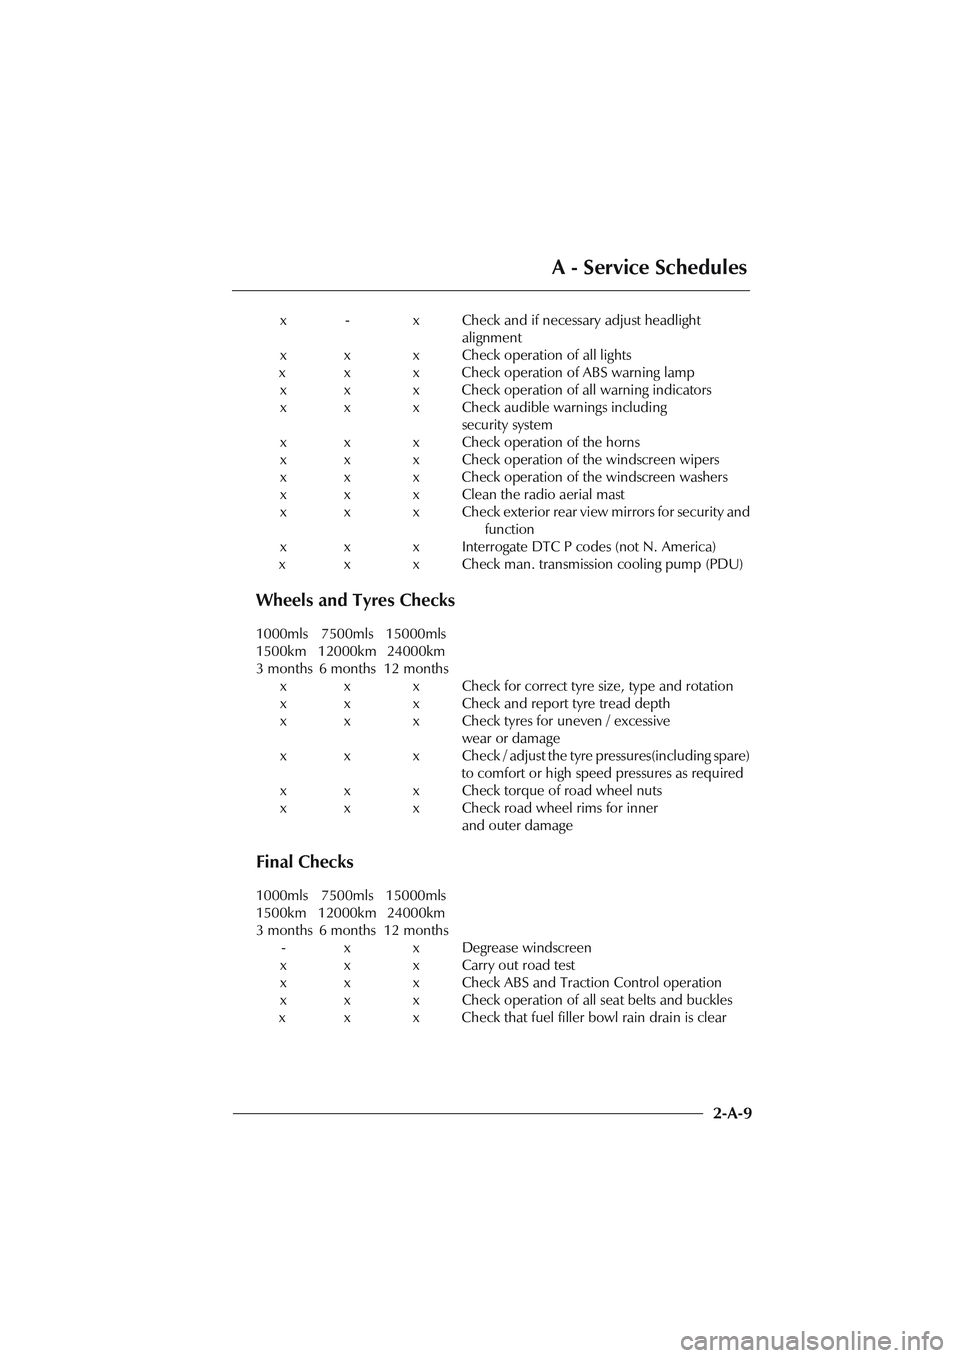
Wheels and Tyres Checks
1000mls 7500mls 15000mls
1500km 12000km 24000km
3 months 6 months 12 months
x x x Check for correct tyre size, type and rotation
x x x Check and report tyre tread depth
x x x Check tyres for uneven / excessive
wear or damage
x x x Check / adjust the tyre pressures(including spare)
to comfort or high speed pressures as required
x x x Check torque of road wheel nuts
x x x Check road wheel rims for inner
and outer damage
Final Checks
1000mls 7500mls 15000mls
1500km 12000km 24000km
3 months 6 months 12 months
- x x Degrease windscreen
x x x Carry out road test
x x x Check ABS and Traction Control operation
x x x Check operation of all seat belts and buckles
x x x Check that fuel filler bowl rain drain is clear