key ASTON MARTIN DB7 1997 Owner's Manual
[x] Cancel search | Manufacturer: ASTON MARTIN, Model Year: 1997, Model line: DB7, Model: ASTON MARTIN DB7 1997Pages: 421, PDF Size: 9.31 MB
Page 325 of 421
Air Conditioning
Refrigerant Recovery and Recycling ^=2?
Recovery Procedure
Hote:
Run the
air-conditioning
system
for
a
few
minutes
before starting the
recovery
procedure as
this will
enable
more refrigerant to be recovered. Turn the
system
off
before
starting
the procedure.
1.
Attach the red (high side) hose oftheunittothe high
side fitting of the system on the vehicle then fit the
blue (low side) fitting to the low side on the vehicle.
Note: Make sure that the Air conditioning
system
has
pressure in it before beginning the recovery
process;
if
there is no
system
pressure there is no refrigerant to
recover.
Also
make sure that the
oil
drain
valve
is
closed.
2. Open both the high and low side valves on the
control panel.
3. Open the red CAS (vapour) valve and the blue
LIQUID valve on the tank.
4.
Turn on the MAIN POWER switch.
5. Press the RECOVERY key on the key-pad. The
display shows that the unit in the RECOVER mode
and AUTOMATIC cycle. After the compressor starts
the display shows the weight of refrigerant being
recovered.
The compressor shuts off automatically
when the recovery is complete and the display
shows the message 'CPL' and the final weight of the
recovered refrigerant.
6. Wait for five minutes and watch the manifold
gauges for a rise above 0. If a rise occurs press the
HOLD/CONT key. Repeat as needed until the
system pressure holds for two minutes.
Note: Drain the oil
separator
after
each
job.
7. Slowly open the oil drain valve and drain the oil
into the oil catch bottle. When all the recovered oil
has completely drained close the valve.
8. Replace oil lost during the recovery procedure by
measuringthe amount of oil inthe catch bottle and
adding the same amount of new oil to the system.
Note:
Dispose
of the
recovered
oil in an approved way.
9. When the recovery tank is full the compressor is
shut off and the display shows the message FULL.
Evacuating and Recycling the Refrigerant
1.
Open the red (high side) and the blue (low side)
valves on the unit and open the red GAS (vapour)
valve and the blue LIQUID valve on the tank.
2.
Enter the required time using the key-pad, press
enter,thedisplayshowstheenteredtime in minutes.
3. Start the vacuum pump by pressing the VACUUM
KEY again. The recycling process begins
approximately five seconds after the vacuum pump
starts and the message RECYCLE is displayed.
Note: If the vacuum pump
has
run for ten hours or
over
without an oil change the
message
OIL
flashes
on the
display.
Change
the pump oil and
then press
the
SHIFT/
RESET key and
the
zero key to
reset the
oil
change
timer
to zero.
The digital display counts down the evacuation
time.
4.
Check for non-condensibles after five minutes
recycling.
Ifthegauge needles are more than lOpsi
apart purge the non-condensibles from the tank by
open
i ng
the purge valve on the back of the
un
it and
continue to bleed until both needles show the same
reading.
The vacuum sequence continues until the
programmed time has elapsed at which point the
message CPL is displayed.
5. If the moisture indicator turns green recharge with
refrigerant.
or
5. If the moisture indicator has not turned green
replace the unit's filter-drier, which is probably
saturated.
Note:
Pressing
any key at this point allows the next
function to be
accessed.
To recycle the refrigerant only without pulling a
vacuum for an indefinite period of time press the
SHIFT/RESET key and the RECYCLE key on the key
pad.
Press the SHIFT/RESET key to cancel.
For vacuum only press the SHIFT/RESET key and
the ENTER key and then press
"1".
Run the vacuum
pump as long as required and then press
"1"
or
press SHIFT/RESET to cancel.
8-48 May 1996
Page 326 of 421
^2?
Air Conditioning
System Recharging / Compressor Oil Check
Recharging the System
1.
Open the high side valve on the unit control panel.
If the messages PROGRAM and CHARGE are not
displayed press the CHG key to enter PROGRAM
mode.
2.
Key in the amount of refrigerant needed to recharge
the system and press ENTER.
3. Press the CHG key; the message AUTOMATIC and
the entered amount of refrigerant wi
11
be displayed.
The display counts down to zero as the charging
process proceeds. When the charging is complete
the message CPL is displayed.
If the refrigerant transfer is too slow the charging
unit emits a signal. If the message CHECK
REFRIGERANT is not displayed, close the high side
valve,
open the low side valve and start the air
conditioning system to pull the remainder of the
charge into the system.
If the refrigerant transfer will not complete and the
message CHECK REFRIGERANT is displayed, press
the HOLD/CONT key to interrupt the cycle then
reset the unit by pressing the RESET key. Recover
the refrigerant already charged into the system by
following the procedure for recovering the
refrigerant, add new refrigerant to the tank and
return to Step 1 to recharge the system.
4.
If the air conditioning system is not running start it
and let it run until the gauge pressure readings
stabilize (compare the gauge readings with the
system manufacturer's specifications).
Note:
Ensure
that the
readings
are accurate by closing
both the high and low side
valves
on the unit's control
panel.
5. Check the evaporator outlet temperature to make
sure that the air conditioning system is operating
properly (refer to the system manufacturer's
specifications for the proper temperature).
Compressor Oil Checic
Data
Special Tools
Sanden oil dipstick JD 149
Torque Figures
Oil filler plug 8-12 Nm
Procedure
Whenever a component has been replaced in the
refrigerator system or there is an obvious oil leak, the
following procedure should be carried out.
A Sanden oil dipstick and angle gauge are required in
order to carry out the check.
1.
Run the compressor for 10 minutes at engine idle
speed.
2.
Depressurise the system.
3. Lay the angle gauge across the flat surfaces of the
two front mounting lobes. Centre the bubble and
note the mounting angle.
4.
Remove the compressor from the vehicle.
3. Remove the plug from the oil filler hole
(1
Fig. 1).
4.
Rotate the counter weight (3 Fig. 1) on the front of
theclutchtoallowthedipstick(2 Fig. 1)to penetrate
to its fullest extent.
Figure 1.
5. Insert the dipstick to its stop position (4 Fig. 1). The
point of dipstick angle should be facing left.
6. Removethedipstickandchecktheoil levelagainst
the figures quoted in the chart below.
May 1996 8-49
Page 337 of 421
Air Conditioning Repair Procedures
Blower Assembly Renewal o^s^-^?
12.
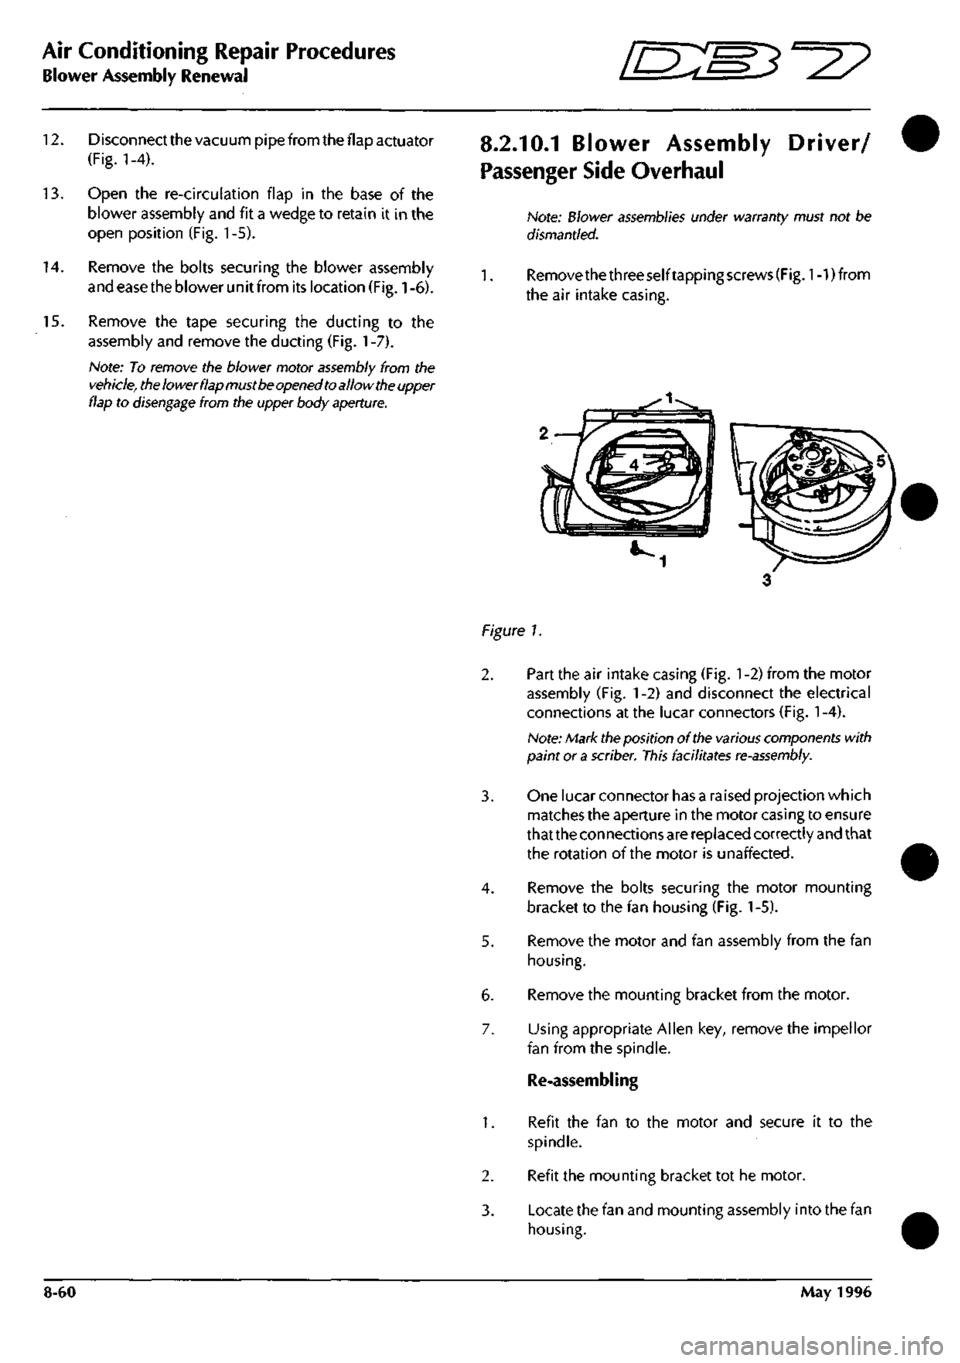
Disconnect the vacuum pipe from the flap actuator
(Fig.
1-4).
13.
Open the re-circulation flap in the base of the
blower assembly and fit a wedge to retain it in the
open position (Fig. 1-5).
14.
Remove the bolts securing the blower assembly
and ease the blower unit from its location (Fig.
1
-6).
15.
Remove the tape securing the ducting to the
assembly and remove the ducting (Fig.
1
-7).
Note: To remove the blower motor
assembly
from the
vehicle,
the
lower flap must be opened to allow the upper
flap to
disengage
from the upper body
aperture.
8.2.10.1 Blower Assembly Driver/
Passenger Side Overhaul
Note:
Blower
assemblies
under warranty must not be
dismantled.
1.
Remove the three selftapping screws
(Fig.
1-1) from
the air intake casing.
Figure 7.
2.
Part the air intake casing (Fig.
1
-2) from the motor
assembly (Fig. 1-2) and disconnect the electrical
connections at the lucar connectors (Fig.
1
-4).
Note: Mark the position of the
various components
with
paint or
a
scriber.
This
facilitates
re-assembly.
3. One lucar connector has a raised projection which
matches the aperture in the motor casing to ensure
that the connections are replaced correctly and that
the rotation of the motor is unaffected.
4.
Remove the bolts securing the motor mounting
bracket to the fan housing (Fig. 1-5).
5. Remove the motor and fan assembly from the fan
housing.
6. Remove the mounting bracket from the motor.
7. Using appropriate Allen key, remove the impellor
fan from the spindle.
Re-assembling
1.
Refit the fan to the motor and secure it to the
spindle.
2.
Refit the mounting bracket tot he motor.
3. Locate the fan and mounting assembly into the fan
housing.
8-60 May 1996
Page 354 of 421
'=^
The Aston Martin Lagonda Diagnostic System
Installation Instructions
12 10
19 22 21 20
VIA A / /^^>^ I B T
A-XA^I'A® QA
13
16
18 29
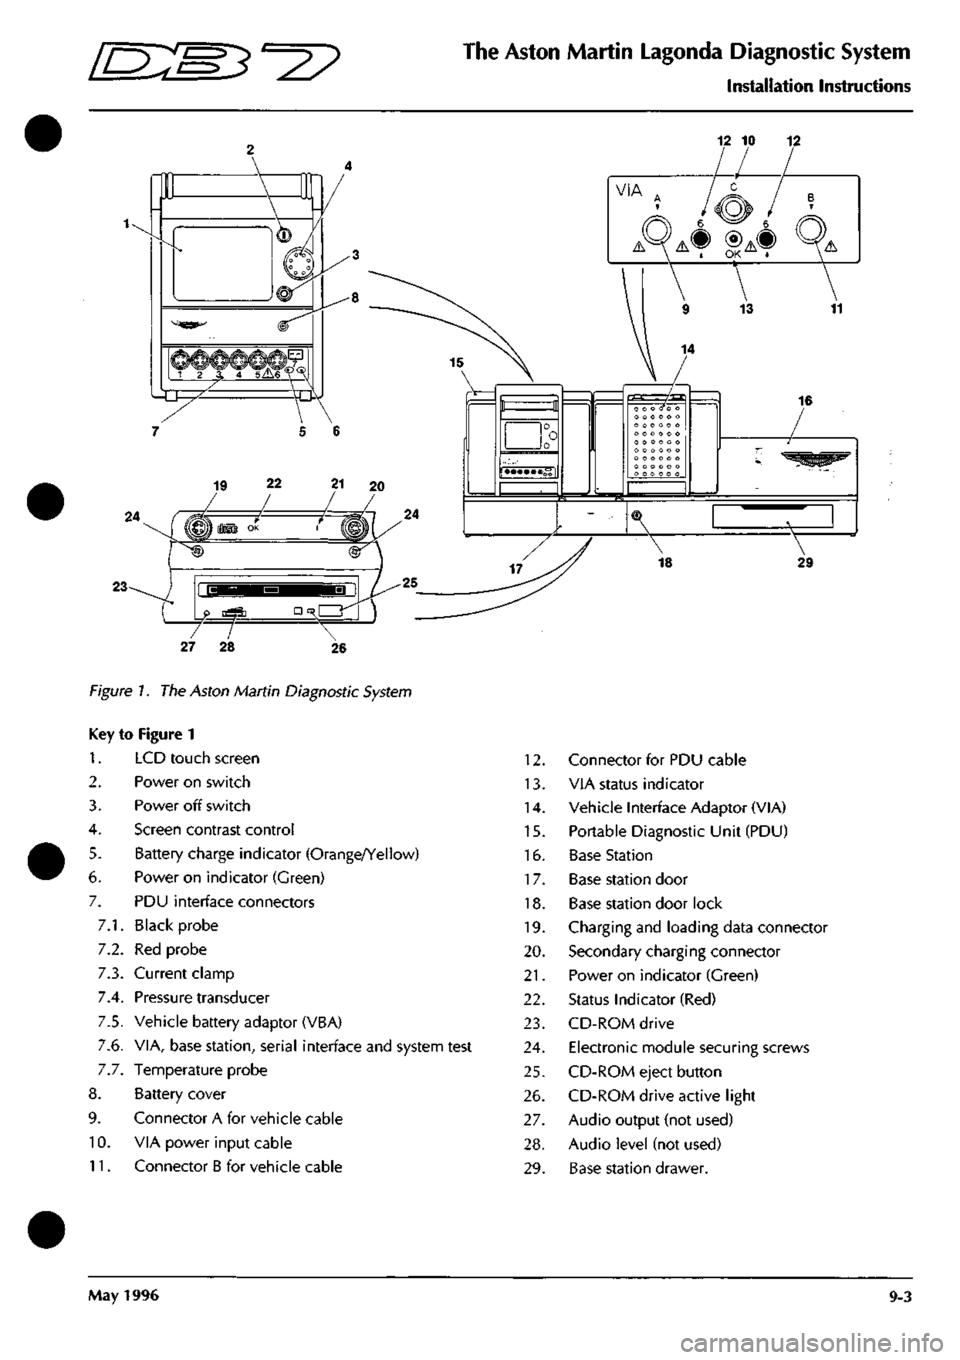
Figure 7. The Aston Martin Diagnostic System
Key to Figure 1
1.
2.
3.
4.
5.
6.
7.
7.1.
7.2.
7.3.
7.4.
7.5.
7.6.
7.7.
8.
9.
10.
11.
LCD touch screen
Power on switch
Power off switch
Screen contrast control
Battery charge indicator (Orange/Yellow)
Power on indicator (Green)
PDU interface connectors
Black probe
Red probe
Current clamp
Pressure transducer
Vehicle battery adaptor (VBA)
VIA, base station, serial interface and system test
Temperature probe
Battery cover
Connector A for vehicle cable
VIA power input cable
Connector B for vehicle cable
12.
13.
14.
15.
16.
17.
18.
19.
20.
21.
22.
23.
24.
25.
26.
27.
28.
29.
Connector for PDU cable
VIA status indicator
Vehicle Interface Adaptor (VIA)
Portable Diagnostic Unit (PDU)
Base Station
Base station door
Base station door lock
Charging and loading data connector
Secondary charging connector
Power on indicator (Green)
Status Indicator (Red)
CD-ROM drive
Electronic module securing screws
CD-ROM eject button
CD-ROM drive active light
Audio output (not used)
Audio level (not used)
Base station drawer.
May 1996 9-3
Page 383 of 421
The Aston Martin Lagonda Diagnostic System
Users Guide "^7
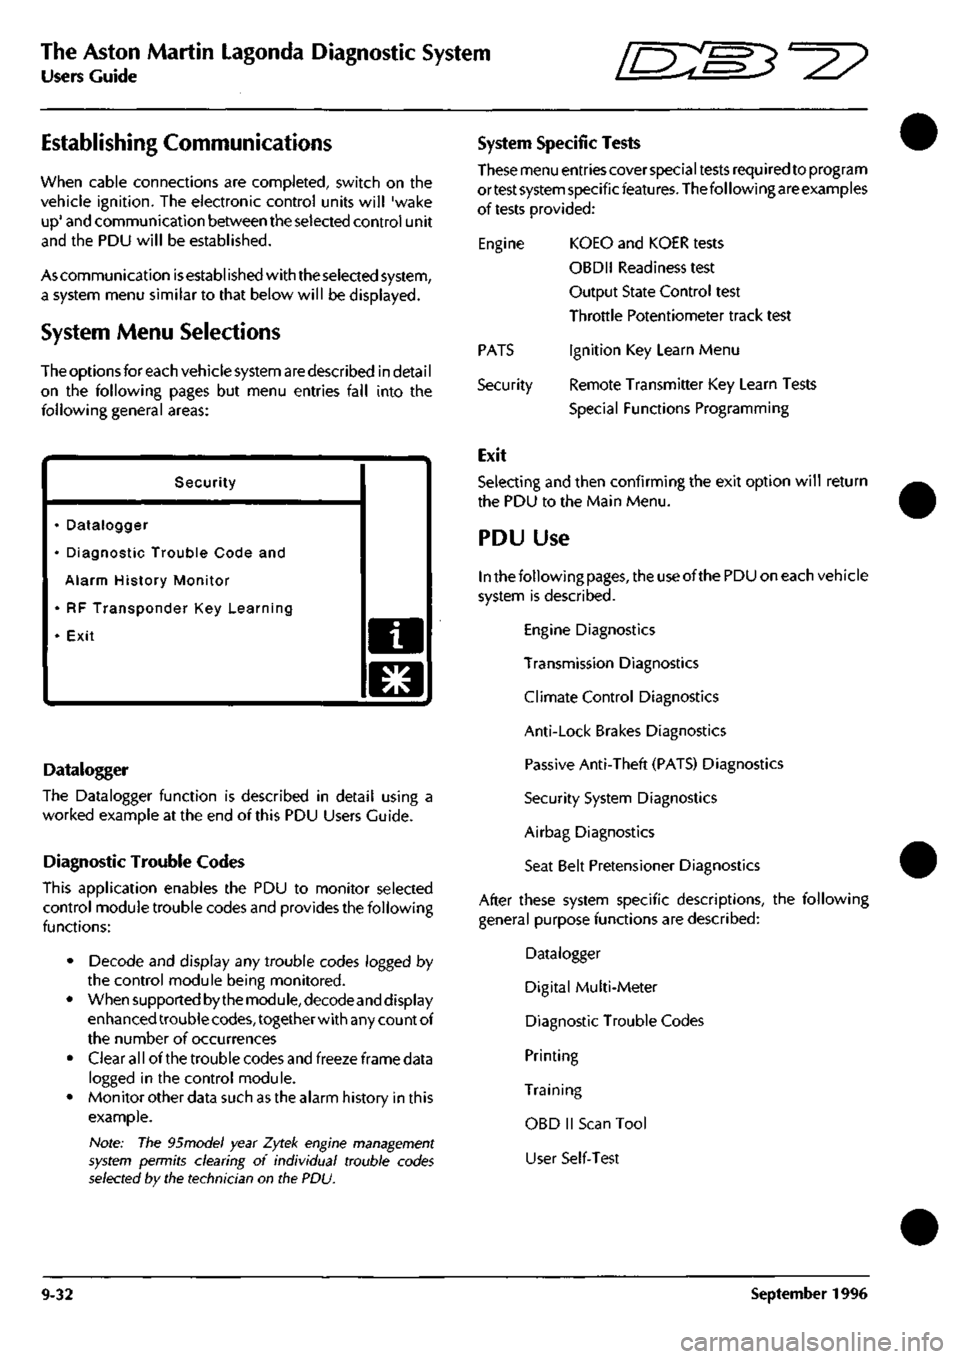
Establishing Communications
when cable connections are completed, switch on the
vehicle ignition. The electronic control units will 'wake
up'
and communication between the selected control unit
and the PDU will be established.
As communication
is
established with the selected system,
a system menu similar to that below will be displayed.
System Menu Selections
The options for each vehicle system are described in detai
I
on the following pages but menu entries fall into the
following general areas:
Security
• Datalogger
• Diagnostic Trouble Code and
Alarm History Monitor
• RF Transponder Key Learning
• Exit a
o
Datalogger
The Datalogger function is described in detail using a
worked example at the end of this PDU Users Guide.
Diagnostic Trouble Codes
This application enables the PDU to monitor selected
control module trouble codes and provides the following
functions:
• Decode and display any trouble codes logged by
the control module being monitored.
• When supported by the module, decodeand display
enhanced trouble
codes,
together with any count of
the number of occurrences
• Clear all of the trouble codes and freeze frame data
logged in the control module.
• Monitor other data such as the alarm history in this
example.
Note: The 95model year Zytek engine management
system permits clearing of individual trouble codes
selected by the technician on the PDU.
System Specific Tests
These menu entries cover special tests required to program
ortest system specificfeatures. The following are examples
of tests provided:
Engine KOEO and KOER tests
OBDII Readiness test
Output State Control test
Throttle Potentiometer track test
Ignition Key Learn Menu
Remote Transmitter Key Learn Tests
Special Functions Programming
PATS
Security
Exit
Selecting and then confirming the exit option will return
the PDU to the Main Menu.
PDU Use
In the following
pages,
the use of the PDU on each vehicle
system is described.
Engine Diagnostics
Transmission Diagnostics
Climate Control Diagnostics
Anti-Lock Brakes Diagnostics
Passive Anti-Theft (PATS) Diagnostics
Security System Diagnostics
Airbag Diagnostics
Seat Belt Pretensioner Diagnostics
After these system specific descriptions, the following
general purpose functions are described:
Datalogger
Digital Multi-Meter
Diagnostic Trouble Codes
Printing
Training
OBD II Scan Tool
User Self-Test
9-32 September 1996
Page 384 of 421
^27
The Aston Martin Lagonda Diagnostic System
Users Guide
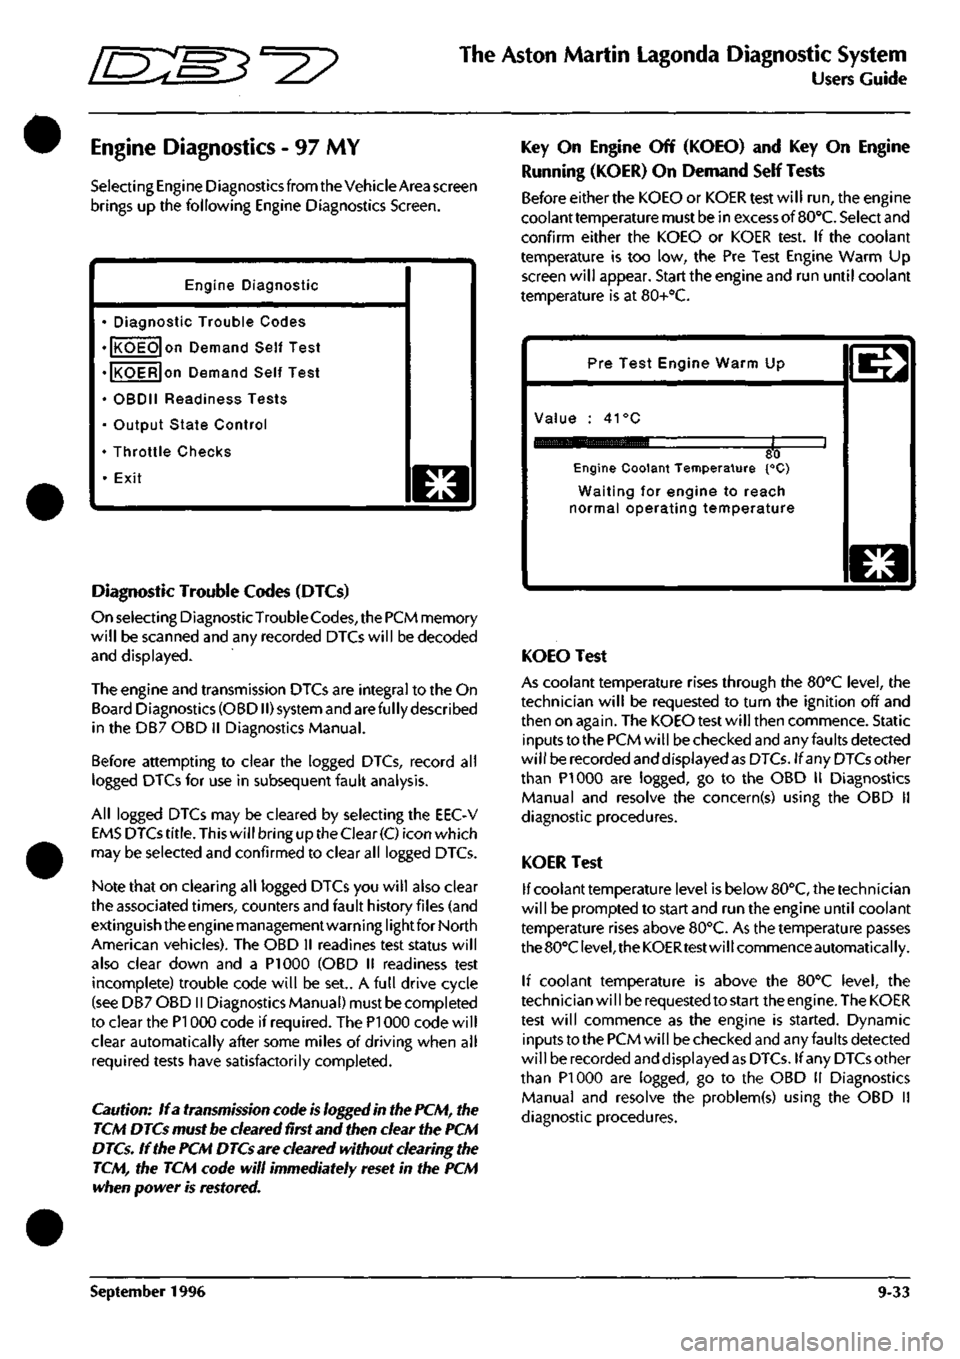
Engine Diagnostics - 97 MY
Selecting Engine Diagnostics from the Vehicle Area screen
brings up the following Engine Diagnostics Screen.
Engine Diagnostic
• Diagnostic Trouble Codes
• KOEO on Demand Self Test
• KOER on Demand Self Test
• OBDII Readiness Tests
• Output State Control
• Throttle Checks
• Exit
o
Diagnostic Trouble Codes (DTCs)
On selecting DiagnosticTrouble
Codes,
the PCM memory
will be scanned and any recorded DTCs will be decoded
and displayed.
The engine and transmission DTCs are integral to the On
Board Diagnostics (OBDII) system and are ful ly described
in the DB7 OBD II Diagnostics Manual.
Before attempting to clear the logged DTCs, record all
logged DTCs for use in subsequent fault analysis.
All logged DTCs may be cleared by selecting the EEC-V
EMS DTCs
title.
This will bring up the Clear
(C)
icon which
may be selected and confirmed to clear all logged DTCs.
Note that on clearing all logged DTCs you will also clear
the associated timers, counters and fault history files (and
extinguish the engine management warning lightfor North
American vehicles). The OBD II readines test status will
also clear down and a PI 000 (OBD II readiness test
incomplete) trouble code will be set.. A full drive cycle
(see DB7 OBD II Diagnostics Manual) must be completed
to clear the PI 000 code if required. The PI 000 code will
clear automatically after some miles of driving when all
required tests have satisfactorily completed.
Caution: If a transmission code is logged in the PCM, the
TCM DTCs must be cleared first and then clear the PCM
DTCs. If the PCM DTCs are cleared without clearing the
TCM, the TCM code will immediately reset in the PCM
when power is restored.
Key On Engine Off (KOEO) and Key On Engine
Running (KOER) On Demand Self Tests
Before either the KOEO or KOER test will run, the engine
coolant temperature must be in excess of
BO'C.
Select and
confirm either the KOEO or KOER test. If the coolant
temperature is too low, the Pre Test Engine Warm Up
screen will appear. Start the engine and run until coolant
temperature is at 80+°C.
Pre Test Engine Warm Up
Value : 41°C
80 Engine Coolant Temperature {°C)
Waiting for engine to reach
normal operating temperature
o
KOEO Test
As coolant temperature rises through the BO'C level, the
technician will be requested to turn the ignition off and
then on again. The KOEO test will then commence. Static
inputs to the PCM will be checked and any faults detected
will be recorded and displayed as DTCs. If any DTCs other
than PI 000 are logged, go to the OBD II Diagnostics
Manual and resolve the concern(s) using the OBD 11
diagnostic procedures.
KOER Test
If coolant temperature level is below 80°C, the technician
will be prompted to start and run the engine until coolant
temperature rises above 80°C. As the temperature passes
the 80°C
level,
the KOERtest will commence automatically.
If coolant temperature is above the 80°C level, the
technician wi
11
be requested to start the engine. The KOER
test will commence as the engine is started. Dynamic
inputs to the PCM will be checked and any faults detected
will be recorded and displayed as DTCs. If any DTCs other
than PI 000 are logged, go to the OBD 11 Diagnostics
Manual and resolve the problem(s) using the OBD II
diagnostic procedures.
September 1996 9-33
Page 386 of 421
^^2?
The Aston Martin Lagonda Diagnostic System
Users Guide
Output State Control - 97 MY
This menu item provides a quick test of the basic electro
mechanical components controlled by the PCM. These
tests should be performed in a key on engine off state.
The selections available are:
• Low Speed Cooling Fans
• High Speed Cooling Fans
• Set Electromechanical Outputs
Low and High Speed Fans
Selecting and confirming either the low or high speed
cooling fans will run the fans at the selected speed for 5
seconds to verify their operation.
Electromechanical Outputs
This selection will cause the following electromechanical
devices to operate for five seconds
Air Pump
Fuel Pumps
Canister Purge Valve
Idle Air Control Valve
Observing each device in turn as the PCM outputs are
turned 'On' will enable the technician to verify correct
operation.
September 1996 9-35
Page 403 of 421
The Aston Martin Lagonda Diagnostic System
Users Guide [S:S3^2?
The PDU will then check the cable connections. Until all
connections are correct, the PDU will not allow progression
beyond this
screen.
Pressingthe'asterisk'icon and selecting
abort returns the operator to the general screen if an
incorrect system has been chosen.
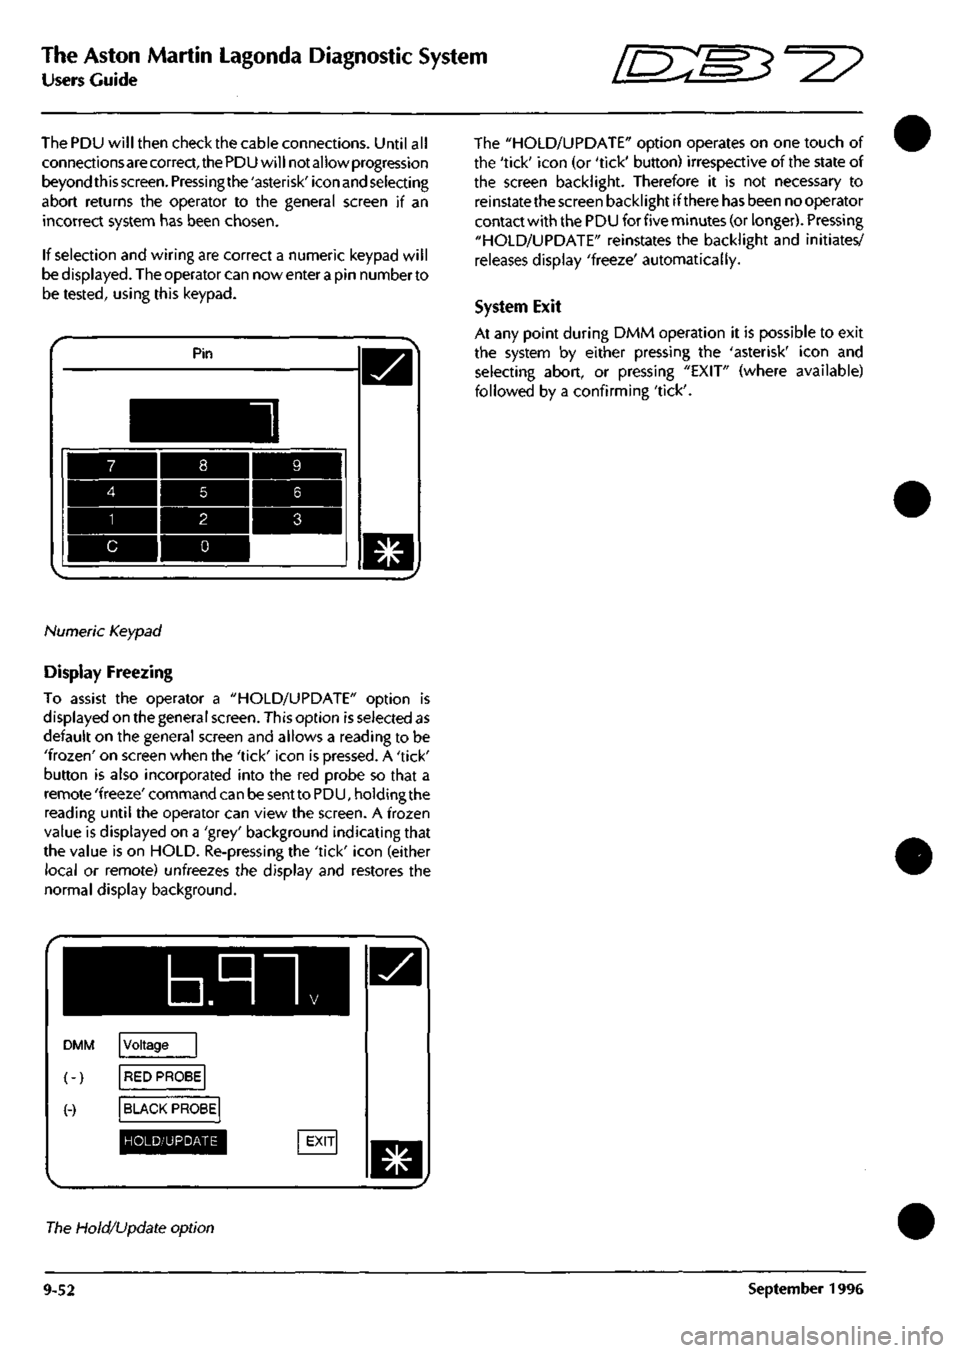
If selection and wiring are correct a numeric keypad will
be displayed. The operator can nowenterapin numberto
be tested, using this keypad.
Pin
Numeric Keypad
Display Freezing
To assist the operator a "HOLD/UPDATE" option is
displayed on the general screen. This option is selected as
default on the general screen and allows a reading to be
'frozen'
on screen when the 'tick' icon is pressed. A 'tick'
button is also incorporated into the red probe so that a
remote 'freeze' command can be sent to PDU, holding the
reading until the operator can view the screen. A frozen
value is displayed on a 'grey' background indicating that
the value is on HOLD. Re-pressing the 'tick' icon (either
local or remote) unfreezes the display and restores the
normal display background.
b.nn
DMM
(-)
(-)
Voltage
RED PROBE
BLACK PROBE
HOLD/UPDATE
The "HOLD/UPDATE" option operates on one touch of
the 'tick' icon (or 'tick' button) irrespective of the state of
the screen backlight. Therefore it is not necessary to
reinstate the screen backlight if there has been no operator
contact with the PDU for five minutes (or longer). Pressing
"HOLD/UPDATE" reinstates the backlight and initiates/
releases display 'freeze' automatically.
System Exit
At any point during DMM operation it is possible to exit
the system by either pressing the 'asterisk' icon and
selecting abort, or pressing "EXIT" (where available)
followed by a confirming 'tick'.
The Hold/Update option
9-52 September 1996
Page 418 of 421
in:s3''^
The Aston Martin Lagonda Diagnostic System
Users Guide
#
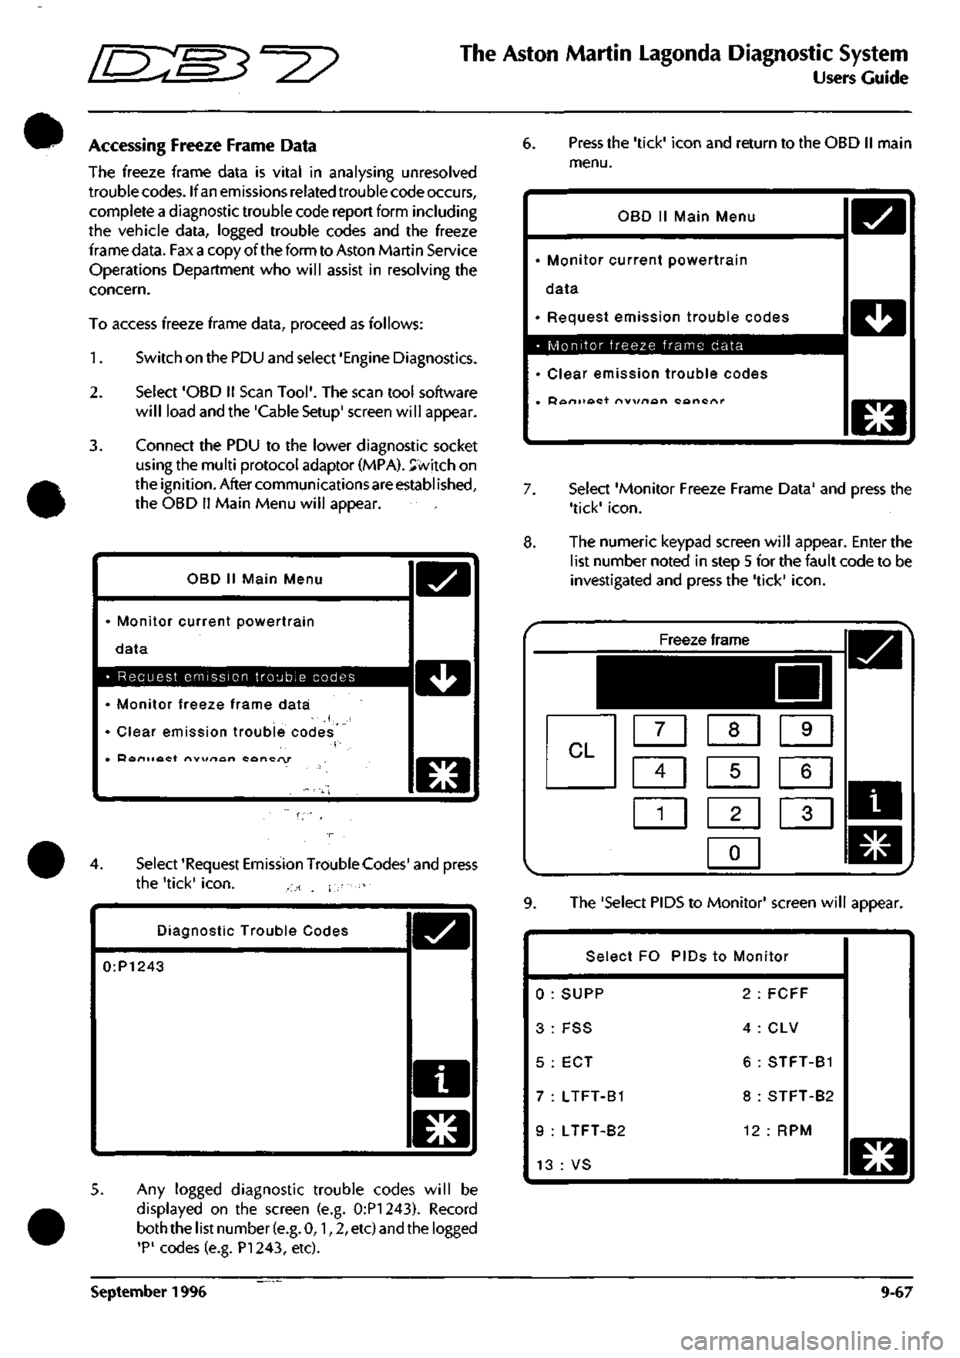
Accessing Freeze Frame Data
The freeze frame data is vital in analysing unresolved
trouble codes. If an emissions related trouble code occurs,
complete a diagnostic trouble code report form including
the vehicle data, logged trouble codes and the freeze
frame data. Fax a copy of the form to Aston Martin Service
Operations Department who will assist in resolving the
concern.
To access freeze frame data, proceed as follows:
1.
Switch on the PDU and select 'Engine Diagnostics.
2.
Select 'OBD II Scan
Tool'.
The scan tool software
will load and the 'Cable Setup' screen will appear.
3. Connect the PDU to the lower diagnostic socket
using the multi protocol adaptor (MPA). Svvitch on
the ignition. After communications are established,
the OBD
11
Main Menu will appear.
OBD
11
Main Menu
• Monitor current powertrain
data
D
• Request emission trouble codes 1 ^^ 1
• Monitor freeze frame data
' Clear emission trouble codes
• Doniiact nw\/rtan concry
O
4.
Select 'Request Emission TroubleCodes' and press
the 'tick'
icon.
, ., - . i-
Diagnostic Trouble Codes
0:P1243
o
5. Any logged diagnostic trouble codes will be
displayed on the screen (e.g. 0:P1243). Record
both the list number
(e.g.
0,1,2, etc) and the logged
'P'
codes (e.g. PI 243, etc).
6. Press the 'tick' icon and return to the OBD II main
menu.
OBD II Main Menu
• Monitor current powertrain
data
• Request emission trouble codes
• Monitor freeze frame data
• Clear emission trouble codes
• Doniioct nvx/nort cancnr
D
D
O
7. Select 'Monitor Freeze Frame Data' and press the
'tick'
icon.
8. The numeric keypad screen will appear. Enter the
list number noted in step 5 for the fault code to be
investigated and press the 'tick'
icon.
Freeze frame
^^HHI
CL m [XI s
ci] s m
1
1 1 2 1 1 3 1
0
1
9. The 'Select PIDS to Monitor' screen will appear.
Select FO PIDs to Monitor
0 : SUPP 2 : FCFF
3: FSS 4:CLV
5 : ECT 6 : STFT-B1
7 : LTFT-B1 8 : STFT-B2
9 : LTFT-B2 12 : RPM
13 : VS
WWWM
o
September 1996 9-67