service ASTON MARTIN DB7 1997 Service Manual
[x] Cancel search | Manufacturer: ASTON MARTIN, Model Year: 1997, Model line: DB7, Model: ASTON MARTIN DB7 1997Pages: 421, PDF Size: 9.31 MB
Page 372 of 421

' -^ ^ The Aston Martin Lagonda Diagnostic System
Installation Instructions
Service Centres
UK and EIRE
GenRad Limited, Horsefield Way, Bredbury Industrial Park, Bredbury, Stockport, Cheshire SK6 2SU, England
Telephone: 061-406-8209 Fax: 061-406-8480
Germany
GenRad GmbH, Neumarkter Strasse 83, 81673 Munchen, Germany
Telephone: 01049-89-431990 Fax: 01049-89-43199101
Switzerland and Austria
GenRad AG, Drahzug Strasse 18, Postfach 8032, Zurich, Switzerland
Telephone: 010411-422-2420 Fax: 010411-422-2065
Italy
GenRad SPA, Via Fantoli 21/13, 20138 Milano, Italy
Telephone: 01039-2-502951 Fax: 01039-2-5063331
France, Spain and Portugal
GenRad Europe Paris, Succursale de GenRad Europe Limited, 6 Rue Vincent Van Gogh, 93364, Neuilly Plaisance
Cedex, France.
Telephone: 01033-1-49442200 Fax: 01033-1-49442298
Sweden,
Norway, Denmark and Finland
Lagercrantz Kontest AB, Kung Hans vag 3, Box 986, 191 29 Sollentuna, Sweden
Telephone: 01046-8-626-06-20 Fax: 01046-8-754-88-67
Netherlands, Belgium and Luxembourg
Multidata BV, Postbus 137, Bedrijvencentrum "De Baanderije", ParallelwegZuid 33/1,5280 AC Boztel, Netherlands
Telephone: 01031-4116-83775 Fax: 01031-4116-85359
USA and Canada
GenRad Inc, 300 Baker Avenue, Concord, Massachusetts,
1
742, USA.
Telephone: 0101-508-369-4400 Fax: 0101-508-287-2011
Singapore, Taiwan, Hong Kong and Thailand
GenRad Inc, 73 Science Park Drive, Cintech Building #03-04, Singapore, Singapore 0511.
Telephone: 01065-2784400 Fax: 01065-7766422
Australia and New Zealand
Nilsen Instruments, 25-27 Paul Street North, North Ryde, New South Wales 2113, Australia.
Telephone: 01061-2-7362888 Fax: 01061-2-7363005
Japan
Tokyo Electron Limited, 2-30-7 Sumiyoshi-Cho, Fuchu City, Tokyo, Japan 183
Telephone: 01081-423-33-8377 Fax: 01081-423-33-8489
May 1996 9-21
Page 373 of 421

The Aston Martin Lagonda Diagnostic System
Installation Instructions ^=2?
Warranty
The Aston Martin Diagnostic System is covered by a one year warranty. Should any of the electrical components
fail during the warranty period, contact your local GenRad Service Centre for a replacement part. Note that the
warranty does not include physical damage.
Spare Parts
Refer to the Aston Martin Diagnostic System Users Guide for a full parts list. All spare parts should be obtained from
your local GenRad Service Centre who can advise you on current prices.
Servicing and Maintenance
CA UTION: With the exception of those parts listed in this section, there are no user serviceable parts within the
system. All servicing must be carried out by GenRad Service Centres.
Battery Testing.
The NICAD batteries fitted in the PDU are designed to be rechargeable and should normally last through many
recharge cycles. Battery life of three to five years can be expected. The capacity of new batteries improves after
several charging cycles. After extended use, they may require renewing. The following procedure will assist you to
determine when renewal is required. Do not use this procedure with new batteries or with a new PDU.
Testing Procedure
1.
Remove all cables from the PDU.
2.
Switch the PDU on and leave it until it switches off (the power on indicator will extinguish)
3. Connect the PDU to the base station for at least 12 hours charging.
4.
Remove all cables from the PDU, switch on the PDU and start timing.
5. If the PDU switches off in less than 30 minutes, the batteries should be renewed.
Changing the Battery Pack
CAUTION: Always read and follow safety warnings and instructions printed on the equipment. The rechargeable
NICAD batteries fitted to the PDU are of a special type. They must only be substituted by GenRad approved parts.
Do not substitute the batteries with any other type. Always dispose of old batteries in compliance with local
recycling regulations.
Battery Changing Procedure
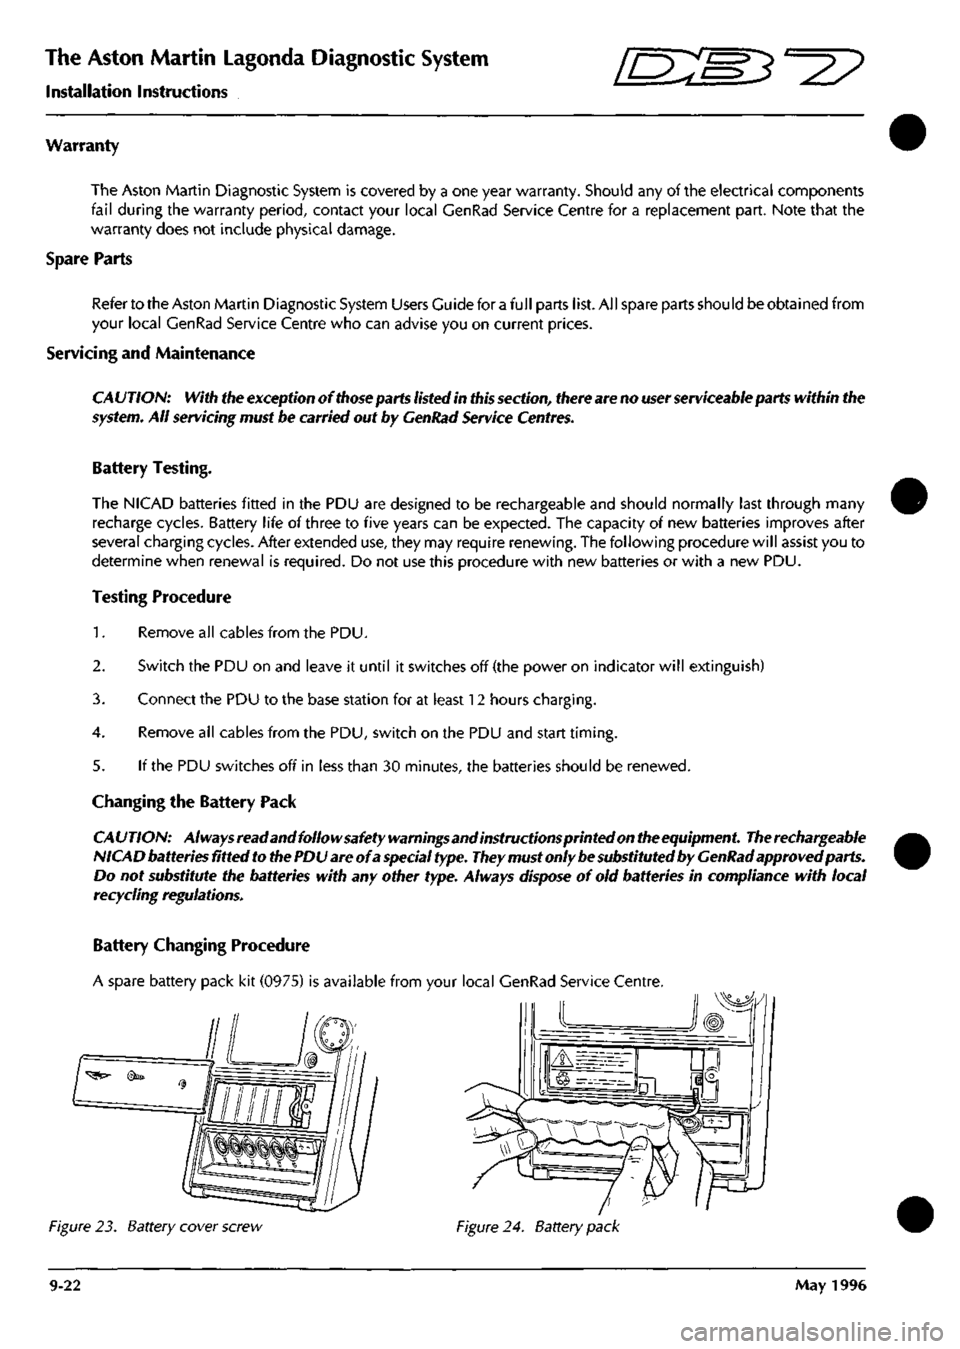
A spare battery pack kit (0975) is available from your local GenRad Service Centre.
Figure 23. Battery cover screw Figure 24. Battery pack
9-22 May 1996
Page 418 of 421

in:s3''^
The Aston Martin Lagonda Diagnostic System
Users Guide
#
Accessing Freeze Frame Data
The freeze frame data is vital in analysing unresolved
trouble codes. If an emissions related trouble code occurs,
complete a diagnostic trouble code report form including
the vehicle data, logged trouble codes and the freeze
frame data. Fax a copy of the form to Aston Martin Service
Operations Department who will assist in resolving the
concern.
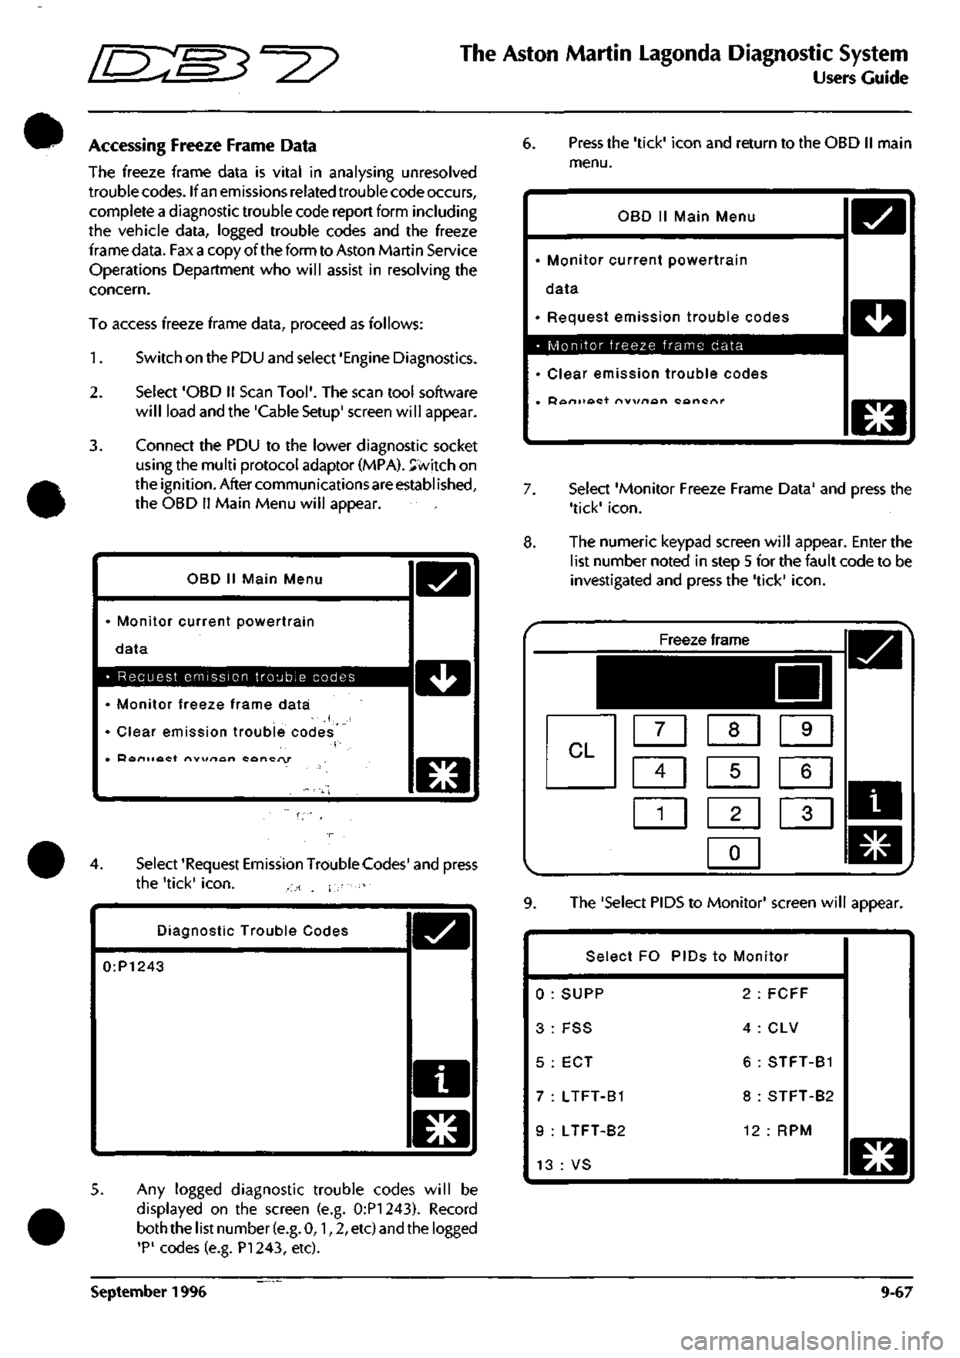
To access freeze frame data, proceed as follows:
1.
Switch on the PDU and select 'Engine Diagnostics.
2.
Select 'OBD II Scan
Tool'.
The scan tool software
will load and the 'Cable Setup' screen will appear.
3. Connect the PDU to the lower diagnostic socket
using the multi protocol adaptor (MPA). Svvitch on
the ignition. After communications are established,
the OBD
11
Main Menu will appear.
OBD
11
Main Menu
• Monitor current powertrain
data
D
• Request emission trouble codes 1 ^^ 1
• Monitor freeze frame data
' Clear emission trouble codes
• Doniiact nw\/rtan concry
O
4.
Select 'Request Emission TroubleCodes' and press
the 'tick'
icon.
, ., - . i-
Diagnostic Trouble Codes
0:P1243
o
5. Any logged diagnostic trouble codes will be
displayed on the screen (e.g. 0:P1243). Record
both the list number
(e.g.
0,1,2, etc) and the logged
'P'
codes (e.g. PI 243, etc).
6. Press the 'tick' icon and return to the OBD II main
menu.
OBD II Main Menu
• Monitor current powertrain
data
• Request emission trouble codes
• Monitor freeze frame data
• Clear emission trouble codes
• Doniioct nvx/nort cancnr
D
D
O
7. Select 'Monitor Freeze Frame Data' and press the
'tick'
icon.
8. The numeric keypad screen will appear. Enter the
list number noted in step 5 for the fault code to be
investigated and press the 'tick'
icon.
Freeze frame
^^HHI
CL m [XI s
ci] s m
1
1 1 2 1 1 3 1
0
1
9. The 'Select PIDS to Monitor' screen will appear.
Select FO PIDs to Monitor
0 : SUPP 2 : FCFF
3: FSS 4:CLV
5 : ECT 6 : STFT-B1
7 : LTFT-B1 8 : STFT-B2
9 : LTFT-B2 12 : RPM
13 : VS
WWWM
o
September 1996 9-67
Page 420 of 421

ThesAston Martin LagondanDiagriostic System
Users;
Guide-,^
User Self Test
^ -
The self-test function built into
the
PDU software enables
users
to
completely test the system
for
faulty rnodules and,
cables. By following the screen instructions, faulty system
components
can be
identified.
Procedure
Select User Self-Test from
the PDU
main menu.
The
self-
test software will load from
the CD.
The first screen shows
the
cable setup with
the PDU
connected
to the
base station. After confirming that
the
connections
are
correct,
the
self-test sequence begins.
The initial test
is of
the
PDU and
base station electronics
and takes slightly less than
2
minutes.
The user
is
then directed
to
connect
the
various external
elements of the system
in
turn and confirm the cable setup
at each stage.
As
each element
is
connected
and
tested,
the sequence will either direct that
the
next element
is
connected
or
will report
a
fault
in the
last element tested.
Using this procedure, any faulty element in the system will
be identified.
If the
self-test concludes with
no
fault
reported,
any
problem encountered must be in the vehicle
or
as a
result
of
incorrect
use.
The Asterisk
(*)
lcon?'fi ^^
G * s ^
When available, selecting
the
asterisk icon will bring
up
the
following menu
of
general facilities:
ic
•
•
*
•
• ~',"•'.
•
•
,
•., .,
Resume
Abort . ..
Status
• •
Setup ., , ,
Print Screen
Show trace : T'J
Print trace
D
•u
_ ,1
1
l»
.
*-«•
-
-•
,
'
•
Resume
Return
to the
screen from which
you
selected
the
asterisk
icon.
Abort
•
'•'•'"'
• '• "
'"'^''•'
"'-
' Return
to the PDU
Main Menu.
' ' ' ••'""
Self-Test Problems
If
the
self test software will
not
load
or if
unidentified
problems
are
encountered during
the
self-test,
go to the
problem solving procedure
in
the PDU installation guide.
Be prepared
to
record
any
problem codes which
are
reported during problem solving.
The
Genrad Service
Centre will require
the
problem code number
to
identify
the correct remedial action
and
replacement parts.
Status
Show
the
current software level
and the
application
currently loaded.
--«
^
^.« - ...
•
^f;;fc.i.*ir.
....-^i^cw'i*;*^--'. Print Screen
Send
the
current screen display
to the
printer
.iia*M--i^-Vj^W'JStS:'
.
Show Trace
••'- •
'B-T'^TS
o^
•._,
^,„„, ,' J
rbisplay'the current contents
of
the fracelmemorylDri
^
the screen
(Use the
Down
and
Up^ arrows
to
scroll
•,
through
the
display
if
more than
one
screenful). •
Ai..;:
. ; •
,\J-'!-MT.'
0'; I
Print Trace
•-l.---^,^
• ,\.
^,
,./j-,i:,
Q
:;
Send
the
current contents
of
the trace memory
to the
printer.
I
a-.-s.-™.*'.-jc^.'-v*
September 1996? 9-69,